


In this instructable by gustavio101 you will know how to make a capacitance meter using Arduino displayed on the TM1637 display with a range from 1 uF to 2000 uF.
To build this project you need the following parts:
- Resistors
1x: 220 Ohm
1x: 10 kOhm, 8000 Ohms also would work depending on your code - Capacitors
You need some capacitors to calibrate your meter, you can use 0 uF, 47 uF, 220 uF and 1000 uF - TM1637
A chip for driving 7-segment displays. Using it in this project is optional, only if you wish to see the results on a small screen. You need also 8 jumper wires to wire the whole circuit including TM1637. - Arduino & USB cable
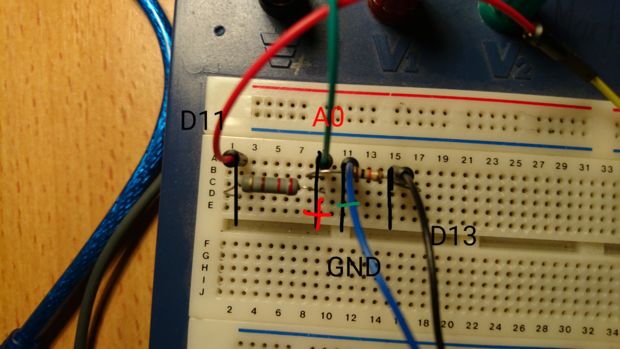
In order to connect the circuit, first you have to connect the 220 Ohm resistor to A0 and pin 11, the 10K Ohm should be connected between the A1 and pin 13, giving the hardware core structure of the meter. The anode of you capacitor should be placed where the A0 and A1 pin are connected, and the cathode to the GND as shown in this picture.
By uploading this code to your Arduino everything will be set! You only need to include the TM1637 library and the code necessary to view your work. Once you open the Arduino IDE open the two files together to have everything done.
#include "TM1637.h"

#define analogPin      0
#define chargePin      13
#define dischargePin   11
#define resistorValue  10000.0F
#define CLK 9
#define DIO 8

TM1637 TM(CLK, DIO);

unsigned long startTime;
unsigned long elapsedTime;
float microFarads;

void setup()
{
  pinMode(chargePin, OUTPUT);
  digitalWrite(chargePin, LOW);
  Serial.begin(19200);
  TM.init();
  TM.set(BRIGHT_TYPICAL);
  delay(1500);
}

void loop()
{
  digitalWrite(chargePin, HIGH);
  startTime = millis();
  while(analogRead(analogPin) < 620){
  }

  elapsedTime= millis() - startTime;
  microFarads = ((float)elapsedTime / resistorValue) * 1000;
  Serial.print(elapsedTime);
  Serial.print(" mS    ");


  if (microFarads >= 1000)
        {
          Serial.print((long)microFarads);
          Serial.println(" microFarads");
          int value = microFarads;
          int DigitOne = value / 1000;
          int DigitTwo = ((value / 100) % 10);
          int DigitThree = ((value / 10) % 10);
          int DigitFour = value % 10;
          TM.display(0, DigitOne);
          TM.display(1, DigitTwo);
          TM.display(2, DigitThree);
          TM.display(3, DigitFour);
        }
  else
  {
  if ( microFarads >= 100)
        {
          Serial.print((long)microFarads);
          Serial.println(" microFarads");
          int value = microFarads;
          int DigitOne = value / 100;
          int DigitTwo = ((value / 10) % 10);
          int DigitThree = value % 10;
          TM.display(1, DigitOne);
          TM.display(2, DigitTwo);
          TM.display(3, DigitThree);
        }
      else
      {
        if (100 > microFarads >= 1)
        {
          Serial.print((long)microFarads);
          Serial.println(" microFarads");
          int value = microFarads;
          int DigitOne = value / 10;
          int DigitTwo = value % 10;
          TM.display(0, 0);
          TM.display(1, 0);
          TM.display(2, DigitOne);
          TM.display(3, DigitTwo);
        }
          else
          {
           delay(500);
          }
     }
  }

  digitalWrite(chargePin, LOW);
  pinMode(dischargePin, OUTPUT);
  digitalWrite(dischargePin, LOW);
  while(analogRead(analogPin) > 0){
  }


  pinMode(dischargePin, INPUT);
}
Check gustavo101’s instructable to know more details and also the project that inspired him to do this one!
RELATED POSTS
 21 February, 2024 ASUS Mini PC PL64 – Ultra-Slim, Fanless Design with 12th Gen CPU, WiFi 6E, and Support for Triple 4K Displays
 8 December, 2017 Sculpto+, An Affordable User-Friendly Wireless 3D Printer
 30 December, 2019 uLisp for Serpente boards
 29 October, 2021 Waveshare Compact PCIe With Four USB 3.2 Gen. 1 Ports for RPi CM4
 11 April, 2016 ECG Arduino Shield
 2 October, 2019 UDOO X86 II SBC Combines Intel Braswell SoC with Microchip ATMega32U4 “Arduino” MCU


