

DIY Geiger Counter With an ESP8266 and a Touchscreen
- Emmanuel Odunlade
- https://twitter.com/emmaodunlade
- emmaodunlade@gmail.com
- 13.708 Views
- medium
- Tested
- 0 Likes

Several of our past tutorials looked at the possibility of building the hobbyist version of several important tools and equipment used by different categories of makers. We have explored how to build the DIY/Hobbyist versions of seemingly easy tools like a voltmeter to more complex and abstract tools like the VU meter, but for today’s tutorial, we will work on the development of a very important tool in the history of technology; the Geiger Counter.
The Geiger counter is an instrument used for detecting and measuring ionizing radiation. It is one of the worlds best-known radiation detection instrument as it can be used to detect ionizing radiation such as alpha particles, beta particles, and gamma rays and its is usually used as a handheld radiation survey instrument, warning its users when in the region of dangerous ambient radiation levels with an all-too-familiar clicking noise. The counter detects ionizing radiation through the use of the ionization effect produced in a Geiger Muller tube which, you guessed right, is probably why it is named after the German Physicist.
While there are many DIY attempts at the Geiger-counter field on the internet, today’s tutorial will show the efforts of “Instructable” user Prabhat who combined an ESP8266 with a touchscreen display to create a unique device with a custom GUI through which the information is displayed in a very user-friendly way.
The principle of operation of a Geiger Counter is simple. A thin-walled tube with a low-pressure gas inside (called a Geiger-Muller Tube) is energized with a high voltage across its two electrodes. The electric field that’s created is not enough to cause dielectric breakdown – so no current flows through the tube. That is until a particle or photon of ionizing radiation goes through it. As such, when a beta or gamma radiation passes through, it can ionize some of the gas molecules inside, creating free electrons and positive ions. These particles start moving due to the presence of the electric field, and the electrons actually pick up enough speed that they end up ionizing other molecules, creating a cascade of charged particles which momentarily conduct electricity. This brief pulse of current can be detected using the connected electronic circuit and then be used to create the clicking sound, or in this case, fed to the microcontroller to perform calculations and display readings.
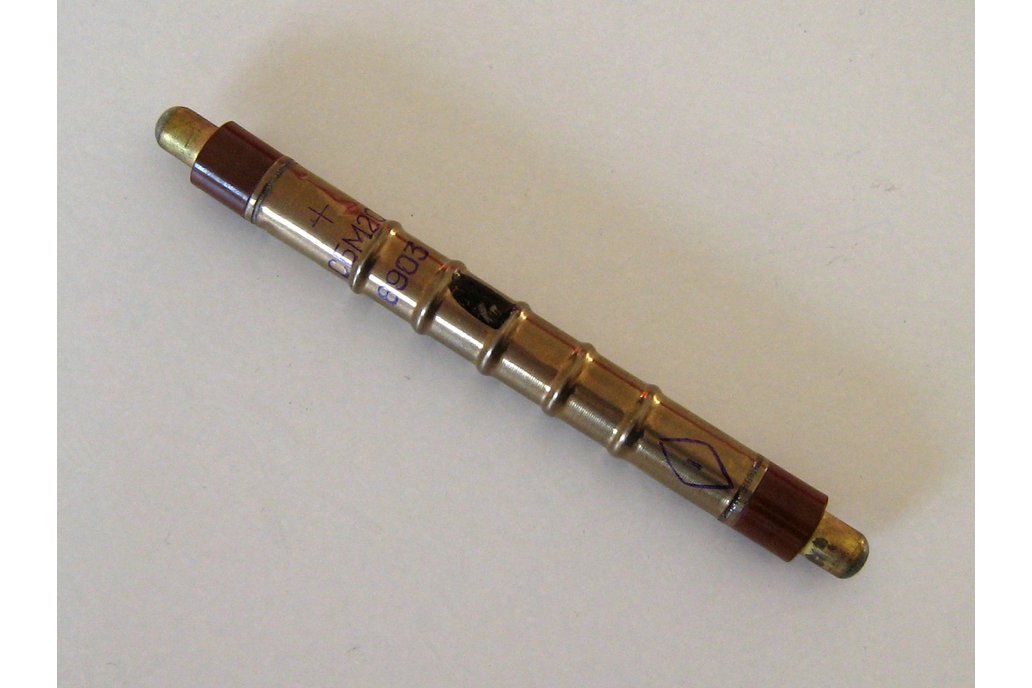
This project is built around the SBM-20 Geiger tube since it is quite easy to find it on eBay, and very sensitive to beta and gamma radiation.
At the end of this tutorial, you would have acquired the capacity to develop your own Geiger counter and the confidence to build more DIY based tools.
Required Components
The following components are required to build this project;
- SBM-20 GM tube
- High Voltage Boost Converter
- Boost Converter for 4.2V
- NodeMCU esp8266 board
- 2.8″ SPI Touchscreen
- 18650 Li-ion cell OR Any 3.7 V LiPo battery (500+ mAh)
- 18650 cell holder
- Resistors (Ohms): 330, 1K, 10K, 22K, 100K, 1.8M, 3M, 10M
- Capacitors: 220 pF
- Transistors: 2N3904
- LED: 3mm
- Buzzer: Any 12-17 mm piezo buzzer
- Fuse holder 6.5*32 (to attach Geiger tube securely)
- A Toggle switch 12 mm
The components can be bought from online electronics component sales stores like Aliexpress and even eBay or directly via the attached links.
Schematics
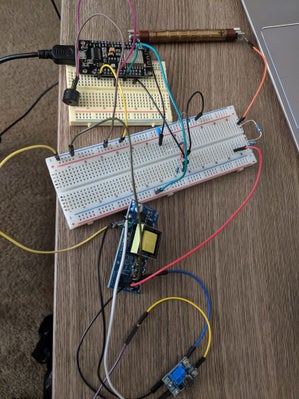
While the project can be implemented on a breadboard, to reduce the complexity involved and ensure things fit nicely in the enclosure, a PCB was designed for the project. As a result of this, the schematics for this project won’t be in the usual Fritzing breadboard style but the connections will still be clear and easy to follow. The components are connected as shown in the schematics below.
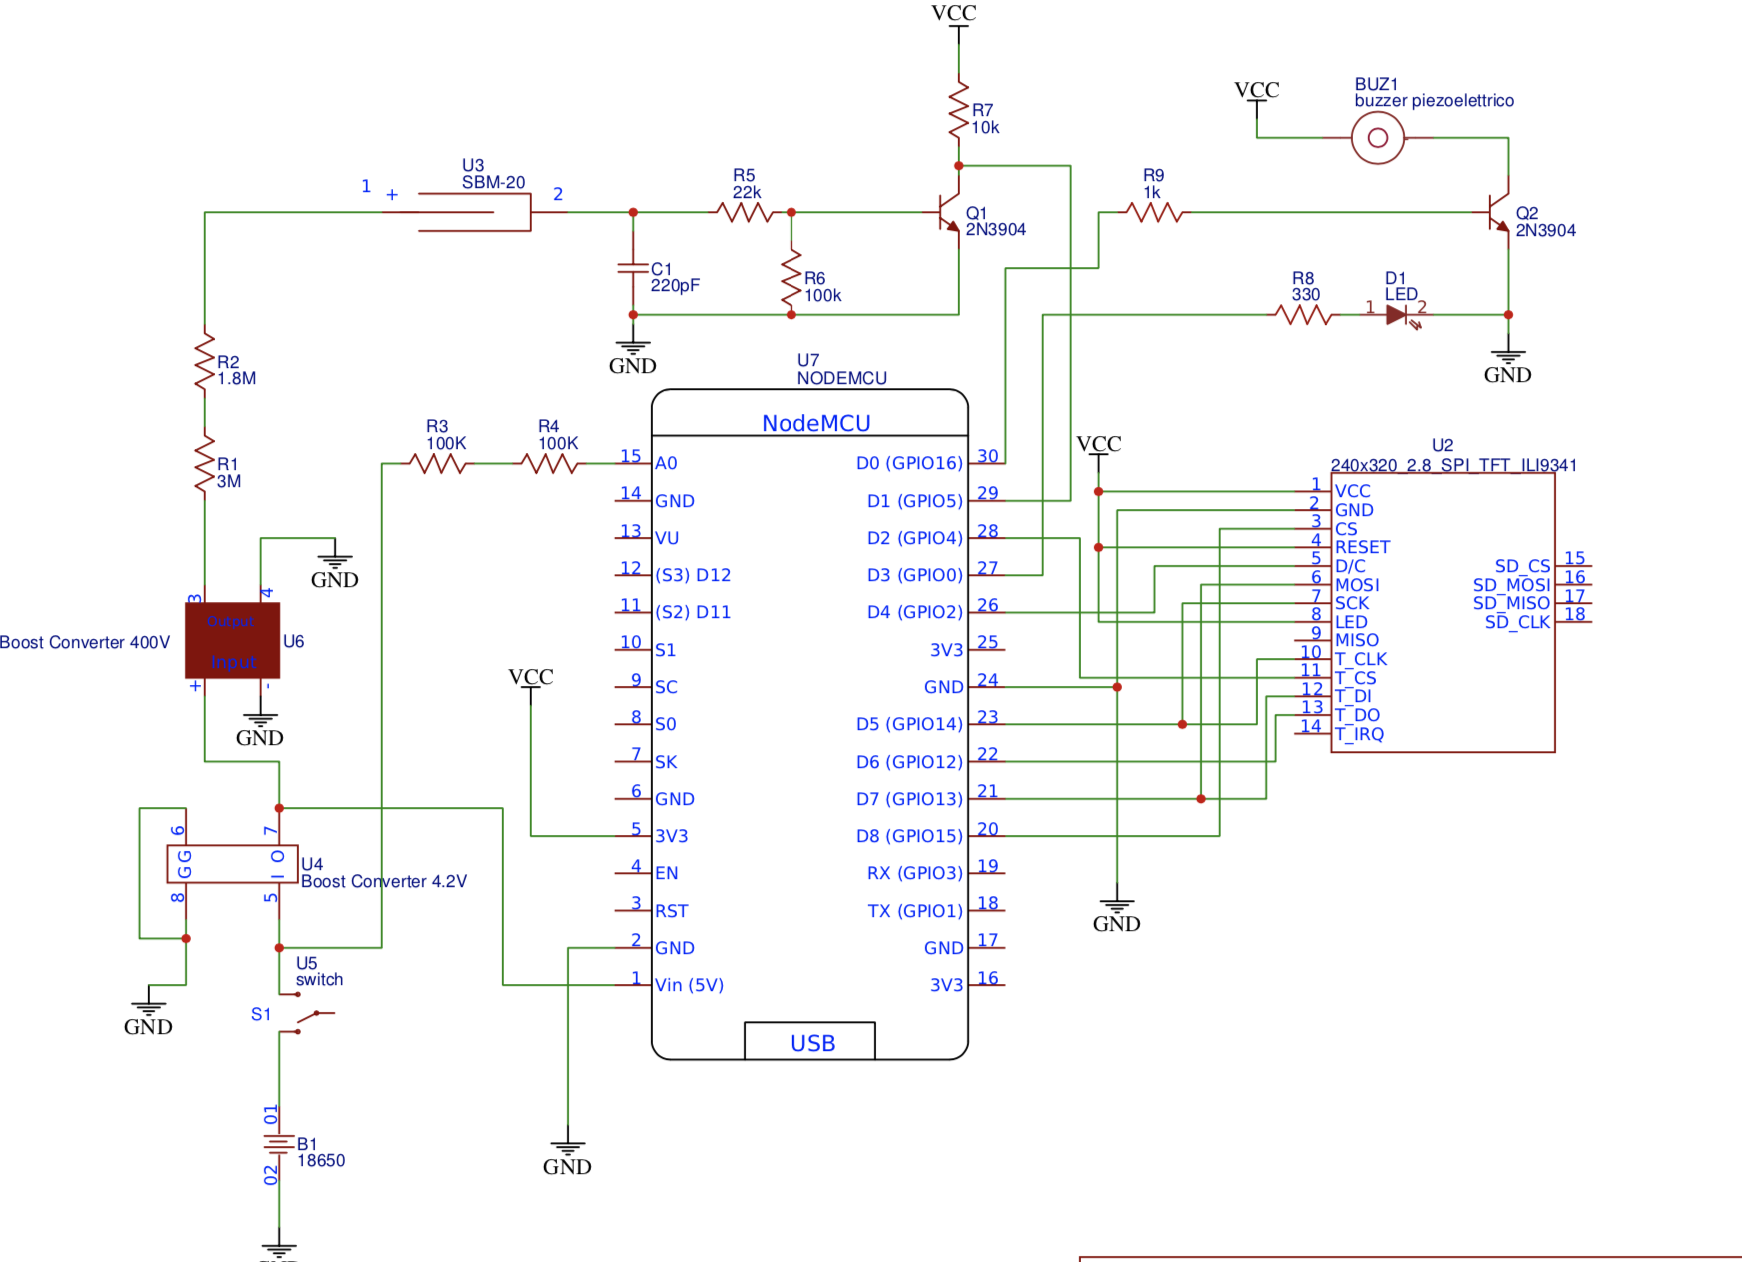
So, you can choose to either produce your own PCB or just replicate the schematics on a breadboard or VeroBoard.
The PCB design files are attached along with other files (Gerber) under the download section. A picture of the schematics implemented on a PCB is shown below.
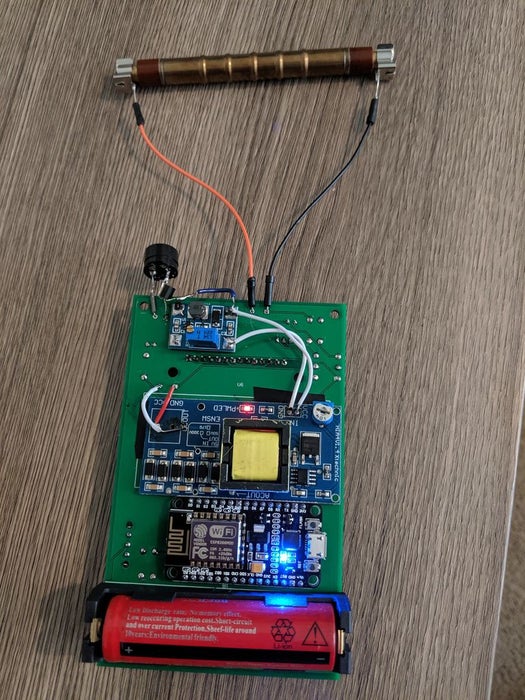
For those who would like to replicate the project on a breadboard, below is an image showing how the project looks when implemented on a breadboard.
Enclosure Design
This project is one of those that deserves going an extra mile, this is why to make the project look neat and give it an appealing finish, an enclosure was designed to improve not just the physical look of the device but also the functional parts.
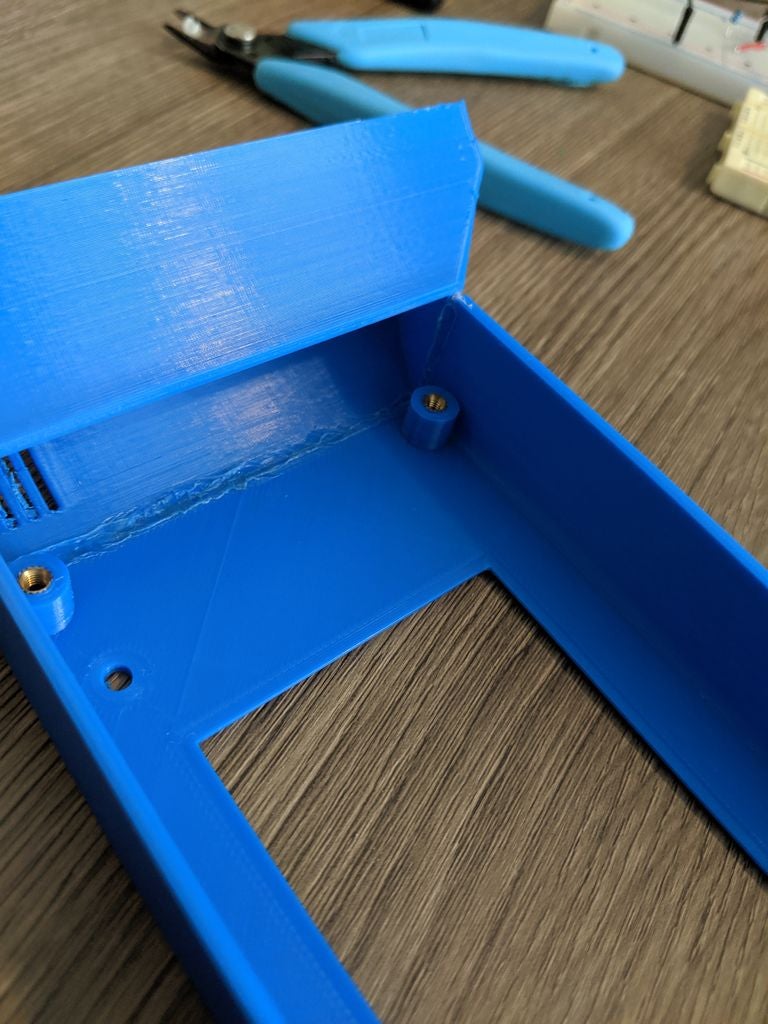
The enclosure was designed with flexibility in mind. It was broken down into different parts which can all be joined together with M3 countersunk screws except for the “sensor housing” which will need to be glued or “welded” (by melting with a soldering iron) to the “case top” part.
The standoffs help keep the PCB (which is 120 x 75 mm) securely attached to the front of the case and can be optionally glued to the underside of the cover for easier assembly and disassembly.
Four standoffs will be required for the full assembly. The .STL files of all parts of the enclosure are attached under the download section and can also be found on Thingiverse.
Code
With your breadboard or PCB version of the device ready, we can now upload code to it.
We will use Platform.io to program the ESP8266 and this requires quite some work to set it up. So if this is your first time using the ESP8266, you will need to go through the process of installing the ESP8266 board support on the Arduino IDE and also setting up Platform.io on VScode for writing Arduino codes. You can check out our articles in the links attached.
The sketch for this project is heavily reliant on the Adafruit_ILI9341 and Adafruit GFX library. The ILI9341 library allows us to directly interact with the display as it was used to create the user interface for the display. We will create two major UIs; One will be the homepage while the other will be a settings menu. The home page will show important information like the dose rate, counts per minute, and the total accumulated dose since the device was turned on while the settings menu, on the other hand, will allow users to set things like the dose units, the alert threshold, and the calibration factor that relates the CPM to dose rate. All of the settings are saved on the microcontrollers EEPROM ensuring the data is not lost when the device is disconnected from power.
To help us access the EEPROM we will use the EEPROM library created for the ESP8266. It is one of the libraries that are automatically installed when you add the ESP8266 board reference to your Arduino IDE.
The code for today’s project is quite long but, as usual, I will do a run through to explain some of the very important and tricky parts. Ensure all the libraries mentioned above are installed on the Arduino IDE, then launch VSCode and create a new project. Open the main.cpp file and start typing in your code.
We start the sketch by including all the libraries required for the project. By default the Arduino.h library will be added by platform.io if not, go ahead and add it. Add the other libraries too as shown below.
#include <Arduino.h>
#include <ESP8266WiFi.h>
#include <EEPROM.h>
#include "SPI.h"
#include "Adafruit_GFX.h"
#include <Fonts/FreeSans9pt7b.h>
#include <Fonts/FreeSans12pt7b.h>
#include "Adafruit_ILI9341.h"
#include <XPT2046_Touchscreen.h>
The ESP8266WiFI library was only added to enable us to disable the WiFi so as to reduce power consumption while the SPI library is what allows us to talk to the display since it’s connected to the ESP over SPI. The XPT2046_Touchscreen.h library allows us to use the touchscreen feature of the display.
Next, we create an object of the touchscreen library with the CS pin as an argument and then create variables to hold the (4 extremes) calibration points for the touch screen and specify the pins of the Arduino to which the DC and CS pins of the display are connected.
#define CS_PIN D2
XPT2046_Touchscreen ts(CS_PIN);

#define TS_MINX 250
#define TS_MINY 200 // calibration points for touchscreen
#define TS_MAXX 3800
#define TS_MAXY 3750

#define TFT_DC D4
#define TFT_CS D8
We also create variables to hold the hex values signifying the different colors that we will be using after which we create an instance of the Adafruit TFT library and create several other variables used to hold different values in the code.
#define BLACK 0x0000
#define BLUE 0x001F
#define RED 0xF800
#define GREEN 0x07E0
#define CYAN 0x07FF
#define MAGENTA 0xF81F
#define YELLOW 0xFFE0
#define WHITE 0xFFFF
#define DOSEBACKGROUND 0x0455

Adafruit_ILI9341 tft = Adafruit_ILI9341(TFT_CS, TFT_DC);
Notably we also create variables settingsBitmap, ledOnBitmap, ledOffBitmap, and backBitmap which are used to hold the Char equivalent of a bitmap image. We covered how to generate this in a previous tutorial we did on displaying bitmap images on LCDs.
const unsigned char settingsBitmap[] PROGMEM = {
    0x00, 0x00, 0x00, 0x00, 0x00, 0x00, 0x00, 0x00, 0x00, 0x00, 0x00, 0x00, 0x00, 0x00, 0x00, 0x00,
    0x00, 0x00, 0x00, 0x00, 0x00, 0x00, 0x00, 0x00, 0x00, 0x00, 0x00, 0x00, 0x00, 0x00, 0x00, 0x00,
    0x00, 0x00, 0x00, 0x00, 0x00, 0x00, 0x00, 0x00, 0x00, 0x00, 0x00, 0x00, 0x00, 0x00, 0x00, 0x00,
    0x00, 0x00, 0x00, 0x00, 0x00, 0x00, 0x00, 0x00, 0x00, 0x00, 0x00, 0x1f, 0x80, 0x00, 0x00, 0x00,
    0x00, 0x00, 0x00, 0x3f, 0xc0, 0x00, 0x00, 0x00, 0x00, 0x00, 0x00, 0x3f, 0xc0, 0x00, 0x00, 0x00,
    0x00, 0x00, 0x00, 0x3f, 0xc0, 0x00, 0x00, 0x00, 0x00, 0x00, 0x00, 0x7f, 0xe0, 0x00, 0x00, 0x00,
    0x00, 0x01, 0xc0, 0x7f, 0xe0, 0x38, 0x00, 0x00, 0x00, 0x03, 0xf0, 0x7f, 0xe0, 0xfc, 0x00, 0x00,
    0x00, 0x07, 0xf9, 0xff, 0xf9, 0xfe, 0x00, 0x00, 0x00, 0x0f, 0xff, 0xff, 0xff, 0xff, 0x00, 0x00,
    0x00, 0x0f, 0xff, 0xff, 0xff, 0xff, 0x00, 0x00, 0x00, 0x0f, 0xff, 0xff, 0xff, 0xff, 0x00, 0x00,
    0x00, 0x07, 0xff, 0xff, 0xff, 0xfe, 0x00, 0x00, 0x00, 0x07, 0xff, 0xff, 0xff, 0xfe, 0x00, 0x00,
    0x00, 0x03, 0xff, 0xff, 0xff, 0xfc, 0x00, 0x00, 0x00, 0x01, 0xff, 0xff, 0xff, 0xf8, 0x00, 0x00,
    0x00, 0x01, 0xff, 0xff, 0xff, 0xf8, 0x00, 0x00, 0x00, 0x03, 0xff, 0xf0, 0x7f, 0xfc, 0x00, 0x00,
    0x00, 0x03, 0xff, 0xc0, 0x3f, 0xfc, 0x00, 0x00, 0x00, 0x1f, 0xff, 0x80, 0x1f, 0xff, 0x80, 0x00,
    0x00, 0xff, 0xff, 0x00, 0x0f, 0xff, 0xf0, 0x00, 0x01, 0xff, 0xff, 0x00, 0x07, 0xff, 0xf8, 0x00,
    0x01, 0xff, 0xfe, 0x00, 0x07, 0xff, 0xf8, 0x00, 0x01, 0xff, 0xfe, 0x00, 0x07, 0xff, 0xf8, 0x00,
    0x01, 0xff, 0xfe, 0x00, 0x07, 0xff, 0xf8, 0x00, 0x01, 0xff, 0xfe, 0x00, 0x07, 0xff, 0xf8, 0x00,
    0x01, 0xff, 0xfe, 0x00, 0x07, 0xff, 0xf8, 0x00, 0x00, 0xff, 0xff, 0x00, 0x0f, 0xff, 0xf0, 0x00,
    0x00, 0x1f, 0xff, 0x80, 0x1f, 0xff, 0x80, 0x00, 0x00, 0x03, 0xff, 0xc0, 0x3f, 0xfc, 0x00, 0x00,
    0x00, 0x03, 0xff, 0xe0, 0x7f, 0xfc, 0x00, 0x00, 0x00, 0x01, 0xff, 0xff, 0xff, 0xf8, 0x00, 0x00,
    0x00, 0x01, 0xff, 0xff, 0xff, 0xf8, 0x00, 0x00, 0x00, 0x03, 0xff, 0xff, 0xff, 0xfc, 0x00, 0x00,
    0x00, 0x07, 0xff, 0xff, 0xff, 0xfe, 0x00, 0x00, 0x00, 0x07, 0xff, 0xff, 0xff, 0xfe, 0x00, 0x00,
    0x00, 0x0f, 0xff, 0xff, 0xff, 0xff, 0x00, 0x00, 0x00, 0x0f, 0xff, 0xff, 0xff, 0xff, 0x00, 0x00,
    0x00, 0x0f, 0xff, 0xff, 0xff, 0xff, 0x00, 0x00, 0x00, 0x07, 0xf9, 0xff, 0xf9, 0xfe, 0x00, 0x00,
    0x00, 0x03, 0xf0, 0x7f, 0xe0, 0xfc, 0x00, 0x00, 0x00, 0x01, 0xc0, 0x7f, 0xe0, 0x38, 0x00, 0x00,
    0x00, 0x00, 0x00, 0x7f, 0xe0, 0x00, 0x00, 0x00, 0x00, 0x00, 0x00, 0x3f, 0xc0, 0x00, 0x00, 0x00,
    0x00, 0x00, 0x00, 0x3f, 0xc0, 0x00, 0x00, 0x00, 0x00, 0x00, 0x00, 0x3f, 0xc0, 0x00, 0x00, 0x00,
    0x00, 0x00, 0x00, 0x1f, 0x80, 0x00, 0x00, 0x00, 0x00, 0x00, 0x00, 0x00, 0x00, 0x00, 0x00, 0x00,
    0x00, 0x00, 0x00, 0x00, 0x00, 0x00, 0x00, 0x00, 0x00, 0x00, 0x00, 0x00, 0x00, 0x00, 0x00, 0x00,
    0x00, 0x00, 0x00, 0x00, 0x00, 0x00, 0x00, 0x00, 0x00, 0x00, 0x00, 0x00, 0x00, 0x00, 0x00, 0x00,
    0x00, 0x00, 0x00, 0x00, 0x00, 0x00, 0x00, 0x00, 0x00, 0x00, 0x00, 0x00, 0x00, 0x00, 0x00, 0x00};

const unsigned char buzzerOnBitmap[] PROGMEM = {
    0x00, 0x00, 0x00, 0x00, 0x00, 0x00, 0x00, 0x00, 0x00, 0x00, 0x00, 0x00, 0x00, 0x00, 0x00, 0x00,
    0x00, 0x00, 0x00, 0x00, 0x00, 0x00, 0x00, 0x00, 0x00, 0x00, 0x00, 0x00, 0x00, 0x00, 0x00, 0x00,
    0x00, 0x00, 0x00, 0x00, 0x00, 0x00, 0x00, 0x00, 0x00, 0x00, 0x00, 0x00, 0x03, 0x80, 0x0c, 0x00,
    0x00, 0x00, 0x07, 0x80, 0x0e, 0x00, 0x00, 0x00, 0x0f, 0x80, 0x0f, 0x00, 0x00, 0x00, 0x1f, 0x80,
    0x07, 0x00, 0x00, 0x00, 0x3f, 0x80, 0xc7, 0x80, 0x00, 0x00, 0xff, 0x80, 0xe3, 0x80, 0x00, 0x01,
    0xff, 0x80, 0xf3, 0xc0, 0x00, 0x03, 0xff, 0x80, 0x71, 0xc0, 0x00, 0x07, 0xff, 0x8c, 0x79, 0xc0,
    0x3f, 0xff, 0xff, 0x9e, 0x38, 0xe0, 0x3f, 0xff, 0xff, 0x8e, 0x38, 0xe0, 0x3f, 0xff, 0xff, 0x8e,
    0x3c, 0xe0, 0x3f, 0xff, 0xff, 0x87, 0x1c, 0xe0, 0x3f, 0xff, 0xff, 0x87, 0x1c, 0x60, 0x3f, 0xff,
    0xff, 0x87, 0x1c, 0x70, 0x3f, 0xff, 0xff, 0x87, 0x1c, 0x70, 0x3f, 0xff, 0xff, 0x87, 0x1c, 0x70,
    0x3f, 0xff, 0xff, 0x87, 0x1c, 0x70, 0x3f, 0xff, 0xff, 0x87, 0x1c, 0x70, 0x3f, 0xff, 0xff, 0x87,
    0x1c, 0xe0, 0x3f, 0xff, 0xff, 0x8e, 0x3c, 0xe0, 0x3f, 0xff, 0xff, 0x8e, 0x38, 0xe0, 0x3f, 0xff,
    0xff, 0x9e, 0x38, 0xe0, 0x00, 0x07, 0xff, 0x8c, 0x79, 0xc0, 0x00, 0x03, 0xff, 0x80, 0x71, 0xc0,
    0x00, 0x00, 0xff, 0x80, 0xf1, 0xc0, 0x00, 0x00, 0x7f, 0x80, 0xe3, 0x80, 0x00, 0x00, 0x3f, 0x80,
    0xc7, 0x80, 0x00, 0x00, 0x1f, 0x80, 0x07, 0x00, 0x00, 0x00, 0x0f, 0x80, 0x0f, 0x00, 0x00, 0x00,
    0x07, 0x80, 0x0e, 0x00, 0x00, 0x00, 0x03, 0x80, 0x0c, 0x00, 0x00, 0x00, 0x00, 0x00, 0x00, 0x00,
    0x00, 0x00, 0x00, 0x00, 0x00, 0x00, 0x00, 0x00, 0x00, 0x00, 0x00, 0x00, 0x00, 0x00, 0x00, 0x00,
    0x00, 0x00, 0x00, 0x00, 0x00, 0x00, 0x00, 0x00, 0x00, 0x00, 0x00, 0x00, 0x00, 0x00};

const unsigned char buzzerOffBitmap[] PROGMEM = {
    0x00, 0x00, 0x00, 0x00, 0x00, 0x00, 0x00, 0x00, 0x00, 0x00, 0x00, 0x00, 0x00, 0x00, 0x03, 0x80,
    0x00, 0x00, 0x00, 0x00, 0x0f, 0x80, 0x00, 0x00, 0x00, 0x00, 0x1f, 0x80, 0x00, 0x00, 0x00, 0x00,
    0x3f, 0x80, 0x00, 0x00, 0x00, 0x00, 0x7f, 0x80, 0x00, 0x00, 0x00, 0x00, 0xff, 0x80, 0x00, 0x00,
    0x00, 0x03, 0xff, 0x80, 0x00, 0x00, 0x00, 0x07, 0xff, 0x80, 0x00, 0x00, 0x00, 0x0f, 0xff, 0x80,
    0x00, 0x00, 0x0f, 0xff, 0xff, 0x80, 0x00, 0x00, 0x1f, 0xff, 0xff, 0x80, 0x00, 0x00, 0x3f, 0xff,
    0xff, 0x8f, 0x00, 0x78, 0x7f, 0xff, 0xff, 0x8f, 0x80, 0xf8, 0x7f, 0xff, 0xff, 0x8f, 0xc1, 0xf8,
    0x7f, 0xff, 0xff, 0x87, 0xe3, 0xf0, 0x7f, 0xff, 0xff, 0x83, 0xf7, 0xe0, 0x7f, 0xff, 0xff, 0x81,
    0xff, 0xc0, 0x7f, 0xff, 0xff, 0x80, 0xff, 0x80, 0x7f, 0xff, 0xff, 0x80, 0x7f, 0x00, 0x7f, 0xff,
    0xff, 0x80, 0x7f, 0x00, 0x7f, 0xff, 0xff, 0x80, 0xff, 0x80, 0x7f, 0xff, 0xff, 0x81, 0xff, 0xc0,
    0x7f, 0xff, 0xff, 0x83, 0xf7, 0xe0, 0x7f, 0xff, 0xff, 0x87, 0xe3, 0xf0, 0x7f, 0xff, 0xff, 0x8f,
    0xc1, 0xf0, 0x7f, 0xff, 0xff, 0x8f, 0x80, 0xf8, 0x3f, 0xff, 0xff, 0x8f, 0x00, 0x70, 0x3f, 0xff,
    0xff, 0x84, 0x00, 0x20, 0x1f, 0xff, 0xff, 0x80, 0x00, 0x00, 0x0f, 0xff, 0xff, 0x80, 0x00, 0x00,
    0x00, 0x07, 0xff, 0x80, 0x00, 0x00, 0x00, 0x03, 0xff, 0x80, 0x00, 0x00, 0x00, 0x01, 0xff, 0x80,
    0x00, 0x00, 0x00, 0x00, 0xff, 0x80, 0x00, 0x00, 0x00, 0x00, 0x7f, 0x80, 0x00, 0x00, 0x00, 0x00,
    0x1f, 0x80, 0x00, 0x00, 0x00, 0x00, 0x0f, 0x80, 0x00, 0x00, 0x00, 0x00, 0x07, 0x80, 0x00, 0x00,
    0x00, 0x00, 0x03, 0x80, 0x00, 0x00, 0x00, 0x00, 0x00, 0x00, 0x00, 0x00, 0x00, 0x00, 0x00, 0x00,
    0x00, 0x00, 0x00, 0x00, 0x00, 0x00, 0x00, 0x00, 0x00, 0x00, 0x00, 0x00, 0x00, 0x00};

const unsigned char ledOnBitmap[] PROGMEM = {
    0x00, 0x00, 0x02, 0x00, 0x00, 0x00, 0x00, 0x00, 0x07, 0x00, 0x00, 0x00, 0x00, 0x00, 0x07, 0x00,
    0x00, 0x00, 0x00, 0x18, 0x07, 0x00, 0xc0, 0x00, 0x00, 0x1c, 0x07, 0x01, 0xc0, 0x00, 0x00, 0x1e,
    0x07, 0x03, 0xc0, 0x00, 0x00, 0x0e, 0x07, 0x03, 0x80, 0x00, 0x00, 0x0f, 0x00, 0x07, 0x80, 0x00,
    0x00, 0x07, 0x00, 0x07, 0x00, 0x00, 0x00, 0x00, 0x00, 0x00, 0x00, 0x00, 0x00, 0x00, 0x00, 0x00,
    0x00, 0x00, 0x1e, 0x00, 0x1f, 0xc0, 0x03, 0xc0, 0x0f, 0x80, 0x7f, 0xf0, 0x0f, 0x80, 0x07, 0xc1,
    0xff, 0xfc, 0x1f, 0x00, 0x03, 0xc3, 0xe0, 0x3e, 0x1e, 0x00, 0x00, 0x07, 0xc0, 0x0f, 0x00, 0x00,
    0x00, 0x07, 0x00, 0x07, 0x00, 0x00, 0x00, 0x0f, 0x00, 0x07, 0x80, 0x00, 0x00, 0x0e, 0x00, 0x03,
    0x80, 0x00, 0x00, 0x0e, 0x00, 0x03, 0x80, 0x00, 0x00, 0x1c, 0x00, 0x01, 0xc0, 0x00, 0x7f, 0x1c,
    0x00, 0x01, 0xc3, 0xf0, 0x7f, 0x1c, 0x00, 0x01, 0xc7, 0xf0, 0x3c, 0x0e, 0x00, 0x03, 0x81, 0xe0,
    0x00, 0x0e, 0x00, 0x03, 0x80, 0x00, 0x00, 0x0e, 0x00, 0x03, 0x80, 0x00, 0x00, 0x0f, 0x00, 0x07,
    0x80, 0x00, 0x00, 0x07, 0x00, 0x07, 0x00, 0x00, 0x00, 0x07, 0x80, 0x0f, 0x00, 0x00, 0x01, 0xc3,
    0xc0, 0x1e, 0x1c, 0x00, 0x07, 0xc1, 0xc0, 0x1c, 0x1f, 0x00, 0x0f, 0x81, 0xe0, 0x3c, 0x0f, 0x80,
    0x1e, 0x00, 0xe0, 0x38, 0x03, 0xc0, 0x0c, 0x00, 0xe0, 0x38, 0x01, 0x80, 0x00, 0x00, 0xf0, 0x78,
    0x00, 0x00, 0x00, 0x00, 0x7f, 0xf0, 0x00, 0x00, 0x00, 0x00, 0x7f, 0xf0, 0x00, 0x00, 0x00, 0x00,
    0x3f, 0xe0, 0x00, 0x00, 0x00, 0x00, 0x3f, 0xe0, 0x00, 0x00, 0x00, 0x00, 0x3f, 0xe0, 0x00, 0x00,
    0x00, 0x00, 0x3f, 0xe0, 0x00, 0x00, 0x00, 0x00, 0x3f, 0xe0, 0x00, 0x00, 0x00, 0x00, 0x3f, 0xe0,
    0x00, 0x00, 0x00, 0x00, 0x1f, 0xc0, 0x00, 0x00, 0x00, 0x00, 0x07, 0x00, 0x00, 0x00};

const unsigned char ledOffBitmap[] PROGMEM = {
    0x00, 0x00, 0x00, 0x00, 0x00, 0x00, 0x00, 0x00, 0x00, 0x00, 0x00, 0x00, 0x00, 0x00, 0x00, 0x00,
    0x00, 0x00, 0x00, 0x00, 0x00, 0x00, 0x00, 0x00, 0x00, 0x00, 0x00, 0x00, 0x00, 0x00, 0x00, 0x00,
    0x00, 0x00, 0x00, 0x00, 0x00, 0x00, 0x00, 0x00, 0x00, 0x00, 0x00, 0x00, 0x00, 0x00, 0x00, 0x00,
    0x00, 0x00, 0x00, 0x00, 0x00, 0x00, 0x00, 0x00, 0x00, 0x00, 0x00, 0x00, 0x00, 0x00, 0x00, 0x00,
    0x00, 0x00, 0x00, 0x00, 0x1f, 0xc0, 0x00, 0x00, 0x00, 0x00, 0x7f, 0xf0, 0x00, 0x00, 0x00, 0x01,
    0xff, 0xfc, 0x00, 0x00, 0x00, 0x03, 0xe0, 0x3e, 0x00, 0x00, 0x00, 0x07, 0xc0, 0x0f, 0x00, 0x00,
    0x00, 0x07, 0x00, 0x07, 0x00, 0x00, 0x00, 0x0f, 0x00, 0x07, 0x80, 0x00, 0x00, 0x0e, 0x00, 0x03,
    0x80, 0x00, 0x00, 0x0e, 0x00, 0x03, 0x80, 0x00, 0x00, 0x1c, 0x00, 0x01, 0xc0, 0x00, 0x00, 0x1c,
    0x00, 0x01, 0xc0, 0x00, 0x00, 0x1c, 0x00, 0x01, 0xc0, 0x00, 0x00, 0x0e, 0x00, 0x03, 0x80, 0x00,
    0x00, 0x0e, 0x00, 0x03, 0x80, 0x00, 0x00, 0x0e, 0x00, 0x03, 0x80, 0x00, 0x00, 0x0f, 0x00, 0x07,
    0x80, 0x00, 0x00, 0x07, 0x00, 0x07, 0x00, 0x00, 0x00, 0x07, 0x80, 0x0f, 0x00, 0x00, 0x00, 0x03,
    0xc0, 0x1e, 0x00, 0x00, 0x00, 0x01, 0xc0, 0x1c, 0x00, 0x00, 0x00, 0x01, 0xe0, 0x3c, 0x00, 0x00,
    0x00, 0x00, 0xe0, 0x38, 0x00, 0x00, 0x00, 0x00, 0xe0, 0x38, 0x00, 0x00, 0x00, 0x00, 0xf0, 0x78,
    0x00, 0x00, 0x00, 0x00, 0x7f, 0xf0, 0x00, 0x00, 0x00, 0x00, 0x7f, 0xf0, 0x00, 0x00, 0x00, 0x00,
    0x3f, 0xe0, 0x00, 0x00, 0x00, 0x00, 0x3f, 0xe0, 0x00, 0x00, 0x00, 0x00, 0x3f, 0xe0, 0x00, 0x00,
    0x00, 0x00, 0x3f, 0xe0, 0x00, 0x00, 0x00, 0x00, 0x3f, 0xe0, 0x00, 0x00, 0x00, 0x00, 0x3f, 0xe0,
    0x00, 0x00, 0x00, 0x00, 0x1f, 0xc0, 0x00, 0x00, 0x00, 0x00, 0x07, 0x00, 0x00, 0x00};

const unsigned char backBitmap[] PROGMEM = {
    0x00, 0x00, 0x00, 0x1f, 0xfc, 0x00, 0x00, 0x00, 0x00, 0x00, 0x00, 0x01, 0xff, 0xff, 0xc0, 0x00,
    0x00, 0x00, 0x00, 0x00, 0x0f, 0xff, 0xff, 0xf8, 0x00, 0x00, 0x00, 0x00, 0x00, 0x3f, 0xff, 0xff,
    0xfe, 0x00, 0x00, 0x00, 0x00, 0x00, 0xff, 0xff, 0xff, 0xff, 0x80, 0x00, 0x00, 0x00, 0x01, 0xff,
    0x80, 0x00, 0xff, 0xc0, 0x00, 0x00, 0x00, 0x07, 0xfc, 0x00, 0x00, 0x1f, 0xf0, 0x00, 0x00, 0x00,
    0x0f, 0xf0, 0x00, 0x00, 0x07, 0xf8, 0x00, 0x00, 0x00, 0x1f, 0xc0, 0x00, 0x00, 0x01, 0xfc, 0x00,
    0x00, 0x00, 0x3f, 0x80, 0x00, 0x00, 0x00, 0xfe, 0x00, 0x00, 0x00, 0x7e, 0x00, 0x00, 0x00, 0x00,
    0x3f, 0x00, 0x00, 0x00, 0xfc, 0x00, 0x00, 0x00, 0x00, 0x1f, 0x80, 0x00, 0x01, 0xf8, 0x00, 0x00,
    0x00, 0x00, 0x0f, 0xc0, 0x00, 0x03, 0xf0, 0x00, 0x00, 0x00, 0x00, 0x07, 0xe0, 0x00, 0x03, 0xe0,
    0x00, 0x00, 0x00, 0x00, 0x03, 0xf0, 0x00, 0x07, 0xc0, 0x00, 0x00, 0x00, 0x00, 0x01, 0xf0, 0x00,
    0x0f, 0xc0, 0x00, 0x00, 0x00, 0x00, 0x01, 0xf8, 0x00, 0x0f, 0x80, 0x00, 0x00, 0x00, 0x00, 0x00,
    0xf8, 0x00, 0x1f, 0x00, 0x00, 0x0e, 0x00, 0x00, 0x00, 0x7c, 0x00, 0x1f, 0x00, 0x00, 0x1f, 0x00,
    0x00, 0x00, 0x7c, 0x00, 0x3e, 0x00, 0x00, 0x3f, 0x00, 0x00, 0x00, 0x3e, 0x00, 0x3e, 0x00, 0x00,
    0x7e, 0x00, 0x00, 0x00, 0x3e, 0x00, 0x3c, 0x00, 0x00, 0xfe, 0x00, 0x00, 0x00, 0x1e, 0x00, 0x7c,
    0x00, 0x01, 0xfc, 0x00, 0x00, 0x00, 0x1f, 0x00, 0x7c, 0x00, 0x03, 0xf8, 0x00, 0x00, 0x00, 0x1f,
    0x00, 0x78, 0x00, 0x07, 0xf0, 0x00, 0x00, 0x00, 0x0f, 0x00, 0x78, 0x00, 0x0f, 0xe0, 0x00, 0x00,
    0x00, 0x0f, 0x00, 0xf8, 0x00, 0x1f, 0xc0, 0x00, 0x00, 0x00, 0x0f, 0x80, 0xf8, 0x00, 0x3f, 0x80,
    0x00, 0x00, 0x00, 0x0f, 0x80, 0xf8, 0x00, 0x7f, 0x00, 0x00, 0x00, 0x00, 0x0f, 0x80, 0xf8, 0x00,
    0xff, 0xff, 0xff, 0xff, 0x00, 0x0f, 0x80, 0xf8, 0x01, 0xff, 0xff, 0xff, 0xff, 0x80, 0x0f, 0x80,
    0xf8, 0x01, 0xff, 0xff, 0xff, 0xff, 0xc0, 0x07, 0x80, 0xf8, 0x01, 0xff, 0xff, 0xff, 0xff, 0x80,
    0x0f, 0x80, 0xf8, 0x00, 0xff, 0xff, 0xff, 0xff, 0x00, 0x0f, 0x80, 0xf8, 0x00, 0x7e, 0x00, 0x00,
    0x00, 0x00, 0x0f, 0x80, 0xf8, 0x00, 0x3f, 0x80, 0x00, 0x00, 0x00, 0x0f, 0x80, 0xf8, 0x00, 0x1f,
    0x80, 0x00, 0x00, 0x00, 0x0f, 0x80, 0x78, 0x00, 0x0f, 0xe0, 0x00, 0x00, 0x00, 0x0f, 0x00, 0x78,
    0x00, 0x07, 0xe0, 0x00, 0x00, 0x00, 0x0f, 0x00, 0x7c, 0x00, 0x03, 0xf8, 0x00, 0x00, 0x00, 0x1f,
    0x00, 0x7c, 0x00, 0x01, 0xf8, 0x00, 0x00, 0x00, 0x1f, 0x00, 0x3c, 0x00, 0x00, 0xfe, 0x00, 0x00,
    0x00, 0x1e, 0x00, 0x3e, 0x00, 0x00, 0x7e, 0x00, 0x00, 0x00, 0x3e, 0x00, 0x3e, 0x00, 0x00, 0x3f,
    0x00, 0x00, 0x00, 0x3e, 0x00, 0x1f, 0x00, 0x00, 0x1f, 0x00, 0x00, 0x00, 0x7c, 0x00, 0x1f, 0x00,
    0x00, 0x0e, 0x00, 0x00, 0x00, 0x7c, 0x00, 0x0f, 0x80, 0x00, 0x00, 0x00, 0x00, 0x00, 0xf8, 0x00,
    0x0f, 0xc0, 0x00, 0x00, 0x00, 0x00, 0x00, 0xf8, 0x00, 0x07, 0xc0, 0x00, 0x00, 0x00, 0x00, 0x01,
    0xf0, 0x00, 0x03, 0xe0, 0x00, 0x00, 0x00, 0x00, 0x03, 0xf0, 0x00, 0x03, 0xf0, 0x00, 0x00, 0x00,
    0x00, 0x07, 0xe0, 0x00, 0x01, 0xf8, 0x00, 0x00, 0x00, 0x00, 0x0f, 0xc0, 0x00, 0x00, 0xfc, 0x00,
    0x00, 0x00, 0x00, 0x1f, 0x80, 0x00, 0x00, 0x7e, 0x00, 0x00, 0x00, 0x00, 0x3f, 0x00, 0x00, 0x00,
    0x3f, 0x80, 0x00, 0x00, 0x00, 0x7e, 0x00, 0x00, 0x00, 0x1f, 0xc0, 0x00, 0x00, 0x01, 0xfc, 0x00,
    0x00, 0x00, 0x0f, 0xf0, 0x00, 0x00, 0x07, 0xf8, 0x00, 0x00, 0x00, 0x07, 0xfc, 0x00, 0x00, 0x1f,
    0xf0, 0x00, 0x00, 0x00, 0x03, 0xff, 0x80, 0x00, 0xff, 0xe0, 0x00, 0x00, 0x00, 0x00, 0xff, 0xff,
    0x7f, 0xff, 0x80, 0x00, 0x00, 0x00, 0x00, 0x3f, 0xff, 0xff, 0xfe, 0x00, 0x00, 0x00, 0x00, 0x00,
    0x0f, 0xff, 0xff, 0xf8, 0x00, 0x00, 0x00, 0x00, 0x00, 0x01, 0xff, 0xff, 0xc0, 0x00, 0x00, 0x00,
    0x00, 0x00, 0x00, 0x1f, 0xfc, 0x00, 0x00, 0x00, 0x00};
With that done, we initialize some of the functions that will be used in the code proper before moving to the void setup() function.
void drawHomePage();
void drawSettingsPage();
void drawUnitsPage();
void drawAlertPage();
void drawCalibrationPage();
We start the void setup() function by initializing the serial monitor setting our baud rate to 38400. Feel free to set this to whatever you want.
void setup()
{
  Serial.begin(38400);
We then initialize the touchscreen(ts) and the TFT using the begin command and we set the rotation to an orientation that suits us (2 in this case). We also fill the screen with a black color to create a sort of black background.
ts.begin();
  ts.setRotation(2);

  tft.begin();
  tft.setRotation(2);
  tft.fillScreen(ILI9341_BLACK);
With that done, we initialize the pins to which the status LED and the buzzer are connected, setting their pin modes to output and turning both off.
pinMode(D0, OUTPUT); // buzzer switch
pinMode(D3, OUTPUT); // LED
digitalWrite(D3, LOW);
digitalWrite(D0, LOW);
We follow that up by initializing the EEPROM and initializing a couple of variables including doseUnits, alarmThreshold and conversionFactor using data stored on the EEPROM.
EEPROM.begin(512);

  doseUnits = EEPROM.read(saveUnits);
  alarmThreshold = EEPROM.read(saveAlertThreshold);
  conversionFactor = EEPROM.read(saveCalibration);

  Serial.println("Begin");
  attachInterrupt(interruptPin, isr, FALLING);
Next, we disable the ESP8266 WiFi to increase the battery life of the project and call the drawhomePage() function to create the homepage on the display.
 WiFi.mode( WIFI_OFF );                // turn off wifi
  WiFi.forceSleepBegin();

  drawHomePage();
}
Next is the void loop function. This is where all the action takes place. The void loop is definitely too long to explain but thanks to the very descriptive variable names that are used, it should be easy to follow. The basic idea is to monitor the dose adjusted parameter which is influenced by the dose rate which is in turn by the activities taking place in the GM tube. When the dose level attains a particular threshold, it triggers the alarm and displays the current critical level of radiation being experienced. Other sketches in the void loop function are related to displaying data and maintaining the good UI on the display.
Due to its bulkiness, the complete code for the project is attached along with other resources under the download section.
Demo
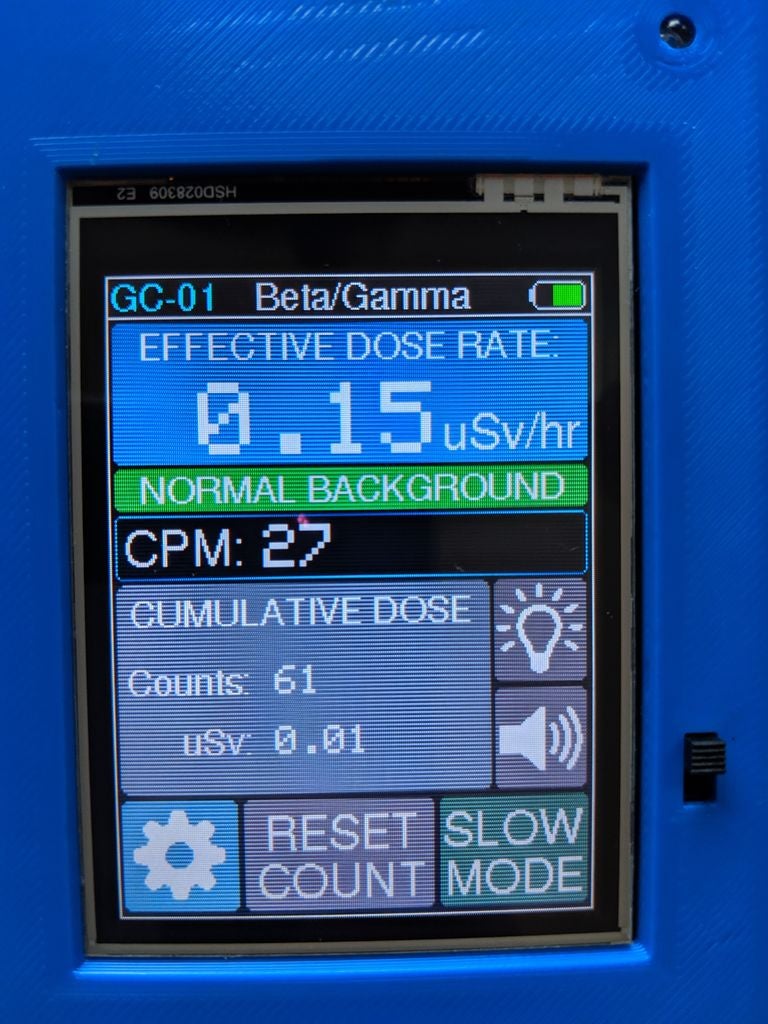
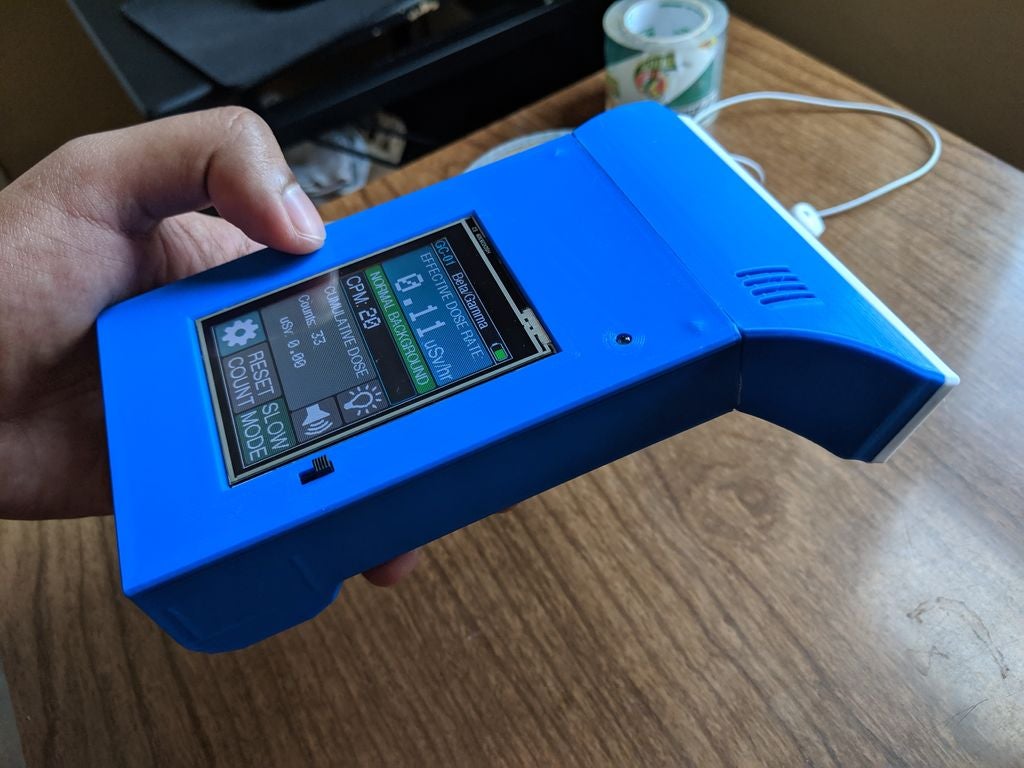
With your PCB or breadboard version of the build all set and ready to go, connect the ESP8266 to your computer and upload the code to it. You should now see the screen come up with the home page being displayed as shown in the image below.
To try the device, a couple of tests were carried out. According to “Phabat”, a small sample of Uranium Ore registers as moderately radioactive, at over 350 CPM
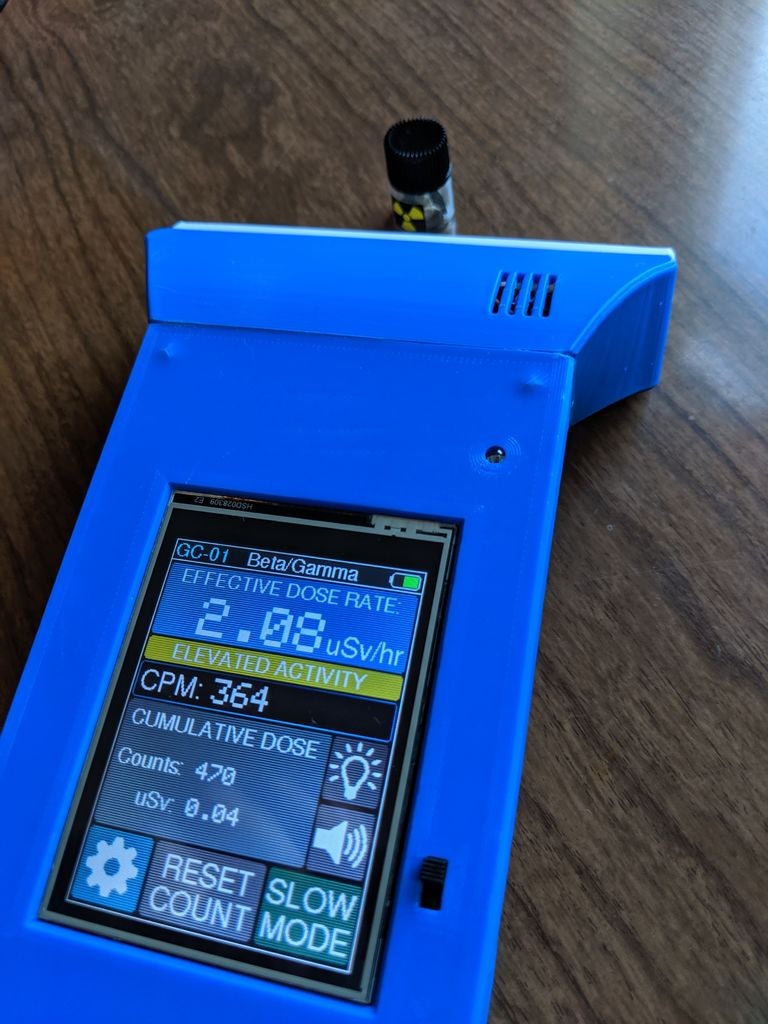
A Thoriated Lantern Mantle made things click faster than 1500 CPM when held up against the tube.
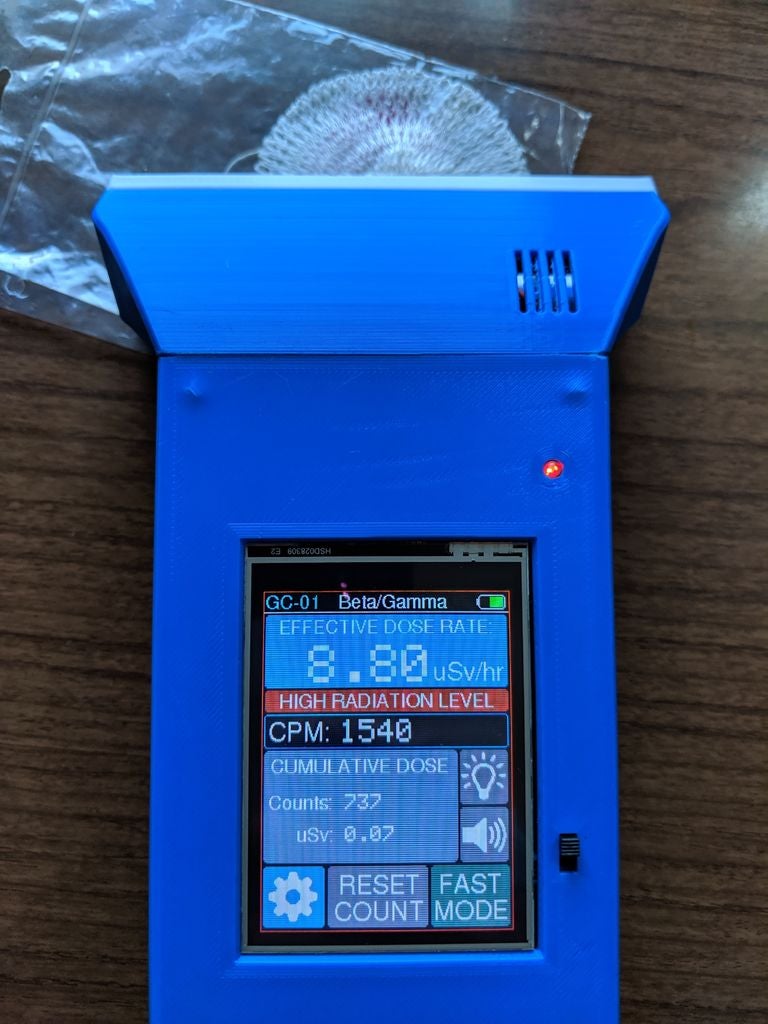
The Geiger counter measures a click rate of 15 – 30 counts per minute from natural background radiation, which is about what one would expect from an SBM-20 tube. It draws around 180 mA at 3.7V, so a 2000 mAh battery should last around 11 hours on a charge.
While the Geiger counter is probably not an everyday tool, if you look hard enough, you will see that the DIY version of several other tools that are directly related to the task you do every day can be built.
Thanks for reading this article, as usual, feel free to reach me via the comment section with any question you might have as regards this project.
References
- https://github.com/pra22/GC-01-Geiger-Counter
- https://www.instructables.com/id/DIY-Geiger-Counter-With-an-ESP8266-and-a-Touchscre/
- https://github.com/pra22/GC-20


