

Using an Optical Fingerprint Sensor with the Arduino
- Nick Koumaris
- http://educ8s.tv
- info@educ8s.tv
- 5.280 Views
- moderate
- Tested
- 0 Likes

Fingerprint sensing is one of those technologies in science fiction movies that fascinated most of us as kids. Today, they are everywhere and asides from existing in everyday devices with huge electronics complexity, like mobile phones, they are also available in tiny modules to give makers and electronics hobbyists, the ability to include them in their own projects. For today’s tutorial, we will look at the use of a fingerprint sensor with Arduino.
Fingerprint sensors are based on diverse kind of technology, from capacitive fingerprint sensors used in recent mobile phones, to optical fingerprint sensors commonly used in access control applications. For today’s project, we will use an optical fingerprint sensor.
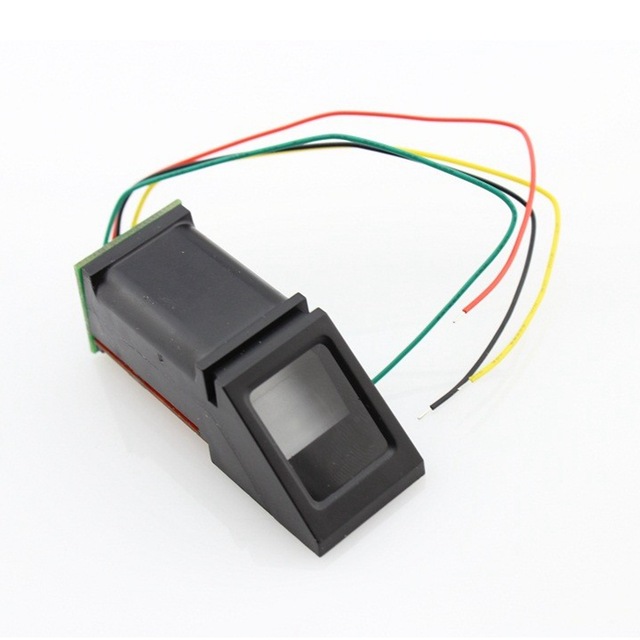
The Optical fingerprint sensor is a highly compact device. It comes embedded with an advanced DSP (Digital Signal Processing) chip, which is used to process the image of fingers captured and determine if a match exists or not.
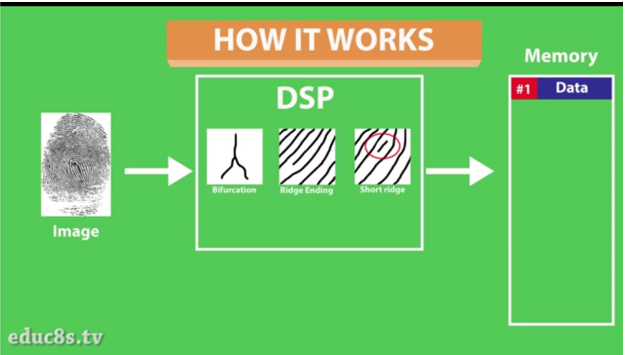
When the sensor captures a new image, it is rendered and the distinguishing features are extracted. The memory of the sensor is searched for a fingerprint with matching characteristics and the result of that session is sent to the microcontroller via serial communication. All of this is done in less than a second. The module can store up to 1000 fingerprints in its memory and its false acceptance rate is less than 0.001% which makes it pretty secure!
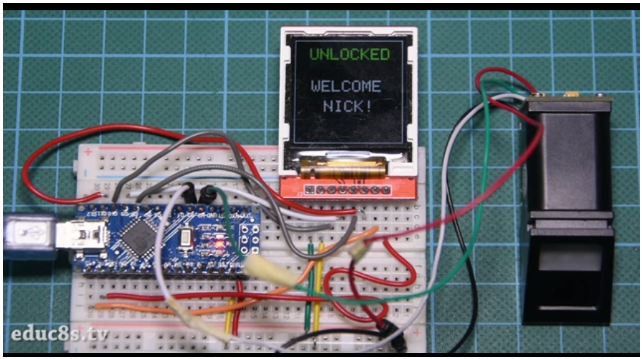
To demonstrate the use of this module with the Arduino, we will build an access notification system. We will use a TFT display alongside the fingerprint sensor and an Arduino nano, to build a simple device that displays “UNLOCKED” when there is a fingerprint match and displays “LOCKED ” when there is no match.
Required Components
The following components are required to build this project;
These components, can be purchased via the links attached to them. The Power bank is optional but provides a very easy way to power the project when it is not connected to your computer.
Schematics
Connect the components as shown in the schematics below. The particular optical fingerprint sensor used for this tutorial is not available on Fritzing, so a makeshift version was used.
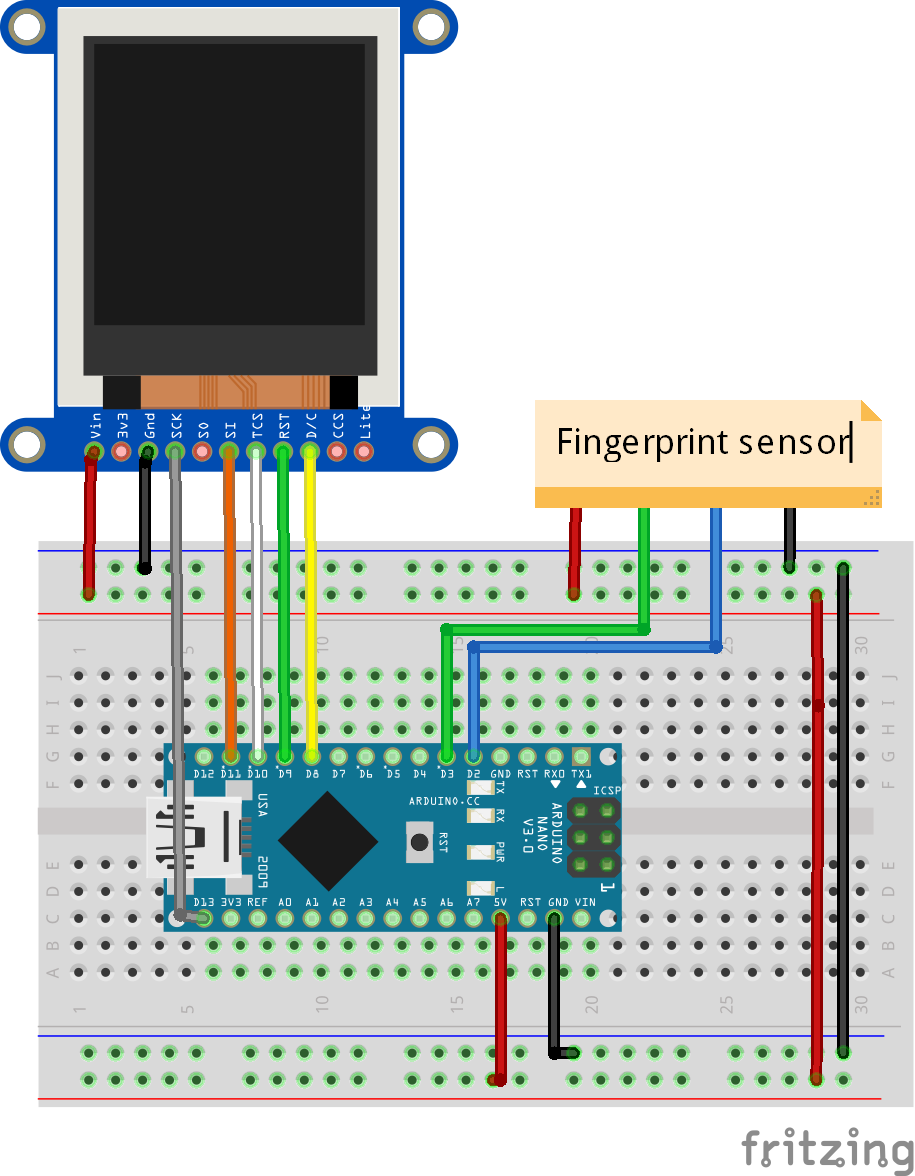
As mentioned earlier, the optical fingerprint sensor communicates with microcontrollers over UART (Serial communication) and as such only requires 4 wires to connect it to the Arduino. The second significant element of the schematic is the 1.44″ color TFT LCD display and a detailed tutorial about its use is found on the link.
To make the connections easier to follow, especially since a makeshift representation was used for the fingerprint sensor, the pin connections are mapped below.
Fingerprint sensor – Arduino
VCC - 5V
GND - GND
TX - D2
RX - D3
TFT Display – Arduino
VIN - 5V
GND - GND
CS - D10
RST - D9
A0 - D8
SDA - D11
SCK - D13
LED - 3.3V
The pins of the fingerprint sensors are sometimes not labeled but differentiated with the color codes of the wires. It is important you check the description of the sensor to know what color of wire was used for each pin. If you have any further problems with connection, feel free to reach out via the comment section.
Code
The code for this project relies heavily on the fingerprint sensor library from Adafruit. The library reduces the amount of code that is needed to interact with the sensor by compressing them into functions. The library can be downloaded here. To easily interact with the TFT display also, we will use the popular Adafruit GFX library and the ILI9163C library from Somutoy.
To do a brief explanation of the code, we start by including the libraries we will us.
//written by Nick Koumaris
//info@educ8s.tv
#include <SPI.h>
#include <Adafruit_GFX.h>
#include <TFT_ILI9163C.h>
#include <Adafruit_Fingerprint.h>
#include <SoftwareSerial.h>
#include <avr/pgmspace.h>
Then we define the colors that will be used in the display.
#define BLUE    0x001F
#define RED     0xF800
#define GREEN   0x07E0
#define CYAN    0x07FF
#define MAGENTA 0xF81F
#define YELLOW 0xFFE0
#define WHITE   0xFFFF
The next important line is the creation of a software serial instance to enable the Arduino to communicate with the fingerprint sensor. The hardware serial was not used because it is the same pins that is being used by the Arduino to communicate with the computer.
SoftwareSerial mySerial(2, 3);
Adafruit_Fingerprint finger = Adafruit_Fingerprint(&mySerial);
With that done, we move to the void setup() function where we start and initialize all the communication systems and display the lock screen.
void setup(void)
 {
  startFingerprintSensor();
  display.begin();
  displayLockScreen();
}
Next is the void loop function. In this function we check for a finger present every 50ms. If a finger is found, the module checks to see if the fingerprint is stored in its memory. If it is present, it generates the fingerprint ID and displays the name of the user. After a few seconds, the screen is locked again.
void loop() {

  fingerprintID = getFingerprintID();
  delay(50);
  if(fingerprintID == 1)
  {
    display.drawBitmap(30,35,icon,60,60,GREEN);
    delay(2000);
    displayUnlockedScreen();
    displayIoanna();
    delay(5000);
    display.fillScreen(BLACK);
    displayLockScreen();
  }
  if(fingerprintID == 2)
  {
    display.drawBitmap(30,35,icon,60,60,GREEN);
    delay(2000);
    displayUnlockedScreen();
    displayNick();
    delay(5000);
    display.fillScreen(BLACK);
    displayLockScreen();
  }
}
Enrolling a finger before uploading the code for this project is important and can be done by uploading the enroll example from the Adafruit fingerprint library to our Arduino board. We go to File-> Examples -> Adafruit Fingerprint Sensor Library -> Enroll. With this example program, we can store fingerprints in the FLASH memory of the module. We upload the sketch and open the Serial Monitor. The program asks us to enter the ID to enroll. Then we place the finger on the sensor twice as we are instructed and the fingerprint is stored! You can store as many as 1000 fingerprints this way.
The complete code for this project is shown below and also attached under the download section.
//written by Nick Koumaris
//info@educ8s.tv
#include <SPI.h>
#include <Adafruit_GFX.h>
#include <TFT_ILI9163C.h>
#include <Adafruit_Fingerprint.h>
#include <SoftwareSerial.h>

// Color definitions
#define BLACK   0x0000
#define BLUE    0x001F
#define RED     0xF800
#define GREEN   0x07E0
#define CYAN    0x07FF
#define MAGENTA 0xF81F
#define YELLOW  0xFFE0
#define WHITE   0xFFFF

#define __CS 10
#define __DC 9
static const uint8_t icon [] PROGMEM = {
0x0,0x0,0x0,0x0,0x0,0x0,0x0,0x0,
0x0,0x0,0x0,0x0,0x0,0x0,0x0,0x0,
0x0,0x0,0x0,0x0,0x0,0x0,0x0,0x0,
0x0,0x0,0x0,0x3f,0xc0,0x0,0x0,0x0,
0x0,0x0,0x3,0xff,0xf8,0x0,0x0,0x0,
0x0,0x0,0x7,0xff,0xfe,0x0,0x0,0x0,
0x0,0x0,0x1f,0xc0,0x7f,0x80,0x0,0x0,
0x0,0x0,0x3e,0x0,0x7,0xc0,0x0,0x0,
0x0,0x0,0x7c,0x0,0x3,0xe0,0x0,0x0,
0x0,0x0,0xfd,0xff,0x81,0xf0,0x0,0x0,
0x0,0x0,0xff,0xff,0xe0,0xf0,0x0,0x0,
0x0,0x1,0xff,0xff,0xf8,0x78,0x0,0x0,
0x0,0x1,0xff,0x80,0x7c,0x38,0x0,0x0,
0x0,0x3,0xfc,0x0,0xe,0x3c,0x0,0x0,
0x0,0x3,0xf0,0x0,0x7,0x1c,0x0,0x0,
0x0,0x7,0xc0,0x7f,0x83,0x8e,0x0,0x0,
0x0,0x7,0x83,0xff,0xe0,0xe,0x0,0x0,
0x0,0x7,0xf,0xff,0xf8,0xf,0x0,0x0,
0x0,0x6,0x1f,0x80,0xfc,0x7,0x0,0x0,
0x0,0x4,0x7e,0x0,0x3f,0x7,0x0,0x0,
0x0,0x0,0xf8,0x0,0xf,0x7,0x0,0x0,
0x0,0x0,0xf0,0x3e,0x7,0x87,0x0,0x0,
0x0,0x1,0xe1,0xff,0x83,0x83,0x80,0x0,
0x0,0x3,0xc3,0xff,0xc3,0xc3,0x80,0x0,
0x0,0x3,0xc7,0xc3,0xe1,0xc3,0x80,0x0,
0x0,0x3,0x8f,0x0,0xf1,0xe3,0x80,0x0,
0x0,0x7,0x1e,0x0,0x78,0xe3,0x80,0x0,
0x0,0x7,0x1e,0x3c,0x38,0xe3,0x80,0x0,
0x0,0x7,0x1c,0x7e,0x38,0xe3,0x80,0x0,
0x0,0xf,0x1c,0x7f,0x38,0xe3,0x80,0x0,
0x0,0xe,0x3c,0xf7,0x38,0x71,0x80,0x0,
0x0,0xe,0x38,0xe7,0x38,0x71,0xc0,0x0,
0x0,0xe,0x38,0xe7,0x38,0x71,0xc0,0x0,
0x0,0xe,0x38,0xe7,0x38,0x73,0xc0,0x0,
0x0,0xe,0x38,0xe3,0x98,0xe3,0xc0,0x0,
0x0,0xe,0x38,0xe3,0xb8,0xe3,0x80,0x0,
0x0,0x0,0x38,0xe3,0xf8,0xe3,0x80,0x0,
0x0,0x0,0x38,0xe3,0xf8,0xe3,0x80,0x0,
0x0,0x0,0x3c,0xf1,0xf1,0xe3,0x80,0x0,
0x0,0x6,0x1c,0x70,0x1,0xc7,0x80,0x0,
0x0,0xe,0x1c,0x78,0x3,0xc7,0x80,0x0,
0x0,0xf,0x1c,0x3e,0x7,0x87,0x0,0x0,
0x0,0xf,0x1e,0x3f,0xff,0x8f,0x0,0x0,
0x0,0xf,0x1e,0x1f,0xff,0x1f,0x0,0x0,
0x0,0xf,0xf,0x7,0xfc,0x3e,0x0,0x0,
0x0,0x7,0x87,0x80,0x0,0x7c,0x0,0x0,
0x0,0x7,0x87,0xe0,0x0,0xfc,0x0,0x0,
0x0,0x3,0xc3,0xf8,0x7,0xf8,0x0,0x0,
0x0,0x3,0xe1,0xff,0xff,0xe1,0x0,0x0,
0x0,0x1,0xe0,0x7f,0xff,0x83,0x0,0x0,
0x0,0x1,0xf8,0xf,0xfe,0x7,0x0,0x0,
0x0,0x0,0xfc,0x0,0x0,0xe,0x0,0x0,
0x0,0x0,0x3f,0x0,0x0,0x3c,0x0,0x0,
0x0,0x0,0x1f,0xe0,0x1,0xf8,0x0,0x0,
0x0,0x0,0x7,0xff,0xff,0xf0,0x0,0x0,
0x0,0x0,0x1,0xff,0xff,0xc0,0x0,0x0,
0x0,0x0,0x0,0x1f,0xfc,0x0,0x0,0x0,
0x0,0x0,0x0,0x0,0x0,0x0,0x0,0x0,
0x0,0x0,0x0,0x0,0x0,0x0,0x0,0x0,
0x0,0x0,0x0,0x0,0x0,0x0,0x0,0x0
};


TFT_ILI9163C display = TFT_ILI9163C(__CS,8, __DC);
SoftwareSerial mySerial(2, 3);
Adafruit_Fingerprint finger = Adafruit_Fingerprint(&mySerial);
int fingerprintID = 0;

void setup(void) {

  startFingerprintSensor();
  display.begin();
  displayLockScreen();
}

void loop() {

  fingerprintID = getFingerprintID();
  delay(50);
  if(fingerprintID == 1)
  {
    display.drawBitmap(30,35,icon,60,60,GREEN);
    delay(2000);
    displayUnlockedScreen();
    displayIoanna();
    delay(5000);
    display.fillScreen(BLACK);
    displayLockScreen();
  }

   if(fingerprintID == 2)
  {
    display.drawBitmap(30,35,icon,60,60,GREEN);
    delay(2000);
    displayUnlockedScreen();
    displayNick();
    delay(5000);
    display.fillScreen(BLACK);
    displayLockScreen();
  }
}


void displayUnlockedScreen()
{
   display.fillScreen(BLACK);
   display.drawRect(0,0,128,128,WHITE);

   display.setCursor(18,10);
   display.setTextColor(GREEN);
   display.setTextSize(2);
   display.print("UNLOCKED");

   display.setCursor(20,50);
   display.setTextColor(WHITE);
   display.setTextSize(2);
   display.print("WELCOME");
}
void displayNick()
{
  display.setCursor(35,75);
  display.setTextColor(WHITE);
  display.setTextSize(2);
  display.print("NICK!");
}

void displayIoanna()
{
  display.setCursor(25,75);
  display.setTextColor(WHITE);
  display.setTextSize(2);
  display.print("IOANNA!");
}

void displayLockScreen()
{
  display.drawRect(0,0,128,128,WHITE);
  display.setCursor(30,10);
  display.setTextColor(RED);
  display.setTextSize(2);
  display.print("LOCKED");

  display.setCursor(10,100);
  display.setTextColor(WHITE);
  display.setTextSize(1);
  display.print("Waiting for valid \n    fingerprint.");

  display.drawBitmap(30,35,icon,60,60,WHITE);
}
void startFingerprintSensor()
{
  Serial.begin(9600);
  finger.begin(57600);

  if (finger.verifyPassword()) {
    Serial.println("Found fingerprint sensor!");
  } else {
    Serial.println("Did not find fingerprint sensor");
  }
  Serial.println("Waiting for valid finger...");
}

int getFingerprintID() {
  uint8_t p = finger.getImage();
  if (p != FINGERPRINT_OK)  return -1;

  p = finger.image2Tz();
  if (p != FINGERPRINT_OK)  return -1;

  p = finger.fingerFastSearch();
  if (p != FINGERPRINT_OK)  return -1;

  // found a match!
  Serial.print("Found ID #"); Serial.print(finger.fingerID);
  Serial.print(" with confidence of "); Serial.println(finger.confidence);
  return finger.fingerID;
}
Demo
As mentioned above, you should use the enroll examples to enroll new fingerprints. Once this is done, Upload the code of this tutorial to your Arduino board. You should see the display come up after a while, waiting for you to place a finger on the fingerprint sensor. If an existing finger is placed, “UNLOCKED” will be displayed on the TFT display as shown below. If the finger has not been registered it will display “DENIED”.
That’s it for today’s tutorial. If you have any question in regards to this, do not hesitate to drop it under the comment section below.
Till next time!
The video version of this tutorial is available on youtube.


