

Michael Zhang
-
Posts
21 -
Joined
-
Last visited
Content Type
Profiles
Forums
Events
Posts posted by Michael Zhang
-
-
https://www.youtube.com/watch?v=RX9iCh0l0UU&ab_channel=AmebaIoT
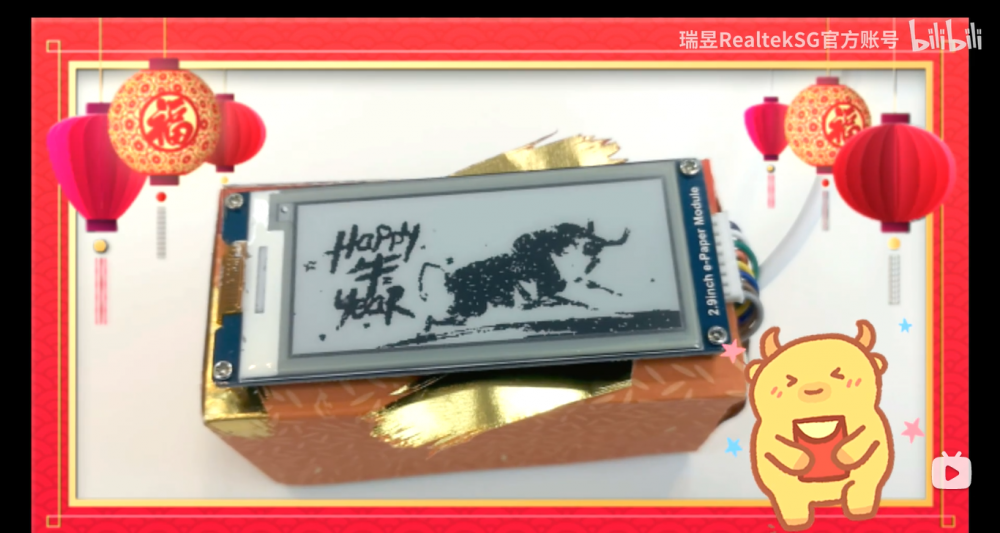
Happy Chinese New Year!
The project is a combination of Eink display and buzzer music. Basically, the project is the summary refer to the following 2 links.
- https://www.arduino.cc/en/Tutorial/BuiltInExamples/toneMelody/
- https://www.amebaiot.com/en/amebad-arduino-epaper/
Best wishes to all!
-
There is a new Eink related project starting. Guys, anybody could give me some suggestions about how to use RFID by cell phone?
-
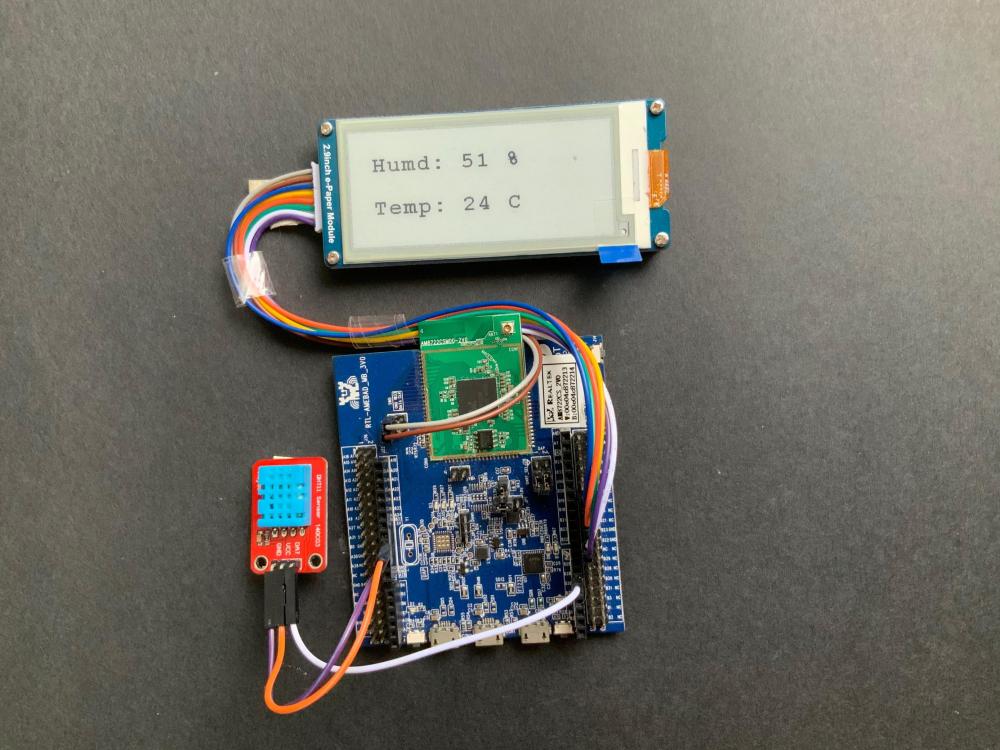
The last demo is display the real time data with powersave mode. In this example, we use the Ameba RTL8722 module connects to a Waveshare 2.9inch e-Paper module to display a few texts data from the DHT sensor. The display uses the flexible substrate as the base plate, with interface and a reference system design. The DHT sensor reads data and displays on Eink screen when system is awake. After 5 seconds system auto enter DeepSleep Mode for power save. System will wake up by wakeup source.
https://www.amebaiot.com/en/amebad-arduino-deepsleepmode-elink/
-
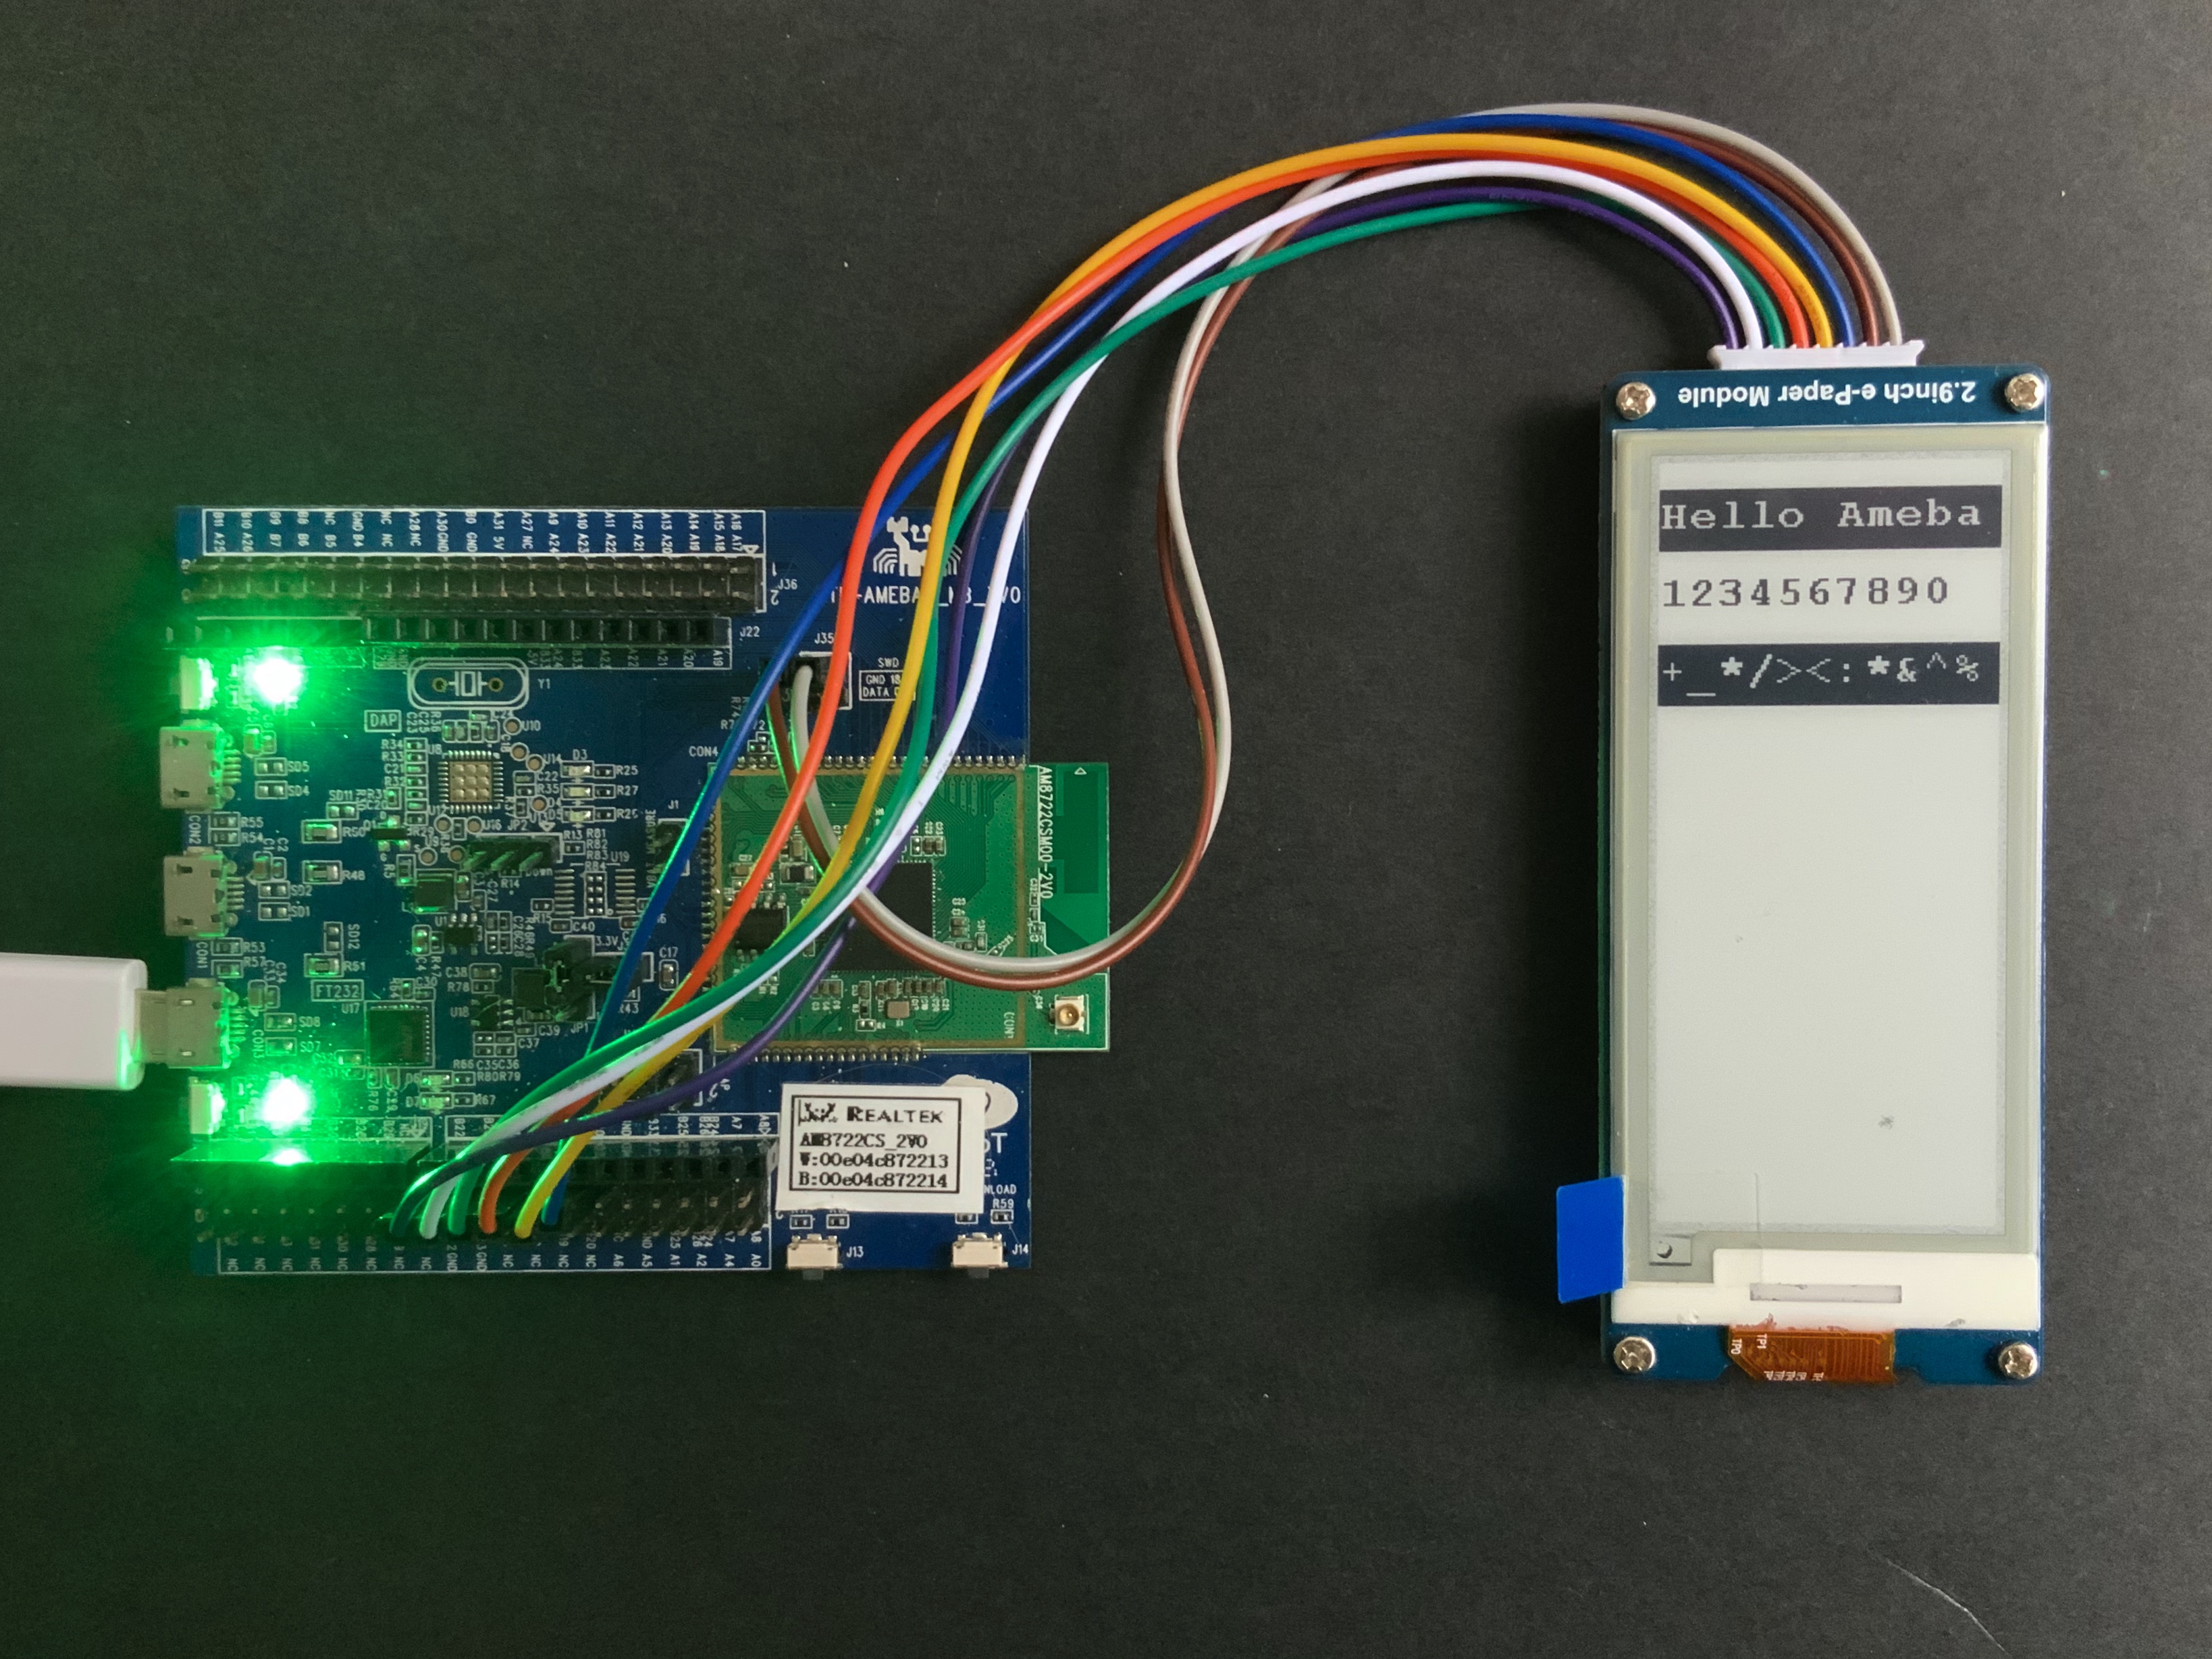
The third demo is display the texts. In this example, we use the Ameba RTL8722 module connects to a Waveshare 2.9inch e-Paper module to display a few texts. The display uses the flexible substrate as the base plate, with interface and a reference system design.
The text is generated from customized libraries and has restructured into hex data. The data is sent to the screen to directly control the pixel and display.
https://www.amebaiot.com/en/amebad-arduino-epaper-text/

-
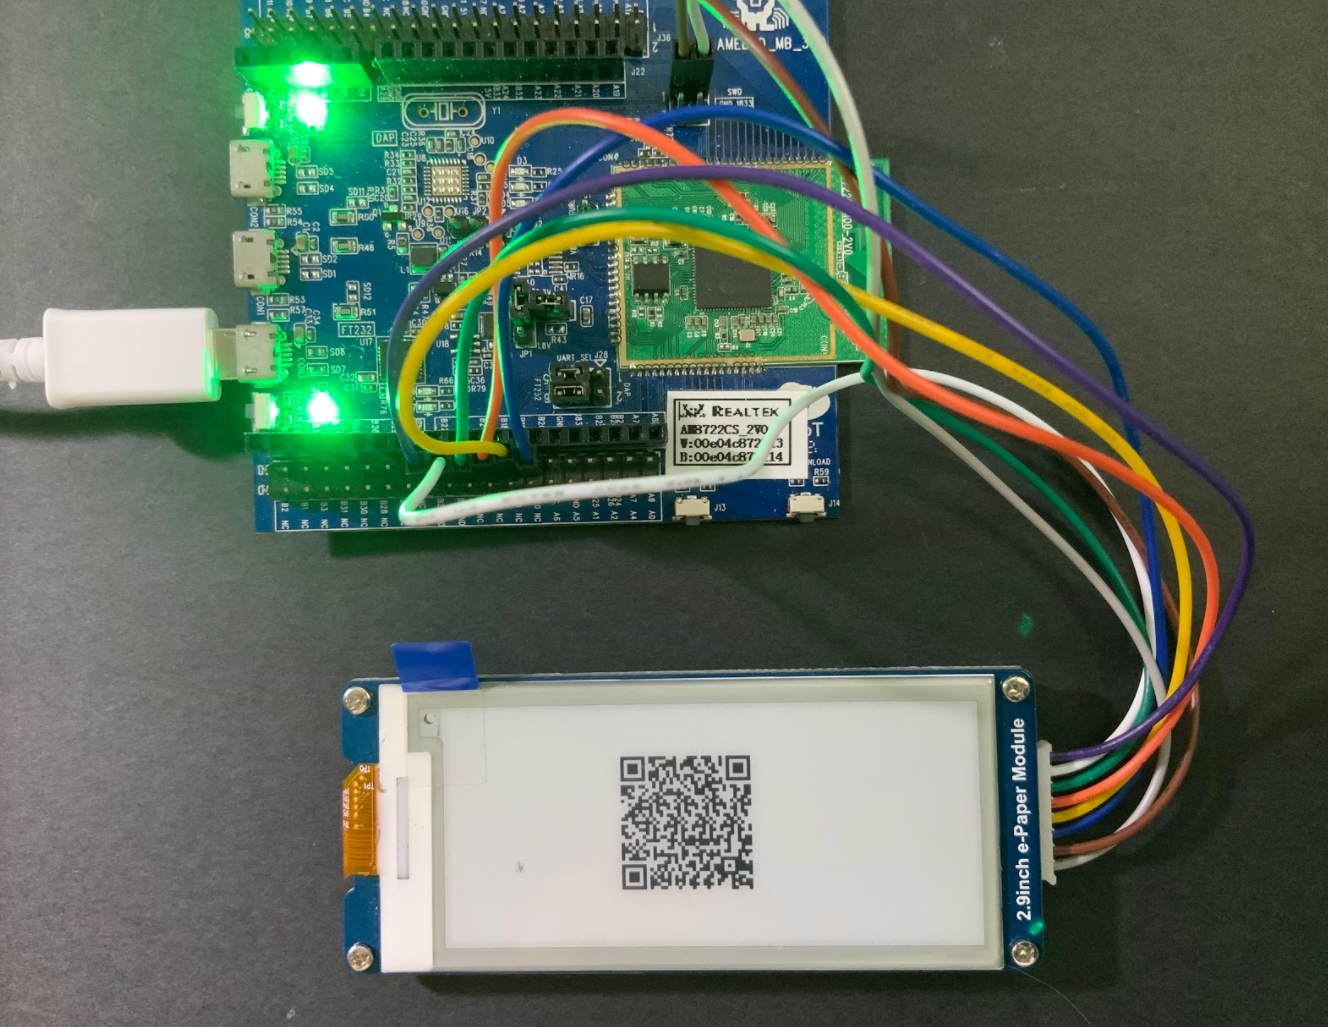
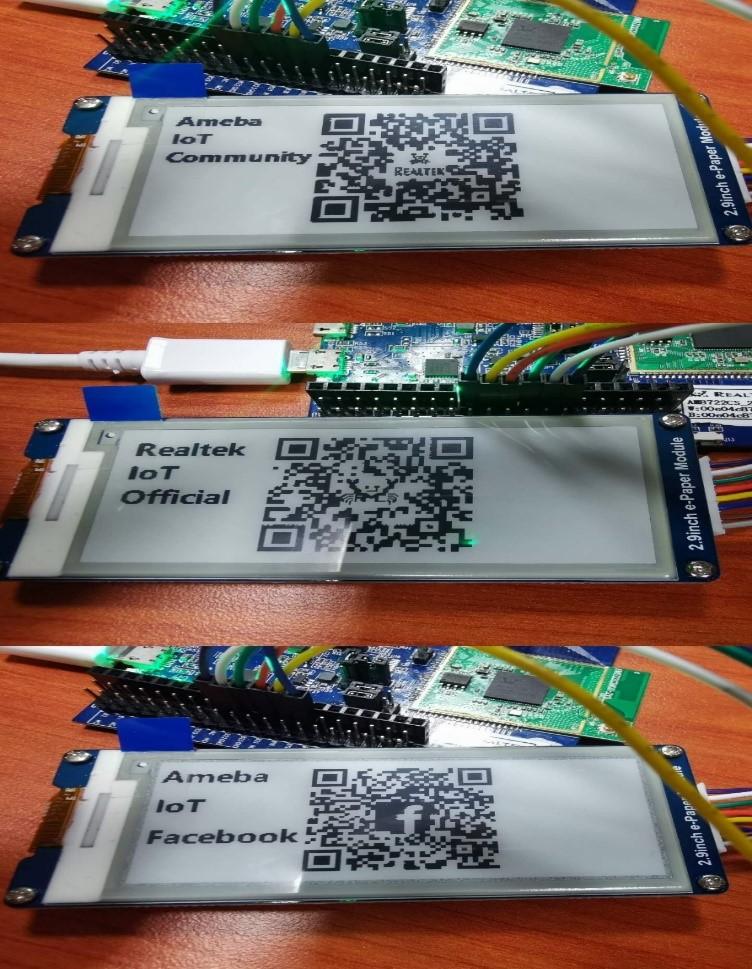
The second demo is controlling the pixel directly. In this example, we use the Ameba RTL8722 module connects to a Waveshare 2.9inch e-Paper module to display a few QR codes. The display uses the flexible substrate as the base plate, with interface and a reference system design.
The QR code is generated from URL and has restructured into hex data. The data is sent to the screen to directly control the pixel and display.
https://www.amebaiot.com/en/amebad-arduino-epaper-qrocde/

-
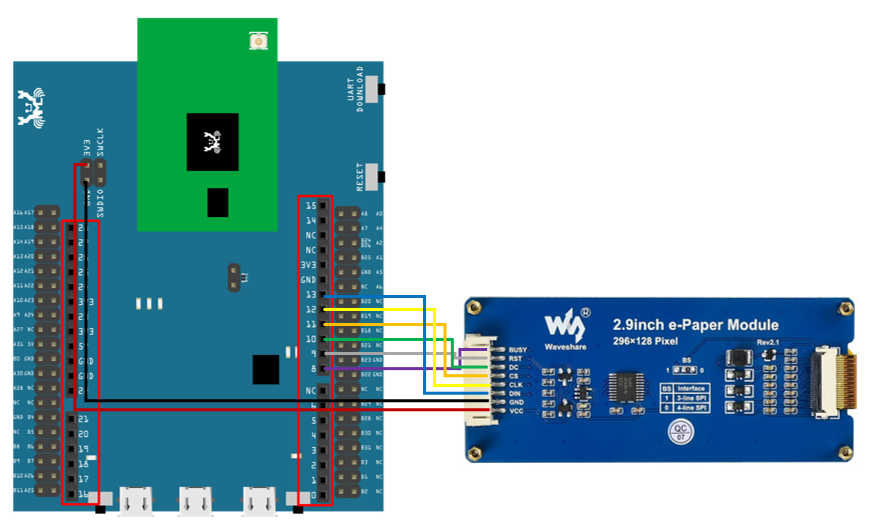
In this example, use the Ameba RTL8722 module connects to a Waveshare 2.9inch e-Paper module to display a few QR codes. The display uses the flexible substrate as a base plate, with an interface and a reference system design.
Firstly, you need to prepare a picture/photo in the format of 296×128 pixels. It is easy to find a photo resizing tool online and download the generated image in JPG format. Then link all hardware and upload code in to the hardware. Upon successfully upload the sample code and press the reset button, you need to wait for around 1~2 seconds for the e-Paper module to fresh its screen. Then the screen will start to display an image for 5 seconds first, then 3 different QR codes will be displayed every 5 seconds (showing in the screenshot below, y may scan the QR codes and find out more information if you wish to). Lastly, a gif in which forms of 3 frames will be displayed for a few seconds.

-
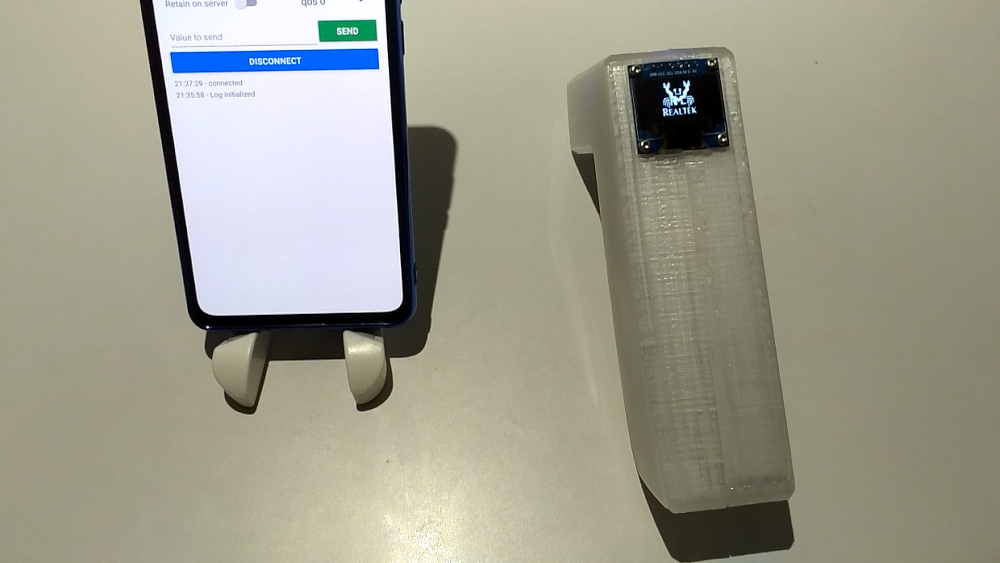
n this project, a WiFi configuration service is set up on the Ameba Bluetooth stack. A mobile phone with the configuration app connects to the Ameba device using BLE and configures the Ameba to connect to the correct WiFi access point.
Realtek WiFi configuration app should be installed on the mobile phone, it is available at:
- Google Play Store: https://play.google.com/store/apps/details?id=com.rtk.btconfig
- Apple App Store: https://apps.apple.com/sg/app/easy-wifi-config/id1194919510Refer to the link for instructions to apply the wifi configuration.
https://www.amebaiot.com/en/amebad-arduino-ble-wifi-configuration/
-
Hi, Guy
I have joined this forum some time. Recently, i have just finished a project development. The project is building CMD line(cli) tools for multiple OS, windows10, linux and macos. I just want to share you guys my experience with the 3 platform. BTW, the RTL8722DM dev from following link is what my project is used for. https://www.amebaiot.com/en/amebad-arduino-getting-started/
Basically, windows is the most convenient platform. It has all kind of tools for compiling c, cpp and c# projects. One things need to be considered. 1, if you use visual studio for c# in windows. the tool you have build is not easy to transfer in to the other platforms. To support a visual studio c# project there a lot of works to do in linux and macos. Additionally, you have to set up the toolchain/compiler properly for windows.
Linux has no issue to compile my project. But lack of development tools and "sudo" sometimes gives you big problem. For, c and cpp development, i suggest that linux is the best and all project is able to transfer to the other platform.
Macos has the most limitations. i am a windows person so using macos to development is a bit trouble for me. And the disc name of macos always has a "space" which is very bad for process command. However, i would say the project made by macos is the most stable and small size one.
To summarize, if you trying to make a multiple platform/OS support project. I would recommend to use c/cpp project and start on linux. Please try not to start with windows, windows is the easiest way, but will gives you troubles when trying to support all 3 platform/OS.

-
A BLE beacon broadcasts its identity to nearby Bluetooth devices, to enable the other devices to determine their location relative to the beacon, and to perform actions based on information broadcast by the beacon.
Example applications of beacons include indoor positioning system, location-based advertising and more.
From the definition of its purpose as a broadcast device, a BLE beacon thus cannot be connected to, and can only send information in its Bluetooth advertisement packets.
There are several BLE beacon protocols. The Ameba BLEBeacon library supports the iBeacon and AltBeacon protocols.

-
BLE connections use a server client model. The server contains the data of interest, while the client connects to the server to read the data. Commonly, a Bluetooth peripheral device acts as a server, while a Bluetooth central device acts as a client. Servers can contain many services, with each service containing a some set of data. Clients can send requests to read or write some data and can also subscribe to notifications so that the server can send data updates to a client.
In this example, a basic battery service is set up on the Ameba Bluetooth stack. A mobile phone is used to connect the the Ameba peripheral device and read the battery data.
GitHub page
https://github.com/Realtek-AmebaApp/Official pages
https://www.amebaiot.com/en/Facebook pages
https://www.facebook.com/groups/AmebaIoT/
-
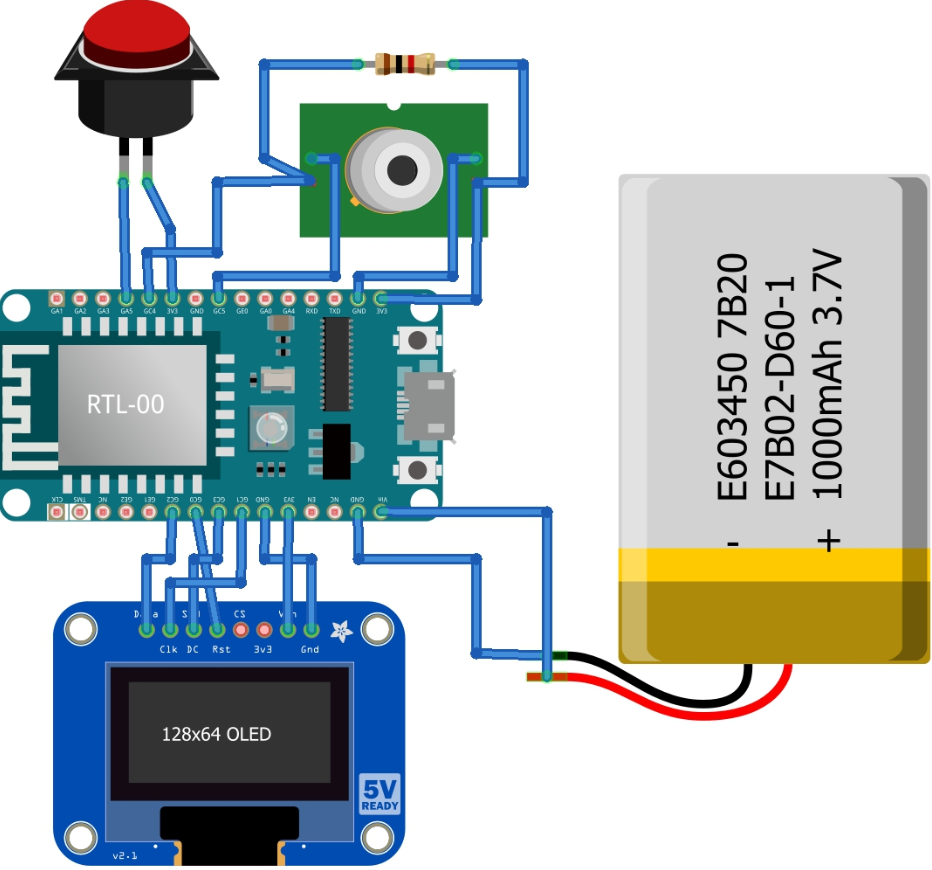
This project use Ameba Dev. board RTL8710AF, which connects to an OLED display to show temperature data obtained from the MLX90615 IR sensor. Pushing the push button not only perform data acquisition and visualization, but also publish the data via MQTT to all subscribers. The casing is using 3D printing all 3D design files will be open source on github page.
GitHub page
https://github.com/Realtek-AmebaApp/Official pages
https://www.amebaiot.com/en/Facebook pages
https://www.facebook.com/groups/AmebaIoT/
-
Realtek's Ameba RTL8195AM supports including IFTTT services in your IoT projects.
If This Then That (IFTTT) is a simple to use cloud service that allow you to set actions that will be performed when certain conditions are met. You can link in other devices and services, such as smart lights and twitter, to automate various actions in the background.
The example code for Ameba uses IFTTT to trigger the sending of an email alerting you that some event happened. You can find the guide and source code at the official website.
https://www.amebaiot.com/en/ifttt-via-ameba/
Facebook group, https://www.facebook.com/groups/AmebaIoT
-
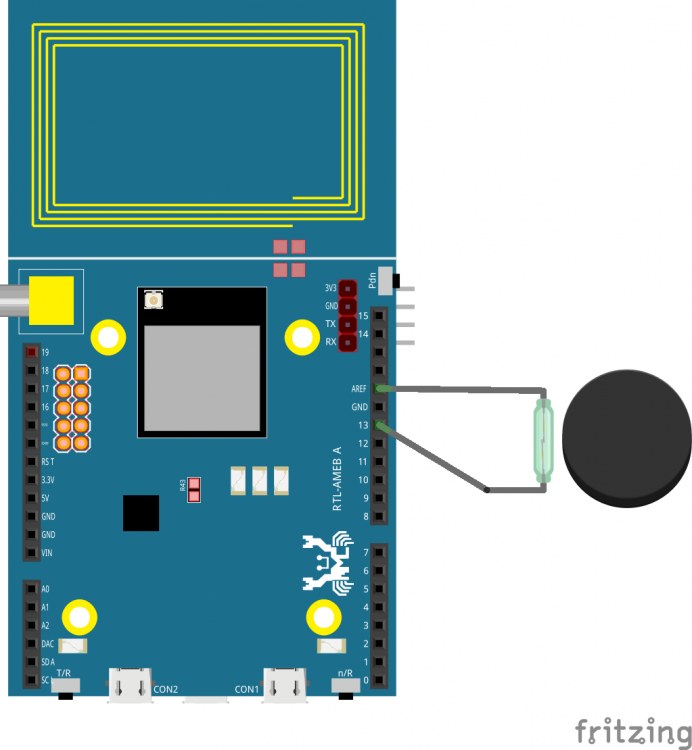
Descriptions
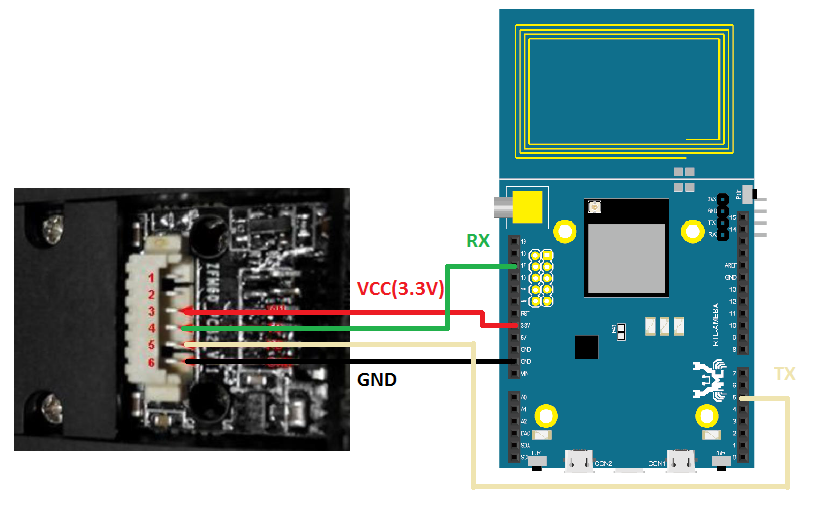
In this example, a fingerprint identification module is used to store fingerprints and identify them. This module uses SYNOCHIP AS606 chip, which can store up to 1000 sets of fingerprints.Step1
Finish up all hardware connections.This module uses UART to communicate with AMEBA. In addition to VCC (3.3V) and GND, and using UART TX and RX lines, we turn the module to the back.
Step2
Download Arduino IDE, install Ameba RTL8195 board.refer to https://www.amebaiot.com/en/ameba-arduino-getting-started/
For the way to install the library, please refer to the teaching article of the Arduino official website to add the zip file library to Ameba:
https://www.arduino.cc/en/Guide/Libraries#toc4
Step3
Testing the system refer to the link: https://www.amebaiot.com/en/fingerprint_module/
Official pageshttps://www.amebaiot.com.cn/en/
Facebook pages
https://www.facebook.com/groups/AmebaIoT/
-
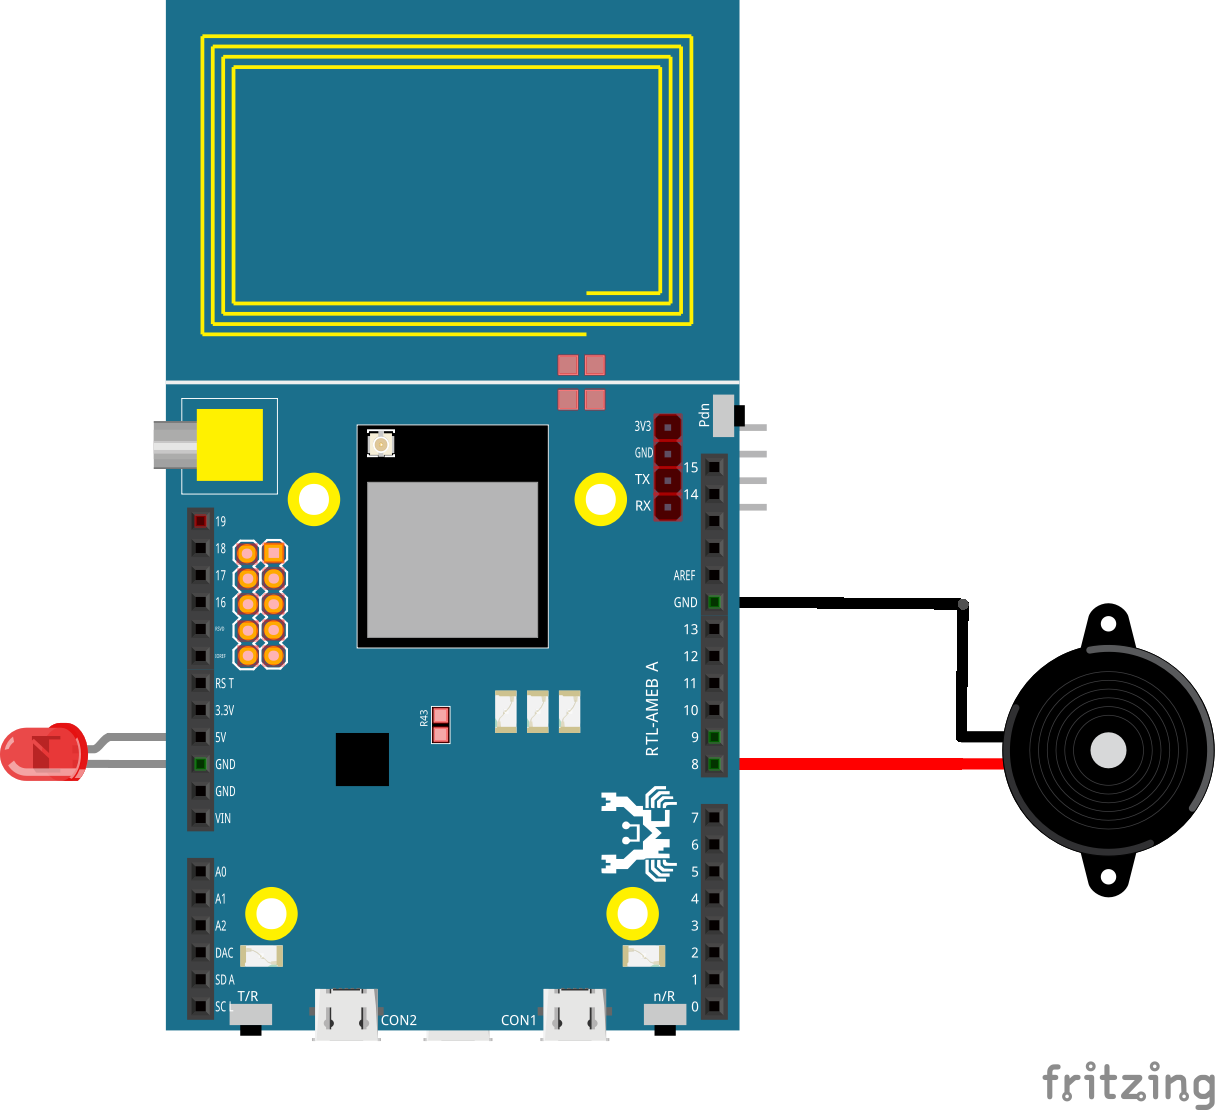
One of the most useful IoT applications is home security. Imagine a thief cutting your security camera wire while trying to break into house. This won’t happen if your security system goes wireless and smart.
This project demonstrates the capability of Realtek Ameba dev. board to conduct board-to-board communication via MQTT (FREE MQTT broker hosted at cloud.amebaiot.com).
With this home security system, you will definitely be alarmed when your window/door is opened by the self-invited as the buzzer will make loud irritating noise while red LED flashes continuously.
GitHub page
https://github.com/Realtek-AmebaApp/Ameba_Examples/tree/master/RTL8195AM/006_HOME_SECURITYOfficial pages
https://www.amebaiot.com.cn/en/
https://www.amebaiot.com/en/Facebook pages
https://www.facebook.com/groups/AmebaIoT/BiliBili channel
https://space.bilibili.com/45777743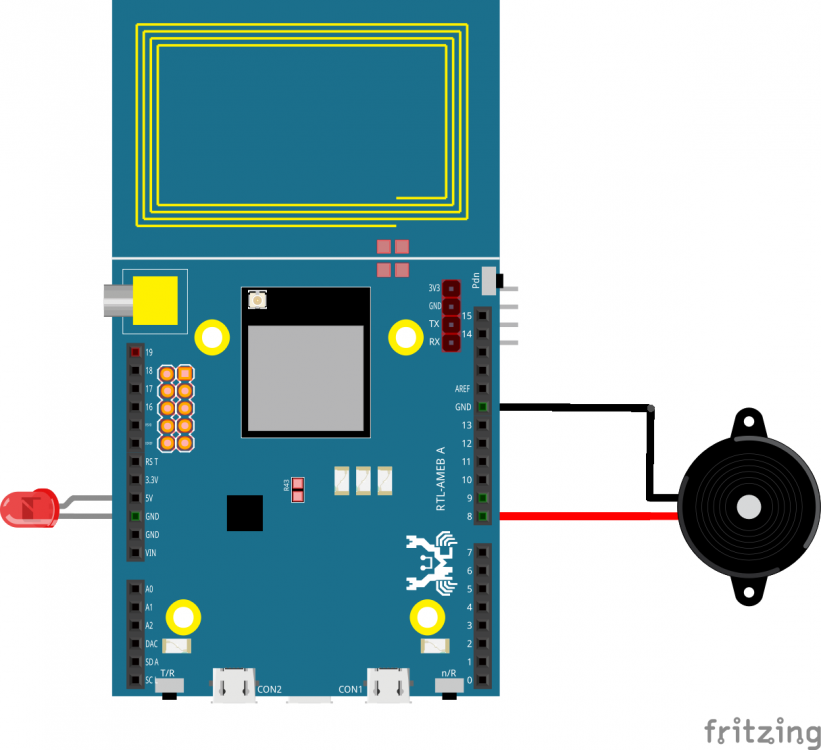
-
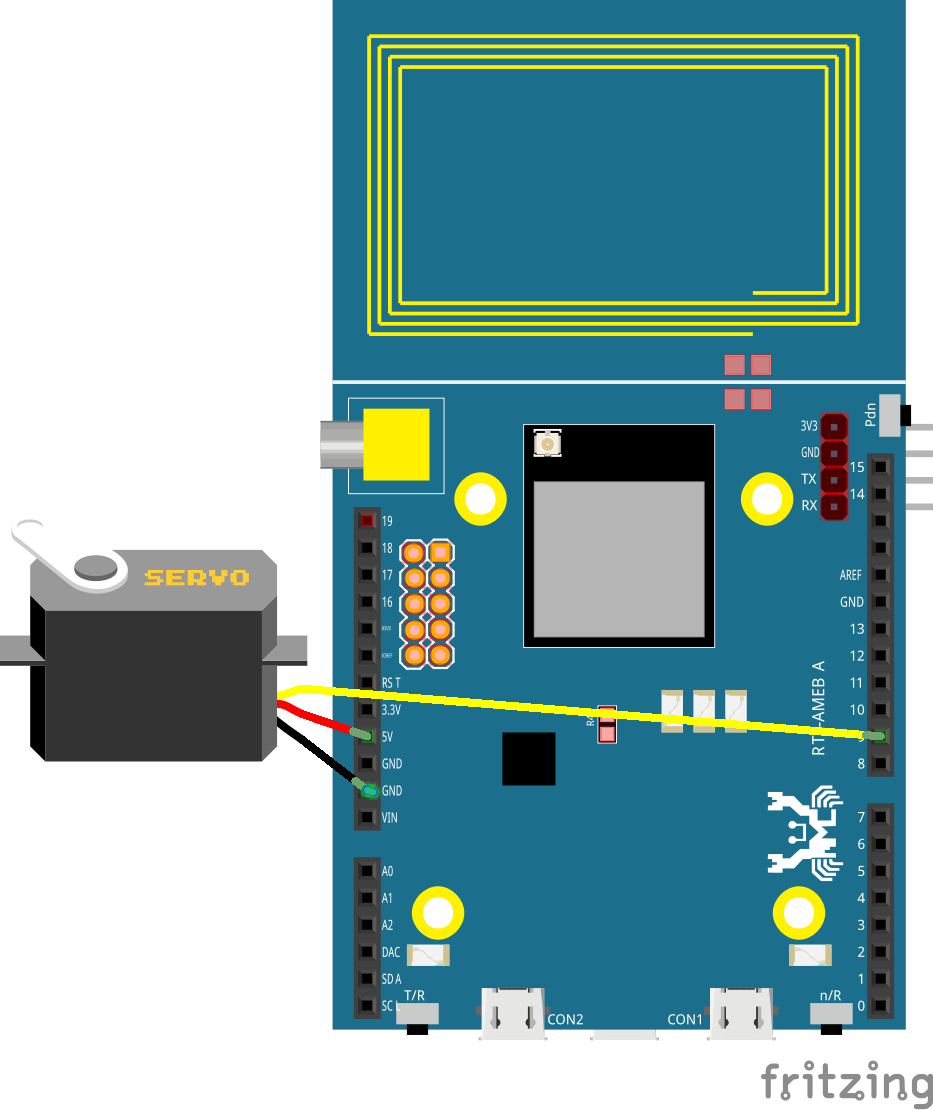
The focus of this project is to demonstrates how easy it is for Ameba Wi-Fi Dev. board to communicate with our smart phone via MQTT protocol. Phone to microcontroller communication used to be very difficult as they use totally different hardware interface and phone get its data mainly through the network. Now with a Wi-Fi enabled microcontroller like Ameba RTL8195AM, communication with our phone becomes a bliss.
Of course, in this video, only a mini window is used for demonstration purpose, but controlling a real window should not be a problem if you simply replace the servo motor with a bigger DC step motor and change the source code accordingly.
With this smart curtain system, you may,
1. Remotely control your curtain to open or close instantaneously
2. Check your curtain status according to the MQTT message received
3. Link with the previous weather station project and automate your room from thereGitHub page
https://github.com/Realtek-AmebaApp/Ameba_Examples/tree/master/RTL8195AM/005_SMART_CURTAINOfficial pages
https://www.amebaiot.com.cn/en/
https://www.amebaiot.com/en/Facebook pages
https://www.facebook.com/groups/AmebaIoT/BiliBili channel
https://space.bilibili.com/45777743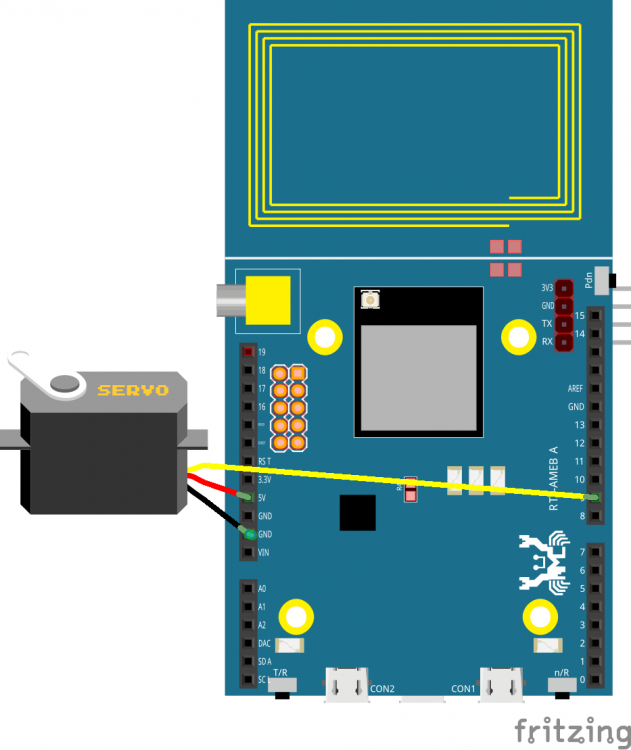
-
The project demonstrates how an IoT device (Ameba RTL8195) is applied in real-life scenarios. If you have watched previous demo videos, you should have no problem understanding how an LCD display, a DHT Temperature Humidity sensor and our Ameba RTL8195. It can be put together to form a fully functional smart weather station. Simply follow the instructions in our examples as follows to DIY your own weather station,
1. LCD 24H Clock
2. MQTT
3. DHT+MQTT
The key to integrate these 3 examples successfully is to make sure that you have set up your MQTT server correctly and note that here we are using a different set of MQTT topics, namely “dht_data” and “dht_status”. Also, when connect DHT sensor, D13 pin is used as data input pin.
GitHub page
https://github.com/Realtek-AmebaApp/Ameba_Examples/tree/master/RTL8195AM/004_WEATHER_STATIONOfficial pages
https://www.amebaiot.com.cn/en/
https://www.amebaiot.com/en/Facebook pages
https://www.facebook.com/groups/AmebaIoT/BiliBili channel
https://space.bilibili.com/45777743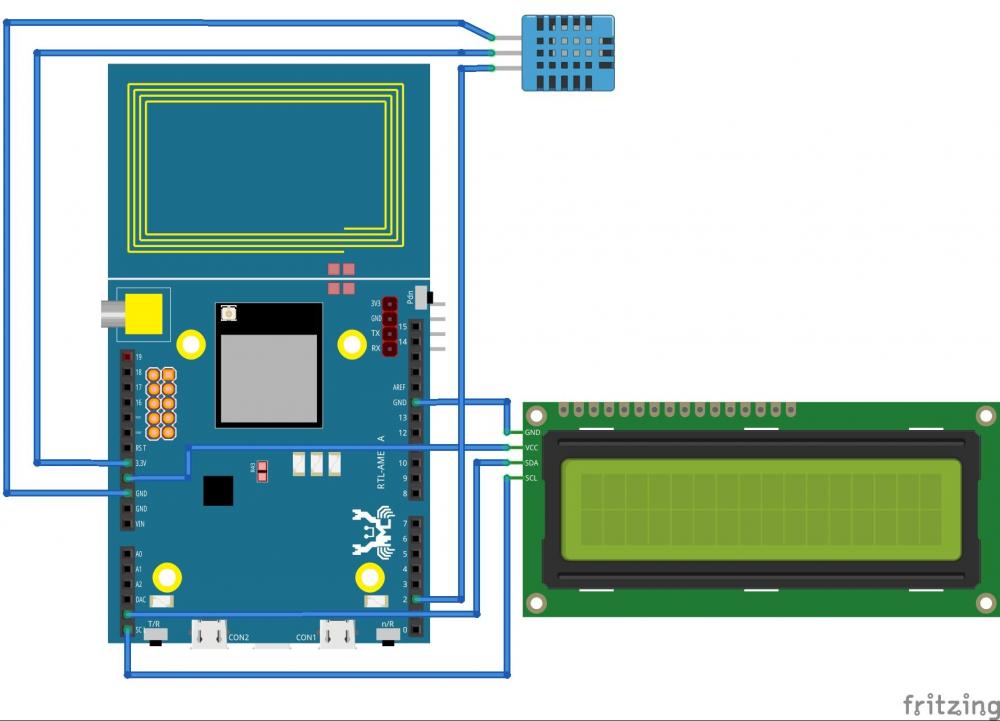
-
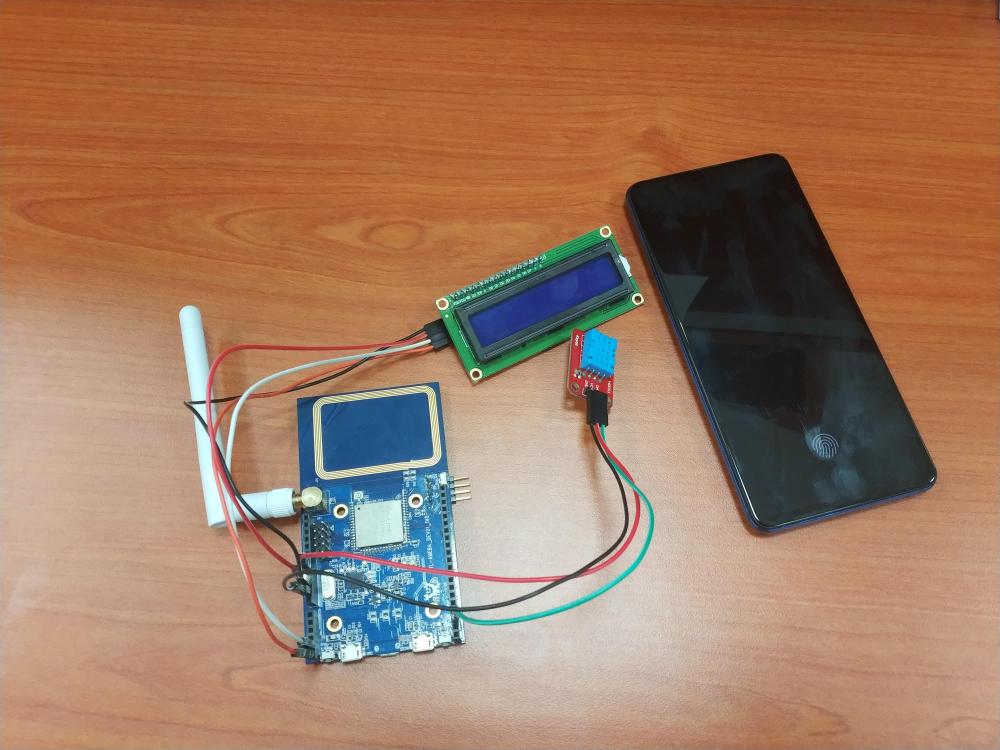
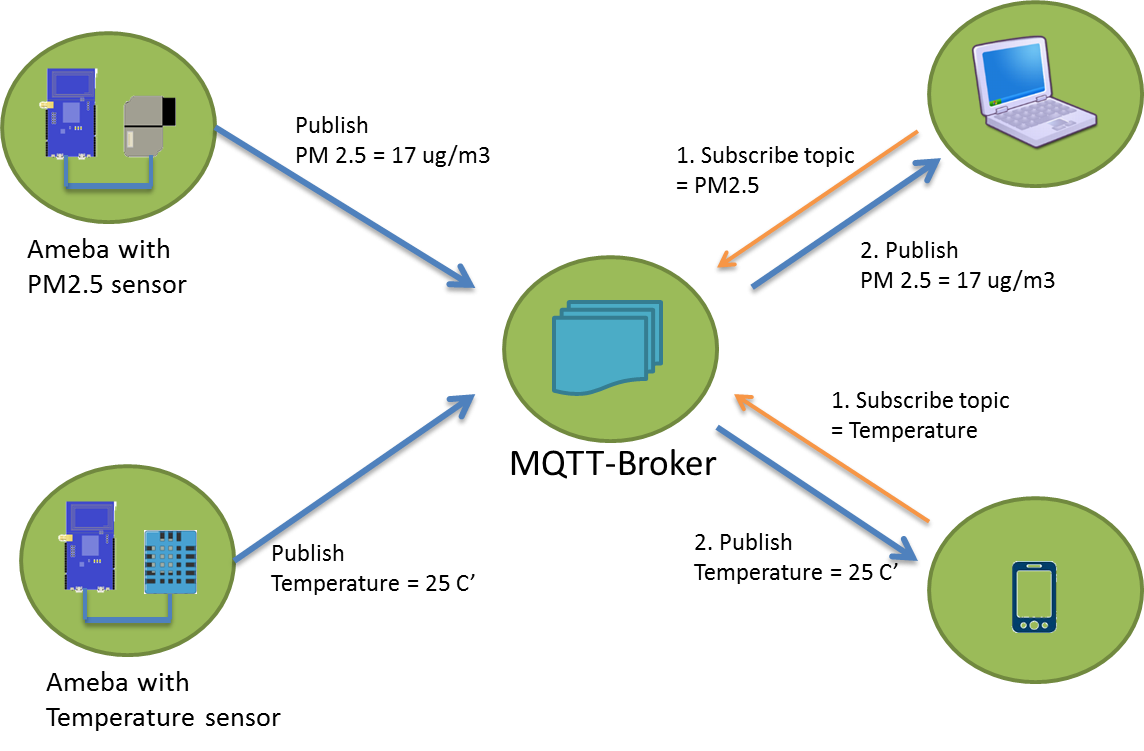
Temperature and humidity are 2 of the most important factors affecting people’s comfort level in an enclosed space.
The DHT humidity and temperature sensor can read the ambient temperature and humidity every 2-3 seconds, and then pass the data to Ameba who will forward them to the server using MQTT protocol. Whoever “subscribing” to the right topic gets the data almost instantaneously. Users can then adjust the aircon mode or temperature according to the readings received.
An android phone was used as an MQTT client and the Ameba RTL8195 Dev. Board acted as another MQTT client communicating with the android phone. Both clients have to connect to the same MQTT server before proceeding to the next step.
The DHT sensor updates its data every 10 seconds to stay as accurate as possible. Once sensor data is received, Ameba then “publishes” the data to the MQTT server where all clients “subscribing” to the right topic gets the data displayed on the console.GitHub page
https://github.com/Realtek-AmebaApp/Ameba_Examples/tree/master/RTL8195AM/003_DHT_MQTT
Official pages
https://www.amebaiot.com.cn/en/
https://www.amebaiot.com/en/
Facebook pages
https://www.facebook.com/groups/AmebaIoT/
https://www.facebook.com/groups/AmebaIoTWW/
BiliBili channel
https://space.bilibili.com/45777743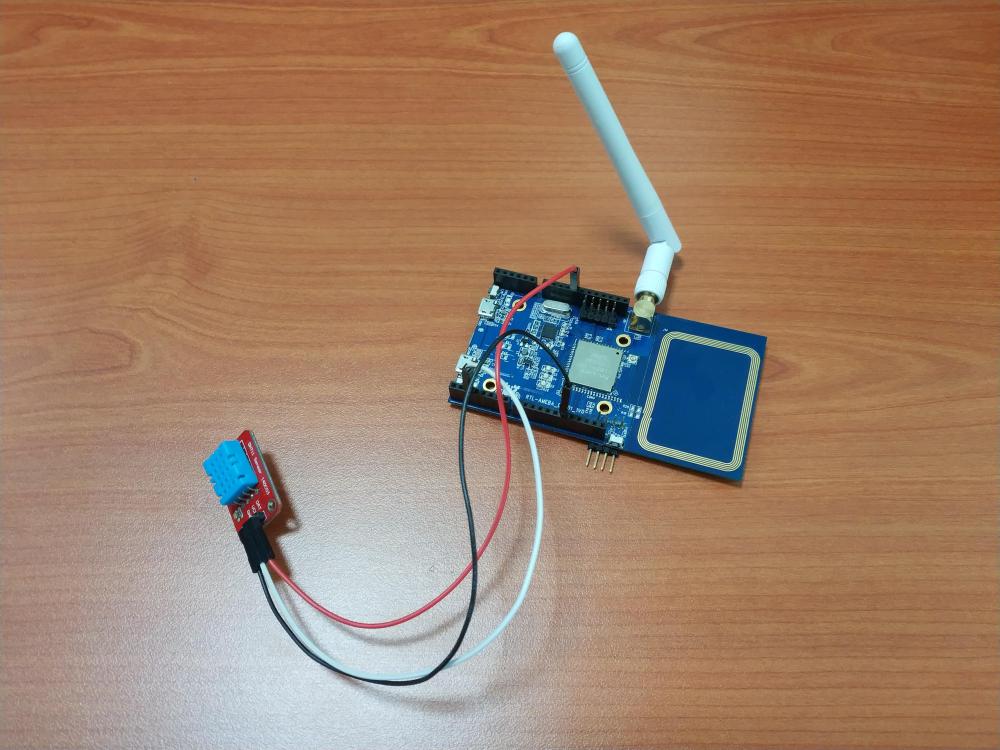
-
This is a simple IoT project based on the “mqtt basic” example that comes with the Arduino package when you install the RTL8195 on Arduino IDE. In this project, simple passive components are used to aid in demonstrating the power of bidirectional communication of MQTT protocol which is widely used in modern IoT applications for its advantages in speedy response and lightweight.
In the video, an android tablet was used as a MQTT client and our Ameba RTL8195. Board acted as another MQTT client communicating with the android tablet. Both client have to connect to the same MQTT server before proceeding to the next step, you may choose to set up own MQTT server or using an online free server.
Please refer to the video link,
GitHub source code,
Official pages

-
Hi, I would to share what i found recently. The AmebaIoT RTL8195 board. Looks like it is a very powerful board for IoT and WiFi related projects. I am going to dig more about it and sharing more myself DIY projects with you guys. Hope you guys can give me some technical suggestions about my project.
Please refer to the video link,
This video is a small embedded project named “LCD 24H Clock” featuring RealtekTM Ameba RTL8195 development board as the microcontroller. The Ameba board is pre-programmed with code written in Arduino IDE and connects to the LCD screen via I2C protocol. The 24H clock is capable of displaying hour, minute and second on the LCD screen and counting up to 24 hours. It will reset itself after time has passed longer than 24 hours.
GitHub source codes,
AmebaIoT Official pages,
YouTube & BiliBili channel,


Display Images on E-Paper RTL8722
in Electronic Projects Design/Ideas
Posted
ok there is a new project using Eink and Realtek Ameba IoT board. It is a IR remote control looks pretty cool.
https://hackaday.io/project/178252-universal-ir-remote-controller