Search the Community
Showing results for tags 'arduino'.
-
Realtek's ameba dev. board is capable of USB OTG and SDIO thus making it possible to take photo with a UVC camera and store it in a SD card via SDIO. Here, combining these 2 function, one can easily create a Time Lapse Photography with merely an arduino size MCU. Here is a tutorial about it, Preparation Ameba x 1 SD card or MicroSD card x 1 SD sniffer x 1 (optional) Logitech C170 web cam x 1 Micro USB OTG adapter x 1 Example In this example, we use UVC to take photos and save to SD card at regular time, which is similar to time lapse photography. Open the sample code in "File" -> "Examples" -> "AmebaSdFatFs" -> "time_lapse_photography" In the sample code, we start the UVC at first, then initialize SD FAT FS. In loop(), use UVC to capture photo every three seconds, and the captured photos are numbered in 0001.jpeg, 0002.jpeg, 0003.jpeg, ... There are some tools to turn these photos to a video. We use ffmpeg here: https://ffmpeg.org/ In Windows OS environment, type the command in the directory of all UVC photos: ffmpeg -framerate 30 -i %04d.jpeg -vf fps=30 -pix_fmt yuv420p output.mp4 The explanation of the arguments in the command: -framrate: By specifying this argument, you tell ffmpeg to use the time handled by framerate to be the timeline. Here we use 30, which means in 30 photos are displayed per second. -i: use this argument to specify input file name. We use "%04d.jpeg" to tell ffmpeg to read the files from 0000.jpeg, 0001.jpeg, 0002.jpeg, ... fps: the framerate of output video, we use 30 frames per second here. The last argument is the output file name. Demo video: Code reference The sample code is comprised of two parts: use UVC to capture photo, and write file to SD card. The UVC part please refer to previous "UVC – Use UVC To Send Image" example. And SD part please refer tp the "SDIO – Edit Files In SD Card" example
-
LoRa is a low-power wide-area network protocol developed by Semtech. It has a typical range of 10KM at low power consumption which is ideal in some IoT applicaitons. Using LoRa on Realtek's Ameba Dev. board is very easy, here is a tutorial about it, Materials Ameba x 1 Dragino LoRa Shield x 2 Example Dragino Lora Shield is a long range transceiver and based on Open source library. It allows the user to send data and reach extremely long ranges at low data-rates.It provides ultra-long range spread spectrum communication and high interference immunity whilst minimising current consumption. Due to different frequency regulations on each country, please notice the frquency LoRa Shield used when you purchase it. Download the LoRa Library: https://github.com/ambiot/amb1_arduino/raw/master/Arduino_libraries/AmebaLoRa.zip Refer to the documentation on Arduino website to install library and add the .zip file to Ameba: https://www.arduino.cc/en/Guide/Libraries#toc4 Dragino LoRa Shield SPI example wiring explanation: Dragino LoRa Shield can be embedded on Ameba board directly, but the Ameba CS pin is different to the standard SPI protocol. Therefore, Dragino LoRa Shield CS pin cannot connect to Ameba CS pin directly. Modify and pull the CS pin which is pin 10 toward inside and connect to pin 0 with dupont line on Dragino LoRa Shield. The example is shown below: Dragino LoRa Shield SPI Data is produced from ICSP SPI BUS, then connect to AMEBA SPI pin as follows: Below is the RTL8710 Wiring Diagram: Example Illustration This example uses send and receive code to do the functional verification for two Dragino LoRa Shield. One is for sender and another one is fr receiver. Open “File” -> “Examples” -> “AmebaLoRa” -> “LoRaSender” and LoRaReceiverCallback. Compile them separately and upload to Ameba, push the Reset button. Then you can see the results on the terminal:
-

arduino Using Fingerprint Sensor on MCU -- Ameba Arduino
MENG XI posted a topic in Electronic Gadgets
Lack of security consideration is always debated in DIY projects, but now with Ameba Arduino-- an ARM Cortex M3 based WiFi microcontroller, you can add fingerprint sensor to your personal DIY project and boost its security. Here is a demo Preparation Ameba x 1 AS606 fingerprint identification module x 1 Example In this example, a fingerprint identification module is used to store fingerprints and identify them. This module uses SYNOCHIP AS606 chip, which can store up to 1000 sets of fingerprints. The libraries we need are: https://github.com/ambiot/amb1_arduino/raw/master/Arduino_libraries/AmebaFingerprint.zip For the way to install the library, please refer to the teaching article of the Arduino official website to add the zip file library to Ameba: https://www.arduino.cc/en/Guide/Libraries#toc4 This module uses UART to communicate with AMEBA. In addition to VCC (3.3V) and GND, and using UART TX and RX lines, we turn the module to the back. The RTL8195 example wiring is as follows: The RTL8710 example wiring is as follows: We open the example "File" -> "Examples" -> "AmebaFingerprint" -> "enroll", compile and upload to Ameba and press the Reset button. At this point, open the terminal and you should see the fingerprint identification module message: Then follow the message at the console prompt, we type a letter 'a’ on the keyboard. The console prints the "waiting for valid finger to enroll" message, and you can place your finger on the module window. If the module has correctly collected the fingerprint, then it will ask to remove the fingerprint and then place the same finger on the window. If the fingerprint is collected correctly, the console will mention printfs matched and store the fingerprint. Then you can try to collect more fingerprints from different fingers. Then we have to test whether the fingerprint identification module can successfully identify the fingerprint that has just been stored. We open the example "File" -> "Examples" -> "AmebaFingerprint" -> "fingerprint", compile and upload to Ameba and press Reset button, open the terminal at this time, you should see the message that can find the fingerprint identification module: And the prompt is waiting for the verification fingerprint, at this time, place the same finger just sampled in the fingerprint recognition window. The Console will display the message "Found ID #x with confidence of xx", which means the identification is successful. -
Ameba RTL8195AM has onboard NFC tag and run on ARM Cortex-M3 core with WiFi, just nice to make use of all these 3 powerful tool to make an useful applicaiton. Many models of Android smart phone support NFC feature, and numerous of NFC applications are developed for inspection and modification of NFC Tag. In this example, we establish NFC connection between Ameba and a smartphone, and open a webpage on the smartphone via a NFC event. Preparation Ameba x 1 Smartphone with NFC feature x 1 Note: Make sure the onboard NFC antenna is safely connected to the module. Then open the example, "File" -> "Examples" -> "AmebaNFC" -> "UriWebPage" and upload, you will see this message when you tap your NFC-enabled phone on Ameba For more details, refer to the offical website at https://www.amebaiot.com/en/ameba-arduino-nfc-open-web/ Also feel free to join the Facebook group to discuss with other makers! https://www.facebook.com/groups/AmebaIoT
-
With COVID-19 still wreaking havoc globally, causing thousands of deaths, millions hospitalized, any useful medical device is on high demand, especially household medical device like IR non-contact thermometer. Handheld thermometer usually is on high price point and is hard to come by these days, but the components needed to make thermometer are not that expensive, that give us the perfect reason to DIY one during this lockdown period. This ThermoGun project use Ameba Dev. board RTL8710AF from Realtek, which connects to an OLED display to show temperature data obtained from the MLX90615 IR sensor. Pushing the push button not only perform data acquisition and visualization, but also publish the data via MQTT to all subscribers. Note: The MQTT service used in this project is a FREE MQTT broker hosted at cloud.amebaiot.com, which need to register at www.amebaiot.com . Details of registration is at the link below, https://www.amebaiot.com/en/cloud-getting-started/ For details of step-by-step guide and connections, please refer to Github page here, https://github.com/Realtek-AmebaApp/Ameba_Examples/tree/master/RTL8195AM/007_THERMOGUN Demo Video: https://youtu.be/Yl3arBRmyYI
-
Hello.Looking for information on the fastest arduino infrared temperature sensor.If there are sensors out there that can sense between 100 and 300 ms,sensors don't have to be arduino,but there must be ready made interface boards and compatible software.Any assistance will be greatly appreciated. Thank you Regards Arthur
-
Accessing internet service is an easy job for a smart device like an android phone, tablet or a PC, but not so easy on microcontrollers since it usually requires better connectivity and processing power. However, we may offload the heavy part of the job to IFTTT to help us accomplish a great variety of internet service with ease. This tutorial will show you how to make use of IFTTT to do just that. Introduction to IFTTT IFTTT, known as If This Then That, is a website and mobile app and free web-based service to create the applets, or the chains of simple conditional statements. The applet is triggered by changes that occur within other web services such as Gmail, Facebook, Telegram, Instagram, Pinterest etc. Preparation Ameba x 1 An account from https://ifttt.com/ , in order to access IFTTT service* For detailed step-by-step guide, you may refer to link below, https://www.amebaiot.com/en/ifttt-via-ameba/
-
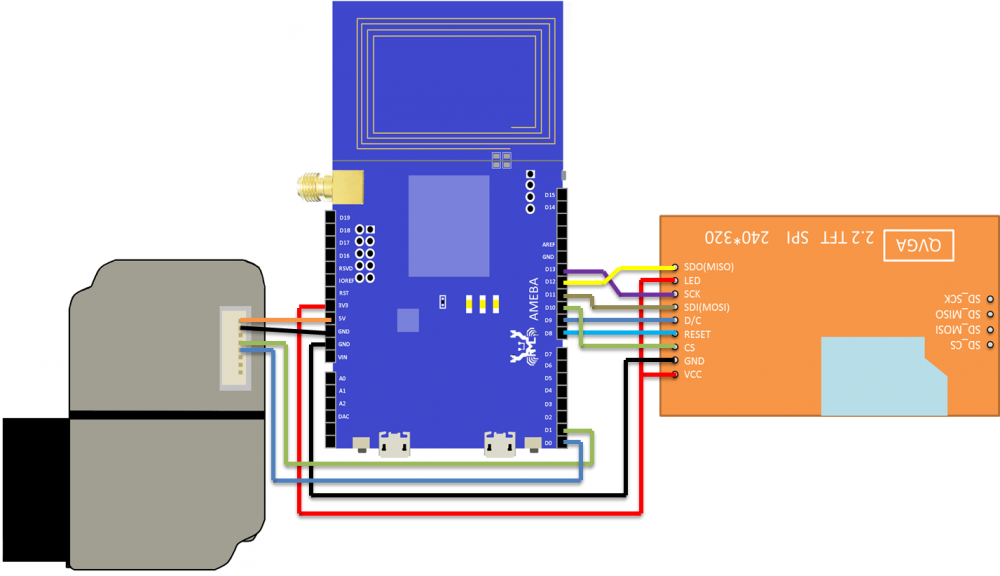
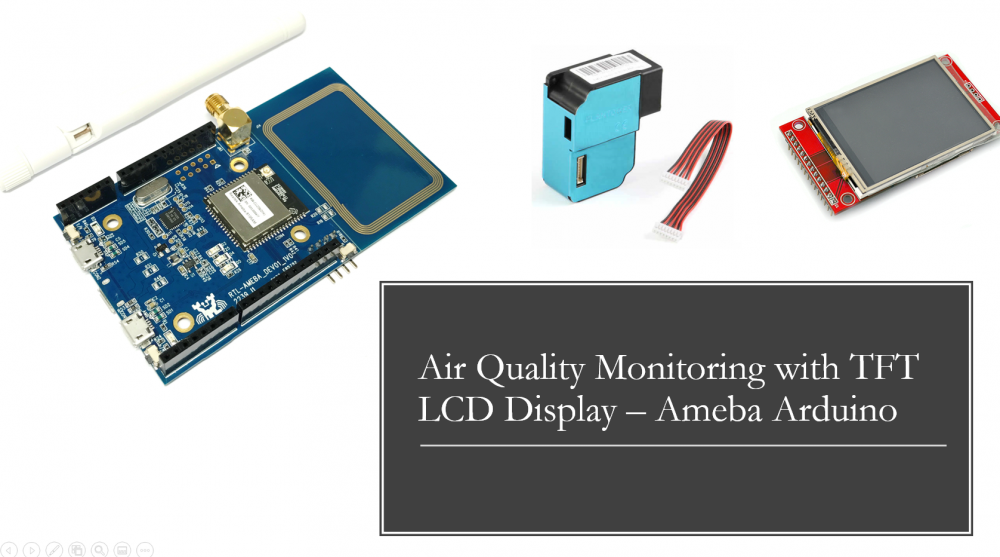
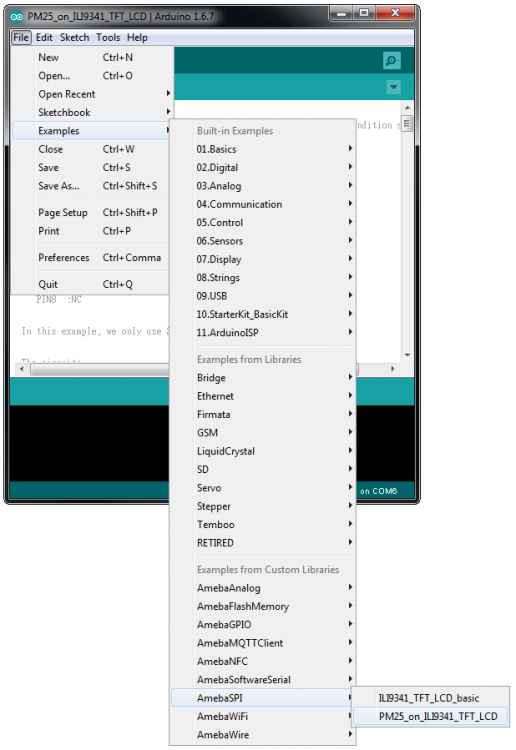
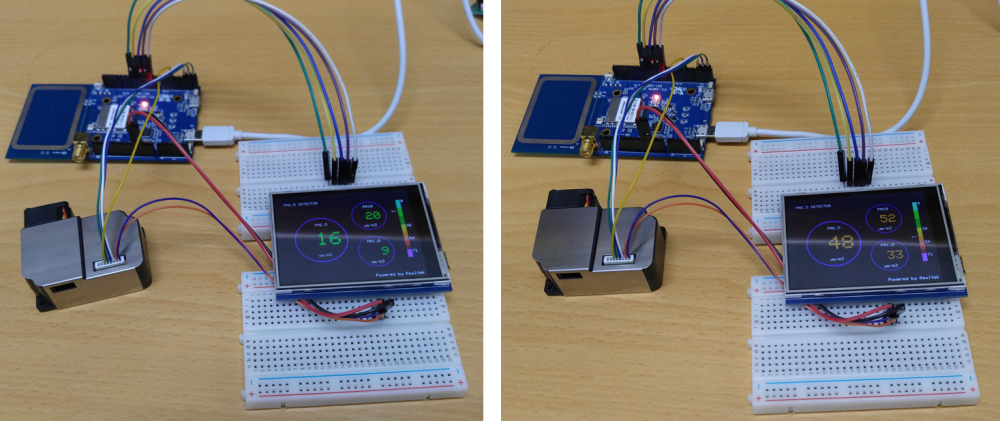
Now that most people stay at home to avoid close contact with potential COVID-19 virus carrier, air quality becomes an important factor to people’s well-being, especially in tropical countries where using air-con is a must during the day, as prolonged use of air-con may do more bad than good to people’s respiration system thus weakening our immunity and make people more susceptible to virus infection. Here I am going to show you how to make a simple yet powerful air quality monitoring system using Realtek Ameba RTL8195AM development board and PM2.5 module, together with a TFT LCD display to create a colourful interface. Preparation § Ameba x 1 § ILI9341 TFT LCD with SPI interface x 1 § Plantower PMS3003 or PMS5003 x 1 Example This example extends previous PM2.5 example to show the PM2.5 concentration on the LCD. Wiring of QVGA TFT LCD: (Note: PMS3003/PMS5003 sensor requires 5V voltage) Open the example, "Files" -> "Examples" -> "AmebaSPI" -> "PM25_on_ILI9341_TFT_LCD" Compile and upload to Ameba, then press the reset button. Then you can see the concentration value of PM1.0, PM2.5 and PM10 on the LCD. Code Reference In this example, first rotate the screen by 90 degrees, and draw the static components such as the circles, the measuring scale and the title text. After the concentration value is detected, it is printed inside the circle. To know more about the details, click the link below, https://www.amebaiot.com/en/ameba-arduino-spi-lcd-pm2-5/
-
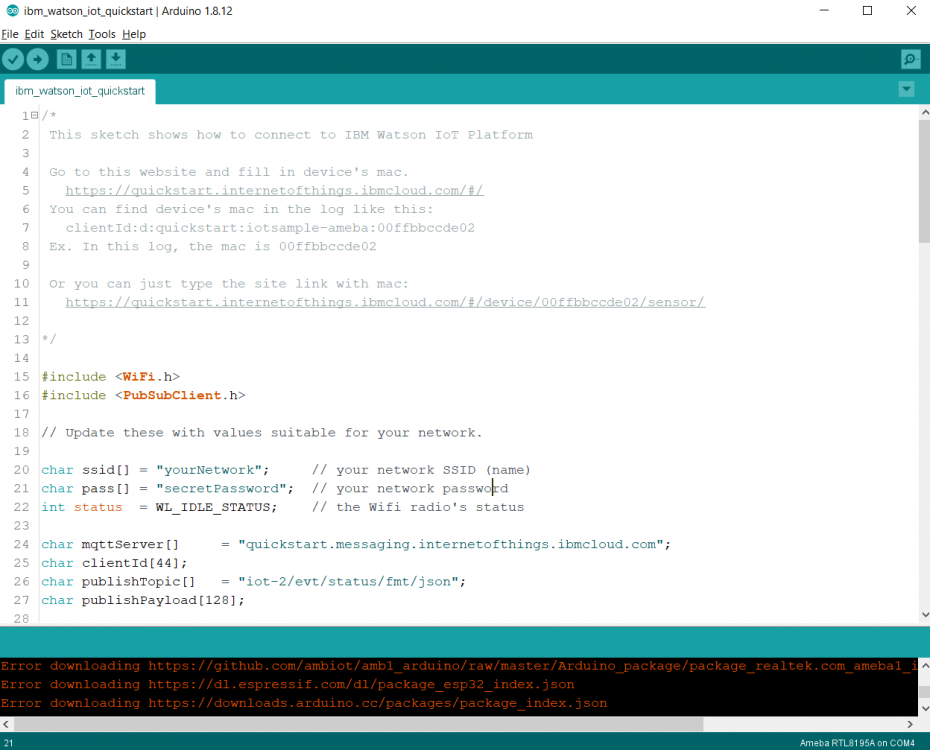
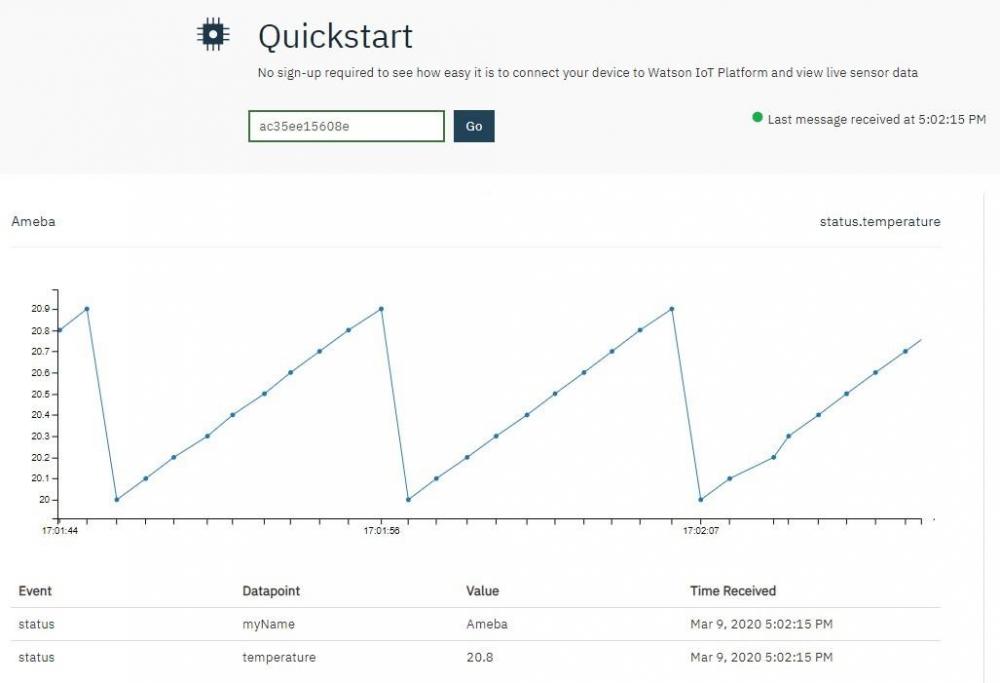
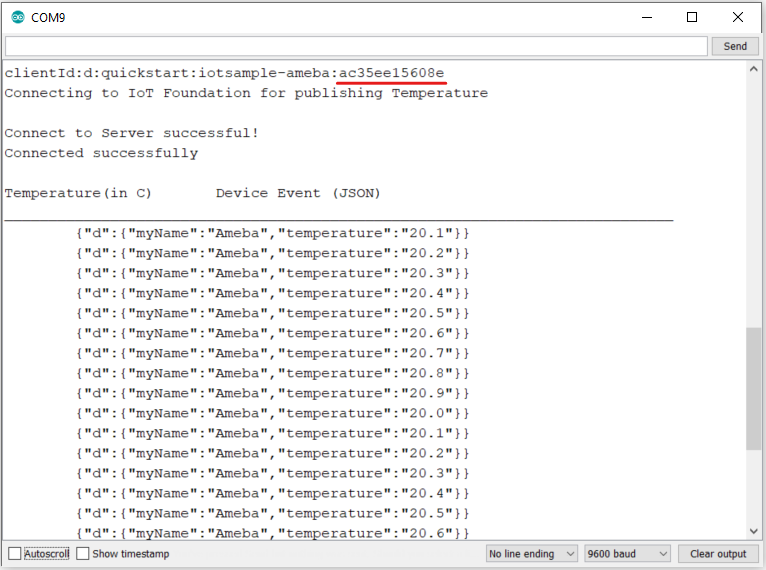
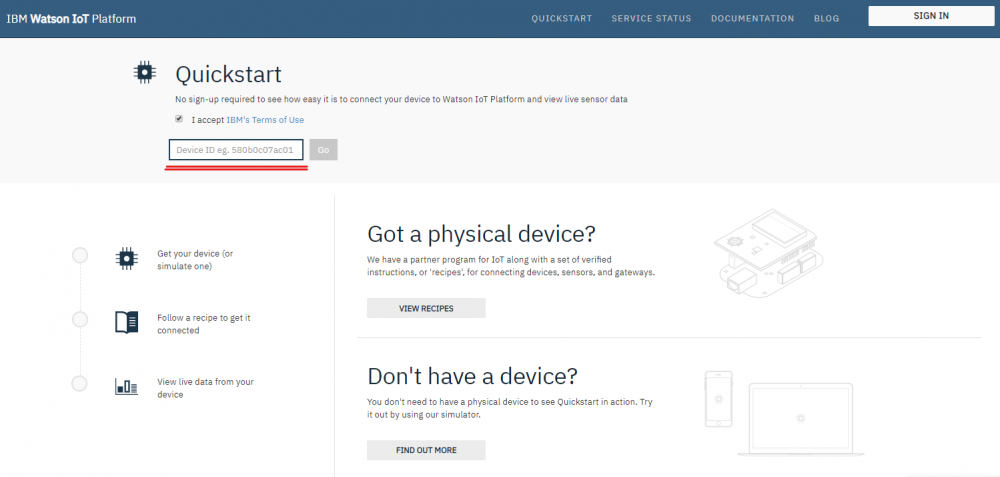
MQTT (Message Queuing Telemetry Transport) is a protocol proposed by IBM and Eurotech. IBM® Watson™ IoT Platform is, by the official definition, “A foundational cloud offering that can connect and control IoT sensors, appliances, homes, and industries. Built on IBM Cloud, Watson IoT Platform provides an extensive set of built-in and add-on tools. Use these tools to process IoT data with real-time and historical analytics, extract key performance indicators (KPIs) from your data, add “smarts” in the cloud for non-smart products, and securely connect your own apps and existing tools to the Watson IoT Platform infrastructure.” (IBM, 2020) This platform provides easy web interface to register, connect and visualize our IOT devices. For quick start and simple try-out, registration is not necessary, we may just run our program to get the device ID needed for this platform. Preparation § Ameba x 1 Example In this example, we will take a look at how to make use of IBM Watson IOT platform for out IOT project. Open the MQTT example “File” -> “Examples” -> “AmebaMQTTClient” -> “ibm_watson_iot_quickstart” Make sure the Wi-Fi information is properly filled in and we are ready to upload the code to ameba. Once uploading finished, open a serial monitor and we shall see information as follows, Important: Please take note of the string of characters on the first line of the picture above -- “clientId:quickstart:iotsample-ameba:ac35ee15608e” “ac35ee15608e” is the device ID as well as the MAC address of the ameba board used here which will NOT be the same for other cases, so make sure to copy down the device ID displayed on your serial monitor. Next, we click the IBM IOT platform link provided here and open our browser: https://quickstart.internetofthings.ibmcloud.com/#/ Paste the device ID we just copied into the box highlighted below, If the device ID keyed in is correct, some fake temperature data that our ameba published will be visualized like this, Done! Now you have FREE and working IOT cloud platform to help you visualize your IOT data in realtime~
-
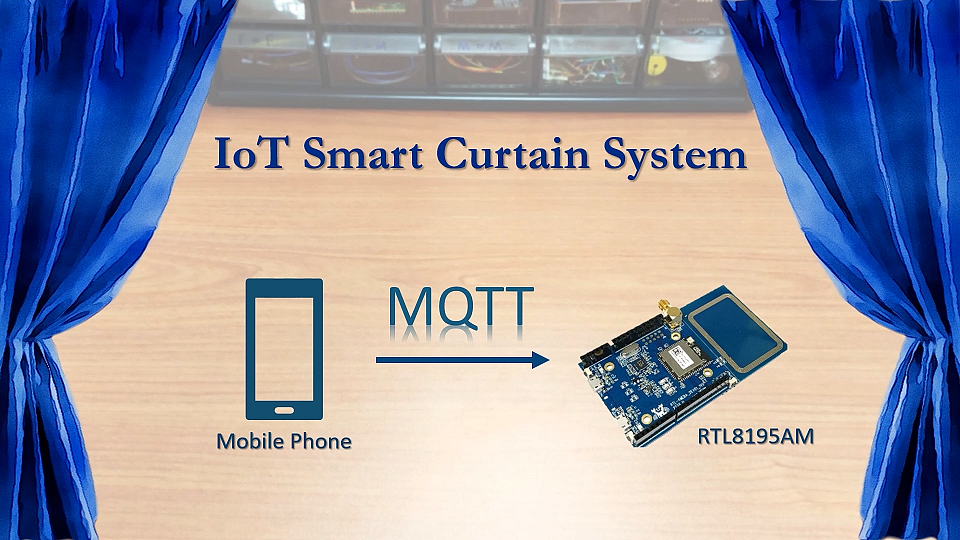
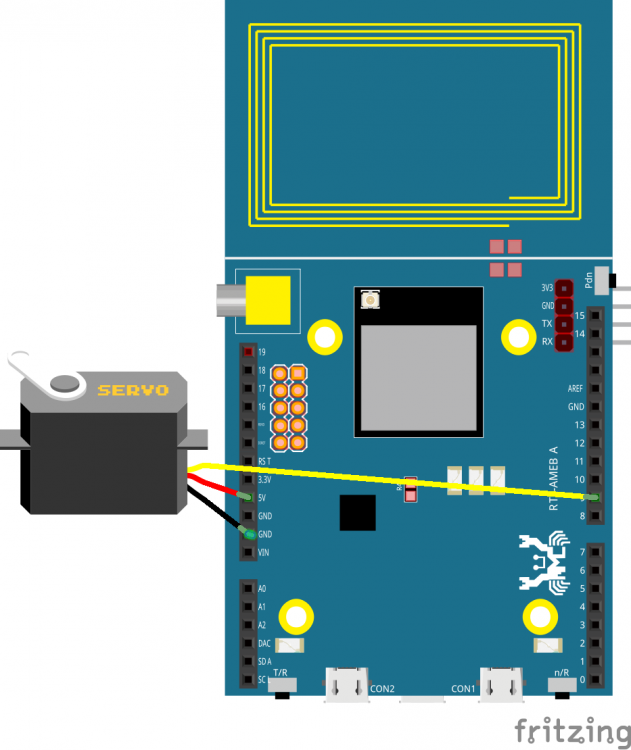
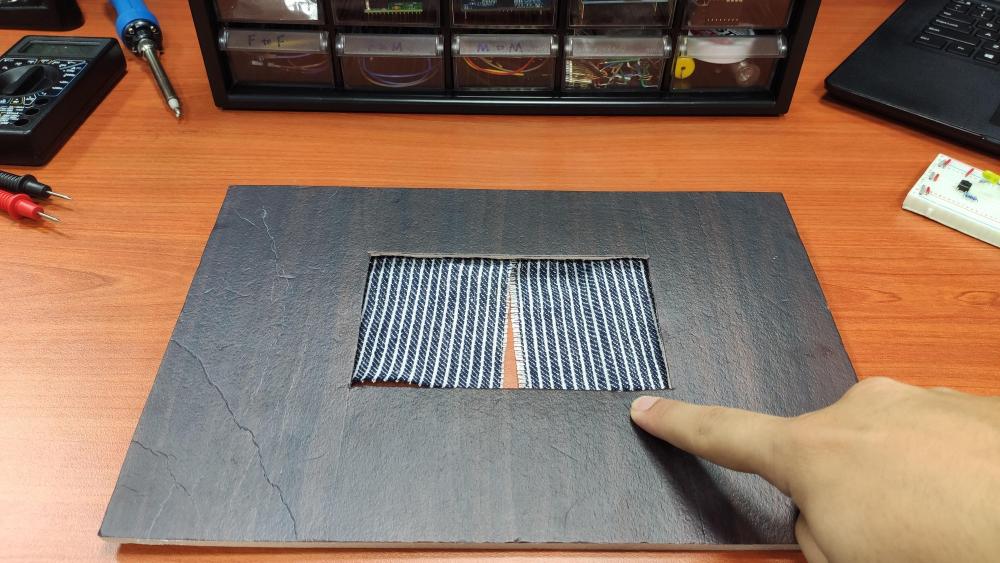
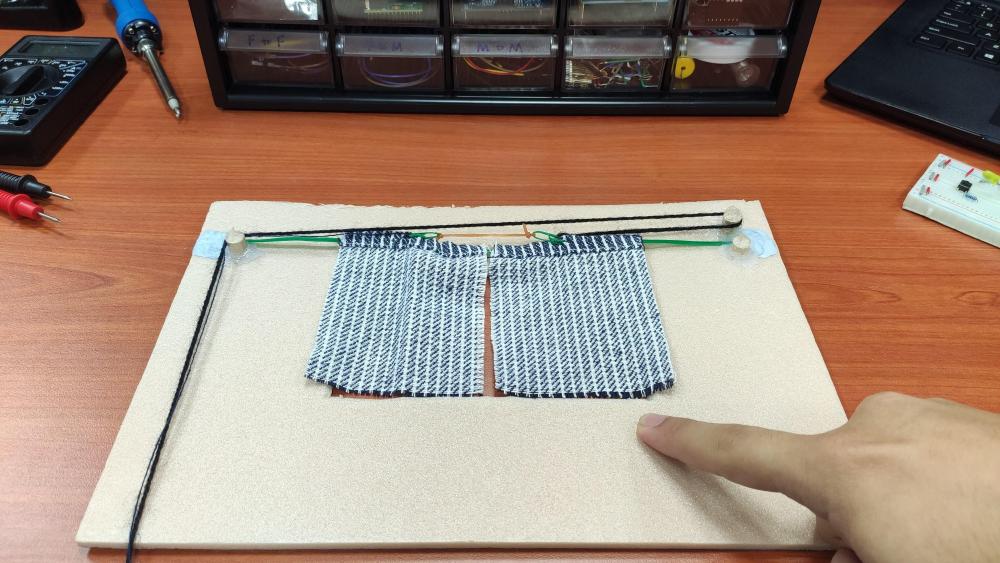
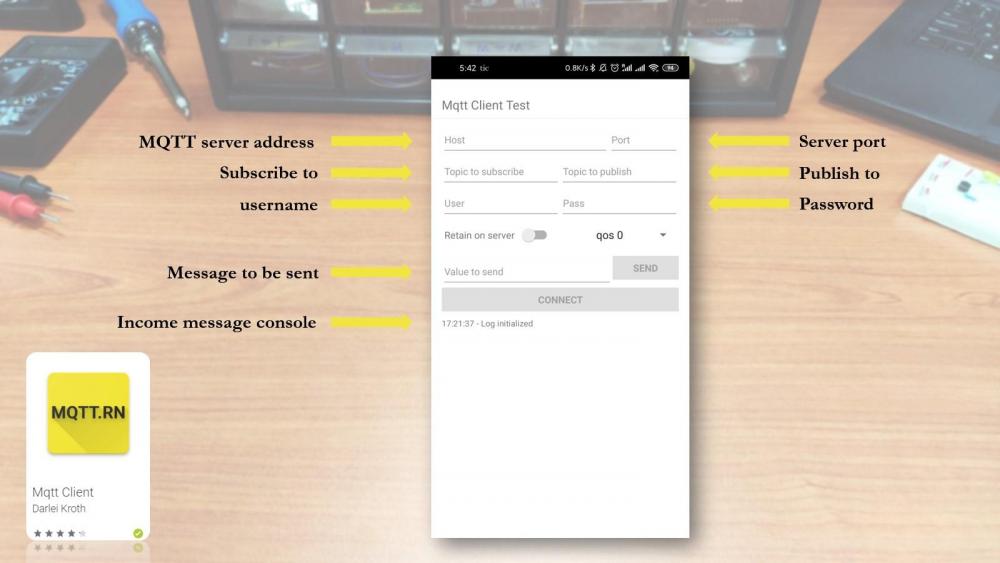
This project is the second one in the new IOT project series on Ameba RTL8195AM Dev. Board. The focus of this project is to demonstrates how easy it is for Ameba Wi-Fi Dev. board to communicate with our smart phone via MQTT protocol. Phone to microcontroller communication used to be very difficult as they use totally different hardware interface and phone get its data mainly through the network. Now with a Wi-Fi enabled microcontroller like Ameba RTL8195AM, communication with our phone becomes a bliss. Of course, in this project, only a mini hand-crafted window is used for demonstration purpose but controlling a real window should not be a problem if you simply replace the servo motor with a bigger DC step motor and change the source code accordingly. With this smart curtain system, you may, 1. Remotely control your curtain to open or close instantaneously 2. Check your curtain status according to the MQTT message received 3. Link with the previous weather station project and automate your room from there Hardware List of hardware needed Ameba 1 RTL8195AM x1 Servo motor x1 Jumper wires x3 DIY materials x3 Hardware connection is shown below, for the window, you may use a Lego house as substitute or simply build one using plywood or hard form board, the exact structure can also be found in this folder. Software 1. Check and make sure you have installed the ameba 1 board to Arduino IDE via adding this link into “additional boards manager URLs” under “Preference”, and install it in “board manager” under “Tools”, https://github.com/ambiot/amb1_arduino/raw/master/Arduino_package/package_realtek.com_ameba1_index.json 2. Upload source code to your Ameba1 RTL8195 board using arduino IDE 3. Install a MQTT client App on your smart device (android/iOS) a) To use a MQTT service, you must first get a free MQTT server address b) Go to www.amebaiot.com and register for a user c) Then go to cloud service tab and register your device d) Once approved, the same username and password used for registration can be used to make use of the MQTT service for free 4. Connect to your MQTT server by keying in the correct server address, port number, username and password • For Host name: cloud.amebaiot.com • For Port number: 1883 • For username: same as your amebaiot.com username • For password: same as your amebaiot.com password 5. Key in the topics that you specified in the code, always remember to swap the publish topic and subscribe topic when you want to monitor your microcontroller’s published data.
-
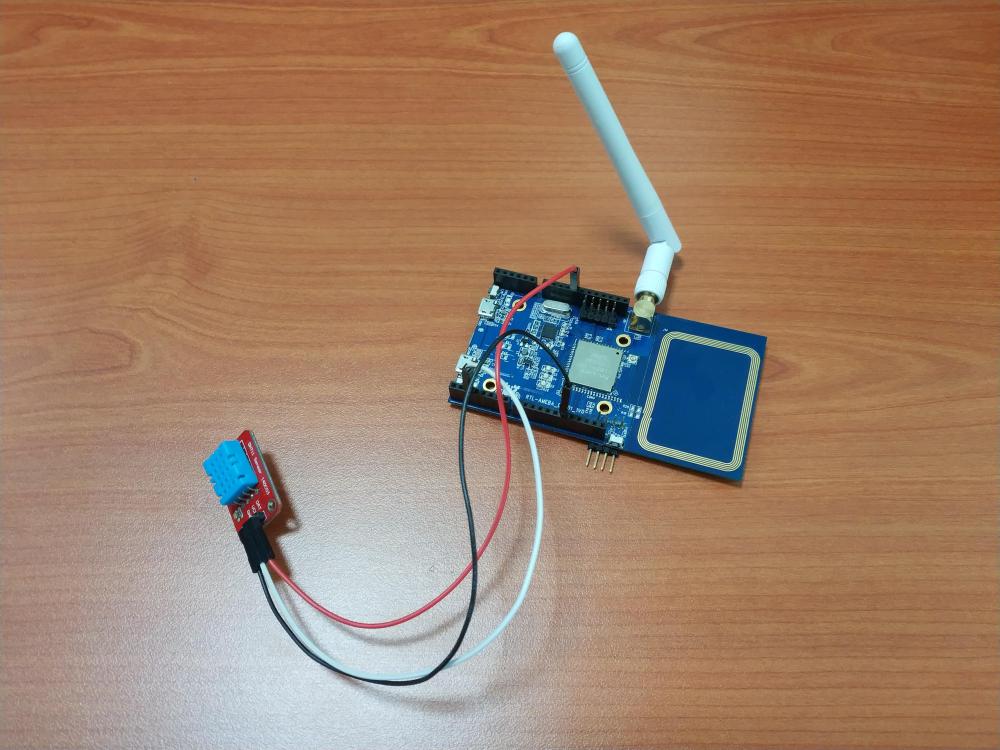
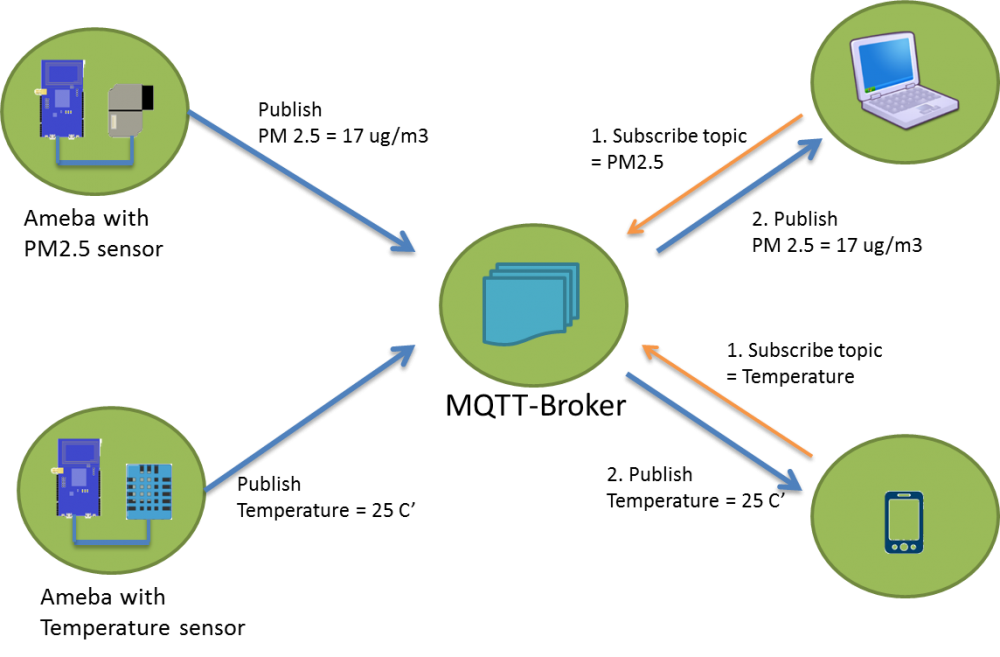
Temperature and humidity are 2 of the most important factors affecting people’s comfort level in an enclosed space. The DHT humidity and temperature sensor can read the ambient temperature and humidity every 2-3 seconds, and then pass the data to Ameba who will forward them to the server using MQTT protocol. Whoever “subscribing” to the right topic gets the data almost instantaneously. Users can then adjust the aircon mode or temperature according to the readings received. An android phone was used as an MQTT client and the Ameba RTL8195 Dev. Board acted as another MQTT client communicating with the android phone. Both clients have to connect to the same MQTT server before proceeding to the next step. The DHT sensor updates its data every 10 seconds to stay as accurate as possible. Once sensor data is received, Ameba then “publishes” the data to the MQTT server where all clients “subscribing” to the right topic gets the data displayed on the console. GitHub page https://github.com/Realtek-AmebaApp/Ameba_Examples/tree/master/RTL8195AM/003_DHT_MQTT Official pages https://www.amebaiot.com.cn/en/ https://www.amebaiot.com/en/ Facebook pages https://www.facebook.com/groups/AmebaIoT/ https://www.facebook.com/groups/AmebaIoTWW/ BiliBili channel https://space.bilibili.com/45777743
-
This is a simple IoT project based on the “mqtt basic” example that comes with the Arduino package when you install the RTL8195 on Arduino IDE. In this project, simple passive components are used to aid in demonstrating the power of bidirectional communication of MQTT protocol which is widely used in modern IoT applications for its advantages in speedy response and lightweight. In the video, an android tablet was used as a MQTT client and our Ameba RTL8195. Board acted as another MQTT client communicating with the android tablet. Both client have to connect to the same MQTT server before proceeding to the next step, you may choose to set up own MQTT server or using an online free server. Please refer to the video link, GitHub source code, https://github.com/Realtek-AmebaApp/Ameba_Examples/tree/master/RTL8195AM/002_MQTT_BASIC Official pages https://www.amebaiot.com.cn/en/ https://www.amebaiot.com/en/
-
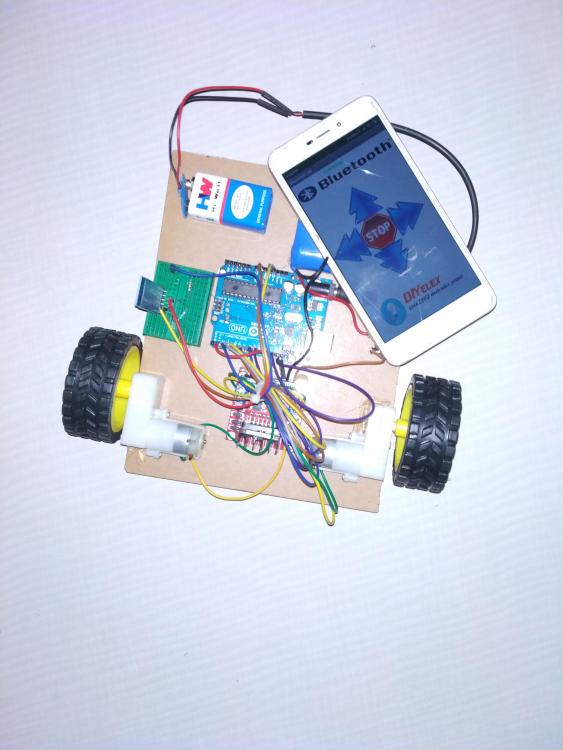
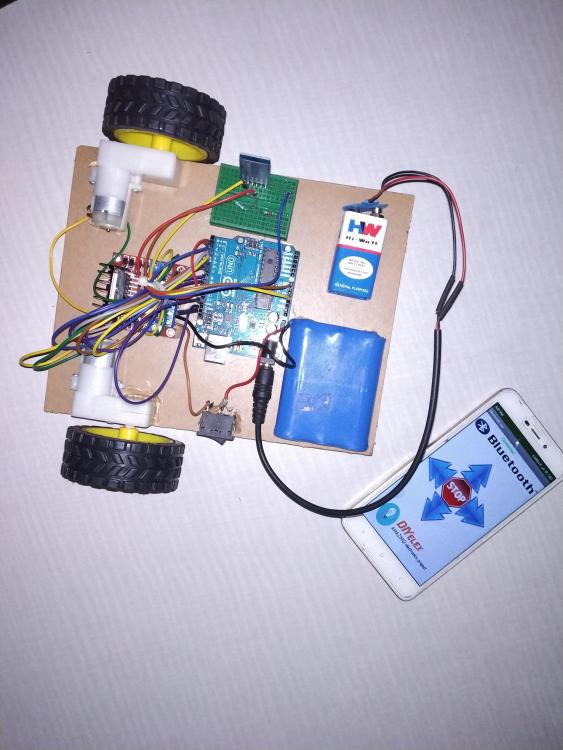
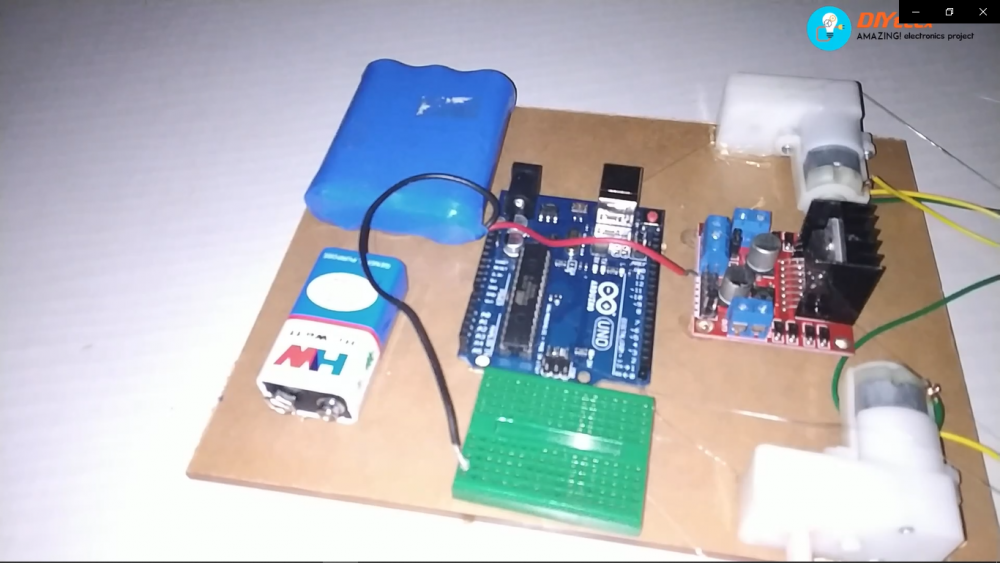
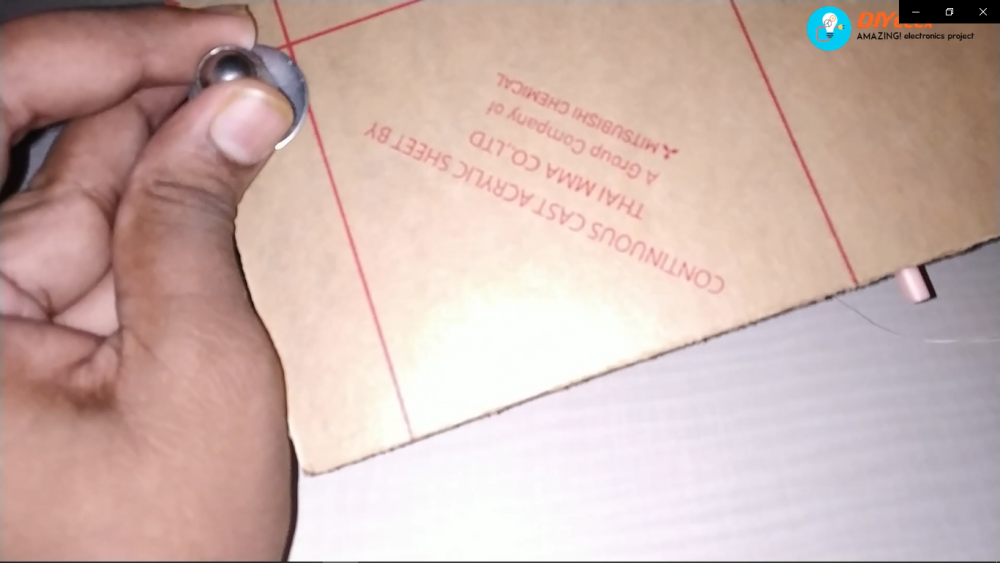
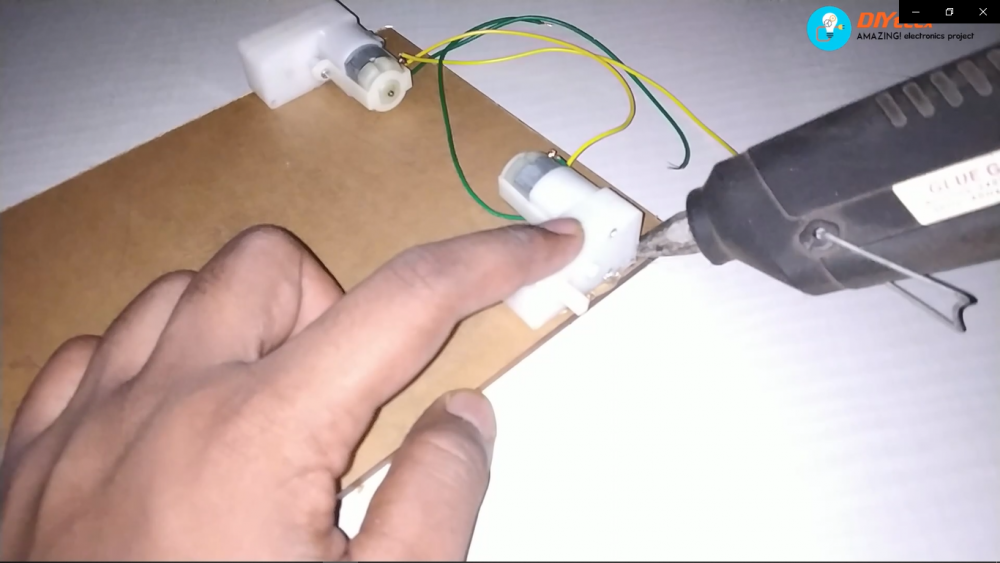
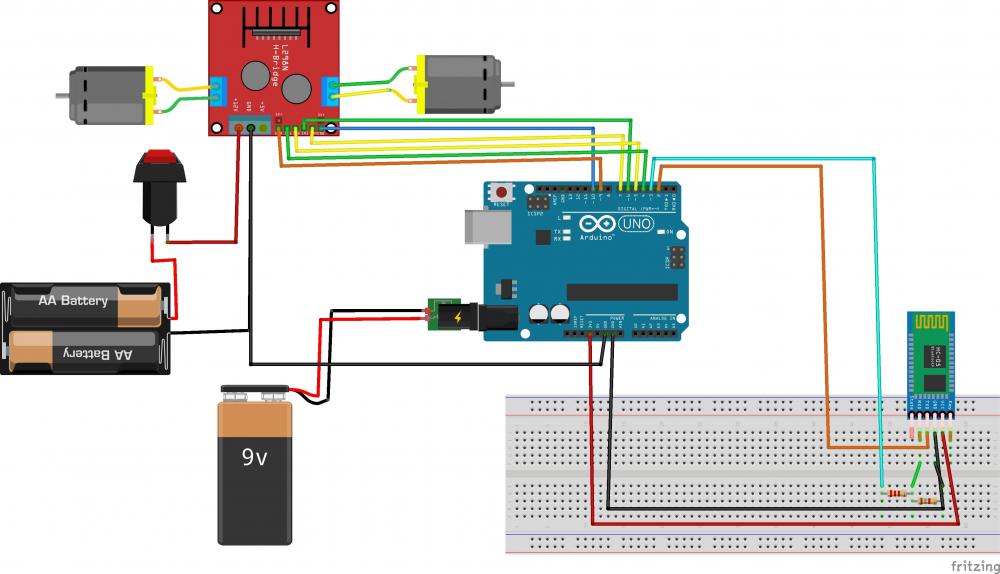
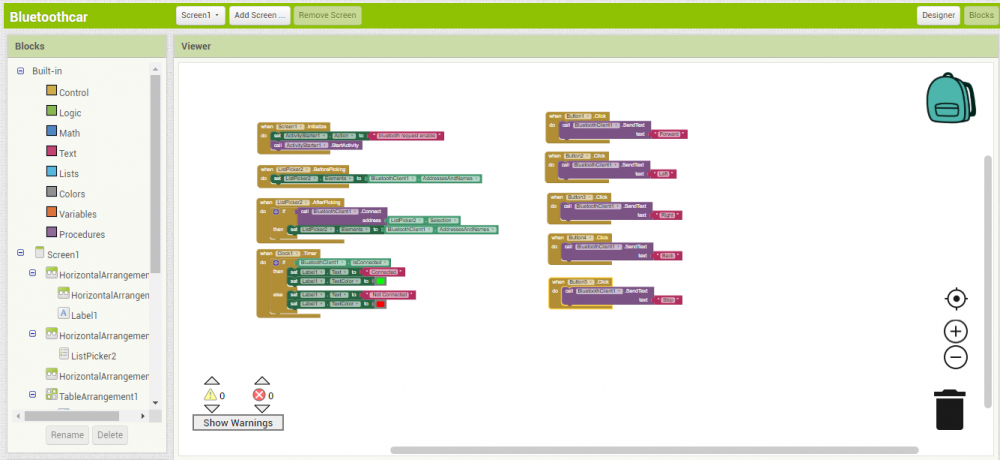
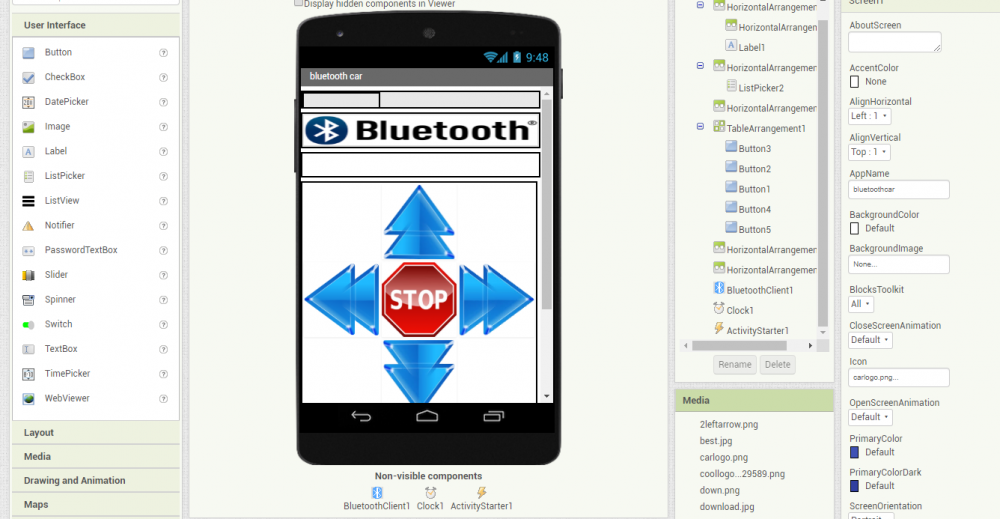
I have just started with the youtube channel, so I decided to make a Bluetooth controlled robotic car. As am an electronics engineer I have knowledge about electronics. but I don't know how to build a custom android application. so Before making the project I learn about MIT app inventor and try to make one app which was a great success it is quite easy to do. In this article, we will learn how to make a custom Android application and how to configure the Bluetooth module with Arduino. Hardware requirements: Arduino Uno Bluetooth HC-05 l298n motor Driver acrylic sheet wheels x2 geared dc motor x2 mini breadboard 4.7k, 2.2k resistor jumper wires 12v battery 9v battery switch Step 1: Building Chassis I used an acrylic sheet length of 18cm and width of 13cm. First, I positioned all parts that going to be mounted on the chassis. then I used a hot glue gun to stick the parts to acrylic you can use spacers or screws. after mounting all parts I stick the caster wheel at the bottom of the chassis. Step 2: Connection Make the connection according to the circuit diagram. we can use separate power for Arduino. Motor driver and 12v battery connected through the switch. As we can see in the circuit diagram there is 2.2k and 4.7 k resistor connected to the pins of the bluetooth module. the main reason for this is the HC-05 Bluetooth module uses a logic level of 3.3v. While transmitting data from HC-05 to Arduino there is no problem because Arduino is capable of receiving data from 3.3v logic, but while receiving any data from Arduino to HC-05 Arduino uses 5v logic which may damage our Bluetooth module, to convert 5v logic level to 3.3v we use a voltage divider method. Make sure that there is common ground between motor driver and Arduino otherwise motor not work. Step 3: Programming /* Author:DIYelex date: 3/8/2019 */ #include <SoftwareSerial.h> // TX RX software library for bluetooth SoftwareSerial mySerial(2, 3); // Connect the TXD pin of BT module to pin 2 of the Arduino and the RXD pin of BT module to pin 3 of Arduino. int Rightmotor1 = 4; //pin 1 of Rightmotor int Rightmotor2 = 5; //pin2 of Rightmotor int leftmotor1 = 6;//pin1 of leftmotor int leftmotor2 = 7;//pin2 of leftmotor int en1=9; //enable pin for Rightmotor int en2=10; // enable pin for leftmotor String readString; void setup() { pinMode(Rightmotor1,OUTPUT); // attach Right Motor 1st wire to pin 4 pinMode(Rightmotor2,OUTPUT); // attach Right Motor 1st wire to pin 5 pinMode(leftmotor1,OUTPUT);// attach Right Motor 1st wire to pin 6 pinMode(leftmotor2,OUTPUT);// attach Right Motor 1st wire to pin 7 pinMode(en1,OUTPUT); //attach motor drivers rightmotor enable pin to PWM pin 9 of arduino pinMode(en2,OUTPUT);//attach motor drivers leftmotor enable pin to PWM pin 10 of arduino Serial.begin(9600); //Setup usb serial connection to computer mySerial.begin(9600);//Setup Bluetooth serial connection to android } void loop() { while(mySerial.available()){ delay(50); char data = mySerial.read();//store the data come from bluetooth to char data readString+=data; } if(readString.length() > 0) { Serial.println(readString); ///Print the data to serial monitor which is given by bluetooth if(readString == "Forward"){ //if forward received do following digitalWrite(Rightmotor1, HIGH); ////////////FORWARD //////////////////////// digitalWrite(Rightmotor2, LOW); digitalWrite(leftmotor1, HIGH); digitalWrite(leftmotor2, LOW); analogWrite(en1,200);// for controlling speed of Rightmotor vary the value from 0 to 255 analogWrite(en2,200);// for controlling speed of leftmotor vary the value from 0 to 255 } if(readString == "Back"){ //if Back received do following digitalWrite(Rightmotor1, LOW); ////////////BACK///////////////////////////// digitalWrite(Rightmotor2, HIGH); digitalWrite(leftmotor1, LOW); digitalWrite(leftmotor2, HIGH); analogWrite(en1,200); analogWrite(en2,200); } if(readString == "Left"){ //if left received do following digitalWrite(Rightmotor1, HIGH);/////////////LEFT//////////////////////////// digitalWrite(Rightmotor2, LOW); digitalWrite(leftmotor1, LOW); digitalWrite(leftmotor2, HIGH); analogWrite(en1,80); analogWrite(en2,80); } if(readString == "Right"){ //if Right received do following digitalWrite(Rightmotor1, LOW);/////////////RIGHT//////////////////////// digitalWrite(Rightmotor2, HIGH); digitalWrite(leftmotor1, HIGH); digitalWrite(leftmotor2, LOW); analogWrite(en1,80); analogWrite(en2,80); } if(readString == "Stop"){ //if stop received do following digitalWrite(Rightmotor1, LOW); ///////////stop///////////////// digitalWrite(Rightmotor2, LOW); digitalWrite(leftmotor1, LOW); digitalWrite(leftmotor2, LOW); } readString = ""; } } Step 4: Android App Now we have to build Bluetooth applications that would be capable of controlling your robot car. If you wish to download my application you can download it from github: The Bluetooth car How I created this application was through App Inventor 2, The images above show both the "Designer" & "Block" view of my application so you can build and change thing up if you wish! Steps for configuring bluetooth First turn on the switch of robot car Go to setting Click on the Bluetooth TabTurn Bluetooth on Wait for your phone to find the HC-05 Bluetooth module Once it has been found click it and input the password by default it should be either "1234" or "0000" Now open the application Bluetooth car Application and click the " Bluetooth image" button You should see the HC-05 Module (If not re-try the steps above) click on the Module The Application will then return automatically to the main screen and you can see the green text "connected" At this point, the HC-05 Modules Red LED should now be constantly on instead of pulsing meaning a device is currently connected. Conclusion Thanks for Reading watch this project video on youtube https://youtu.be/iC7P9nyFu9I
-
AI Smart agriculture control Device Abstract: Agriculture is the broadest economic sector and plays an important role in the overall economic development of a nation. Technological advancements in the arena of agriculture will ascertain to increase the competence of certain farming activities. Smart Farming is a farming management concept using modern technology to increase the quantity and quality of agricultural products. Farmers in the 21st century have access to LoRa, soil scanning, data management, and Internet of Things technologies, web. Our device focuses on the measurement of physical parameters such as soil moisture content, nutrient content, automatic irrigation, pH of the soil and automatic sent notification phone application that plays a vital role in farming activities. Keyword: Agricultural innovation, IoT, LoRa, Power Management, ARM, Data Management Introduction: Smart farming based on IoT technologies will enable growers and farmers to reduce waste and enhance productivity ranging from the quantity of fertilizer utilized to the number of journeys the farm vehicles have made. In IoT-based smart farming, a system is built for monitoring the crop field with the help of sensors (light, humidity, temperature, soil moisture, etc.) and automating the irrigation system. The farmers can monitor the field conditions from anywhere using smart app. IoT-based smart farming device is highly efficient when compared with the conventional approach. The applications of IoT-based smart farming not only target conventional, large farming operations, but could also be new levers to uplift other growing or common trends in agricultural like organic farming, family farming (complex or small spaces, particular cattle and/or cultures, preservation of particular or high quality varieties etc.), and enhance highly transparent farming. Now, let’s discuss the major applications of IoT-based smart farming device that are revolutionizing agriculture. Hardware: Soil Sensor: The Soil Moisture Sensor uses capacitance to measure the water content of soil (by measuring the dielectric permittivity of the soil, which is a function of the water content). Simply insert this rugged sensor into the soil to be tested, and the volumetric water content of the soil is reported in percent. Temperature sensor (DHT 11): Measure the Temperature and humidity Photoresistor (LDR): Check day or night position LoRa ARM development board : This is a low power single board computer inbuild Wi-Fi, LoRa connectivity also has Digital and analog pins. Smart Agriculture Device Features: 1.This device no need external power (inbuild 5-volt Power bank & solar cell), 2. real-time Soil Moisture sensor measure the soil and sent data to the Server, 3.Temperature, photoresistor measure the weather condition. 4. Both way communication (device can send notification & received command from web or app) 5. Dual control (Device ca run manual mode and automatic mode). 6. Dual communication (LoRa and wi-fi mode) System Hardware Implementation: First configure the FreeRTOS on EFB-REV1 board after successful configure of operating system we need configure GPIO library(J-Tag) to access the its GPIO. Install 5-volt solar cell and power bank for powerup the device 24x7. Soil Sensor connected to analog pin of A0, DTH11 connected to A3, Photoresistor connected to A6. Analog sensors measure data and sent via wireless media. EFB_REV1 development come with LoRa, Wi-fi also Bluetooth, for our project we used Wi-Fi and LoRa. For Wi- fi communication need a wifi receiver module which receive and sent sensor data to the cloud server. Another hand implemented the device for loRa communication (data send rang up to 5km), here we need a loRa receiver to receive and sent sensor data to the cloud server. Wi-Fi and LoRa connective protocol of our smart agriculture device uses depend on different location & situation. Firmware & Application software implementation: Application Software: Here we used cloud server to store the data, and help of Rest API sent the command to the device. Device firmware has two measure function (i) Manual mode: In manual mode device will work, user pre set value of the sensor in device using web or smart app. (ii) Automatic Mode: In automatic mode device sent the sensor value to cloud server and machine learning algorithm take decision according the data. Conclusion Thus, the IoT agricultural applications are making it possible for ranchers and farmers to collect meaningful data. Large landowners and small farmers must understand the potential of IoT market for agriculture by installing smart technologies to increase competitiveness and sustainability in their productions. With the population growing rapidly, the demand can be successfully met if the ranchers, as well as small farmers, implement agricultural IoT solutions in a prosperous manner.
-
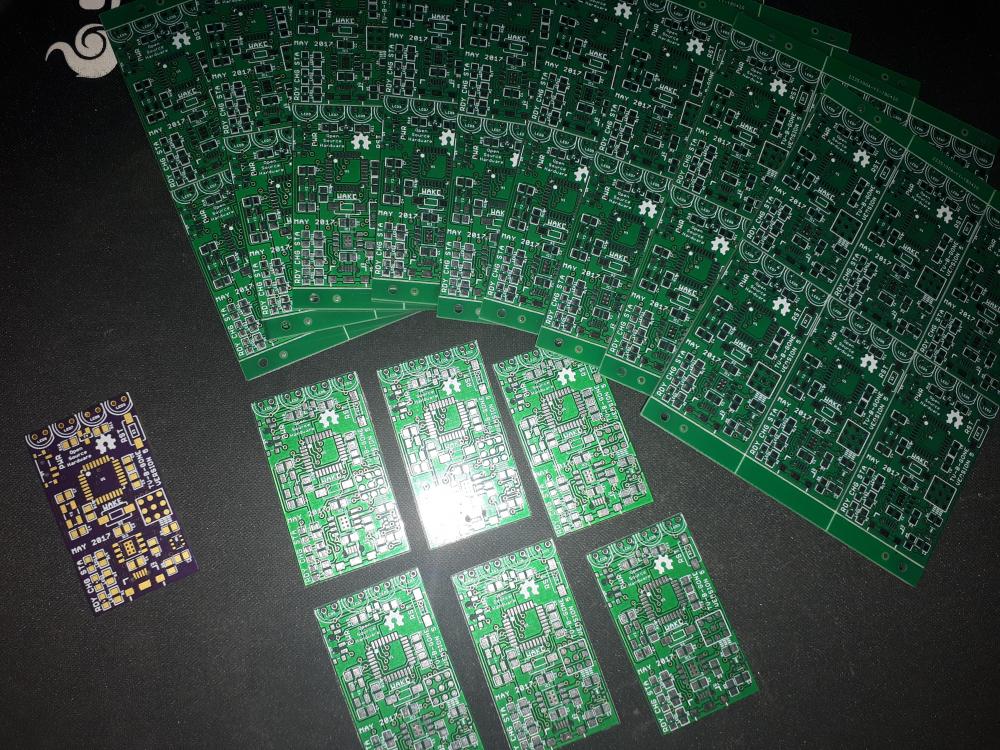
Hello guys, im a 17yo student that loves electronics and i started working on custom tv-b-gone based on arduino version with rechargeable battery and i needed pcbs for it. Firstly i ordered pcbs(on the left) that were $3 PER PIECE and then i found out for JLCPCB. They have amazing offer of 10pcs 10x10cm pcbs for $2!! I could fit 6 tv-b-gone boards on one 10x10cm pcb and multiply that by 10 and you get 60 pcbs for $2!!! When i first ordered i tough that its just a low quality board but when i received them in 2 weeks (which is really fast) i was SURPRISED by QUALITY for that LOW PRICE. First there was no shorts between any of the tracks. My design has really tight traces and they came out perfectly! Silk screen is also really good and vias are covered fully which gives boards nicer look. Panel by JLCPCB really made my job easier and it is also good, VCut is perfect, you just can snap the boards with hands and sand the sharp edges. They also make solder paste stencils which are helpful with pcbs with 95% of smd components and its also cheap, only $7 for big stainless steel stencil! Ordering is really simple. Go to https://jlcpcb.com/ and upload your gerber files in zip or rar format (there is also tutorial how to export gerber). If you want panel select "Yes" for "Panel By JLCPCB" and enter how many boards you want in a row and column. Im just really surprised by quality and looks of the pcbs. If you are interested in the project here are some video clips and soon there will be clip of assembling one with board from jlcpcb. https://jlcpcb.com/ https://jlcpcb.com/ https://jlcpcb.com/
-
The very first program you write when you start learning a new programming language is: "Hello World!". The program itself does nothing more than printing a “Hello World” text on the screen. So, how do we get our Arduino to display the "Hello World!"? In this video, I will be showing you how to get started with the small 0.91 (128x32) and 0.96 (128x64) I2C OLED displays. There are 100s of tutorials on the web explaining the same thing in different ways, but I couldn't find one that tells me all about the OLED display and how to use it in different scenarios. It took me some time to work it all out. So, I thought I should create a tutorial on what I have learned and combine all the features and ways the OLED displays can be used in our projects. Step 1: Things We Are Going to Learn Today In this video we will be talking about: - What is an OLED display? - Then we will have a closer look at the 0.91 (128x32) and 0.96 (128x64) I2C OLED displays - Next we will talk about installing the Adafruit Library to your Arduino IDE - Then we will connect NodeMCU and Arduino to an OLED display - Next we will have a look at the code and display some graphics and text on it - We will also talk about applying Custom Fonts and displaying Images - Then we will connect Multiple OLEDs to a micro-controller using I2C Multiplexer - Finally, we will talk about few common errors people make while using the OLED displays Step 2: Hardware Requirement For this tutorial we need: - A Breadboard - A 0.91" (128x32) and 0.96" (128x64) I2C OLED displays - Arduino UNO/NANO (whatever is handy) - NodeMCU - TCA9548A I2C multiplexer - Few Connecting Cables - and a USB cable to upload the code Step 3: What Is an OLED Display? OLED or organic light-emitting diode is a light-emitting diode (LED) in which the emissive electroluminescent layer is a film of organic compound (millions of small LED lights) that emits light in response to an electric current. OLEDs are used to create digital displays in devices such as television screens, computer monitors, portable systems such as mobile phones, hand-held game consoles and PDAs. An OLED display works without a backlight because it emits visible light. There are many types of OLED displays available in the market based on their - Sizes - Color - Brands - Protocol - SPI (Serial Peripheral Interface) or I2C - Passive-matrix (PMOLED) or active-matrix (AMOLED) control scheme In this tutorial, I am going to talk about connecting the blue color 0.91 (128x32 OLED) and 0.96 (128x64 OLED) I2C OLDE displays to an Arduino NANO and NodeMCU. I2C bus technology uses only 2 pins of the MCU so we have heaps available for other sensors. Step 4: Closer Look Lets have a closer at these two displays. At the back of these displays there are heaps of SMD capacitors and resistors soldered on-board; but, since its an I2C device we only care about these 2 pins (SCL and SDA) The display connects to Arduino using only four wires – two for power (VCC and GND) and two for data (serial clock SCL and serial data SDA), making the wiring very simple. The data connection is I2C (I²C, IIC or Inter-Integrated Circuit) and this interface is also called TWI (Two Wire Interface). - The on-board pins can be in different order, so always triple check before hooking it up to your project. - Operation voltage is between 3v to 5v but, it is best to use the guidance from the manufacturer's datasheet. - Sometimes we need to use 2 displays in our projects. So, how can we achieve this? The trick is to have a configurable address on your display. This unit has a configurable address between 0x78 and 0x7A. Just by unsoldering the 0Ohm resistor from one side and hoking it up to the other side or just by putting a global solder we can change the address. We will talk about it in depth when we hook up multiple displays to an Arduino in the later section of this tutorial. In picture these displays look very big. But, practically speaking they are tiny. They are made of 128 x 32/64 individual OLED pixels and do not require any back-light. Just have a look at this and see how small it is. Even though they are small they can be very useful in any electronic projects. Step 5: Library There are several libraries available to control these displays. In past I have used the "u8glib library" but I find the AdaFruit library very easy to understand and use in our projects. So, I am going to use the AdaFruit library in this tutorial. To control the OLED display you’ll need the "adafruit_GFX.h" library and the "adafruit_SSD1306.h" library. There are two ways you can download and install the library to your Arduino IDE. Method 1 Go to the "Library manager" and search "adafruit_SSD1306" and "adafruit_gfx" Select the latest version and hit the Install button. Once installed you can use these libraries in your program. Method 2 These two libraries can be also be downloaded from github (you need both): I will provide the links in the description below. The display library: https://github.com/adafruit/Adafruit_SSD1306 The GFX library: https://github.com/adafruit/Adafruit-GFX-Library Once downloaded, copy the Adafruit_SSD1306-master folder from the downloaded zipped file into the Arduino libraries folder. This folder is usually found at Documents > Arduino > libraries on Windows systems. On Linux it is usually found at home folder > Arduino > libraries. Finally in the Arduino library folder, rename the Adafruit_SSD1306-master folder to Adafruit_SSD1306. Even if you don’t rename that’s fine. Now, lets have a look at the "Adafruit_SSD1306.h" file Two things we need to know in this library: 1. If you want to use the smaller display use the default 128_32 otherwise for the bigger display comment the 128_32 and uncomment the 128_64 2. If you have soldered the 0x7A Address on the board (which we will talk about later) then use the 7 bit 0x3D address for the bigger displays, otherwise use the default 0x3C address. For the smaller displays the address is 0x3C. Step 6: Wiring 128 X 64/32 OLEDs Lets start by connecting the NodeMCU to the display. The first and most important thing to note is that some of the displays may have the GND and VCC power pins swapped around. Check your display to make sure that it is the same as the image. If the pins are swapped, make sure to change the connections to the Arduino or NodeMCU. - NodeMCU OLED Wiring OLED VCC – NodeMCU 3.3V OLED GND – NodeMCU GND OLED SCL – NodeMCU D1 OLED SDA – NodeMCU D2 - Arduino Uno OLED Wiring OLED VCC – Arduino 5V OLED GND – Arduino GND OLED SCL – Arduino Uno A5 OLED SDA – Arduino Uno A4 - Arduino MEGA 2560 OLED Wiring OLED VCC – Arduino 5V OLED GND – Arduino GND OLED SCL – Arduino MEGA 2560 pin 21 OLED SDA – Arduino MEGA 2560 pin 20 Step 7: Code Adafruit library comes with really good examples for both 128x32 and 128x64 displays. The Library is located under File > Examples > Adafruit SSD1306 > and then the display type in the Arduino IDE. We are going to use the 128x32 I2C example and will modify it to work with both 128x64 and 128x32 displays fist by hooking it up to an Arduino and then to a NodeMCU board. The code starts by including both the Adafruit libraries. In this tutorial I am going to stress on only those parts of the code which are necessary for us to load on both boards and displays. If you want to know more about the code please drop a comment on my blog or in the comments section below and I endeavour to get back to you. - First we are going to load the code to an Arduino Nano connected to a 128x32 display. We can use the code as is without any modifications. 128x32 uses 0x3C address so this bit looks all good here, lets double check the header library, yes its also using the 0x3C address and the display type is 128x32. - Now lets connect the 128x64 display. As we know it uses the 0x3C address by default so we don't need to update the address in either the code or the library. We just need we need to comment the 128_32 and uncomment the 128_64 in the header library and change the LCDHEIGHT to 64 in our code. - Now to run the same code on a NodeMCU we need to change one more line in our code. The "#define OLED_RESET 4" > "#define OLED_RESET LED_BUILTIN" rest of the code is same as Arduino Pretty much to display anything we first need to clear the previous screen using display.clearDisplay(); // Clear the buffer Then draw the object testdrawline(); // Draw a line Show it on the hardware display.display(); // Make them visible on the display hardware! Wait for some time before displaying the next item. delay(2000); // Wait for 2 seconds In this example we are displaying few items like text, lines, circles, scrolling text, triangles and more. Go ahead and use your imagination and display whatever you want on these tiny displays. Attachments Libraries.zip Download NodeMCU.zip Download Step 8: Customizing Text & Adding Images Sometimes your code needs to display custom fonts and images. If you are very good in bit mapping then you just need to create a byte arrays by turning on or off the tiny LEDs of the display to create custom fonts and images. However, I am not very good in doing these mappings and don't want to spend hours creating the bit map tables. So, what are my options? I generally use two websites to generate custom fonts and images. The links are provided in the description below. Custom Fonts ------------ Go to the font converter website, select the font family, style, size, Library Version as "Adafruit GFX Font" and then hit the "Create" button. On the right hand side of this page you can see how your font is going to look like on the actual display. Based on your selection the webpage generates the fonts header file. Create a file called "modified_font.h" in the same folder where your code is and copy and save the generated code into it. Then you just need to include the header file in your code to use the custom font. #include "modified_font.h" Then, you just need to set the font before displaying the text to apply the custom font to it. display.setFont(&Your_Fonts_Name); You can get the name of the font from the header file you just added to your project. Thats it, easy. Memory is always a concern while using custom fonts, so always consider the bytes that will be consumed by the memory. Just remember Arduino UNO has only 32K of memory. Custom Images ------------- To display a bitmap image on your screen you first need to create a 128 x 64/32 sized image. I am using the good old "MS Paint" to create a 128 x 64 bitmap image which I will then upload to this image converter website. The website converts images into byte-strings, which can be used with Arduino and OLED displays. Start by uploading the image to the website. Then put a check on the "Invert image colors" check-box and change the "Output code format" to "Arduino Code" next select the orientation and hit the "Generate Code" button to generate the byte array. The "Preview" section shows you how your image will look like on the actual display. I have included the code along with this tutorial which you can use to display your images. You just need to replace the array in my code with the one you just generated and then load it to your Arduino. Attachments Custom_Font.zip Download Custom_Image.zip Download Step 9: Connecting 2 Displays Connecting two 128 x 64 displays to your project is easy. You just need to unsolder the 0Ohm resistor from 0x78 address and put it on 0x7A and then use the 0x3D address in your code instead of the default 0x3C. You must be wondering why we are using the 0x3C and 0x3D address and not the actual 0x78 and 0x7A. Arduino accepts 7-bit address and not the 8-bit hardware addresses. So, we first need to convert the 8-bit address to binary, and then chop off the least significant bit to get the 7 bits. Then convert the 7 bits to HEX to get the 0x3C or 0x3D addresses which you enter in your code. First, initialize the display by giving it a unique name: Adafruit_SSD1306 display1(OLED_REST); Adafruit_SSD1306 display2(OLED_REST); Then in your code use the display 1 and display 2 to call the begin statements with the device addresses in them: display1.begin(SSD1306_SWITCHCAPVCC, 0x3C); // display 1 op address 0x3C display2.begin(SSD1306_SWITCHCAPVCC, 0x3D); // display 2 op address 0x3D That's it, you can now go ahead and do whatever you want using either Display 1 or Display 2 in the rest of your code. I have provided an example with this tutorial. Wiring is exactly the same as what we have done before, pretty much you just need to add another display to the same I2C pins of either the Arduino or NodeMCU. Based on the addresses, the MCU then sends the data on the I2C data line. Attachments Two_OLEDs.zip Download Step 10: Connecting More Than 2 Displays 3 More Images Now, what if you want to hook up more than 2 displays? Arduino has limited number of pins and hence you cannot have more than a certain amount of shields attached to it. Moreover, it has only one pair of I2C buses. So, how can we attach more than 2 I2C displays to an Arduino? The trick is to use a TCA9548 Multiplexer. TCA9548 allows a single micro-controller to communicate with up to '64 sensors' all with the same or different I2C address by assigning a unique channel to each sensor slave sub-bus. When we talk about sending data over 2 wires to multiple devices we then need a way to address them. Its same as the postman coming on a single road and dropping the mail packets to different houses because they have different addresses written on them. The Multiplexer connects to 3V3, GND, SDA and SCL lines of the micro-controller. The slave sensors are connected to one of eight SCL/SDA slave ports on the board. The channels are selected by sending the TCA9548A its I2C address (0x70 {default} - 0x77) followed by the channel number (0b00000001 - 0b10000000). You could have at the max 8 of these multiplexers connected together on 0x70-0x77 addresses in order to control 64 of the same I2C addressed parts. By connecting the three address bits A0, A1 and A2 to VIN you can get different combination of the addresses. I will explain this in-depth in my next tutorial on TCA9548A breakout board. For now, lets just hook up 8 OLEDs to this board and have a quick look at the code. Connection: VIN to 5V (or 3.3V) GND to ground SCL to I2C clock SDA to I2C data Then wire up the sensors to VIN, GND and use one of the SCn / SDn multiplexed buses Now, Int the code lets start by including the "Wire" library and by defining the multiplexers address. #include "Wire.h" #include #define MUX_Address 0x70 // TCA9548A Encoders address Then we need to select the port we want to communicate to and send the data on it using this function: void tcaselect(uint8_t i) { if (i > 7) return; Wire.beginTransmission(MUX_Address); Wire.write(1 << i); Wire.endTransmission(); } Next we will initialize the display in the setup section by calling "u8g.begin();" for each display attached to the MUX "tcaselect(i);" Once initialized, we can then do whatever we want just by calling the function "tcaselect(i);" where "i" is the value of the multiplexed bus and then sending the data and clock accordingly. Attachments I2C_Port_Scanner.zip Download Multipe_OLEDs.zip Download Step 11: Advantages and Disadvantages The image of an OLED is beautiful. However, OLEDs also have disadvantages. Because OLED screens contain organic material, their lifespan is shorter than LCD displays. Additionally, many OLED displays get burn-ins after showing the same image for a long time. After a burn-in, the image stays on the screen even after showing another image. So make sure you keep refreshing the screen every few seconds. Water can instantly damage the organic materials of these displays. Advantages No need for a backlight Displays are very thin and lightweight Low power consumption Viewing angles are wider than LCDs Brightness and contrast are great High speed and have low response time Deep black color Disadvantages Costly technology Short lifecycle OLEDS are more likely to burn-in Water damage Step 12: Common Errors To conclude the tutorial lets talk about few common errors people make while using these displays: - Always triple check the pins before using it in your project - Pick up the right library address in the header file and in your code #define SSD1306_I2C_ADDRESS 0x3C // in Adafruit_SSD1306.h and display.begin(SSD1306_SWITCHCAPVCC, 0x3C); // in your code If the address is wrong the OLED will not display anything - The display size must be changed in the driver before it can be used. If it is not changed you will get an error message when attempting to verify the code #error ("Height incorrect, please fix Adafruit_SSD1306.h!"); - If using NodeMCU make sure you replace the OLED_RESET from 4 to LED_BUILTIN #define OLED_RESET LED_BUILTIN I have scene people making all sorts of things using this OLED display. Some have even made video games and all. I am really not interested in making a video game using this tiny display. However, I will now leave you to explore your imaginations and come out with amazing ideas. - Blog: http://diyfactory007.blogspot.com.au - Add Image: http://javl.github.io/image2cpp/ - Custom Text: http://oleddisplay.squix.ch/#/home - Adafruit display library: https://github.com/adafruit/Adafruit_SSD1306 - Adafruit GFX library: https://github.com/adafruit/Adafruit-GFX-Library - u8glib library: https://code.google.com/archive/p/u8glib/ or https://github.com/olikraus/u8glib If you want to use the smaller display use the default 128_32 otherwise for the bigger display comment the 128_32 and uncomment the 128X64 NO_ACK in your code (just uncomment the type of screen you are using) (fonts are in the fonts library) Attachments DataSheets.zip Download LCD-U8glib.zip Download OLED_Graphing.zip Download Schema.zip Download
-
Hi Everyone, In this tutorial I am going to show you how to charge a Lithium 18650 Cell using TP4056 chip utilizing the solar energy or simply the SUN. Wouldn’t it be really cool if you can charge your mobile phones battery using the sun instead of a USB charger. You can also use this project as a DIY portable power bank. The total cost of this project excluding the battery is just under $5. The battery will addup another $4 to $5 bucks. So the total cost of the project is some what around $10. All components are available on my website for sale for really good price, the link is in the description below. Step 1: Hardware Requirement For this project we need: - A 5v Solar Cell (make sure it is 5v and not anything less than that) - A general purpose circuit board - A 1N4007 High Voltage, High Current Rated Diode (for reverse voltage protection). This diode is rated at forward current of 1A with peak reverse voltage rating of 1000V. - Copper Wire - 2x PCB Screw Terminal Blocks - A 18650 Battery Holder - A 3.7V 18650 Battery - A TP4056 battery protection board (with or without the protection IC) - A 5 V power booster - Some connecting cables - and general soldering equipments Step 2: How the TP4056 Work Looking at this board we can see that it has the TP4056 chip along with few other components of our interest. There are two LEDs on board one red and one blue. The red one comes on when it is charging and the blue one comes on when the charging is done. Then there is this mini USB connector to charge the battery from an external USB charger. There are also these two points where you can solder your own charging unit. These points are marked as IN- and IN+ We will be utilizing these two point to power this board. The battery will be connected to these two point marked as BAT+ and BAT- (pretty mush self explanatory) The board requires an input voltage of 4.5 to 5.5v to charge the battery There are two versions of this board available in the market. One with battery discharge protection module and one without it. Both boards offer 1A charging current and then cut off when finished. Furthermore, the one with protection switches the load off when the battery voltage drops below 2.4V to protect the cell from running at too low (such as on a cloudy day) - and also protects against over-voltage and reverse polarity connection (it will usually destroy itself instead of the battery) however please check you have it connected correctly the first time. Step 3: Copper Legs These boards gets really hot so I will be soldering them a bit above the circuit board. To achieve this I am going to use a hard copper wire to make legs of the circuit board. I will then be sliding the unit on the legs and will solder them all together. I will put 4 copper wires to make 4 legs of this circuit board. You can also use - Male Breakable Pin Headers instead of the copper wire to achieve this. Step 4: Assembly The assembly is very simple. The solar cell is connected to the TP4056 battery charging board's IN+ and IN- respectively. A diode is inserted at the positive end for the reverse voltage protection. Then the BAT+ and BAT- of the board is connected to the +ve and -ve ends of the battery. (That all we need for charging the battery). Now to power an Arduino board we need to boost up the output to 5v. So, we are adding a 5v voltage booster to this circuit. Connect the -ve end of the battery to the IN- of the booster and +ve to IN+ by adding a switch in between. OK, now lets have a look at what I have made. - I have connected the booster board straight to the charger however I will recommend putting a SPDT switch there. So when the device is charging the battery its only charging and not getting used Solar cells are connected to the input of the lithium battery charger (TP4056), whose output is connected to the 18560 lithium battery. A 5V step-up voltage booster is also connected to the battery and is used to convert from 3.7V dc to 5V dc. Charging voltage is typically around 4.2V. Voltage booster's input ranges from 0.9 to 5.0V. So it will see around 3.7V at it's input when the battery is discharging, and 4.2V when it's recharging. The output of the booster to the rest of the circuit will keep it's 5V value. Step 5: Testing This project will be very helpful to power a remote data logger. As we know, the power supply is always a problem for a remote logger and most of the times there is no power outlet available. A situation like that forces you to use some batteries to power your circuit. But eventually, the battery will die. Question is do you want to go there and charge the battery? Our inexpensive solar charger project will be an excellent solution for a situation like this to power an Arduino board. This project can also solve the efficiency issue of Arduino when in sleep. Sleep saves battery, however, the sensors and power regulators (7805) will still consume battery in idle mode draining the battery. By charging the battery as we use it, we can solve our problem. Thanks again for watching this video! I hope it helps you. If you want to support me, you can subscribe to my channel and watch my other videos. Thanks, ca again in my next video. TP4056.pdf
- 1 reply
-
- solar
- battery charger
-
(and 2 more)
Tagged with:
-
Introduction --------------- Hi Everyone, This is my 1st Arduino's tutorial video. In this video i am going to show you how to use a LDR or Light Dependent resistor to turn on and off another circuit or a LED. Wouldn’t it be really cool if whenever a room gets dark, a light bulb automatically turns ON and eliminates the darkness? In this very simple project, I am focusing on eliminating darkness. You can even use this as an emergency lighting system. Step 1: Principle The LDR is a special type of resistor which allows a lower voltage to pass through it (high resistance) whenever its dark and higher voltages to pass (low resistance) whenever there is a high intensity of light. We are going to use a 10k resistor along with the LDR to create a voltage divider circuit. The varying resistance of the LDR is converted to a varying voltage that the analog pin of the Arduino will then be using in its logic. Step 2: Harware Reqirement For this very simple DIY Arduino project we need: - a breadboard - an arduino uno/nano (whatever is handy) - LED (Light Emitting Diode) - LDR (Photoresistor) - A 10K Resistor for creating the voltage divider and a 220ohm resistor for the LED - Few breadboard friendly connecting wires - and a USB cable to upload the code to the Arduino Step 3: Assembly - Connect the 3.3v output of the Arduino to the positive rail of the breadboard - Connect the ground to the negative rail of the breadboard - Place the LDR on the breadboard - Attach the 10K resistor to one of the legs of the LDR - Connect the A0 pin of the Arduino to the same column where the LDR and resistor is connected (Since the LDR gives out an analog voltage, it is connected to the analog input pin on the Arduino. The Arduino, with its built-in ADC (Analog to Digital Converter), then converts the analog voltage from 0-5V into a digital value in the range of 0-1023). - Now connect the other end of the 10K resistor to the negative rail - And the the second (free) leg of the LDR to the positive rail Pretty much this is what we need for the light sensing. Basic circuits like this can be done without an Arduino aswell. However, if you want to log the values and use it to create charts, run other logics etc. I will recomend an Arduino or ESP8266 or may be a ESP32 for this. Now, as we want our circuit to do something in the real world other than just displaying the values on the computer screen we will be attaching a LED to the circuit. The LED will turn on when its dark and will go off when its bright. To achieve this we will: - Place the LED on the breadboard - Connect the 220ohm resistor to the long leg (+ve) of the LED - Then we will connect the other leg of the resistor to pin number 13 (digital pin) of the Arduino - and the shorter leg of the LED to the negative rail of the breadboard Step 4: The Code const int ledPin = 13; const int ldrPin = A0; void setup() { Serial.begin(9600); pinMode(ledPin, OUTPUT); pinMode(ldrPin, INPUT); } void loop() { int ldrStatus = analogRead(ldrPin); if (ldrStatus <= 200) { digitalWrite(ledPin, HIGH); Serial.print("Its DARK, Turn on the LED : "); Serial.println(ldrStatus); } else { digitalWrite(ledPin, LOW); Serial.print("Its BRIGHT, Turn off the LED : "); Serial.println(ldrStatus); } } Thanks again for watching this video! I hope it helps you. If you want to support me, you can subscribe to my channel and watch my other videos. Thanks, ca again in my next Instructable.
-
- arduino
- ldr arduino
-
(and 1 more)
Tagged with:
-
Hi,I have created a isolated version of the common USB - UART converter for programming the Arduino mini.It have all the communication pins isolated: DTR, TX, RX and also CTS.This little board can be very useful if you are working on some projects and worrying to damage a USB port because of ground loop or a short circuit with the main power supply.Here our campain: https://www.kickstarter.com/projects/1351830006/isolated-usb-to-uart-converter-for-arduino-pro-min?ref=user_menuWe also made a short video: https://www.youtube.com/watch?v=ReD4d7x2PaoThanks!
-
Hello Everyone,We are pleased to announce the launch of our online store - Mynics.All of you are requested to check the website and do give us your valuable feedback.You can do the following at Mynics.in- Shop for electronics and robotics- Blogs- Forums- Projects and VideosWe are soon rolling out some great competitions and offers, do follow us to stay updatedhttps://www.facebook.com/mynics.in/http://stalkture.com/p/mynicsinsta/4934651665/https://plus.google.com/104613178419222567531Time to show your creativity and leave the rest to Mynics.Cheers,Team Mynics.
-
HI CAN I USE 12V 2A DC POWER ADAPTER FOR MY ARDUINO UNO ?IS THEIR ANY LIMITATION FOR CURRENT???
-
Hi all, I found a ver very good and really cheap pcb service! Its called PCBWay, and they have cheap 2layer 10x 10x10cm pcb for just $5! and shipping to the Netherlands was just $7!(china post) And they have real good and very kind customer service witch reply back very fast and every question i had got answered in not time AND they give you $5 free for your first order! Pcb's look good and came fast. All pcb's where exported with eagle. I got 2 extra pcb's(win win) probably if a pcb fails check or something. I used blue silkscreen with white text for the pcb and also bought some project pcb's with holes wich i got in 5 collors and look absolutly great! The blue silkscreen looks absolutly perfect, its really perfectly alligned! and the text looked good, it looked a little bit blocky but still it looks great! I ordered pcb's for a adafruit solar charger clone as i needed 9 of them and just didnt have the money to buy them. Since i already had all the components i needed exept the pcb's i just bought the pcb's since their charger is opensource and created them my self to save some costs.(i'll probable sell the last one i dont need) At first i thought if i had to buy the comonents also it all would be more expensive but i calculated if i wanted to create 10 solar chargers and bought all components from aliexpress and bought the pcbs from pcbway i save around $30 to my suprise!!!!!(first time self build a product is cheaper then buying) The chargers are for my solar powered raspberry pi zero powered wireless timelapse and livestream camera's, witch will be mounted in my backyard pointing at bird homes and one as security camera for my back yard gate to watch intruders. I already finished one of the charger and it looks really really impressive with the blue silkscreen! I'll maybe upload some pics of my assembled pcb's and bare pcb's soon for other peaple to check and i am probably going to clone the adafruit powerboost 1000 charger too!(because its cheaper offcourse, i still bought a lot of products from adafruit so i am still supporting them). The pcb's are of good quality, no broken or half traces, all boards are straight and not bend, all boards got the silkscreen and white text right so they just look amazing! I really really recommend this service to everyone and i am defenitly going to try their 4 layer too some time!! And they also offer cheap assembly services so maybe i will try that sometime too! Since i am very very and very happy with my pcb's i am defenitly buying from them again and again in the future and recommend them to everyone! So now i want to know who else used this service and had good experience or wants to try it out? hope to hear from you all!
-
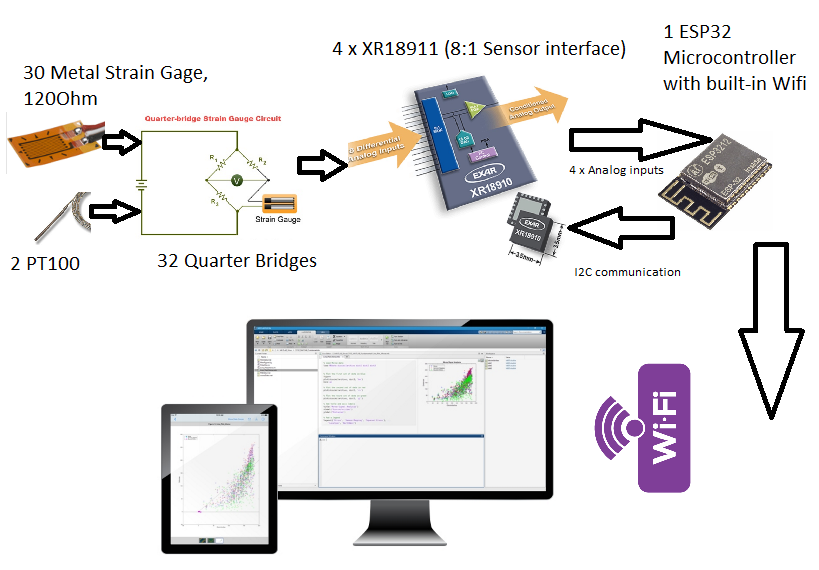
Hi guys,Lovely community here. So i got into the bandwagon of the ESP32. I am planning to build an entire data acquisition built around the ESP32. Would really appreciate it much if i were to get help from all of you. It would be a learning experience for all of us. So basically here are my project details and list of components being used.A 32 Channel Data acquisition system with 30 sensors measuring strain (momentarily using a metal gage strain sensor of 120Ohm being fed to a quarter bridge circuit) and 2 temperature sensors(PT100). I would like an acquisition speed of atleast 1000Samples/Sec per channel. So here is my idea as of now.32 Sensors connected to its each wheatstones bridge. The amplifier is done using the XR18910/XR10910, which is a 16:1 bridge Mux interface with selectable gain. I have attached link https://www.exar.com/content/document.a ... rt=XR10910The XR18911 can be controlled via I2C link. it does all the amplification necessary. I will need to use 2 XR10910 or 4 XR18911(8:1 sensor interface). And then finally controlled by our LEGENDARY ESP32 which converts the analog data to digital. and with the help of wifi to transmit it to a computer where it can be collected in an excel file along with time of capture.Could you guys kindly help me out on how i am to proceed with programming of the ESP32. I would really prefer to use Arduino IDE guys, as that seems to simplify things. Also if there is any improvements that could be added to the circuit. Kindly let me know. Please let me know if you need more details(Picture attached). Thank you
-
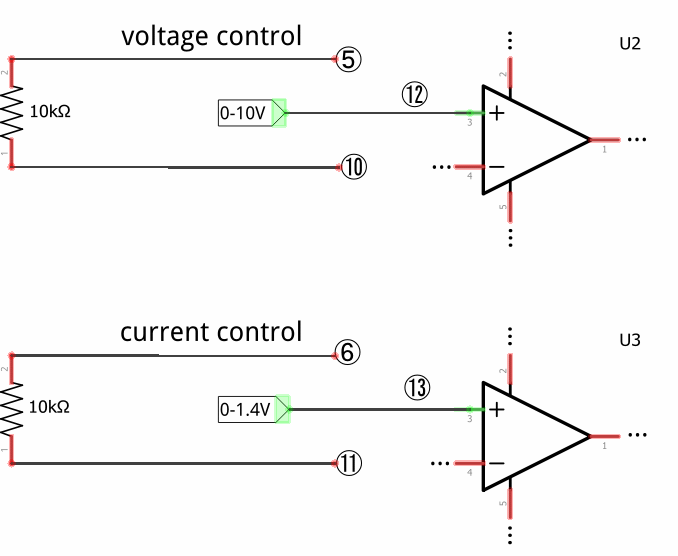
Hi, I've been working on replacing the two 10k potentiometers for voltage and current control with two rotary encoders. The idea is to get (theoretically) arbitrarily fine control via software on an ATMega328P microcontroller. The microcontroller would also be in charge of outputting desired and measured voltage and current values to an LCD. Since I haven't found any suitable digital potentiometers I figured I'd simply generate the analog voltages for the non-inverting inputs of U2 and U3. U2 gets a voltage between 0 and 10V using the uC's PWM output, a low pass filter and an op amp. Points 5 and 10 are connected with a 10k resistor. This part is working brilliantly so far. However current limit control is giving me some trouble. Again points 6 and 11 are connected with a 10k resistor and the non-inverting input of U3 is fed with an analog voltage between 0 and 1.4V (again via PWM and low pass filter). To test the setup I shorted the outputs of the supply with my multimeter, turned up the voltage to about 10V and then slowly increased the current limit. Seemingly at random one of the following scenarios occurs: The current limit increases way too fast (the microcontroller sends the signal for .5A but the multimeter already reads 3A) The current limit increases fairly accurately as it should. The current limit gets stuck and then goes haywire at some 16A and Q4 lets the magic smoke out. Am I wrong in thinking I could generate U3's input voltage isolated from points 6 and 11? If I'm not just being stupid somewhere else my suspicion is that my approach kills some vital feedback path... I'd appreciate any input, thanks!
-
- 0-30v
- power supply
-
(and 3 more)
Tagged with:
-
Hello friends, hope you all are fine and having fun with your lives. In today’s post we are gonna have a look at How to use Temperature Sensor 18B20 in Proteus ISIS. I will use Arduino board as a microcontroller and will connect the temperature sensor with it and then will display the code on LCD. I have already posted the same tutorial in which I have done Interfacing of Temperature Sensor 18B20 with Arduino but in that project I have used the real components and designed the hardware. But today, I will just show you the simulation so that you could test the simulation first and then design it in hardware. Temperature Sensor 18B20 is the most commonly used temperature sensor. Its a one wire sensor means it sends data through a single wire and we can connect multiple sensors with a single wire, that’s why its quite efficient and easy to use as well. I have also posted a tutorial on How to Interface LM35 sensor with Arduino in Proteus ISIS which is another temperature sensor so give it a try as well and let me know which one you think is better. Anyways let’s get started with temperature sensor 18B20 in Proteus ISIS. HOW TO USE 18B20 IN PROTEUS ISIS First of all, get these components from Proteus components list as shown in below figure: Now design the circuit as shown in below figure: As you can see in above simulation, we have used Arduino UNO board along with LCD and 18B20 temperature sensor. 18B20 in Proteus can’t detect the real temperature but we can change the temperature by pressing + and – buttons. So, now we have interfaced the temperature sensor and the LCD with Arduino. Next we are gonna design the code for Arduino and will upload it in Arduino baord. Note: If you don’t know How to use Arduino in Proteus then read Arduino Library for Proteus. You should also read How to get Hex File from Arduino, as Arduino software doesn’t generate the hex file. Now download these three libraries, one is “one wire” library which is the protocol for 18B20 temperature sensor, next is the Dallas Temperature sensor library which is the actua library for temperature sensor 18B20 and uses one wire library. Third library is the Crystal LCD library which is used for displaying character on LCD. So, download all these three libraries by clicking on below buttons and then paste them in your libraries folder of Arduino software. Download One Wire LibraryDownload Dallas Temperature LibraryDownlaod Liquid Crystal Library Now after adding these libraries, open your Arduino software and paste the below code into it. #include <OneWire.h> #include <DallasTemperature.h> #include <LiquidCrystal.h> #define ONE_WIRE_BUS 6 OneWire oneWire(ONE_WIRE_BUS); DallasTemperature sensors(&oneWire); LiquidCrystal lcd(12, 11, 5, 4, 3, 2); void setup(void) { Serial.begin(9600); Serial.println("Welcome to TEP !!!"); Serial.println("www.TheEngineeringProjects.com"); Serial.println(); sensors.begin(); lcd.begin(20, 4); lcd.setCursor(5,0); lcd.print("Welcome to:"); lcd.setCursor(1,2); lcd.print("www.TheEngineering"); lcd.setCursor(4,3); lcd.print("Projects.com"); delay(5000); } void loop(void) { sensors.requestTemperatures(); Serial.print("Temperature : "); Serial.println(sensors.getTempCByIndex(0)); //lcd.clear(); lcd.setCursor(0,0); lcd.print("Temperature: "); lcd.print(sensors.getTempCByIndex(0)); lcd.print("C"); delay(1000); } Now get your hex file from Arduino and upload it to your Proteus Arduino board and hit the RUN button. If everything goes fine then you will something like this at the start: After a delay of around 5 sec you will start receiving the Temperature sensor 18B20 values on your LCD as shown in below figure: Now you can see the value shown in the temperature sensor is the same as in LCD. So, now by clicking the + and – buttons on temperature sensor, you can increase and decrease the value of temperature and same will be changed in LCD. That’s how you can do simulation of Temperature sensor 18B20 in Proteus ISIS. Its quite simple and easy to use. That’s all for today, hope you get some knowledge out of it.
-
- proteus
- proteus isis
-
(and 2 more)
Tagged with:

