


Today I am going to discuss how to make a very simple DIY Breathalyzer using Arduino UNO and few external components. Ana Carolina designed this project as an instructable in instructables.com. This is a low-cost project and a useful one too. If you have no idea about what breathalyzer is, let me explain briefly: A breathalyzer is a device for estimating blood alcohol content (BAC) from a breath sample. Check the link given for more information.
Requirements:
- Arduino Uno
- MQ-3 Alcohol Sensor
- 128×64 LCD (Liquid Crystal Display)
- 7 × 330 Ohm Resistor
- 7 × LEDs (1 Red, 2 Yellow, 3 Green and one other color)
- Jumpers Wires
- Breadboard
- Soldering Iron (optional)
- Solder Wire (optional)
Details:
This project is very simple. Here we are using an array of six LEDs and a 128×64 LCD to display the alcohol level. The presence of alcohol is sensed by an MQ-3 alcohol sensor and then analyzed by an Arduino board. We are using Arduino UNO in this project, but any model can do the job.
Three Green LEDs represent that alcohol level is OK and within the safe limit. Two Yellow LEDs are used to describe that safe limit is going to be reached, and you know it well why the Red LED is there. In fact, those LEDs are used just to give you a quick idea. If you want to know the exact value, the display is there for you.
You can tweak the program and re-calibrate the breathalyzer. But you must remember that breathalyzer doesn’t precisely measure your blood alcohol content, rather it estimates a value from the amount of alcohol in your breath.
Circuit:
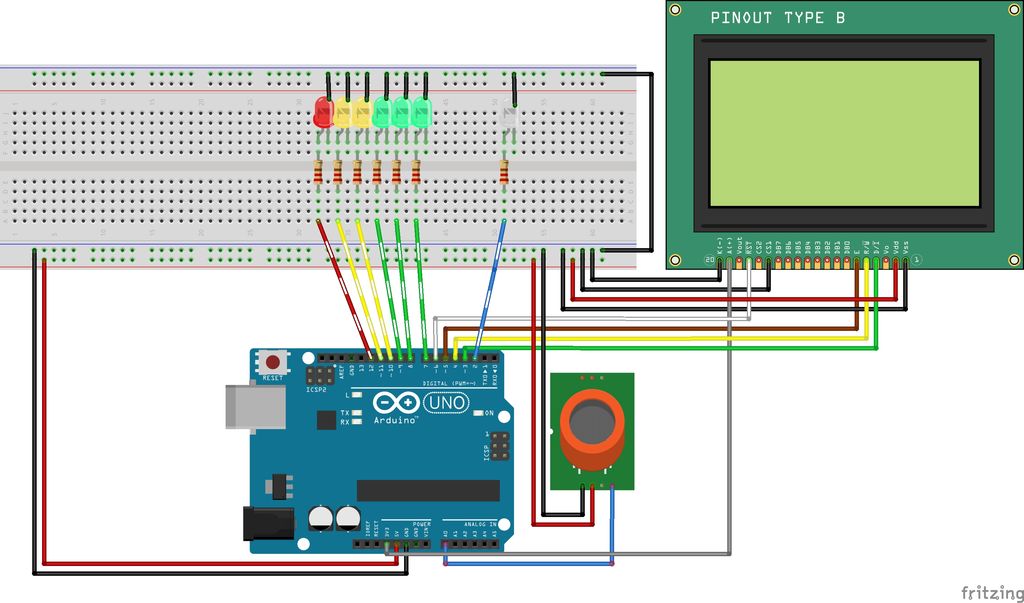
You can make the circuit also on PCB or Veroboard. But for the prototyping purpose, the breadboard is the best choice. You can see how straight forward the connections are.
The Code:
Some part of the original code was in Portuguese. So I have translated it into English. Also, the original code shared by the author in instrucatbles.com is a buggy one. So, I recommend you to use my bug-free code instead of the original one.
Please note that you have to download and add the u8glib library in Arduino IDE beforehand. It is very important. You can either download the u8glib v1.14 library for Arduino directly or go to the site and choose what to download.
Follow the given steps to add a .zip library in your sketch: Open IDE and click on Sketch → Include Library → Add .zip Library. Now select the downloaded .zip library file. You needn’t unzip it.
When everything is done, verify and upload the code to Arduino.
Test It:
I must not recommend you to drink alcohol just for testing the breathalyzer. Rather get a towel and spray alcohol on it. Now hold the towel in front of the sensor. Move it back and forth to observe the change in reading. It may take a while for the breathalyzer to stabilize.
Consider watching the video for a better understanding:
RELATED POSTS
 14 February, 2023 Presenting Industrial Robustel R5020 Lite 5G Routers
 14 December, 2018 Enix: The Modern Nixie Clock
 3 August, 2017 Turtle Rover – World’s First Rover for Earth Exploration
 17 January, 2020 Saelig Announces the 2/4-channel 100-350Hz Siglent SDS2000X Plus Series Oscilloscopes
 9 November, 2017 Design of a Korg Nutube Amplifier
 31 August, 2022 T-Display-S3 – A 1.9-inch ST7789 Powered LCD Development Board with WIFI & BT


i dont know much about these stuff, but i am trying to learn it for my project. so, may i ask what does the resistor do?
The resistors are called current limiting resistors. They are used to limit the current to the LEDs.
20-40 mA current is required by a typical LED. To prevent it from burning out due to excessive current draw, resistors are used.
Sir what about if i will use 16×2 LCD with 16pin? What can be the connection for the board? Thanks