

ESP32 LoRa Sensor Monitoring with Web Server (Long Range Communication)
- 8.175 Views
- Tested
- 0 Likes

I’m a big fan of the ESP32 boards because of the number of communication options they managed to squeeze on the board, but I became more impressed recently when I came across the TTGO LoRa32 development boards which adds LoRa to the onboard communication features of the ESP32.
The LoRa communication capacity of the board opens up a web of possibilities and as a demonstration of how the board works, for today’s tutorial, we are going to build a LoRa Sensor Monitor with a webserver.
The idea behind the project is simple and not so different from the “Introduction to LoRa communication” project we built recently. It comprises two parts; a Transmitter and a Receiver. The transmitter comprises of a TTGO LoRa32 development board along with a BME280 sensor which is used to obtain temperature and humidity parameters from the environment. The data obtained are sent using the LoRa Communication features of the TTGO LoRa32, to the receiver which receives the data and displays it on a webpage via a webserver hosted on the board. By visiting the IP address of the server on any device on the same network as the receiver’s LoRa32 board, users will be able to see the data displayed on a webpage.
At the end of today’s project, you would know how to use both the WiFi and LoRa features of the TTGO LoRa32 board.
Required Components
The following components are required to build this project;
- 2 x TTGO LoRa32 Development Board
- BME280
- Jumper Wires
- BreadBoard
- Power Bank or 3.7v LiPo Battery (optional)
All components can be bought via the attached links. The battery is useful if you plan to use the project without being tethered to your PC by USB Cables.
Schematics
Even though the project involves two devices (transmitter and receiver), we will create schematics for just the transmitter since the TTGO LoRa32 board has everything we need for the receiver, onboard. For the transmitter, the BME280 communicates with connected microcontrollers over I2C, as such, all we need do is connect it to the I2C pins of the TTGO LoRa32 as shown in the image below:
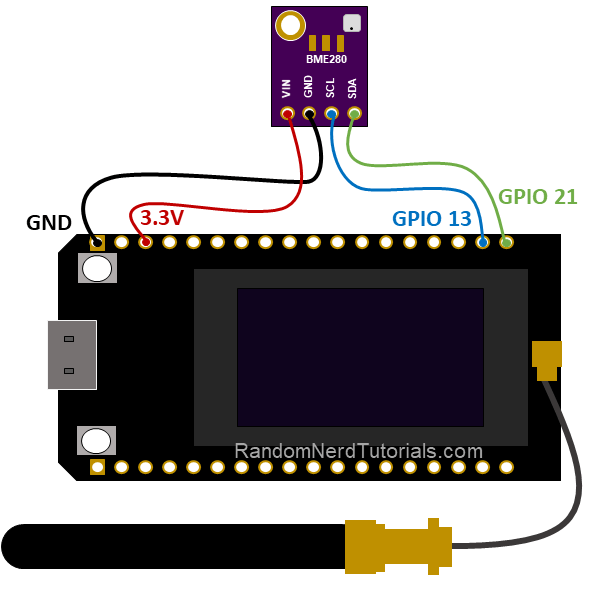
A pin-to-pin connection of the components is described below;
BME280 – LoRa32
GND - GND
VCC - 3.3V
SCL - GPIO13
SDA - GPIO21
The connections when complete should look like the image below
Setting up the Arduino IDE
The code for today’s project will be developed using the Arduino IDE, we need to install two major support package; the ESP32 Board support package, and the ESP32 files system uploader, on it.
The ESP32 board support package provides all you need to program most ESP32-based boards with the Arduino IDE, while the ESP32 file system uploader allows access to the ESP32’s Serial Peripheral Interface Flash File System (SPIFFS). SPIFFS is a lightweight filesystem for microcontrollers that lets you access the flash memory like you would a normal filesystem on your computer. The ESP32 file uploader serves as a tool through which you can upload things like config files, or webserver files like we will be doing today, to the ESP32 SPIFFS. So instead of writing the HTML code for the webserver as a String directly on the Arduino sketch, we can write the HTML and CSS in a separate file and save them on the ESP32 filesystem.
The installation process for the ESP32 board support package has been covered in one of our past tutorials here, as such, for today’s tutorial our focus will be on the ESP32 Filesystem Uploader.
Installing the ESP32 Filesystem Uploader
To install the ESP32 filesystem uploader, it is required that you have the latest version of the Arduino IDE installed, along with the ESP32 board support for the IDE. With those in place, follow the steps below to install the file system uploader.
1. Download the File system uploader from the ESP32FS-1.0.zip release page.
2. Go to the Arduino IDE directory, and open the Tools folder.
3. Unzip the downloaded .zip folder to the Tools folder. You should have a similar folder structure: <home_dir>/Arduino-<version>/tools/ESP32FS/tool/esp32fs.jar
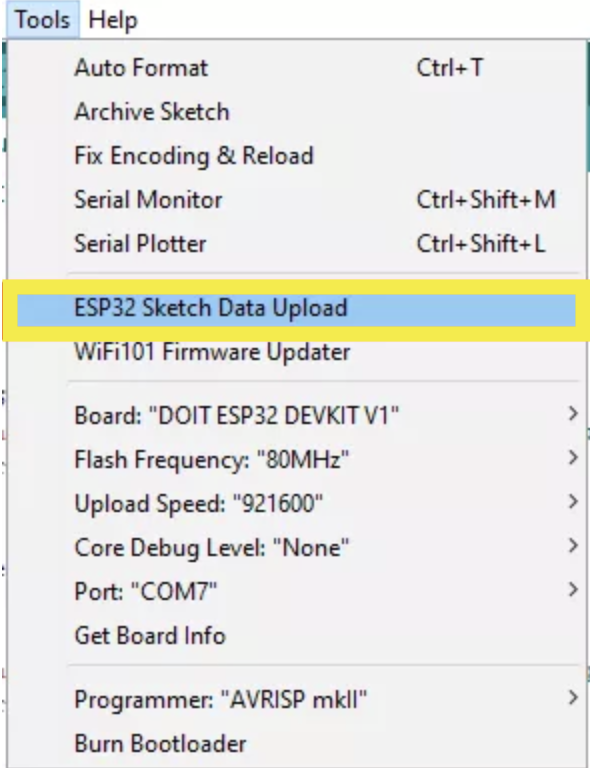
4. With this done, restart the Arduino IDE and Check under tools you should see the ESP32 Sketch Data Upload options there as shown below.
Code
There are two sides to today’s project, as such, we will develop two sketches; one for the transmitter and one for the receiver. These sketches are unedited versions of the one used in Randomnerds tutorial‘s article.
Transmitter Sketch
The algorithm behind the transmitter is straight forward and similar to what we did in the “Introduction to LoRa” project. We obtain temperature and humidity data from the environment via the BME280, display it using the OLED on the TTGO LoRa32 and send it out to the receiver using LoRa communication features of the board.
To achieve this with ease, we will use five important libraries including: the Arduino LoRa library by Sandeep Mistry, the Adafruit SSD1306 library, the Adafruit_GFX library, the Adafruit_BME280 library, and the Adafruit unified sensor library. The Adafruit BME280 and Unified Sensor libraries are involved in reliably obtaining temperature and humidity information from the BME280, the Adafruit SSD1306 and GFX libraries are used in interaction with the OLED, and the Arduino LoRa library handles everything involved with sending the data to the receiver over LoRa. All five libraries can be installed via the Arduino IDE’s Library manager or by downloading them via the links attached to their names and installing them manually.
As usual, I will do a quick breakdown of the code with the aim of explaining parts that may be slightly difficult to follow. The code starts, as always, with the include statement for all the libraries that will be used.
//Libraries for LoRa
#include <SPI.h>
#include <LoRa.h>

//Libraries for OLED Display
#include <Wire.h>
#include <Adafruit_GFX.h>
#include <Adafruit_SSD1306.h>

//Libraries for BME280
#include <Adafruit_Sensor.h>
#include <Adafruit_BME280.h>
Next, the pins of the TTGO LoRa32 being used by the onboard LoRa module are specified;
//define the pins used by the LoRa transceiver module
#define SCK 5
#define MISO 19
#define MOSI 27
#define SS 18
#define RST 14
#define DIO0 26
This is followed by a declaration of the module’s frequency and a declaration of the pins of the TTGO LoRa32 being used by the OLED along with the display’s dimension.
//433E6 for Asia
//866E6 for Europe
//915E6 for North America
#define BAND 866E6

//OLED pins
#define OLED_SDA 4
#define OLED_SCL 15
#define OLED_RST 16
#define SCREEN_WIDTH 128 // OLED display width, in pixels
#define SCREEN_HEIGHT 64 // OLED display height, in pixels
It is important that you ensure the frequency of your LoRa module is, by law, allowed for use in projects like this.
Next, we declare the pins of the TTGO LoRa32 to which the BME is connected, and create an instance of the BME library.
//BME280 definition
#define SDA 21
#define SCL 13

TwoWire I2Cone = TwoWire(1);
Adafruit_BME280 bme;
Next, we create a counter variable to serve as an ID for messages, and a few more variables to hold the LoRa message, temperature, humidity, and pressure.
int readingID = 0;

int counter = 0;
String LoRaMessage = "";

float temperature = 0;
float humidity = 0;
float pressure = 0;
We round up this section by creating an instance of the OLED library with the OLED dimensions as arguments.
Next, we create a few functions which will be used later in the code. The functions include; the StartOLED() function which is used in initializing the OLED, the startloRA() function which is used in initializing and setting parameters for LoRa Communication, the StartBME() function which is used to initialize the BME280, the getReadings() function which is used to obtain temperature, humidity and pressure values from the BME280. and the void sendReadings() function which is used in sending the data obtained with the getReadings() function, over LoRa and also display it on the OLED.
void startOLED(){
  //reset OLED display via software
  pinMode(OLED_RST, OUTPUT);
  digitalWrite(OLED_RST, LOW);
  delay(20);
  digitalWrite(OLED_RST, HIGH);

  //initialize OLED
  Wire.begin(OLED_SDA, OLED_SCL);
  if(!display.begin(SSD1306_SWITCHCAPVCC, 0x3c, false, false)) { // Address 0x3C for 128x32
    Serial.println(F("SSD1306 allocation failed"));
    for(;;); // Don't proceed, loop forever
  }
  display.clearDisplay();
  display.setTextColor(WHITE);
  display.setTextSize(1);
  display.setCursor(0,0);
  display.print("LORA SENDER");
}

//Initialize LoRa module
void startLoRA(){
  //SPI LoRa pins
  SPI.begin(SCK, MISO, MOSI, SS);
  //setup LoRa transceiver module
  LoRa.setPins(SS, RST, DIO0);

  while (!LoRa.begin(BAND) && counter < 10) {
    Serial.print(".");
    counter++;
    delay(500);
  }
  if (counter == 10) {
    // Increment readingID on every new reading
    readingID++;
    Serial.println("Starting LoRa failed!");
  }
  Serial.println("LoRa Initialization OK!");
  display.setCursor(0,10);
  display.clearDisplay();
  display.print("LoRa Initializing OK!");
  display.display();
  delay(2000);
}

void startBME(){
  I2Cone.begin(SDA, SCL, 100000);
  bool status1 = bme.begin(0x76, &I2Cone);
  if (!status1) {
    Serial.println("Could not find a valid BME280_1 sensor, check wiring!");
    while (1);
  }
}

void getReadings(){
  temperature = bme.readTemperature();
  humidity = bme.readHumidity();
  pressure = bme.readPressure() / 100.0F;
}

void sendReadings() {
  LoRaMessage = String(readingID) + "/" + String(temperature) + "&" + String(humidity) + "#" + String(pressure);
  //Send LoRa packet to receiver
  LoRa.beginPacket();
  LoRa.print(LoRaMessage);
  LoRa.endPacket();

  display.clearDisplay();
  display.setCursor(0,0);
  display.setTextSize(1);
  display.print("LoRa packet sent!");
  display.setCursor(0,20);
  display.print("Temperature:");
  display.setCursor(72,20);
  display.print(temperature);
  display.setCursor(0,30);
  display.print("Humidity:");
  display.setCursor(54,30);
  display.print(humidity);
  display.setCursor(0,40);
  display.print("Pressure:");
  display.setCursor(54,40);
  display.print(pressure);
  display.setCursor(0,50);
  display.print("Reading ID:");
  display.setCursor(66,50);
  display.print(readingID);
  display.display();
  Serial.print("Sending packet: ");
  Serial.println(readingID);
  readingID++;
}
Next up is the void setup() function.
The creation of the functions above helps reduce the amount of code required under the void setup() function. All we need to do is to initialize the serial communication so the serial monitor can be used for debugging purposes and call the initialization functions that were created above.
void setup() {
  //initialize Serial Monitor
  Serial.begin(115200);
  startOLED();
  startBME();
  startLoRA();
}
Next is the void loop() function. Just like we did under the void setup() function, all we have to do is call the required functions, which include the getReading() and sendReadings() functions. A delay of 10000ms was also added to allow ample time for sensor refresh.
void loop() {
  getReadings();
  sendReadings();
  delay(10000);
}
The complete transmitter sketch is provided below and attached under the download section.
/*********
  Rui Santos
  Complete project details at https://RandomNerdTutorials.com/esp32-lora-sensor-web-server/

  Permission is hereby granted, free of charge, to any person obtaining a copy
  of this software and associated documentation files.

  The above copyright notice and this permission notice shall be included in all
  copies or substantial portions of the Software.
*********/

//Libraries for LoRa
#include <SPI.h>
#include <LoRa.h>

//Libraries for OLED Display
#include <Wire.h>
#include <Adafruit_GFX.h>
#include <Adafruit_SSD1306.h>

//Libraries for BME280
#include <Adafruit_Sensor.h>
#include <Adafruit_BME280.h>

//define the pins used by the LoRa transceiver module
#define SCK 5
#define MISO 19
#define MOSI 27
#define SS 18
#define RST 14
#define DIO0 26

//433E6 for Asia
//866E6 for Europe
//915E6 for North America
#define BAND 866E6

//OLED pins
#define OLED_SDA 4
#define OLED_SCL 15
#define OLED_RST 16
#define SCREEN_WIDTH 128 // OLED display width, in pixels
#define SCREEN_HEIGHT 64 // OLED display height, in pixels

//BME280 definition
#define SDA 21
#define SCL 13

TwoWire I2Cone = TwoWire(1);
Adafruit_BME280 bme;

//packet counter
int readingID = 0;

int counter = 0;
String LoRaMessage = "";

float temperature = 0;
float humidity = 0;
float pressure = 0;

Adafruit_SSD1306 display(SCREEN_WIDTH, SCREEN_HEIGHT, &Wire, OLED_RST);

//Initialize OLED display
void startOLED(){
  //reset OLED display via software
  pinMode(OLED_RST, OUTPUT);
  digitalWrite(OLED_RST, LOW);
  delay(20);
  digitalWrite(OLED_RST, HIGH);

  //initialize OLED
  Wire.begin(OLED_SDA, OLED_SCL);
  if(!display.begin(SSD1306_SWITCHCAPVCC, 0x3c, false, false)) { // Address 0x3C for 128x32
    Serial.println(F("SSD1306 allocation failed"));
    for(;;); // Don't proceed, loop forever
  }
  display.clearDisplay();
  display.setTextColor(WHITE);
  display.setTextSize(1);
  display.setCursor(0,0);
  display.print("LORA SENDER");
}

//Initialize LoRa module
void startLoRA(){
  //SPI LoRa pins
  SPI.begin(SCK, MISO, MOSI, SS);
  //setup LoRa transceiver module
  LoRa.setPins(SS, RST, DIO0);

  while (!LoRa.begin(BAND) && counter < 10) {
    Serial.print(".");
    counter++;
    delay(500);
  }
  if (counter == 10) {
    // Increment readingID on every new reading
    readingID++;
    Serial.println("Starting LoRa failed!");
  }
  Serial.println("LoRa Initialization OK!");
  display.setCursor(0,10);
  display.clearDisplay();
  display.print("LoRa Initializing OK!");
  display.display();
  delay(2000);
}

void startBME(){
  I2Cone.begin(SDA, SCL, 100000);
  bool status1 = bme.begin(0x76, &I2Cone);
  if (!status1) {
    Serial.println("Could not find a valid BME280_1 sensor, check wiring!");
    while (1);
  }
}

void getReadings(){
  temperature = bme.readTemperature();
  humidity = bme.readHumidity();
  pressure = bme.readPressure() / 100.0F;
}

void sendReadings() {
  LoRaMessage = String(readingID) + "/" + String(temperature) + "&" + String(humidity) + "#" + String(pressure);
  //Send LoRa packet to receiver
  LoRa.beginPacket();
  LoRa.print(LoRaMessage);
  LoRa.endPacket();

  display.clearDisplay();
  display.setCursor(0,0);
  display.setTextSize(1);
  display.print("LoRa packet sent!");
  display.setCursor(0,20);
  display.print("Temperature:");
  display.setCursor(72,20);
  display.print(temperature);
  display.setCursor(0,30);
  display.print("Humidity:");
  display.setCursor(54,30);
  display.print(humidity);
  display.setCursor(0,40);
  display.print("Pressure:");
  display.setCursor(54,40);
  display.print(pressure);
  display.setCursor(0,50);
  display.print("Reading ID:");
  display.setCursor(66,50);
  display.print(readingID);
  display.display();
  Serial.print("Sending packet: ");
  Serial.println(readingID);
  readingID++;
}

void setup() {
  //initialize Serial Monitor
  Serial.begin(115200);
  startOLED();
  startBME();
  startLoRA();
}
void loop() {
  getReadings();
  sendReadings();
  delay(10000);
}
Receiver Code
The receiver, as mentioned earlier, receives temperature and humidity values from the transmitter and displays it, along with the time it was received and the signal strength(RSSI), on a webpage hosted on the TTGO LoRa32 board.
All of this, especially the need to create a webpage and host it on the board, introduces new layers of complexity compared to the transmitter sketch. To create the webserver, we need three different files; the Arduino Sketch, the HTML File, and the Images used by the HTML file. Thankfully, the ESP32 has a file system (SPIFFS) which is what is used in storing the image and the HTML files. To do this, the sketch’s file system needs to be set up as described in the image below;
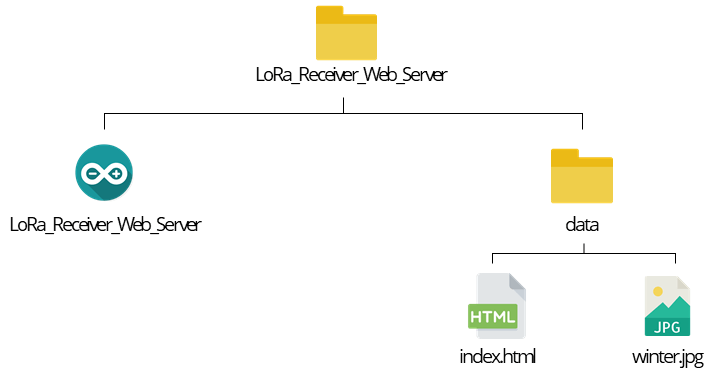
We essentially need to create a sketch folder and add a “data” folder in which the image and HTML file will be stored. Start by creating the index.html file using software like notepad++ or any other editor. The index.html file contain 3 element; the HTML code which creates the basic webpage structure, the CSS style snippets (placed between <style> </style>) which ensures everything looks pretty, and the javascript lines (placed between <script> and </script>) which are responsible for updating the sensor readings on the webpage. Copy the code below and paste it in the index.html file.
<!DOCTYPE HTML><html>
<head>
<meta name="viewport" content="width=device-width, initial-scale=1">
<link rel="icon" href="data:,">
<title>ESP32 (LoRa + Server)</title>
<link rel="stylesheet" href="https://use.fontawesome.com/releases/v5.7.2/css/all.css" integrity="sha384-fnmOCqbTlWIlj8LyTjo7mOUStjsKC4pOpQbqyi7RrhN7udi9RwhKkMHpvLbHG9Sr" crossorigin="anonymous">
<style>
body {
margin: 0;
font-family: Arial, Helvetica, sans-serif;
text-align: center;
}
header {
margin: 0;
padding-top: 5vh;
padding-bottom: 5vh;
overflow: hidden;
background-image: url(winter);
background-size: cover;
color: white;
}
h2 {
font-size: 2.0rem;
}
p { font-size: 1.2rem; }
.units { font-size: 1.2rem; }
.readings { font-size: 2.0rem; }
</style>
</head>
<body>
<header>
<h2>ESP32 (LoRa + Server)</h2>
<p><strong>Last received packet:<br/><span id="timestamp">%TIMESTAMP%</span></strong></p>
<p>LoRa RSSI: <span id="rssi">%RSSI%</span></p>
</header>
<main>
<p>
<i class="fas fa-thermometer-half" style="color:#059e8a;"></i> Temperature: <span id="temperature" class="readings">%TEMPERATURE%</span>
<sup>°C</sup>
</p>
<p>
<i class="fas fa-tint" style="color:#00add6;"></i> Humidity: <span id="humidity" class="readings">%HUMIDITY%</span>
<sup>%</sup>
</p>
<p>
<i class="fas fa-angle-double-down" style="color:#e8c14d;"></i> Pressure: <span id="pressure" class="readings">%PRESSURE%</span>
<sup>hpa</sup>
</p>
</main>
<script>
setInterval(updateValues, 10000, "temperature");
setInterval(updateValues, 10000, "humidity");
setInterval(updateValues, 10000, "pressure");
setInterval(updateValues, 10000, "rssi");
setInterval(updateValues, 10000, "timestamp");
function updateValues(value) {
var xhttp = new XMLHttpRequest();
xhttp.onreadystatechange = function() {
if (this.readyState == 4 && this.status == 200) {
document.getElementById(value).innerHTML = this.responseText;
}
};
xhttp.open("GET", "/" + value, true);
xhttp.send();
}
</script>
</body>
</html>
Arduino Sketch
The Arduino sketch basically takes data from the receiver, over LoRa, and passes it on, along with the signal strength and a timestamp that indicates when the message was received, to the webpage.
To reduce the complexity of the sketch, we will be using 3 libraries in addition to the ones used for the transmitter’s sketch. These libraries include; the NTPClient library forked by Taranis, the ESPAsyncWebServer library, and the Async TCP library.
The ESPAsyncWebserver and AsyncTCP library makes it easy to implement an asynchronous web server on the ESP, while the forked NTPClient library makes it easy to obtain network date and time which is used in time-stamping the data received from the transmitter. All these libraries are not available through the Arduino IDE’s Library Manager, as such, you will need to download them from the attached links and install them by unzipping them to the Arduino Libraries folder. Remember to restart the Arduino IDE after the installation.
Just like with the other sketch, I will do a quick run-through of the sketch explaining some of the key parts.
The sketch starts with include statements for all the libraries that will be used.
// Import Wi-Fi library
#include <WiFi.h>
#include "ESPAsyncWebServer.h"

#include <SPIFFS.h>

//Libraries for LoRa
#include <SPI.h>
#include <LoRa.h>

//Libraries for OLED Display
#include <Wire.h>
#include <Adafruit_GFX.h>
#include <Adafruit_SSD1306.h>

// Libraries to get time from NTP Server
#include <NTPClient.h>
#include <WiFiUdp.h>
Then the pins of the TTGO LoRa32 board being used by the onboard LoRa module are specified.
//define the pins used by the LoRa transceiver module
#define SCK 5
#define MISO 19
#define MOSI 27
#define SS 18
#define RST 14
#define DIO0 26
Next, the LoRa module’s frequency is specified and the pins of the TTGO LoRa32 being used by the OLED along with the display’s dimension are also specified.
//433E6 for Asia
//866E6 for Europe
//915E6 for North America
#define BAND 866E6

//OLED pins
#define OLED_SDA 4
#define OLED_SCL 15
#define OLED_RST 16
#define SCREEN_WIDTH 128 // OLED display width, in pixels
#define SCREEN_HEIGHT 64 // OLED display height, in pixels
For obvious reasons, you must ensure the frequency of the LoRa module on the receiver is the same as that of the transmitter and it’s legal to use it in projects like this in your country,
Next, provide the credentials of the WiFI access point through which the ESP is expected to connect to your local network.
// Replace with your network credentials
const char* ssid     = "REPLACE_WITH_YOUR_SSID";
const char* password = "REPLACE_WITH_YOUR_PASSWORD";
and create an NTP client to be used in fetching date and time information, along with variables to store them.
// Define NTP Client to get time
WiFiUDP ntpUDP;
NTPClient timeClient(ntpUDP);

// Variables to save date and time
String formattedDate;
String day;
String hour;
String timestamp;
We create a few more variables to store the message received from the transmitter.
// Initialize variables to get and save LoRa data
int rssi;
String loRaMessage;
String temperature;
String humidity;
String pressure;
String readingID;
and an AsyncWebServer object on port 80 and also create an instance of the SSD1306 library.
AsyncWebServer server(80);

Adafruit_SSD1306 display(SCREEN_WIDTH, SCREEN_HEIGHT, &Wire, OLED_RST);
Next, we create a few functions which will be used later in the code. The functions include; the processor() function which is used to send values to the place holders created in the HTML file, the startOLED() function which is used to initialize the OLED, the startloRA() function which is used to initialize and set parameters for LoRa Communication, the connectWiFi() function which uses the SSID and password credentials to connect the TTGO LoRa32 board to your Local network, the void getTimeStamp() function which is used to obtain time information from the NTPClient, and void getLoRaData() which receives the String sent from the transmitter and breaks it down to separate each value into its corresponding variable.
// Replaces placeholder with DHT values
String processor(const String& var){
  //Serial.println(var);
  if(var == "TEMPERATURE"){
    return temperature;
  }
  else if(var == "HUMIDITY"){
    return humidity;
  }
  else if(var == "PRESSURE"){
    return pressure;
  }
  else if(var == "TIMESTAMP"){
    return timestamp;
  }
  else if (var == "RRSI"){
    return String(rssi);
  }
  return String();
}

//Initialize OLED display
void startOLED(){
  //reset OLED display via software
  pinMode(OLED_RST, OUTPUT);
  digitalWrite(OLED_RST, LOW);
  delay(20);
  digitalWrite(OLED_RST, HIGH);

  //initialize OLED
  Wire.begin(OLED_SDA, OLED_SCL);
  if(!display.begin(SSD1306_SWITCHCAPVCC, 0x3c, false, false)) { // Address 0x3C for 128x32
    Serial.println(F("SSD1306 allocation failed"));
    for(;;); // Don't proceed, loop forever
  }
  display.clearDisplay();
  display.setTextColor(WHITE);
  display.setTextSize(1);
  display.setCursor(0,0);
  display.print("LORA SENDER");
}

//Initialize LoRa module
void startLoRA(){
  int counter;
  //SPI LoRa pins
  SPI.begin(SCK, MISO, MOSI, SS);
  //setup LoRa transceiver module
  LoRa.setPins(SS, RST, DIO0);

  while (!LoRa.begin(BAND) && counter < 10) {
    Serial.print(".");
    counter++;
    delay(500);
  }
  if (counter == 10) {
    // Increment readingID on every new reading
    Serial.println("Starting LoRa failed!");
  }
  Serial.println("LoRa Initialization OK!");
  display.setCursor(0,10);
  display.clearDisplay();
  display.print("LoRa Initializing OK!");
  display.display();
  delay(2000);
}

void connectWiFi(){
  // Connect to Wi-Fi network with SSID and password
  Serial.print("Connecting to ");
  Serial.println(ssid);
  WiFi.begin(ssid, password);
  while (WiFi.status() != WL_CONNECTED) {
    delay(500);
    Serial.print(".");
  }
  // Print local IP address and start web server
  Serial.println("");
  Serial.println("WiFi connected.");
  Serial.println("IP address: ");
  Serial.println(WiFi.localIP());
  display.setCursor(0,20);
  display.print("Access web server at: ");
  display.setCursor(0,30);
  display.print(WiFi.localIP());
  display.display();
}

// Read LoRa packet and get the sensor readings
void getLoRaData() {
  Serial.print("Lora packet received: ");
  // Read packet
  while (LoRa.available()) {
    String LoRaData = LoRa.readString();
    // LoRaData format: readingID/temperature&soilMoisture#batterylevel
    // String example: 1/27.43&654#95.34
    Serial.print(LoRaData);

    // Get readingID, temperature and soil moisture
    int pos1 = LoRaData.indexOf('/');
    int pos2 = LoRaData.indexOf('&');
    int pos3 = LoRaData.indexOf('#');
    readingID = LoRaData.substring(0, pos1);
    temperature = LoRaData.substring(pos1 +1, pos2);
    humidity = LoRaData.substring(pos2+1, pos3);
    pressure = LoRaData.substring(pos3+1, LoRaData.length());
  }
  // Get RSSI
  rssi = LoRa.packetRssi();
  Serial.print(" with RSSI ");
  Serial.println(rssi);
}

// Function to get date and time from NTPClient
void getTimeStamp() {
  while(!timeClient.update()) {
    timeClient.forceUpdate();
  }
  // The formattedDate comes with the following format:
  // 2018-05-28T16:00:13Z
  // We need to extract date and time
  formattedDate = timeClient.getFormattedDate();
  Serial.println(formattedDate);

  // Extract date
  int splitT = formattedDate.indexOf("T");
  day = formattedDate.substring(0, splitT);
  Serial.println(day);
  // Extract time
  hour = formattedDate.substring(splitT+1, formattedDate.length()-1);
  Serial.println(hour);
  timestamp = day + " " + hour;
}
Up next is the void setup() function. Just like the transmitter sketch, the creation of the functions above helps reduce the amount of code required leaving the initialization of the SPIffS system, along with the implementation of the server.on routine as the major tasks. The javascript snippet of code in the HTML file is set to update the webpage every 10 seconds, as such, it makes a request to the Arduino Sketch for data when that happens. The Server.on routine handles that request and sends all the values to the server.
void setup() {
  // Initialize Serial Monitor
  Serial.begin(115200);
  startOLED();
  startLoRA();
  connectWiFi();

  if(!SPIFFS.begin()){
    Serial.println("An Error has occurred while mounting SPIFFS");
    return;
  }
  // Route for root / web page
  server.on("/", HTTP_GET, [](AsyncWebServerRequest *request){
    request->send(SPIFFS, "/index.html", String(), false, processor);
  });
  server.on("/temperature", HTTP_GET, [](AsyncWebServerRequest *request){
    request->send_P(200, "text/plain", temperature.c_str());
  });
  server.on("/humidity", HTTP_GET, [](AsyncWebServerRequest *request){
    request->send_P(200, "text/plain", humidity.c_str());
  });
  server.on("/pressure", HTTP_GET, [](AsyncWebServerRequest *request){
    request->send_P(200, "text/plain", pressure.c_str());
  });
  server.on("/timestamp", HTTP_GET, [](AsyncWebServerRequest *request){
    request->send_P(200, "text/plain", timestamp.c_str());
  });
  server.on("/rssi", HTTP_GET, [](AsyncWebServerRequest *request){
    request->send_P(200, "text/plain", String(rssi).c_str());
  });
  server.on("/winter", HTTP_GET, [](AsyncWebServerRequest *request){
    request->send(SPIFFS, "/winter.jpg", "image/jpg");
  });
  // Start server
  server.begin();
The setup also includes the line of code to initialize the NTPClient and offset the data received with your timezone.
  // Initialize a NTPClient to get time
  timeClient.begin();
  // Set offset time in seconds to adjust for your timezone, for example:
  // GMT +1 = 3600
  // GMT +8 = 28800
  // GMT -1 = -3600
  // GMT 0 = 0
  timeClient.setTimeOffset(0);
}
Next, is the void loop() function. The loop starts with a line of code to listen for incoming packets which if available, the getLoRaData() and getTimeStamp() functions are called.
void loop() {
  // Check if there are LoRa packets available
  int packetSize = LoRa.parsePacket();
  if (packetSize) {
    getLoRaData();
    getTimeStamp();
  }
}
The complete Arduino Sketch for the receiver is provided below and also attached under the download section.
/*********
  Rui Santos
  Complete project details at https://RandomNerdTutorials.com/esp32-lora-sensor-web-server/

  Permission is hereby granted, free of charge, to any person obtaining a copy
  of this software and associated documentation files.

  The above copyright notice and this permission notice shall be included in all
  copies or substantial portions of the Software.
*********/

// Import Wi-Fi library
#include <WiFi.h>
#include "ESPAsyncWebServer.h"

#include <SPIFFS.h>

//Libraries for LoRa
#include <SPI.h>
#include <LoRa.h>

//Libraries for OLED Display
#include <Wire.h>
#include <Adafruit_GFX.h>
#include <Adafruit_SSD1306.h>

// Libraries to get time from NTP Server
#include <NTPClient.h>
#include <WiFiUdp.h>

//define the pins used by the LoRa transceiver module
#define SCK 5
#define MISO 19
#define MOSI 27
#define SS 18
#define RST 14
#define DIO0 26

//433E6 for Asia
//866E6 for Europe
//915E6 for North America
#define BAND 866E6

//OLED pins
#define OLED_SDA 4
#define OLED_SCL 15
#define OLED_RST 16
#define SCREEN_WIDTH 128 // OLED display width, in pixels
#define SCREEN_HEIGHT 64 // OLED display height, in pixels

// Replace with your network credentials
const char* ssid     = "REPLACE_WITH_YOUR_SSID";
const char* password = "REPLACE_WITH_YOUR_PASSWORD";

// Define NTP Client to get time
WiFiUDP ntpUDP;
NTPClient timeClient(ntpUDP);

// Variables to save date and time
String formattedDate;
String day;
String hour;
String timestamp;


// Initialize variables to get and save LoRa data
int rssi;
String loRaMessage;
String temperature;
String humidity;
String pressure;
String readingID;

// Create AsyncWebServer object on port 80
AsyncWebServer server(80);

Adafruit_SSD1306 display(SCREEN_WIDTH, SCREEN_HEIGHT, &Wire, OLED_RST);

// Replaces placeholder with DHT values
String processor(const String& var){
  //Serial.println(var);
  if(var == "TEMPERATURE"){
    return temperature;
  }
  else if(var == "HUMIDITY"){
    return humidity;
  }
  else if(var == "PRESSURE"){
    return pressure;
  }
  else if(var == "TIMESTAMP"){
    return timestamp;
  }
  else if (var == "RRSI"){
    return String(rssi);
  }
  return String();
}

//Initialize OLED display
void startOLED(){
  //reset OLED display via software
  pinMode(OLED_RST, OUTPUT);
  digitalWrite(OLED_RST, LOW);
  delay(20);
  digitalWrite(OLED_RST, HIGH);

  //initialize OLED
  Wire.begin(OLED_SDA, OLED_SCL);
  if(!display.begin(SSD1306_SWITCHCAPVCC, 0x3c, false, false)) { // Address 0x3C for 128x32
    Serial.println(F("SSD1306 allocation failed"));
    for(;;); // Don't proceed, loop forever
  }
  display.clearDisplay();
  display.setTextColor(WHITE);
  display.setTextSize(1);
  display.setCursor(0,0);
  display.print("LORA SENDER");
}

//Initialize LoRa module
void startLoRA(){
  int counter;
  //SPI LoRa pins
  SPI.begin(SCK, MISO, MOSI, SS);
  //setup LoRa transceiver module
  LoRa.setPins(SS, RST, DIO0);

  while (!LoRa.begin(BAND) && counter < 10) {
    Serial.print(".");
    counter++;
    delay(500);
  }
  if (counter == 10) {
    // Increment readingID on every new reading
    Serial.println("Starting LoRa failed!");
  }
  Serial.println("LoRa Initialization OK!");
  display.setCursor(0,10);
  display.clearDisplay();
  display.print("LoRa Initializing OK!");
  display.display();
  delay(2000);
}

void connectWiFi(){
  // Connect to Wi-Fi network with SSID and password
  Serial.print("Connecting to ");
  Serial.println(ssid);
  WiFi.begin(ssid, password);
  while (WiFi.status() != WL_CONNECTED) {
    delay(500);
    Serial.print(".");
  }
  // Print local IP address and start web server
  Serial.println("");
  Serial.println("WiFi connected.");
  Serial.println("IP address: ");
  Serial.println(WiFi.localIP());
  display.setCursor(0,20);
  display.print("Access web server at: ");
  display.setCursor(0,30);
  display.print(WiFi.localIP());
  display.display();
}

// Read LoRa packet and get the sensor readings
void getLoRaData() {
  Serial.print("Lora packet received: ");
  // Read packet
  while (LoRa.available()) {
    String LoRaData = LoRa.readString();
    // LoRaData format: readingID/temperature&soilMoisture#batterylevel
    // String example: 1/27.43&654#95.34
    Serial.print(LoRaData);

    // Get readingID, temperature and soil moisture
    int pos1 = LoRaData.indexOf('/');
    int pos2 = LoRaData.indexOf('&');
    int pos3 = LoRaData.indexOf('#');
    readingID = LoRaData.substring(0, pos1);
    temperature = LoRaData.substring(pos1 +1, pos2);
    humidity = LoRaData.substring(pos2+1, pos3);
    pressure = LoRaData.substring(pos3+1, LoRaData.length());
  }
  // Get RSSI
  rssi = LoRa.packetRssi();
  Serial.print(" with RSSI ");
  Serial.println(rssi);
}

// Function to get date and time from NTPClient
void getTimeStamp() {
  while(!timeClient.update()) {
    timeClient.forceUpdate();
  }
  // The formattedDate comes with the following format:
  // 2018-05-28T16:00:13Z
  // We need to extract date and time
  formattedDate = timeClient.getFormattedDate();
  Serial.println(formattedDate);

  // Extract date
  int splitT = formattedDate.indexOf("T");
  day = formattedDate.substring(0, splitT);
  Serial.println(day);
  // Extract time
  hour = formattedDate.substring(splitT+1, formattedDate.length()-1);
  Serial.println(hour);
  timestamp = day + " " + hour;
}

void setup() {
  // Initialize Serial Monitor
  Serial.begin(115200);
  startOLED();
  startLoRA();
  connectWiFi();

  if(!SPIFFS.begin()){
    Serial.println("An Error has occurred while mounting SPIFFS");
    return;
  }
  // Route for root / web page
  server.on("/", HTTP_GET, [](AsyncWebServerRequest *request){
    request->send(SPIFFS, "/index.html", String(), false, processor);
  });
  server.on("/temperature", HTTP_GET, [](AsyncWebServerRequest *request){
    request->send_P(200, "text/plain", temperature.c_str());
  });
  server.on("/humidity", HTTP_GET, [](AsyncWebServerRequest *request){
    request->send_P(200, "text/plain", humidity.c_str());
  });
  server.on("/pressure", HTTP_GET, [](AsyncWebServerRequest *request){
    request->send_P(200, "text/plain", pressure.c_str());
  });
  server.on("/timestamp", HTTP_GET, [](AsyncWebServerRequest *request){
    request->send_P(200, "text/plain", timestamp.c_str());
  });
  server.on("/rssi", HTTP_GET, [](AsyncWebServerRequest *request){
    request->send_P(200, "text/plain", String(rssi).c_str());
  });
  server.on("/winter", HTTP_GET, [](AsyncWebServerRequest *request){
    request->send(SPIFFS, "/winter.jpg", "image/jpg");
  });
  // Start server
  server.begin();

  // Initialize a NTPClient to get time
  timeClient.begin();
  // Set offset time in seconds to adjust for your timezone, for example:
  // GMT +1 = 3600
  // GMT +8 = 28800
  // GMT -1 = -3600
  // GMT 0 = 0
  timeClient.setTimeOffset(0);
}

void loop() {
  // Check if there are LoRa packets available
  int packetSize = LoRa.parsePacket();
  if (packetSize) {
    getLoRaData();
    getTimeStamp();
  }
}
With the sketch saved, go to the sketch folder and create a folder called data. Move the image and the index.html file we created earlier into the folder so the file hierarchy looks as we described earlier. With that done, we are ready to upload the sketches and test the project.
Demo
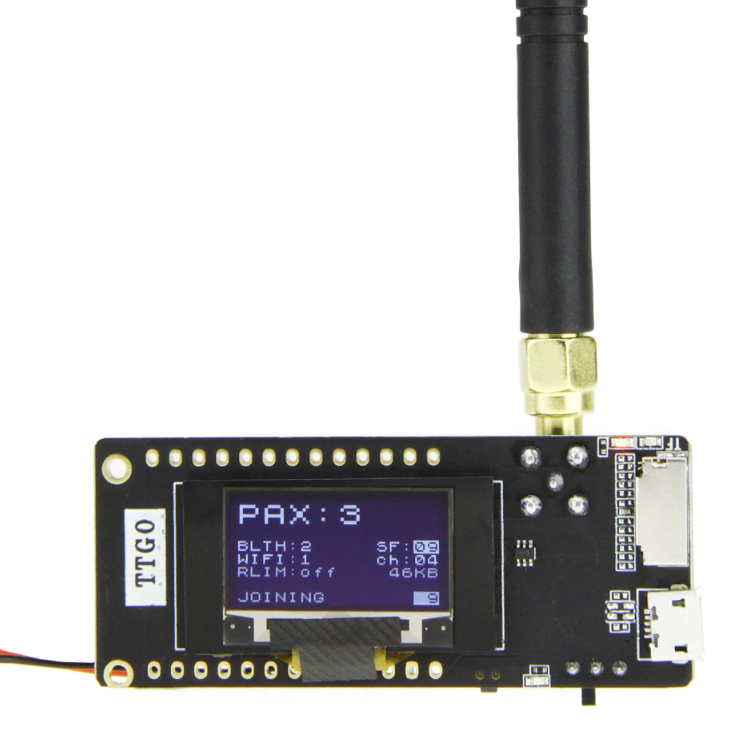
For the transmitter, connect the setup to your computer, ensure you select the right port and board type (in this case, the TTGO LoRa32-OLED V1.) and hit the upload button. If successful, you should see the OLED come up with the latest temperature, humidity, and pressure data as shown in the image below.
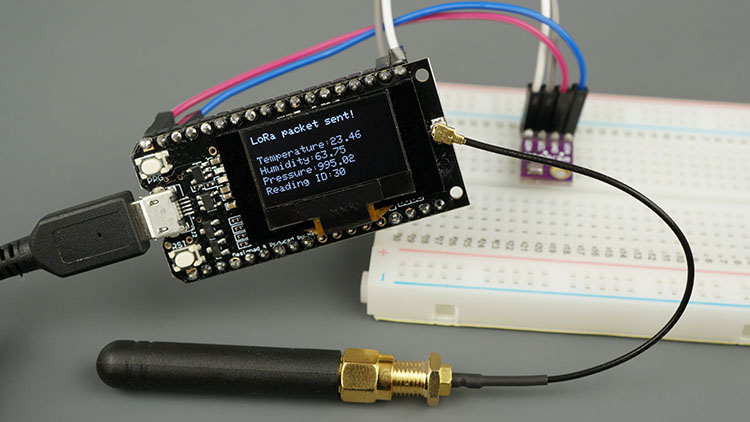
The serial monitor should also show the LoRa Transmission progress. Since we did not include a way to check if the data was received, the transmitter will keep sending the data out.
The upload mechanism for the receiver is a bit different. We need to first upload the Data file to the SPIFFS using the ESP32 Filesystem Uploader we installed earlier, after which we upload the main sketch. With the HTML file and image in the right directory, go to tools, select the right port, and board type(), then click the ESP32 Sketch Data Upload option.
After a few seconds, the data file should be successfully uploaded. Now upload the sketch to the board using the IDE’s upload button. With the upload completed, open the serial monitor. You should see the IP address along with LoRa Packets being received from the transmitter (you can power the transmitter with a battery or any other power source for this).
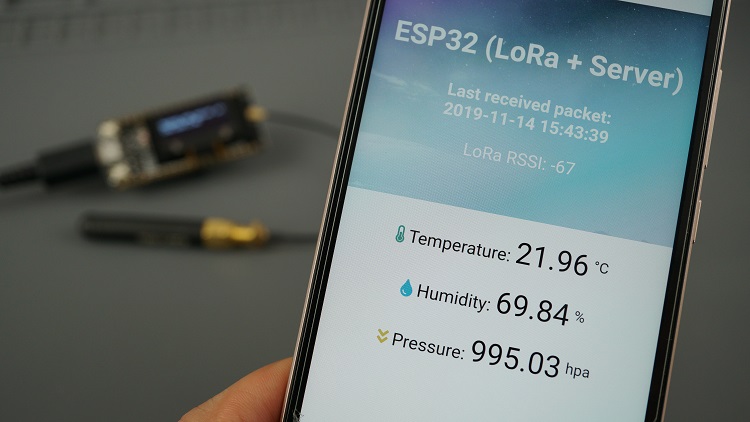
Enter the IP address into the address bar of a browser on any device on the same network as the ESP. you should see the webserver displayed with the latest sensor readings as shown in the image below.
That’s it!
There are dozens of ways to take the project forward. You could decide to hook up the receiver to the internet and instead of a local server, report the data to a globally accessible webpage. You could also decide to retain the local network features but have it display data from multiple transmitters (sensors).
References:


Hi, what is the range of this?
Normally it’s about 0.8-1km but this depends on the surroundings and there have been reports that this can be as low as 100m.
Hell, thanks for this project, I can’t understood the reciver part!!! Do you use another esp32 part ?