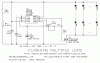
Flashing multiple LEDs
This diagram shows a general way to flash a large number of LEDs in unison.
On the left is the power source. It is shown as a battery but would normally be a power supply, since the LEDs can draw quite a lot of current.
The ideal voltage is 12V. Do not exceed 15V because U1 (the 555 timer) and Q1 (the MOSFET) may be damaged.
The ON/OFF switch, SW1, is optional.
TIMING PARAMETERS
U1 generates a square wave at its output (pin 3). The frequency is determined by CT (shown as a 33 uF electrolytic capacitor) and RT (shown as a 100 kilohm preset potentiometer or trimpot).
The LEDs flash ON and OFF for equal durations, i.e. the duty cycle of the oscillator is 50%. The LED ON time (which is equal to the LED OFF time) can be calculated as approximately T = 0.7 RT CT, as shown on the schematic.
T is the ON time (which is equal to the OFF time), in seconds;
RT is the RT resistance in ohms (as shown, RT is adjustable from 0 ohms to 100,000 ohms);
CT is the CT capacitance in farads (33 uF is 0.000033 farads).
So with the value given, the ON time is adjustable up to approximately 0.7 * 100,000 * 0.000033 which is about 2.3 seconds. So with RT fully anticlockwise, the LEDs will flash ON for 2.3 seconds, and OFF for 2.3 seconds.
You can change the values of CT and RT, and replace RT with a fixed resistor if you like, to get the flash rate you want.
LED DRIVE MOSFET (Q1)
Q1 is driven from the oscillator and controls the LEDs. I have suggested the NTD4906N, which is a small, cheap and high-performance device available from Digikey (
http://www.digikey.com/product-detail/en/NTD4906N-35G/NTD4906N-35GOS-ND/2194521) but many other types are suitable, including the MTP3055, and most likely
any MOSFET with 3055 as the numeric part of its part number.
The important selection parameters for Q1 are:
1-1. It must be an N-channel MOSFET, not a JFET
1-2. Its Vds voltage specification (maximum allowable drain-source voltage) must be at least 20V. The NTD4906N is rated for 30V and the MTP3055 for 60V.
1-3. Its ON-resistance (the Rds(on) parameter) should be as low as possible. This parameter is specified in ohms, or milliohms (one milliohm is 0.001 ohms). Don't use a device with Rds(on) greater than 0.1 ohms (100 milliohms). Under 50 milliohms is good.
This parameter directly affects the amount of voltage lost in the MOSFET, and the amount of power it dissipates, while the LEDs are ON. Keeping Rds(on) under 50 milliohms means that a total LED current of up to 2.4A can be driven with less than 1% voltage loss in the MOSFET, and very little heating (no need for a heatsink on the MOSFET).
1-4. It must be in a suitable package. If you are a hobbyist, you may prefer a through-hole package (the type with wire leads that can be pushed through holes in a piece of stripboard). Of these, the TO-220 package (and its variants) are convenient, because the pins are spaced at 0.1 inch pitch, to suit stripboard. The NTD4906N I recommended is smaller than TO-220 so you'll need to spread the leads a bit.
Most MOSFETs nowadays are in SMT (surface mount technology) packages, which mount directly onto a copper surface. This is quite workable with stripboard, and gives a more robust result than a through-hole package, which can become bent over, and can short onto other components.
Other MOSFET parameters are not really important in this application.
LED SERIES STRINGS
LEDs are driven in series strings, each string with a current limiting resistor. The strings are connected in parallel. When Q1 turns ON, the full supply voltage is applied across all of the strings.
The number of LEDs in each string, and the value of the series resistor, can be calculated as follows.
2-1. The forward voltages of the LEDs in a series string add together. The resistor "takes up the slack" between the sum of the LED voltages and the total applied voltage.
The current in all parts of a series string is the same. This current is controlled by the resistor - specifically, by its resistance and the voltage across it - and can be calculated using Ohm's Law: I = V / R, where I is the LED current in amps, V is the voltage across the resistor, and R is the resistor value, in ohms.
Ohm's Law can be rearranged to R = V / I, where V is the voltage across the resistor, I is the desired string current in amps, and R is the resistor value in ohms.
2-2. TYPICAL EXAMPLE.
Say we want an LED current of 20 mA (0.02 amps), with four red LEDs in the string. Each LED has a forward voltage of 2.1V at 20 mA (from the data sheet).
The total voltage across the LEDs is 4 * 2.1V = 8.4V. If the supply voltage is 12V, that leaves 3.6V across the resistor.
R = V / I where V=3.6 and I=0.02 so R is 180 ohms.
2-3. The forward voltage of an LED depends mainly on what colour it is. It is also affected by the current that you pass through the LED. It also varies from one device to another within a batch, and between batches, and between manufacturers.
Manufacturers usually give a "typical" voltage at one or more operating currents. You should base your calculations on this typical value, but be aware that with the simple driving method shown here, variations in LED forward voltage WILL affect the string current.
If you're running LEDs at high currents (e.g. over 50 mA), you may want to consider using a current source instead of a simple current limiting resistor, to get more accurate control of the LED current.
2-4. As a rule of thumb, the voltage across the resistor should be at least 15~20% of the total voltage. For a 12V supply, this means you should have 1.8~2.4V across the resistor. So the total voltage available for the LEDs is 9.6~10.2V.
Say your LED forward voltage is 2.9V. Although 4 * 2.9V is 11.6V, which is less than the 12V supply voltage, that would leave only 0.4V across the resistor. That is only 3.3% of the total voltage.
In this case, you wouldn't be able to have four LEDs per string. You would use three LEDs per string. Total LED voltage would be 8.7V and there would be 3.3V dropped across the resistor.
The reason for this rule of thumb is that LED forward voltages are not tightly controlled, so you want a reasonable amount of "slack" voltage across the resistor. In the example above, with only 0.4V across the resistor, a small change in LED forward voltage from 2.9V to 2.8V would cause the voltage across the resistor to double, from 0.4V to 0.8V. Since this voltage determines the string current, the current would double too, and this could damage the LEDs.
2-5. The total current drawn from the power source when the LEDs are ON is the sum of the currents of all the strings. If each string operates at 20 mA and you have 50 strings, there will be 1A load on the battery while the LEDs are ON. Load on the power source while the LEDs are OFF will be about 10 mA.
2-6. You can mix and match colours within each string. As always, all LEDs in the series string will operate at the same current. This may make the layout more convenient, or it may enable a better combination of voltages.
For example, say you're using a lot of white LEDs with forward voltages of 3.4V. Three of these adds up to 10.2V, which is pretty close to the 12V total voltage. You would probably use two white LEDs per string, so each string would have 6.8V across the LEDs and 5.2V across the resistor. This means more strings are needed, which wastes power. But you could add a red LED (forward voltage about 2V) into each string.
If you want different colours to operate at different currents, you can put them in separate strings. An alternative is to connect a resistor across the LEDs that you want to run at a lower current; the resistor will carry some of the current, leaving less current flowing through the LED. The resistance can be calculated using R = V / I where V is the voltage across the LED and I is the current that you want to divert through the resistor, in amps.
OTHER COMMENTS
Several part numbers are listed for U1. The LM555 and NE555 types are the original "555 timer"; TLC555 and TS555 are enhanced modern equivalents. Any type is suitable for this application.
CD and CC are decoupling capacitors. CD should be connected close to pins 1 and 8 of U1. RG limits the current into and out of Q1's gate at switching times (MOSFET gates have significant capacitance.)
MOSFETs are static-sensitive devices. You should keep the pins connected together using a piece of conductive foam, a paper clip, or some thin wire, until it has been installed in the board. (Install it last.)
The circuit can be constructed on stripboard. Layout is not critical.