

Using the 3.2″ HX8357B Color TFT Display with Arduino
- Nick Koumaris
- http://educ8s.tv
- info@educ8s.tv
- 16.007 Views
- easy
- Tested
- 0 Likes

Hi guys, welcome to another Arduino tutorial. Today, I will be showing you how to use the 3.2″color TFT display with Arduino.
The display demand for every project is unique, a project may require just a simple, single character OLED display, while another project may require something bigger, all based on the function the display is to perform. For this reason, as a maker or electronics hobbyist, anyone needs to know how to work with as many displays as possible, that’s why today, we will take a look at how to use the super cheap, 3.2″ color TFT display with Arduino.
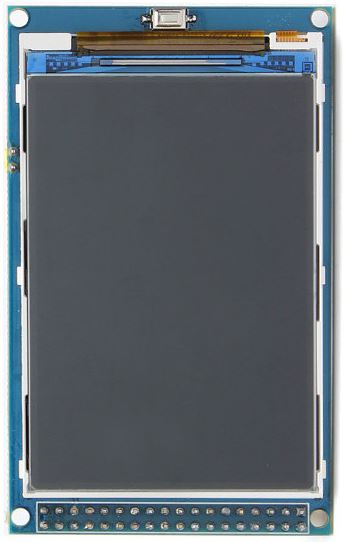
For this tutorial, we will use the 3.2″ TFT display from banggood. The display which is based on the HX8357B LCD Controller, supports 16-wire DataBus interface and comes with 262K color at 480 x 320 resolution. The module includes an SD card socket, an SPI FLASH circuit and a 5V-3.3V power and Logic Level conversion circuit which makes it easy to use with any microcontroller that uses either 5v or 3.3v logic voltage level. The module can be directly inserted into an Arduino Mega or Due board.
To demonstrate how the display works, we will use the UTFT LCD library for Arduino to display some images and text on the display including an animated graph. All these will show how the display could be used for something like an oscilloscope.
Required Components
The following components are required to build this project:
These components can each be bought via the links attached. The 3.2″ TFT display, as at the time I bought it was listed on the website as a 3″ display but after buying and measuring, the size of the display is 3.2″.
Schematics
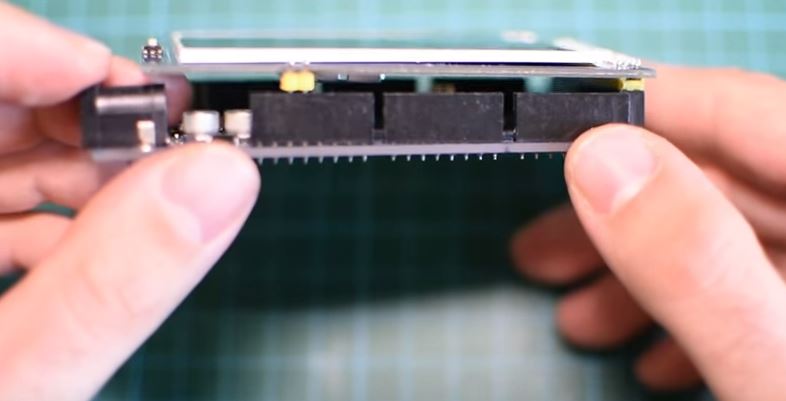
The display comes in a shield form, which means it can be plugged directly into the Arduino with which it is going to be used, as such, no schematic is needed. Plug the display into your Arduino Mega or Due as shown in the image below.
Code
To achieve the goals of this tutorial, we will use a simple sample code attached to the UTFT library. The UTFT library is a library created to facilitate easy interaction between a microcontroller and several LCD displays. Unfortunately, the latest versions of the UTFT library has no support for the HX8357B LCD controller which is used to our 3.2″ TFT display. To go round this hurdle, we will be installing a previous version of the library on the Arduino IDE.
The wonderful library written by Henning Karlsen can be downloaded from the link below. The libraries are pre-built for each Arduino board so choose the right one that matches the board you are using from the link below.
For Arduino Mega: https://github.com/Bodmer/TFT_HX8357
For Arduino Due: https://github.com/Bodmer/TFT_HX8357_Due
Use your favorite library installation method to install the library after downloading and launch an Instance of the Arduino IDE. With the IDE opened, click on file, select examples, select UTFT then select the Display Demo or the UTFT_Demo_480x320 example.
We will attempt to do a brief explanation of the code. The code starts by setting the speed (the wait variable) at which it runs to 2000. This speed can be reduced to zero so the demo can play slowly. After this, we include the utft library and invoke the custom library for the for Arduino Due.
#define WAIT 2000 // Delay between tests, set to 0 to demo speed, 2000 to see what it does!

#define CENTRE 240

#include <TFT_HX8357_Due.h> // Hardware-specific library

TFT_HX8357_Due tft = TFT_HX8357_Due();       // Invoke custom library
Next, we specify the initial color for the fonts to be used. It should be noted that to use custom fonts, they must be pre-loaded into the library by editing the User_Setup.h file in the library.
#define TFT_GREY 0x7BEF
with that done, we proceed to the void setup() function. Under the setup() function, we initialize the LCD using the init command and we ensure the LCD display is on landscape using the set rotation function with a value of 1.
void setup()
{
  randomSeed(analogRead(5));
  Serial.begin(38400);
// Setup the LCD
  tft.init();
  tft.setRotation(1);
}

void loop()
Next is the void loop() function which I personally now use as a reference for functions and how to use them. The void loop function uses quite a number of functions which were used to achieve different effects in the demo. The functions are easy to use and from their name, one can easily tell what they do.
void loop()
{
  int buf[478];
  int x, x2;
  int y, y2;
  int r;

  runTime = millis();
// Clear the screen and draw the frame
  tft.fillScreen(TFT_BLACK);

  tft.fillRect(0, 0, 480, 13, TFT_RED);

  tft.fillRect(0, 305, 480, 320, TFT_GREY);
  tft.setTextColor(TFT_BLACK,TFT_RED);

  tft.drawCentreString("* TFT_HX8357_Due *", CENTRE, 3, 1);
  tft.setTextColor(TFT_YELLOW,TFT_GREY);
  tft.drawCentreString("Adapted by Bodmer", CENTRE, 309,1);

  tft.drawRect(0, 14, 479, 305-14, TFT_BLUE);

// Draw crosshairs
  tft.drawLine(239, 15, 239, 304, TFT_BLUE);
  tft.drawLine(1, 159, 478, 159, TFT_BLUE);
  for (int i=9; i<470; i+=10)
    tft.drawLine(i, 157, i, 161, TFT_BLUE);
  for (int i=19; i<220; i+=10)
    tft.drawLine(237, i, 241, i, TFT_BLUE);

// Draw sin-, cos- and tan-lines
  tft.setTextColor(TFT_CYAN);
  tft.drawString("Sin", 5, 15,2);
  for (int i=1; i<478; i++)
  {
    tft.drawPixel(i,159+(sin(((i*1.13)*3.14)/180)*95),TFT_CYAN);
  }

  tft.setTextColor(TFT_RED);
  tft.drawString("Cos", 5, 30,2);
  for (int i=1; i<478; i++)
  {
    tft.drawPixel(i,159+(cos(((i*1.13)*3.14)/180)*95),TFT_RED);
  }

  tft.setTextColor(TFT_YELLOW);
  tft.drawString("Tan", 5, 45,2);
  for (int i=1; i<478; i++)
  {
    tft.drawPixel(i,159+(tan(((i*1.13)*3.14)/180)),TFT_YELLOW);
  }

  delay(WAIT);

  tft.fillRect(1,15,478-1,304-15,TFT_BLACK);
  tft.drawLine(239, 15, 239, 304,TFT_BLUE);
  tft.drawLine(1, 159, 478, 159,TFT_BLUE);

// Draw a moving sinewave
int col = 0;
  x=1;
  for (int i=1; i<(477*15); i++)
  {
    x++;
    if (x==478)
      x=1;
    if (i>478)
    {
      if ((x==239)||(buf[x-1]==159))
        col = TFT_BLUE;
      else
        tft.drawPixel(x,buf[x-1],TFT_BLACK);
    }
    y=159+(sin(((i*0.7)*3.14)/180)*(90-(i / 100)));
    tft.drawPixel(x,y, TFT_BLUE);
    buf[x-1]=y;
  }

  delay(WAIT);

  tft.fillRect(1,15,478-1,304-15,TFT_BLACK);

// Draw some filled rectangles
  for (int i=1; i<6; i++)
  {
    switch (i)
    {
      case 1:
        col = TFT_MAGENTA;
        break;
      case 2:
        col = TFT_RED;
        break;
      case 3:
        col = TFT_GREEN;
        break;
      case 4:
        col = TFT_BLUE;
        break;
      case 5:
        col = TFT_YELLOW;
        break;
    }
    tft.fillRect(150+(i*20), 70+(i*20), 60, 60,col);
  }

  delay(WAIT);

  tft.fillRect(1,15,478-1,304-15,TFT_BLACK);

// Draw some filled, rounded rectangles
  for (int i=1; i<6; i++)
  {
    switch (i)
    {
      case 1:
        col = TFT_MAGENTA;
        break;
      case 2:
        col = TFT_RED;
        break;
      case 3:
        col = TFT_GREEN;
        break;
      case 4:
        col = TFT_BLUE;
        break;
      case 5:
        col = TFT_YELLOW;
        break;
    }
    tft.fillRoundRect(270-(i*20), 70+(i*20), 60, 60, 3, col);
  }

  delay(WAIT);

  tft.fillRect(1,15,478-1,304-15,TFT_BLACK);

// Draw some filled circles
  for (int i=1; i<6; i++)
  {
    switch (i)
    {
      case 1:
        col = TFT_MAGENTA;
        break;
      case 2:
        col = TFT_RED;
        break;
      case 3:
        col = TFT_GREEN;
        break;
      case 4:
        col = TFT_BLUE;
        break;
      case 5:
        col = TFT_YELLOW;
        break;
    }
    tft.fillCircle(180+(i*20),100+(i*20), 30,col);
  }

  delay(WAIT);

  tft.fillRect(1,15,478-1,304-15,TFT_BLACK);

// Draw some lines in a pattern

  for (int i=15; i<304; i+=5)
  {
    tft.drawLine(1, i, (i*1.6)-10, 303, TFT_RED);
  }

  for (int i=304; i>15; i-=5)
  {
    tft.drawLine(477, i, (i*1.6)-11, 15, TFT_RED);
  }

  for (int i=304; i>15; i-=5)
  {
    tft.drawLine(1, i, 491-(i*1.6), 15, TFT_CYAN);
  }

  for (int i=15; i<304; i+=5)
  {
    tft.drawLine(477, i, 490-(i*1.6), 303, TFT_CYAN);
  }

  delay(WAIT);

  tft.fillRect(1,15,478-1,304-15,TFT_BLACK);

// Draw some random circles
  for (int i=0; i<100; i++)
  {
    x=32+random(416);
    y=45+random(226);
    r=random(30);
    tft.drawCircle(x, y, r,random(0xFFFF));
  }

  delay(WAIT);

  tft.fillRect(1,15,478-1,304-15,TFT_BLACK);

// Draw some random rectangles
  for (int i=0; i<100; i++)
  {
    x=2+random(476);
    y=16+random(289);
    x2=2+random(476);
    y2=16+random(289);
    if (x2<x) {
      r=x;x=x2;x2=r;
    }
    if (y2<y) {
      r=y;y=y2;y2=r;
    }
    tft.drawRect(x, y, x2-x, y2-y,random(0xFFFF));
  }

  delay(WAIT);

  tft.fillRect(1,15,478-1,304-15,TFT_BLACK);

// Draw some random rounded rectangles
  for (int i=0; i<100; i++)
  {
    x=2+random(476);
    y=16+random(289);
    x2=2+random(476);
    y2=16+random(289);
    if (x2<x) {
      r=x;x=x2;x2=r;
    }
    if (y2<y) {
      r=y;y=y2;y2=r;
    }
    tft.drawRoundRect(x, y, x2-x, y2-y, 3,random(0xFFFF));
  }

  delay(WAIT);

  tft.fillRect(1,15,478-1,304-15,TFT_BLACK);

  for (int i=0; i<100; i++)
  {
    x=2+random(476);
    y=16+random(289);
    x2=2+random(476);
    y2=16+random(289);
    col=random(0xFFFF);
    tft.drawLine(x, y, x2, y2,col);
  }

  delay(WAIT);

  tft.fillRect(1,15,478-1,304-15,TFT_BLACK);

  for (int i=0; i<10000; i++)
  {
    tft.drawPixel(2+random(476), 16+random(289),random(0xFFFF));
  }

  delay(WAIT);

  tft.fillRect(0, 0, 480, 320, TFT_BLUE);

  tft.fillRoundRect(160, 70, 319-160, 169-70, 3,TFT_RED);

  tft.setTextColor(TFT_WHITE,TFT_RED);
  tft.drawCentreString("That's it!", CENTRE, 93,2);
  tft.drawCentreString("Restarting in a", CENTRE, 119, 2);
  tft.drawCentreString("few seconds...", CENTRE, 132, 2);

  tft.setTextColor(TFT_GREEN,TFT_BLUE);
  tft.drawCentreString("Runtime: (msecs)", CENTRE, 280, 2);
  tft.setTextDatum(TC_DATUM);
  runTime = millis()-runTime;
  tft.drawNumber(runTime, CENTRE, 300,2);
  tft.setTextDatum(TL_DATUM);
  delay (10000);
}
Take some time to go through the code to better understand what each function does.
Demo
Upload the code to your Arduino board and you should see the display come up after a few minutes, displaying texts, and different other graphics. A view of the display in action is shown in the image below.
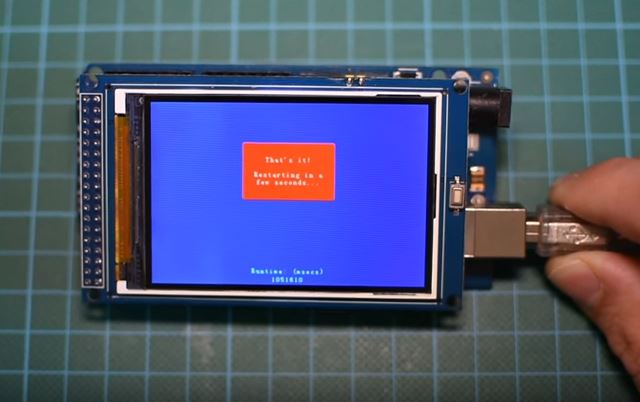
You can use either of the two Arduino boards mentioned above for this tutorial. The Arduino due is faster than the Arduino mega so it will run the code faster than the mega. For instance, on the Arduino Due, the code took 23 seconds to get to the end while on the Arduino Mega, it took 44 seconds to get to the end confirming the speed of the Due.
That’s it for this tutorial guys, what cool thing will you be building with this display? feel free to share under the comment section below.
The video tutorial for this project can be watched on youtube here.


Hi, Can you make the touch buttons working?