Adruino connection question

SparkyCal

Mar 11, 2020
863
Joined
Mar 11, 2020
Messages
863
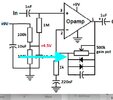
I am building a guitar pedal distortion circuit (see attached schematic). At a point during the circuit, two wires are connected to the left and right sides of diodes, in order to create the distortion. (see there arrow that points to the area of the circuit I am referring to)

Different types of diodes, will produce different kinds of distortion. For example, you can even use LEDs to serve that purpose.

I want to bring the two wires mentioned above, into the Adruino board. Then, I would like to have those two Ins, streamed to different diode configurations.

So, I envision having different types of diodes, connected to different pins on the Adruino. The physical diodes would be soldered onto a PCB board. Through programming (which I think I can figure out), I would like to upload code to have the two Ins mentioned above, connect to whichever diodes I choose.

My question is, what Pins on the Adruino would I use to connect the two In leads, and which pins could I use to connect various diodes to.

Thank-you
 

Attachments

  • adriunoq.jpg
    adriunoq.jpg
    48.3 KB · Views: 8

SparkyCal

Mar 11, 2020
863
Joined
Mar 11, 2020
Messages
863
The Audrino won't be functioning ing as a power source. This circuit is powered by a 9 v battery
 

Delta Prime

Jul 29, 2020
2,987
Joined
Jul 29, 2020
Messages
2,987
Different types of diodes, will produce different kinds of distortion. For example, you can even use LEDs to serve that purpose.
No!
You are overdriving and clipping that’s how you get your distortion.
So, I envision having different types of diodes, connected to different pins on the Adruino
I envision your loss of vision, which is a good thing because now you can use your ears and if you’re horrible at playing the guitar, I can see why distortion would help..
You’re running the operational amplifier at half 9 V supply your biasing the input to 4.5 the output would hover around the 4.5 V.
You’re running the operational amplifier single ended. The negative feedback is being fed from the capacitor at very high frequencies.
Now I’m gonna go play my les Paul guitar upside down and backwards. I’m a southpaw.I Don’t even bother to restring it..
 

be80be

Dec 28, 2024
6
Joined
Dec 28, 2024
Messages
6
You would be adding a lot more then 2 diodes there are diodes on the ouput of the arduino pins Id use relays to swap out the diodes
 

be80be

Dec 28, 2024
6
Joined
Dec 28, 2024
Messages
6
The Op is not going to swap diodes with just a i/o pin it will not be nothing like just swapping the diode.
the problem will be a short on the two i/o pins for your to diodes
 

Delta Prime

Jul 29, 2020
2,987
Joined
Jul 29, 2020
Messages
2,987
Use the analog pins A0 & A1 of your
Arduino for the two input leads of your guitar distortion pedal or fuzz box.
 

Harald Kapp

Moderator
Moderator
Nov 17, 2011
14,270
Joined
Nov 17, 2011
Messages
14,270
Use the analog pins A0 & A1 of your
and then? The Arduino:
  • can handle only positive input voltages from 0 V to +5 V
  • has only 10 bit resolution, although some versions or Arduino board support up to 12 bit - I doubt this is enough for a guitar effects pedal


The way the diodes in the op's schematic work is by creating a non-linear feedback within the operation amplifier circuit. There's no way these diodes can be connected directly to a control voltage or pin of a microcontroller.
To switch between different diodes for creating different kinds of distortion you will need, literally, switches. These can be mechanical switches or electronic switches. The electronic switches in turn can be controlled by a microcontroller. Although this is imho overkill, but if you like to do so, here's how it works:
1735559614311.png
This example uses only 2 sets of different diodes. D1 and D2 = 1N4148, D3 and D4 = 1N4001. The number of diode pairs can be increased at will using more switches.
At any time only one of the switches (S1, S2) should be on, all other switches should be off. The diode pair with the switch being on is the one that is active at that time. The switches could be mechanical or, as stated, electronic. Here is an example of suitable analog switch.
The control inputs of the switches can be controlled by e.g. an Arduino, as requested.
Note:
  • The Arduino needs to be supplied by 5 V. An Arduino UNO may be supplied by 9 V when the intenal 5 V regulator of the board is used. In any case the I/O pins are 5 V tolerant only,
  • Both GND of the effect pedal and GND of the Arduino must be connected.
  • When using a single 9 V power supply aka battery, the power supply "+"of the effect pedal needs to be well decoupled from the power supply "+" of the Arduino. Use e.g. a combination of a 100 µF (or 220 µF, 330 µF or whatever you have at hand) electrolytic capacitor and a 100 nF ceramic capacitor (again: use 100 nF, 220 nF ...whatever you have at hand) right next to the power supply pins of the operational amplifier. This will minimize the feedback of noise from the Arduino into your signal path. Also keep the Arduino as far away from the analog signal path as possible.

With respect to the complexity of the setup: How is your program going to control the electronic switches? Is this a fully automated sequence or is the selection of switch (aka diode pair) done via manual input (or by pressing a foot switch)? If the latter is the case then you would read the stae of the input switch only to control the state of the electronic switch by an Arduino as the man in the middle. IN that case the much simpler solution is to use the input switch directly to control which pair of diodes is used un teh opamp's feedback, thus eliminating the Arduino altogether.
 

Delta Prime

Jul 29, 2020
2,987
Joined
Jul 29, 2020
Messages
2,987
nd then? The Arduino:
  • can handle only positive input voltages from 0 V to +5 V
  • has only 10 bit resolution, although some versions or Arduino board support up to 12 bit - I doubt this is enough for a guitar effects pedal
12 bitis is like an Arduino Uno?
Apologies for giving you doubts, but now I understand from your perspective.
The on board (ADC) analog to digital converter will digitize the input signal and provide all of the digital signal processing (DSP). You have to let your imagination run wild; not be limited by it.
1735563472162.png
 

Harald Kapp

Moderator
Moderator
Nov 17, 2011
14,270
Joined
Nov 17, 2011
Messages
14,270
To run the Arduino's ADC at a reasonable high sampling rate the AnalogRead() from the Arduino framework is much to slow. You will have to bypass it and manipulate the ADC directly. This requires a tad more knowledge than the average Arduino programmer may have. See e.g. this discussion.
Note that for an analog signal from a guitar with a bandwidth of at least 20 kHz (if not wider), the sampling rate must be 40 kHz as an absolute theoretical minimum to avoid aliasing. In practice no anti-alias filter can be constructed that is as perfect as would be required for sampling a 20 kHz signal at 40 kHz. Therefore the practical sampling rate must be higher. This is one reason why CDs are digitized at 44.1 kHz.

Assuming this problem is solved, the next question is how to output the analog signal after processing. The AnalogWrite() can't be used. It outputs a pwm signal at 490 Hz or 980 Hz, depending on the pin(s) used. This pwm is still a digital signal and neds some heavy low pass filtering to create a truly analog looking signal. Useless for this application. @SparkyCal will have to add a dedicated digital-analog-converter (DAC) instead, increasing the complexity of this supposedly simple effect pedal.

Assuming this problem is also solved, it remains to be seen how much signal processing the Arduino can really perform between two samples. I don't have numbers here, but I strongly doubt the Arduino is powerful enough to emulate the non-linear characteristic of the Opamp circuit in real time. It is a microcontroler, not a digital signal processor (DSP).
If it should be done in software, a much more powerful processor is required. An STM32F411 (black pill) might work. At 100 MHz CPU clock the processig power exceeds an Arduino by a n order of magnitude. But the ADC is still limited to 12 bit and there's no DAC, so an external DAC needs to be added.

In my opinion this project will get out of hand if this approach is being followed.
I truly think staying with the analog circuit and simply switching diode pairs is the most elegant approach. At least it is the most simple one.
 

Delta Prime

Jul 29, 2020
2,987
Joined
Jul 29, 2020
Messages
2,987
I strongly doubt the Arduino is powerful enough to emulate the non-linear characteristic of the Opamp circuit in real time
Arduino & raspberry pie
To me is like using a 555 timer and 741 operational amplifier. But these items are popular now they are learning tools (designed for Third World countries )
it’s all dependent on your drag and drop C++ programming skills.
And enough with the doubts, your starting to sound like Dragon.
1735608404693.png
 
Last edited:

bertus

Moderator
Nov 8, 2019
3,835
Joined
Nov 8, 2019
Messages
3,835
Hello,

On an other forum i have seen that a teensy with a kind of audio shield was used for the effects.
They used an audio library for it:


Bertus
 

Harald Kapp

Moderator
Moderator
Nov 17, 2011
14,270
Joined
Nov 17, 2011
Messages
14,270
On an other forum i have seen that a teensy with a kind of audio shield was used for the effects.
Corroborating that you need additional Hardware (ADC + DAC). The Teensy alone will not suffice.
It’s all dependent on your drag and drop C++ programming skills.
Not at all. If the hardware is insufficient, the best programming skills can't overcome the hardware's limits.
And enough with the doubts, your starting to sound like Dragon.
There never can be enough doubts as long as an issue hasn't been cleared.
 
Top