Help Modifying Constant Current LED Driver from 700mA to 400mA

Hudogriz

Mar 2, 2025
4
Joined
Mar 2, 2025
Messages
4
Hello everyone,

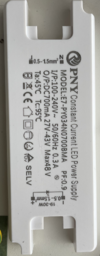
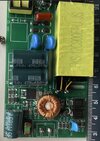
I have a constant current switching power supply (LED driver) that takes in 230V AC and provides a constant current output of 700mA. The output voltage is rated at 27V–43V (up to a maximum of 48V). I’d like to reduce the output current to around 400mA. Ideally, I’d love to make it adjustable, but even a fixed lower current would be fine.

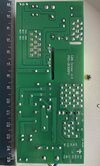
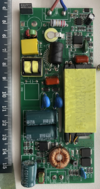
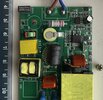
Before I dive into any hardware modifications, I was hoping to get some advice from the community. Has anyone here successfully modified a similar driver to reduce its output current? If so, what approach did you take (e.g. swapping a feedback resistor, adjusting a potentiometer, etc.)? Are there any general rules or recommended practices for reducing the output current on these kinds of constant current supplies?

I’d appreciate any tips, warnings, or suggestions to help me do this safely and avoid damaging the driver. Thanks in advance for your expertise!
 

Attachments

  • 01-BottomPCB.jpg
    01-BottomPCB.jpg
    207.7 KB · Views: 14
  • 02-TOP-side.png
    02-TOP-side.png
    1.9 MB · Views: 15
  • 03-TOP-AC-IN-Detail.jpg
    03-TOP-AC-IN-Detail.jpg
    378 KB · Views: 14
  • 04-TOP-DC-OUT-Detail.jpg
    04-TOP-DC-OUT-Detail.jpg
    210.8 KB · Views: 14

Delta Prime

Jul 29, 2020
2,989
Joined
Jul 29, 2020
Messages
2,989
Welcome to Maker Pro. :)Make?model? link.?
To your switch mode, power supply.
Thank you.
P.S. A schematic would be wonderful.
 

Hudogriz

Mar 2, 2025
4
Joined
Mar 2, 2025
Messages
4
Thanks.:)
Unfortunately I don't have any more detailed documentation.
This Power supply was build in a round LED ceiling light, which is a bit too bright for my eyes.
Here's the case top view.
 

Attachments

  • 05-CASE-TOP-View.png
    05-CASE-TOP-View.png
    430 KB · Views: 4

Alec_t

Jul 7, 2015
3,817
Joined
Jul 7, 2015
Messages
3,817
Is VR2 a Variable Resistor or a Voltage Reference source?
 

Alec_t

Jul 7, 2015
3,817
Joined
Jul 7, 2015
Messages
3,817
If it were a variable resistor you could tweak it slightly and check to see if that affected the LED current.
If it were a voltage reference then there would perhaps be a comparator for comparison of that voltage with the voltage dropped across a LED current sensing resistor. Changing that resistor (if it could be identified) would affect the LED current.
 

AnalogKid

Jun 10, 2015
3,047
Joined
Jun 10, 2015
Messages
3,047
Image #3, right center, the 4 power resistors in parallel probably are sensing switch current, not output current. FR1 is a fuseable resistor, and VR1 looks like a transient protector, not a voltage reference. I don't see an optocoupler, but feedback could be run backwards through the transformer.

Image #4, left center, the group of 4 resistors plus something else (diode or capacitor?). My guess is that these 1.3 ohm and 1.5 ohm resistors are combined in a series/parallel configuration as the output current sense resistance. Assuming the circuit has a fixed voltage reference, increasing this resistance should lower the regulated output current.

No warranties expressed or implied.

What are the markings on component U2?

ak
 
Last edited:

Hudogriz

Mar 2, 2025
4
Joined
Mar 2, 2025
Messages
4
@Alec: the part you are referring to is the primary voltage input (230V AC). I don't want to mess with that side of the driver :) @AnalogKid: the image #4 and the resistors you pointed out indeed did the trick. I wanted to make a little test and took out one of the the 1R3 (=1.3 ohm) 1206 SMD resistor. All of these resistors are in parallel so the current spreads among these R's. I bought a few 1206 resistors on the side if needed to play around with. Since these 1206 SMD are 0.25W they need to be in parallel to spread the current flow not to overheat. Long story short, as said taking out one 1.3 ohm resistor meant the total resistance of R's in parallel increased a bit and the current dropped. Meaning the power on the LEDs now dropped, which is the goal I was after.
Solved! Thanks for your inputs.:)
 

AnalogKid

Jun 10, 2015
3,047
Joined
Jun 10, 2015
Messages
3,047
The board has so many through-hole components that I'm surprised that they went with SMT for the current shunt. A 1 W wirewound would be smaller than the fuseistor at the top of the board and would fit in the space. Whatever - Glad it worked out.

ak
 
Top