

Simple Arduino Data Logger
- Nick Koumaris
- http://educ8s.tv
- info@educ8s.tv
- 37.523 Views
- moderate
- Tested
- 0 Likes

Introduction
A data logger is an electronic device or instrument that records data over a period of time. It allows the user to record time or location stamped data which can be viewed at a later time or real time.
Irrespective of the type of data being logged or the kind of data logger, these devices usually contain two main units, the sensor unit and the storage/communication unit. The sensor unit may involve the use of an external instrument or a sensor embedded within the device. Increasingly, but not entirely, data logging devices are becoming more based on micro processors and microcontrollers, which has opened up a whole new level of data gathering and storage.
For today’s tutorial, our focus will be on building an Arduino based data logger that reads the temperature of the environment every few minutes and saves the data in a micro sd card.
The Project is based on the Arduino nano and the DS3231 RTC Module which has a temperature sensor and a real time clock on board.
Required Components
The following components are required to build this project:
- DS3231 RTC
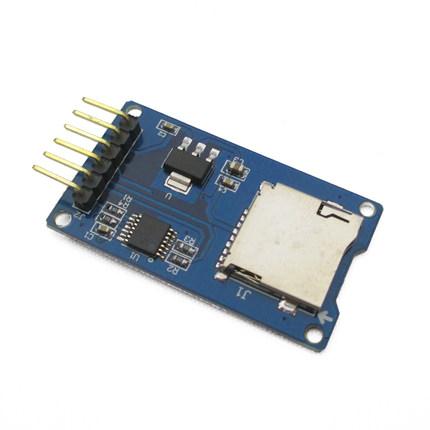
- Micro SD card module
- Arduino Nano
- Multimeter Mastech 8268
- AA Battery holder
- Small Breadboard
- Wires
- Batteries
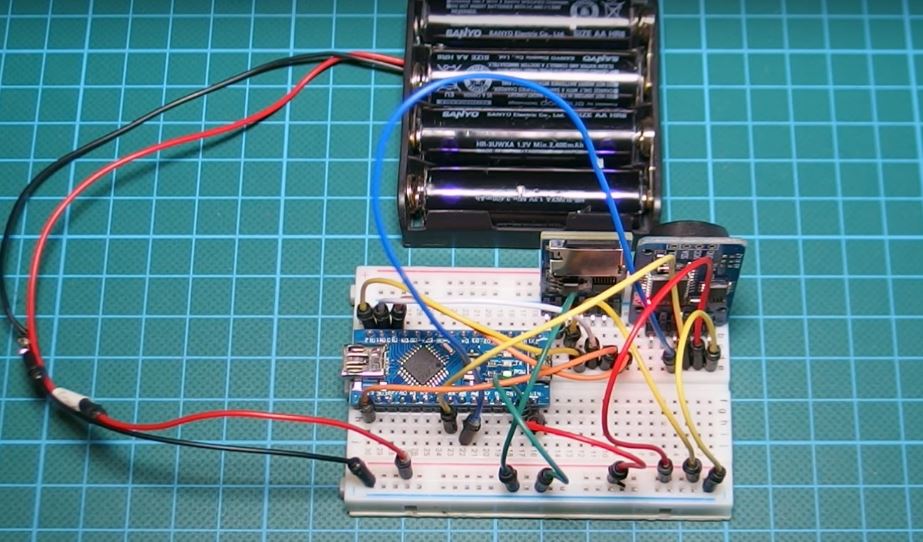
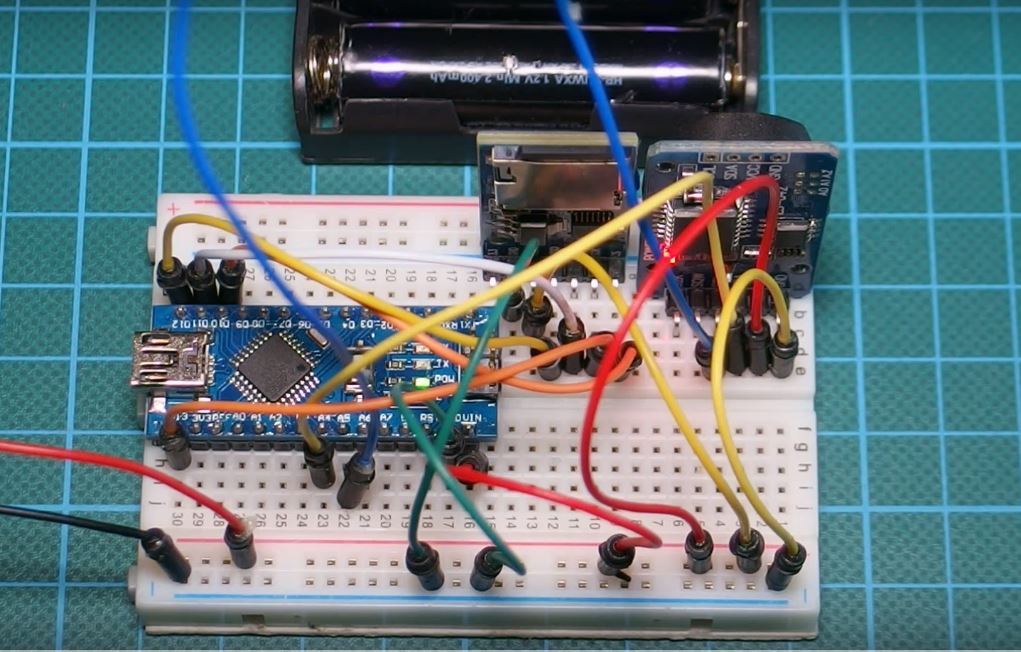
Schematics
Connect the components as shown in the circuit diagram below.
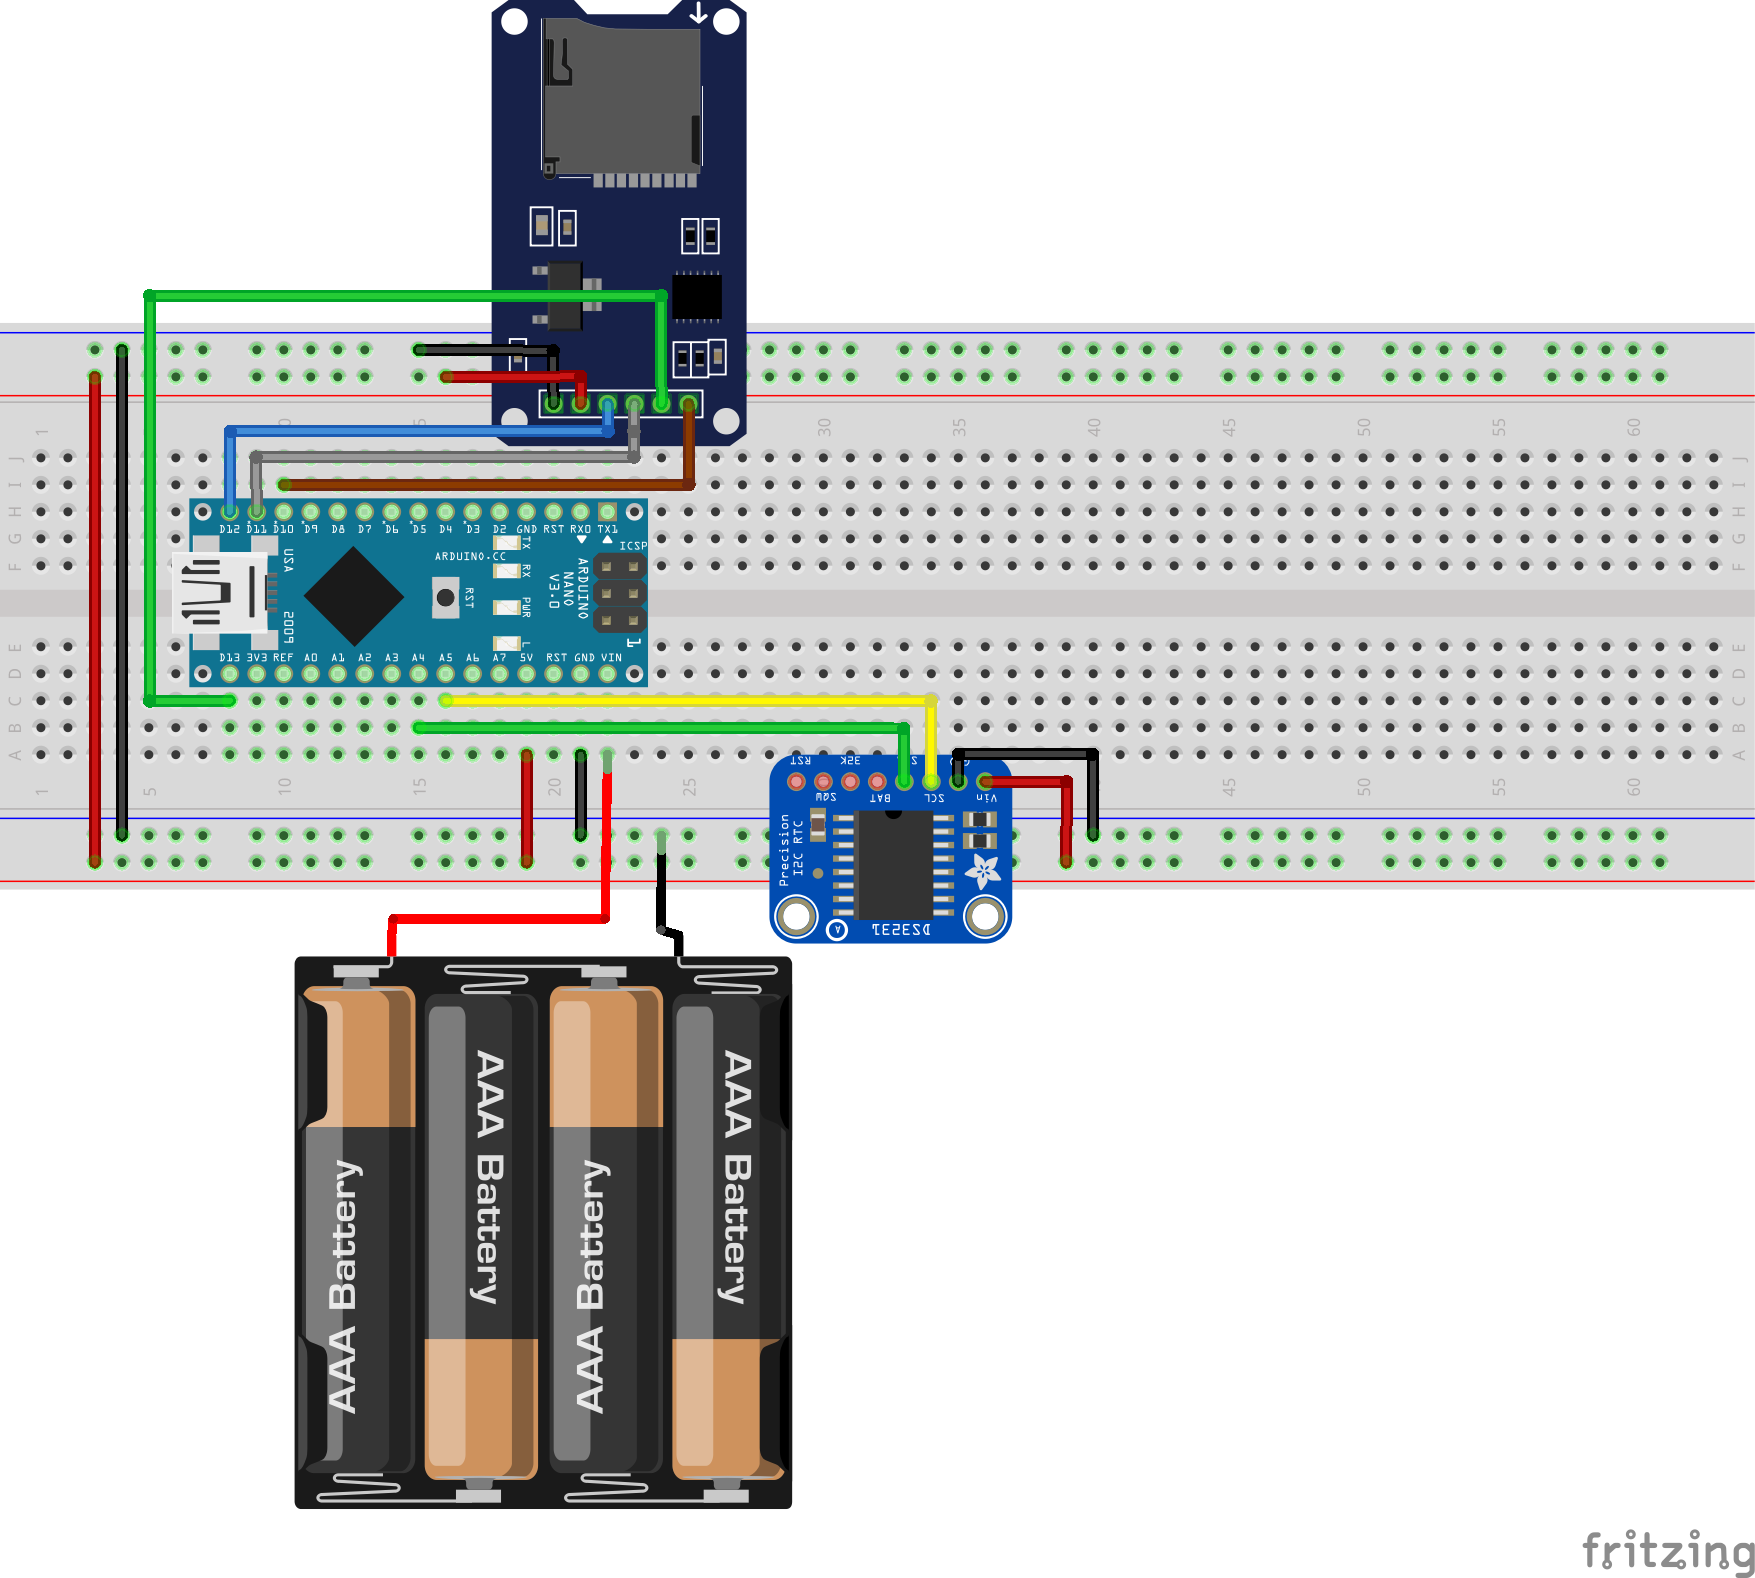
The data logger is made up of the Arduino Nano, the Ds3231 RTC Module, and a micro SD card module. The micro SD card module communicates with the Arduino over SPI as explained in a detailed tutorial here, while the DS3231 module communicates with the Arduino over I2C. A detailed tutorial on the DS3231 module can also be found here.
To simplify the connection further, a pin map of the connections in the schematics is done below.
A connection between Arduino and Micro SD card Module:
SD Arduino
GND - GND
vcc - vcc
MISO - D12
MOSI - D11
SCK - D13
CS - D10
A connection between Arduino and DS3231 Module
DS3231 Arduino
Vcc 5v
GND GND
SDA A4
SCL A5
With the connections all done, we can then move to write the code for this project.
Code
To better understand this project, it is advised that you take a look at two of our previous projects that talked about DS3231 RTC module, and the Micro SD card module.
To jump into writing the code, its important before proceeding to totally understand what you want it to do. For this project we will measure temperature, and storing the data alongside the time at which it was read, delimited by comma, in a text file on a SD card. The goal will be to remove the card after a while and insert it into a computer, to import the data into Microsoft’s Excel software to plot and perform other analysis on the data.
As usual, the first thing we do in our code is to include the libraries that will be used. For this project, we will be using the rtc_ds3231 library attached in the zip file which is available in the download section of this post, the wire.h library, the SD.h library, and the SPI.h library.
    /////////////////////////////////////////////////////////////////
   //            Arduino Simple Data Logger             v1.03     //
  //         Get the latest version of the code here:            //
 //         http://educ8s.tv/arduino-data-logger-project        //
/////////////////////////////////////////////////////////////////

#include <Wire.h>
#include "ds3231.h"
#include <SD.h>
#include <SPI.h>
Next, we declare our variables. The first variable is the maximum buffer size BUFF_MAX 128 after which, we declare the pin to which is the Chipselect pin of our sd card module connected to the Arduino, which is D10. We next create an object file, then declare the variable to store temperature, time, and date, followed by an integer to serves as ID for the entries.
#define BUFF_MAX 128

int CS_PIN = 10;

File file;

String temperature;
String timeString;
String dateString;

int entryId = 0;
Still on declaration, we declare an array to hold time, and set the amount of milliseconds the device has to wait before logging the next data. This could help preserve the battery life of the device in the long run asides other things.
uint8_t time[8];
char recv[BUFF_MAX];
unsigned int recv_size = 0;
unsigned long prev, interval = 1000;
We then move to the setup function.
We start by starting serial communication and enabling wire, after which we move to initialize the SD card module followed by the DS3231 module.
void setup()
{
    Serial.begin(9600);
    Wire.begin();

    initializeSD();

    DS3231_init(DS3231_INTCN);
    memset(recv, 0, BUFF_MAX);
with that done, when running the code for the first time, there will be a need to set the time. The next line of code is used to set the time. It is entered in this order: T”seconds””minutes””timeinhours””dayoftheweek””dayofthemonth””month””year”
Do note the quotes are not included, it was just used for explanation.
parse_cmd("T302410426032015",16); //Set time
}
After running this code for the first time, it should be commented out before uploading to deploy the system.
With the Void Setup out of the way, we now move to the void loop() function. The void loop function majorly contains commands to get the temperature and date and save it on the sd card.
void loop()
{
    String logEntry;
    char in;
    char buff[BUFF_MAX];
    unsigned long now = millis();

    // Log data once in a while
    if ((now - prev > interval) && (Serial.available() <= 0)) {
      getTime();
      getTemperature();
      logEntry = createLogEntry();
      writeEntryToFile(logEntry);
      prev = now;
    }

    if (Serial.available() > 0) {
        in = Serial.read();

        if ((in == 10 || in == 13) && (recv_size > 0)) {
            parse_cmd(recv, recv_size);
            recv_size = 0;
            recv[0] = 0;
        } else if (in < 48 || in > 122) {;       // ignore ~[0-9A-Za-z]
        } else if (recv_size > BUFF_MAX - 2) {   // drop lines that are too long
            // drop
            recv_size = 0;
            recv[0] = 0;
        } else if (recv_size < BUFF_MAX - 2) {
            recv[recv_size] = in;
            recv[recv_size + 1] = 0;
            recv_size += 1;
        }

    }
}
Other functions in the code are functions that were called within the void loop.
The full code for the project is given below.
    /////////////////////////////////////////////////////////////////
   //            Arduino Simple Data Logger             v1.03     //
  //         Get the latest version of the code here:            //
 //         http://educ8s.tv/arduino-data-logger-project        //
/////////////////////////////////////////////////////////////////

#include <Wire.h>
#include "ds3231.h"
#include <SD.h>
#include <SPI.h>

#define BUFF_MAX 128

int CS_PIN = 10;

File file;

String temperature;
String timeString;
String dateString;

int entryId = 0;

uint8_t time[8];
char recv[BUFF_MAX];
unsigned int recv_size = 0;
unsigned long prev, interval = 1000;

void setup()
{
    Serial.begin(9600);
    Wire.begin();

    initializeSD();

    DS3231_init(DS3231_INTCN);
    memset(recv, 0, BUFF_MAX);

    //parse_cmd("T302410426032015",16); //Set time
}

void loop()
{
    String logEntry;
    char in;
    char buff[BUFF_MAX];
    unsigned long now = millis();

    // Log data once in a while
    if ((now - prev > interval) && (Serial.available() <= 0)) {
      getTime();
      getTemperature();
      logEntry = createLogEntry();
      writeEntryToFile(logEntry);
      prev = now;
    }

    if (Serial.available() > 0) {
        in = Serial.read();

        if ((in == 10 || in == 13) && (recv_size > 0)) {
            parse_cmd(recv, recv_size);
            recv_size = 0;
            recv[0] = 0;
        } else if (in < 48 || in > 122) {;       // ignore ~[0-9A-Za-z]
        } else if (recv_size > BUFF_MAX - 2) {   // drop lines that are too long
            // drop
            recv_size = 0;
            recv[0] = 0;
        } else if (recv_size < BUFF_MAX - 2) {
            recv[recv_size] = in;
            recv[recv_size + 1] = 0;
            recv_size += 1;
        }

    }
}

void parse_cmd(char *cmd, int cmdsize)
{
    uint8_t i;
    uint8_t reg_val;
    char buff[BUFF_MAX];
    struct ts t;

    // TssmmhhWDDMMYYYY aka set time
    if (cmd[0] == 84 && cmdsize == 16) {
        //T355720619112011
        t.sec = inp2toi(cmd, 1);
        t.min = inp2toi(cmd, 3);
        t.hour = inp2toi(cmd, 5);
        t.wday = inp2toi(cmd, 7);
        t.mday = inp2toi(cmd, 8);
        t.mon = inp2toi(cmd, 10);
        t.year = inp2toi(cmd, 12) * 100 + inp2toi(cmd, 14);
        DS3231_set(t);
        //Serial.println("OK");
    } else if (cmd[0] == 49 && cmdsize == 1) {  // "1" get alarm 1
        DS3231_get_a1(&buff[0], 59);
        //Serial.println(buff);
    } else if (cmd[0] == 50 && cmdsize == 1) {  // "2" get alarm 1
        DS3231_get_a2(&buff[0], 59);
       // Serial.println(buff);
    } else if (cmd[0] == 51 && cmdsize == 1) {  // "3" get aging register
        //Serial.print("aging reg is ");
        //Serial.println(DS3231_get_aging(), DEC);
    } else if (cmd[0] == 65 && cmdsize == 9) {  // "A" set alarm 1
        DS3231_set_creg(DS3231_INTCN | DS3231_A1IE);
        //ASSMMHHDD
        for (i = 0; i < 4; i++) {
            time[i] = (cmd[2 * i + 1] - 48) * 10 + cmd[2 * i + 2] - 48; // ss, mm, hh, dd
        }
        byte flags[5] = { 0, 0, 0, 0, 0 };
        DS3231_set_a1(time[0], time[1], time[2], time[3], flags);
        DS3231_get_a1(&buff[0], 59);
       // Serial.println(buff);
    } else if (cmd[0] == 66 && cmdsize == 7) {  // "B" Set Alarm 2
        DS3231_set_creg(DS3231_INTCN | DS3231_A2IE);
        //BMMHHDD
        for (i = 0; i < 4; i++) {
            time[i] = (cmd[2 * i + 1] - 48) * 10 + cmd[2 * i + 2] - 48; // mm, hh, dd
        }
        byte flags[5] = { 0, 0, 0, 0 };
        DS3231_set_a2(time[0], time[1], time[2], flags);
        DS3231_get_a2(&buff[0], 59);
        //Serial.println(buff);
    } else if (cmd[0] == 67 && cmdsize == 1) {  // "C" - get temperature register
        //Serial.print("temperature reg is ");
        //Serial.println(DS3231_get_treg(), DEC);
    } else if (cmd[0] == 68 && cmdsize == 1) {  // "D" - reset status register alarm flags
        reg_val = DS3231_get_sreg();
        reg_val &= B11111100;
        DS3231_set_sreg(reg_val);
    } else if (cmd[0] == 70 && cmdsize == 1) {  // "F" - custom fct
        reg_val = DS3231_get_addr(0x5);
       // Serial.print("orig ");
        //Serial.print(reg_val,DEC);
        //Serial.print("month is ");
        //Serial.println(bcdtodec(reg_val & 0x1F),DEC);
    } else if (cmd[0] == 71 && cmdsize == 1) {  // "G" - set aging status register
        DS3231_set_aging(0);
    }
}

void getTemperature()
{
  parse_cmd("C",1);
  temperature = String(DS3231_get_treg());
}

void getTime()
{
  String minute;
  String hour;
  struct ts t;

  DS3231_get(&t);

  if(t.min<10)
  {
    minute = "0"+String(t.min);
  }else
  {
    minute = String(t.min);
  }

  timeString = String(t.hour)+":"+minute;
  dateString = String(t.mon)+"/"+t.mday;
}

String createLogEntry()
{
  String logEntry;
  entryId ++;
  logEntry = String(entryId)+","+dateString+","+timeString+","+temperature;
  return logEntry;
}

void writeEntryToFile(String entry)
{
  openFileToWrite("log.txt");
  Serial.println(entry);
  writeToFile(entry);
  closeFile();
}

void initializeSD()
{
  pinMode(CS_PIN, OUTPUT);

  if (SD.begin())
  {
  } else
  {
    return;
  }
}

int openFileToWrite(char filename[])
{
  file = SD.open(filename, FILE_WRITE);

  if (file)
  {
    return 1;
  } else
  {
    return 0;
  }
}

int writeToFile(String text)
{
  if (file)
  {
    file.println(text);
    return 1;
  } else
  {
    return 0;
  }
}

void closeFile()
{
  if (file)
  {
    file.close();
  }
}
Demo
Copy the code above and paste in your arduino, ensure you have the libraries and hit upload. Don’t forget to set the time when you run the code for the first time.
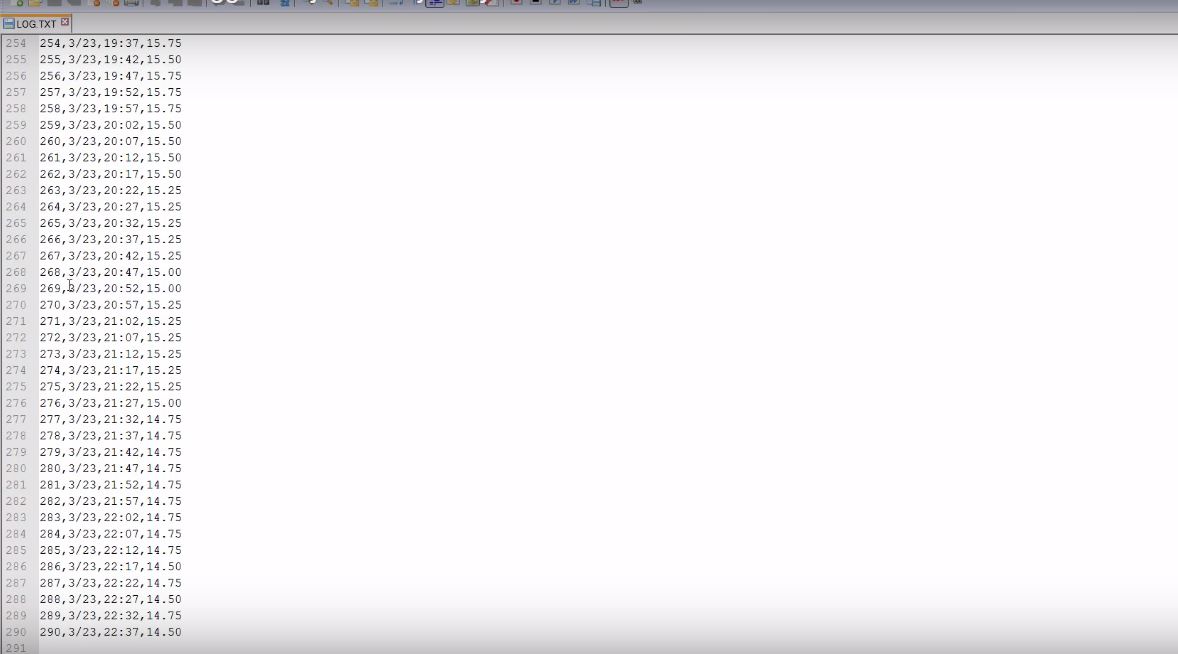
If you follow the steps carefully, wait for few minutes then remove your sd card. If you did everything correctly, you should see something like the image below on your computer screen when the SD card opens. The amount of data stored would depend on the amount of up-time the logger had before you removed the sd card. For example, for this project, we left the device running for a day, logging data every 5-minutes and at the end of the 24 hours, we had logged over 300 data(image below).
Viewing Data in Excel
Excel makes it super easy to plot your data and do analysis.
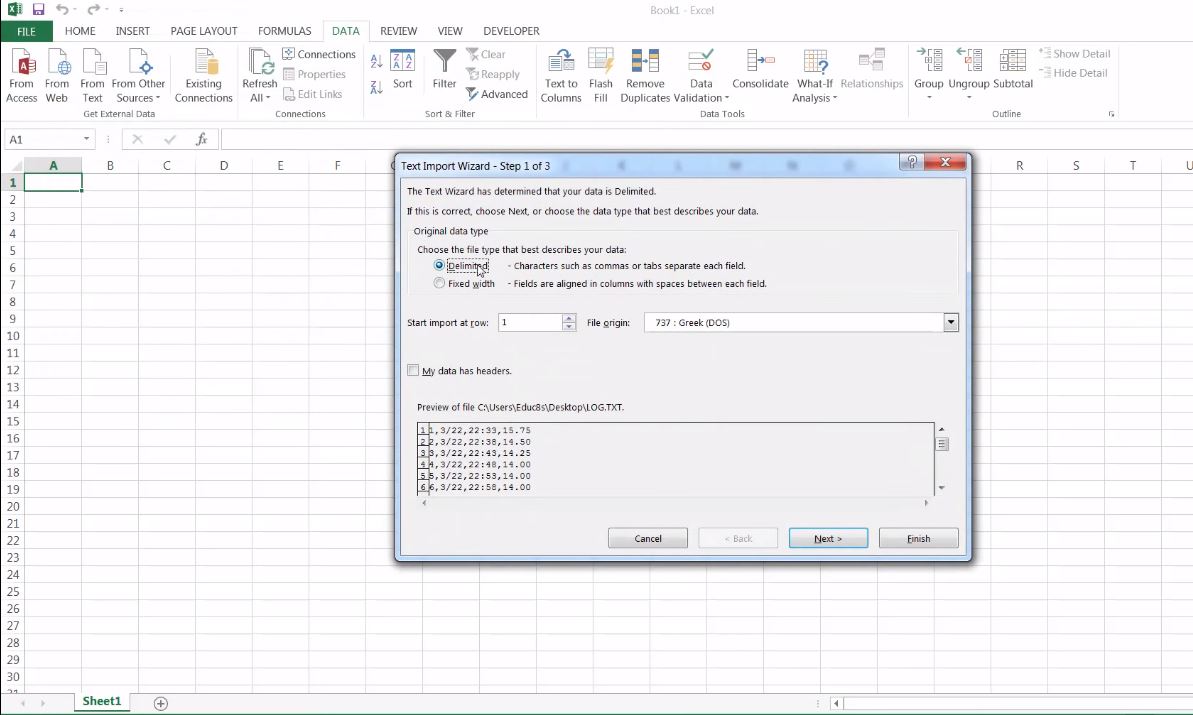
To generate a plot of the temperature against time for this project, open a new excel spread sheet, select data at the top, select from text, and navigate to the file on the SD card, and click OK, excel will prompt you to ask for details about the file, select delimited, then select by commas, after which excel will automatically import the data into your spread sheet.
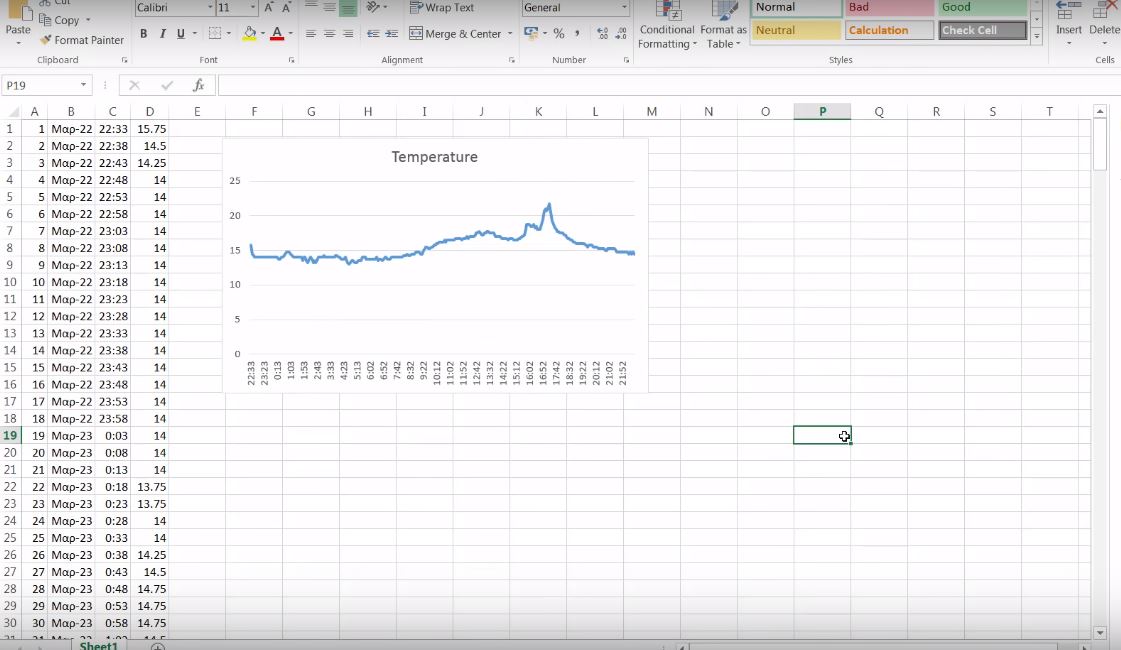
To Plot the data after the import, select the two columns, time and temperature (by holding the ctrl key) then go to insert tab and click on insert chart. you should see the chart pop up like the image below.
That’s it for this tutorial guys, I hope you learn something from it. As usual, feel free to share your questions and contributions via the comment section.
The tutorial video for this tutorial is available on youtube here.
Until Next time, Keep Making.


I keep getting an error that says DS3231_INTCN’ was not declared in this scope what do I need to do to fix that?
Needs to learn programming, cant get time right, found “W” in code, is that week number ???
Hey! Great project but it seems the code has errors.