

Lead Acid Battery Charger #2
- Izhar Fareed
- http://www.extremecircuits.net
- izhar@gmx.us
- 23.452 Views
- easy
- Non tested
- 0 Likes


Description
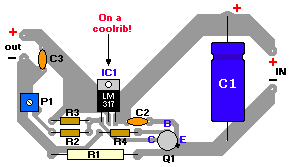
The above pictured schematic diagram is just a standard constant current model with a added current limiter, consisting of Q1, R1, and R4. The moment too much current is flowing biases Q1 and drops the output voltage.
The output voltage is: 1.2 x (P1+R2+R3)/R3 volt. Current limiting kicks in when the current is about 0.6/R1 amp.
For a 6-volt battery which requires fast-charging, the charge voltage is 3 x 2.45 = 7.35 V. (3 cells at 2.45v per cell). So the total value for R2 + P1 is then about 585 ohm. For a 12 V battery the value for R2 + P1 is then about 1290 ohm.
For this power supply to work efficiently, the input voltage has to be a minimum of 3V higher than the output voltage.
P1 is a standard trimmer potentiometer of sufficient watt for your application.
The LM317 must be cooled on a sufficient (large) coolrib.
Q1 (BC140) can be replaced with a NTE128 or the older ECG128 (same company).
Except as a charger, this circuit can also be used as a regular power supply.
Parts List
Parts List:
R1 = 0.56 Ohm, 5W, WW
R2 = 470 Ohm C2 = 220nF
R3 = 120 Ohm
R4 = 100 Ohm
C1 = 1000uF/63V
Q1 = BC140
Q2 = LM317, Adj. Volt Reg.
C3 = 220nF (On large coolrib!)
P1 = 220 Ohm
PCB


 Batteries")
