

JamesMVictoria
-
Posts
4 -
Joined
-
Last visited
-
Days Won
1
Content Type
Profiles
Forums
Events
Posts posted by JamesMVictoria
-
-
On 7/15/2023 at 3:59 AM, Pete Ballotta said:
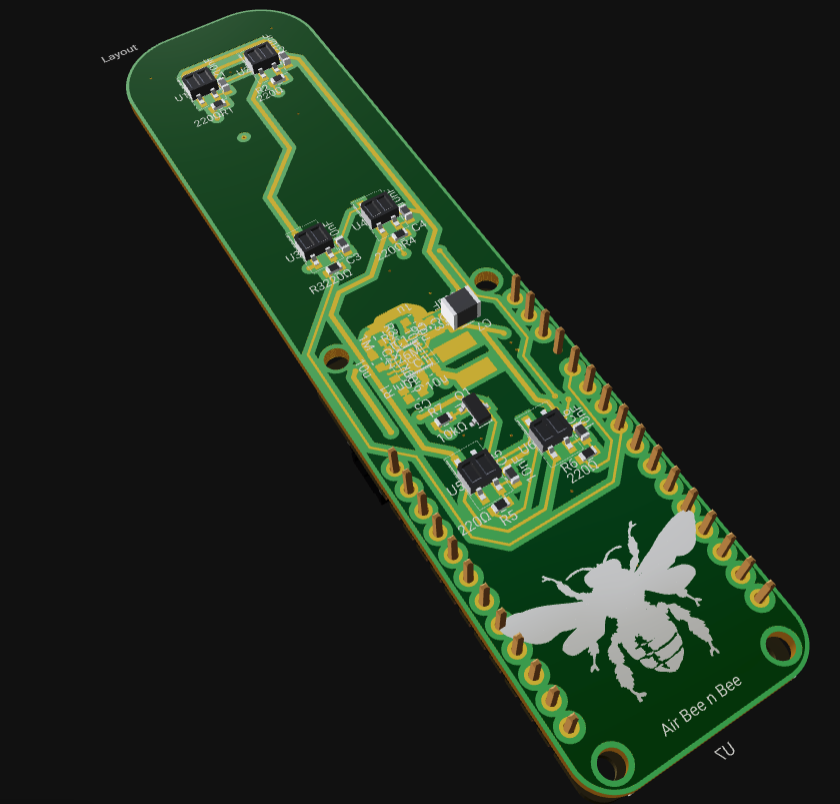
One of my teammates is working on an open Hardware Project that I thought to share. The product they’re developing is a bee hotel for native bees (not honeybees)! At the SF Climate hackathon, they integrated the Particle Argon onto a PCB with solar panels, MPPC, and a PWM PIR sensor for the bees. Here’s the link to the schematics, layout and 3D. I'll add a 3D screenshot at the bottom of the post.
"A little bit of background, a native bee hotel houses sedentary bees which lay their eggs in tube structures, like hollow plant stems. We want to use PIR sensors along the tubes to get bee traffic data and build a country-wide bee traffic map.
Solar Cells
I’ve bumped into the IXYS KXOB25 series before and loved them for their reflowability. I wanted to connect them in parallel so the only constraint was that their output voltage is less than 5V, which is the maximum input voltage of the energy harvesting IC.Energy Harvesting
I chose the LTC3105EDD 15 because I’ve seen it used to maximize solar cell power output in some nanosatellite projects I’ve browsed in the past. Although it doesn’t have an actual MPPT algorithm, it has a very attractive 250mV startup voltage which can potentially increase the times of day our device will provide power (dawn, dusk, cloud cover). All this needs real world testing which is coming next week.PIR Sensors
These are paired infrared transmitters and receivers. As seen in the 3D view, we’re using 2 of them per bee tube to determine which direction the bees are going (in or out of the tube). Of course, this would need to be done in firmware. To save power (because these PIR diodes are super power hungry, we added a low side MOSFET that switches all three strings of PIR diodes (they are strung in series to get 1.1V drive from a 3.3V source). In theory, we can decrease the PWM duty cycle to as low as the PIR’s rise time and set the frequency to 1Hz which would save so much power.
Future Steps
Here are the unknowns that we’ll be researching. I already see some good answers in the forums, but please feel free to chime in! I’ve played with Edge Impulse in the past and we want to run a small tflite model on particle hardware that would determine what type of bee is in the hotel based on a short audio sample. We also want to send this data to a central server hosted by particle; in your experience how many weeks/months would it take to setup particle cloud to get up to 100 provisioned devices sending about 50 bytes of data to a central server? It would be awesome if we can get that done quickly."Nice one, I like it.
- Jolin He and Pete Ballotta
-
 2
2
-
Thanks for giving me an idea by sharing your circuit. I want to start my project and before starting it I want to gather a little bit of information online regarding my project and your circuit is very helpful for me.
-
Thanks for sharing
")
Integrating DHT11 with Beetle ESP32 C3 and Home Assistant
in Electronic Projects Design/Ideas
Posted
Thanks for sharing it, I will surely check it.