Search the Community
Showing results for tags 'imx6ull'.
-
Note: Operate under the root user by default. 1. Qemu and Debootstrap Installation Since a Debian file system is built on Ubuntu, these two tools can be installed directly using the apt-get command. The commands are as follows: sudo apt-get install binfmt-support qemu qemu-user-static debootstrap 2. Extracting Debian File System Use the debootstrap command to extract the file system. Execute the following command to retrieve the file system from the Debian mirror: mkdir /home/forlinx/debian sudo debootstrap --arch=armhf --foreign buster root https://mirrors.tuna.tsinghua.edu.cn/debian/ Explanation of command parameters: arch:Specify CPU architecture buster:Debian version (currently 10) foreign:Use when initializing unpacking in a different architecture than the host root:The folder where the file system is stored https: // mirrors.tuna.tsinghua.edu.cn / debian /:Download source Extraction may take around 10 minutes. Please be patient. Successful extraction reveals the Linux directory tree. If extraction fails, try multiple attempts or switch networks. 3. Perfecting the File System Since the operation is conducted on an X86 virtual machine, QEMU needs to be used to simulate an ARM environment to improve the file system. a.To copy qemu-arm-static into the newly built base system, use the following command: cd root sudo cp /usr/bin/qemu-arm-static usr/bin cd .. b.Initialize the file system. Execute the following command: sudo DEBIAN_FRONTEND=noninteractive DEBCONF_NONINTERACTIVE_SEEN=true LC_ALL=C LANGUAGE=C LANG=C chroot root debootstrap/debootstrap --second-stage c.Use the chroot root command to initialize file system chroot root d.Use the command to create the following echo "proc /proc proc defaults 0 0" >> etc/fstab mkdir -p usr/share/man/man1/ mknod dev/console c 5 1 e.To update the download sources, use the command vi /etc/apt/sources.list to open the source.list file and replace the contents with the following: deb http://mirrors.ustc.edu.cn/debian stable main contrib non-free #deb-src http://mirrors.ustc.edu.cn/debian stable main contrib non-free deb http://mirrors.ustc.edu.cn/debian stable-updates main contrib non-free #deb-src http://mirrors.ustc.edu.cn/debian stable-updates main contrib non-free #deb http://mirrors.ustc.edu.cn/debian stable-proposed-updates main contrib non-free #deb-src http://mirrors.ustc.edu.cn/debian stable-proposed-updates main contrib non-free Then save and exit. Use the command apt-get update to update the source. If updating the download source reports an error,use the date command to modify the system time to solve the problem. f.Use the command apt-get install vim to install some necessary software apt-get install vim apt-get install sudo apt-get install dpkg apt-get install bzip2 apt-get install net-tools apt-get install ntpdate g.Create a new user with the command adduser forlinx, then enter the password adduser forlinx h.Set the root password, use the command passwd root, and set the password to forlinx. passwd root i.To set up Ethernet, enter the following command: vi /etc/network/interfaces As follows: #/etc/network/interfaces -- configuration file for ifup(8), ifdown(8) #The loopback interface auto lo iface lo inet loopback #Wireless interfaces iface wlan0 inet dhcp wireless_mode managed wireless_essid any wpa-driver wext wpa-conf /etc/wpa_supplicant.conf iface atml0 inet dhcp #Wired or wireless interfaces auto eth0 #iface eth0 inet dhcp #iface eth1 inet dhcp iface eth0 inet static address 192.168.0.232 netmask 255.255.255.0 gateway 192.168.0.1 broadcast 192.168.0.255 auto eth1 iface eth1 inet static address 192.168.1.232 netmask 255.255.255.0 gateway 192.168.1.1 broadcast 192.168.1.255 #Ethernet/RNDIS gadget (g_ether) #... or on host side, usbnet and random hwaddr iface usb0 inet static address 192.168.7.2 netmask 255.255.255.0 network 192.168.7.0 gateway 192.168.7.1 #Bluetooth networking iface bnep0 inet dhcp Add a network reboot cd etc/rc5.d/ vi /etc/rc5.d/S02net_restart.sh As follows: #!/bin/bash echo "network restarting!" /etc/init.d/networking restart echo "network restart complete!" j.Modify host name vi /etc/hostname Modify to: Debian k.Modify the system time zone cp /usr/share/zoneinfo/Hongkong /etc/localtime ntpdate ntp.aliyun.com Take East Zone 8 as an example, other time zone files are also included under this path. l.Since 6ull is weak, skip installing the desktop and go straight to using the exit m.Just exit the qemu environment exit 4. Package the file system Go to the debian filesystem directory and use the command tar - cjf rootfs.tar.bz2. / * to package it. 5. Burn-in verification Place the packaged file system into the burner, while keeping the other images as they are and only replacing the file system. Then proceed with the burn-in test. 6. Debian command a.Check Debian version cat /etc/issue b.Install wget apt-get install wget Solve ERROR: The certificate of ‘packages.microsoft.com’ is not trusted. Report error,then add -- no - check - certificate after the command. Appendix: Installation Method for .net on Linux 1. Download the .net compressed package from the official website https://dotnet.microsoft.com/en-us/download/dotnet/6.0 2. Enter the /home/root directory cd /home/root 3. Install script settings vi install.sh The script is as follows: #!/bin/sh DOTNET_FILE=dotnet-sdk-6.0.402-linux-arm.tar.gz export DOTNET_ROOT=$(pwd)/.dotnet mkdir -p "$DOTNET_ROOT" && tar zxf "$DOTNET_FILE" -C "$DOTNET_ROOT" export PATH=$PATH:$DOTNET_ROOT:$DOTNET_ROOT/tools DOTNET_FILE is the name of the downloaded zip file. 4. Execute the installation chmod u+x install.sh ./install.sh 5. Modify environment variables vi /etc/profile As follows: export DOTNET_ROOT=$HOME/.dotnet export PATH=$PATH:$HOME/.dotnet:$HOME/.dotnet/tools 6. Test Enter the following command: dotnet new console -o sample1 cd sample1 dotnet run The following output should be seen: Hello World!
-
▊ IP Settings Two IP configuration methods: (1)Set a default static IP; (2)Set a temporary static IP ( it is disabled after power cycling). 1. Static IP settings (1) Open /etc/network/interfaces and modify the configuration vi /etc/network/interfaces As follows, configure eth0 as static and eth1 as dynamic: (2) DNS settings Open rc.local with the command vi /etc/rc.local and add the following to it: echo "nameserver 8.8.8.8" > /etc/resolv.conf (3) Block information update&restart sync reboot 2. Temporary network settings Alternatively, the commands can be used temporarily to set the IP and gateway. However, please note that this method's configuration will be lost after a restart. ▊ Adding Startup Auto-run Content 1. Adding the following to the startup script Enter vi /etc/rc.local As an example of booting with the output ''hello world,'' add the following content: Note: Add the startup auto-run content before exit 0; 2. Adding startup auto-run items To create a startup auto-run item in the /etc/rc5.d/ directory vi /etc/rc5.d/S99test.sh As follows: #!/bin/bash echo "helloworld!" chmod 777 /etc/rc5.d/S99test.sh S99 indicates the startup priority as 99, which can be adjusted by the user based on demand. 3. Power-on self-starting 4G dialing method Previously it was mentioned that startup applications can be directly added to /etc/rc.local. However, 4G slightly differs from other applications because it uses a separate 4G module that requires initialization time. Based on practical tests, the 4G module takes 3-5 seconds after startup to function properly. Therefore, before initiating 4G dialing, a delay of 3-5 seconds is necessary. Modify as follows: vi /etc/rc.local Add the following: Note: The delay time cannot be less than 3s. ▊ WiFi 1. Static IP Settings (WiFi) WiFi login script: /usr/bin/fltest_cmd_wifi.sh The second-to-last line of the script assigns a dynamic IP to wlan0. If there is a need to set a static IP, it can be done as follows: 2. Power-on self-starting settings (WiFi) Also put the WiFi script in the/etc/rc.local. In this case, it is necessary to add an ''&'' symbol at the end to run the script in the background. Otherwise, it might block and prevent access to the file system. ▊ Boot 1. SSH connection failure (1) When SSH cannot connect, check if ping is possible. If ping fails, it could be due to network issues. The computer and the device should be on the same subnet. The default IP for eth0 is 192.168.0.232. Users can directly connect them or connect both to the same router. Then, set a 192.168.0 subnet IP on the computer; (2) If ping is successful, first confirm whether the factory image can connect normally. If the factory image can connect normally, check what services are starting up at boot causing the issue; ensure that services starting at boot are backgrounded. Failure to do so may cause process blocking, preventing SSH login. Consider reflashing the factory image if necessary; (3) Ensure that the board's IP address is being pinged. This can be tested by unplugging the Ethernet cable and then pinging from the computer.
-
- imx6ull
- embedded development board
-
(and 3 more)
Tagged with:
-
Dust is an open source of pollution due to dust on the ground, human-driven and driven to fly into the atmosphere, and is an important part of the total ambient air. Suspended particulate matter in the ambient air lasts for a long time and can be inhaled. Once the inhalable particulate enters the human body, it will accumulate in the respiratory system and cause many diseases, which is harmful to human beings. Dust monitoring is a real-time on-line monitoring measure to prevent and control air pollution. The dust monitoring equipment can monitor the atmospheric particulate matter concentration, PM value, temperature, humidity, wind speed, wind direction and other data in real time, and the dust pollution can be prevented and rectified in time by means of real-time data monitoring and alarm. The online monitoring system can save a lot of manpower and material resources and provide quantitative data support for on-site treatment and administrative enforcement. After the online monitoring system is installed, continuous and uninterrupted monitoring will be carried out. It mainly monitors respirable particulate matter and is complemented by a video monitoring system, a noise monitoring system, a meteorological system, a data acquisition system, and a communication system. The online automatic monitoring system is mainly used for online dust, environmental protection, meteorological station, tunnel and other online dust monitoring, unorganized smoke and dust pollution source emissions, residential areas, commercial areas, road traffic, construction areas, etc.; online real-time automatic monitoring of ambient air quality, and can obtain evidence through the camera. The real-time data from the weather station monitoring and the tunnel subway station can be transmitted to the data platform in time through the wired or wireless network for easy management and control. System Components The system consists of a data collector, a sensor, a video monitoring system (optional), a wireless transmission system, a background data processing system and an information monitoring management platform. The monitoring sub-station integrates various functions such as atmospheric PM1.0, PM2.5, PM10 monitoring, ambient temperature and humidity and wind speed and direction monitoring, noise monitoring, video surveillance (optional), etc.; the data platform is a networked platform with Internet architecture, which has the monitoring function of each sub-station and various functions such as alarm processing, recording, querying, statistics, report output, etc. of the data. The system can also be linked with various pollution control devices to achieve the purpose of automatic control. Implementation Scheme The online dust monitoring host can be developed using the FETMX6ULL-C SoM recommended by Forlinx Embedded. Hardware Design: FETMX6ULL-C SoM supports 8 x RS232/RS485/TTL and multi-channel I/O interfaces, which can be connected to dust sensors and other environmental monitoring equipment. At the same time, the industrial design enables it to operate stably in harsh outdoor environment, which ensures the reliability of the monitoring system. Network Communication: FETMX6ULL-C System on Module supports 2 x dual 100m Ethernet and standard TCP/IP and UDP protocol stacks. Monitoring data can be transmitted to the monitoring center or cloud server in real time through the network to realize remote monitoring and management. Wireless Communication: It supports 4G and WiFi wireless communication, and after a long time of stable testing, it can ensure the stable transmission of monitoring data, and even in the absence of wired network, it can also realize the online monitoring function. Screen Display: FETMX6ULL-C supports a variety of LCD screen designs, which enables the monitoring system to select the appropriate display screen according to actual needs, and realize the intuitive display and operation of data. Based on the features of Forlinx Embedded FETMX6ULL-C SoM, the dust online monitoring realization solution can achieve the advantages of rich hardware interfaces, stable network communication, flexible software support, etc. It is suitable for a variety of environmental monitoring scenarios and can meet the needs of the industrial level to guarantee the stability and reliability of the monitoring system.
-
- dust monitoring
- online monitoring solution
- (and 3 more)
-
The pollutants produced by human activities are the main factors causing water pollution. To protect the water environment, we must strengthen the monitoring of sewage discharge, the analysis of surface water, groundwater, industrial wastewater, and other water quality, and ensure the safety of people's water use. Drinking water safety concerns everybody, but many people still do not know its quality. Does the residual chlorine exceed the standard? What is the pH? These important indicators related to drinking water health need to be accurately detected. A water quality detector is a professional instrument used to analyze the content of water quality components, which can measure BOD, COD, ammonia nitrogen, total phosphorus, total nitrogen, turbidity, pH, and dissolved oxygen in water. It plays an important role and has been widely used in water quality detection and water resources protection. FETMX6ULL-C arm core board launched by Forlinx Embedded can be effectively used in water quality detectors to help us better protect drinking water. FETMX6ULL-C core board is a processor-based NXP i.MX6ULL is designed with a low-power ARM Cortex-A7 architecture that runs at speeds up to 800MHz. A low main frequency can reduce the heat generated by the CPU and extend the service life of the CPU. Its stable performance has been verified in long-term use in many fields. FETMX6ULL-C SoM is highly integrated and supports 8x serial ports, 2x network ports, and 2x CAN. The rich interfaces can connect dissolved oxygen sensors (with temperature), pH sensors, conductivity sensors, turbidity sensors, ammonia nitrogen analyzers, total organic carbon analyzers TOC, etc., to facilitate on-site construction and assembly. Dual-lane Ethernet can achieve dual-network redundancy. The 10M/100M adaptive Ethernet interface provides double insurance for the network. The support of WiFi and 4G also makes operation and maintenance more convenient. The software system uses Linux 4.1.15 and has an experienced technical support team to solve problems in the user design, allowing customers to quickly enter the product testing phase. Originally published at www.forlinx.net.
-
- water quality detector
- imx6ull
-
(and 2 more)
Tagged with:
-
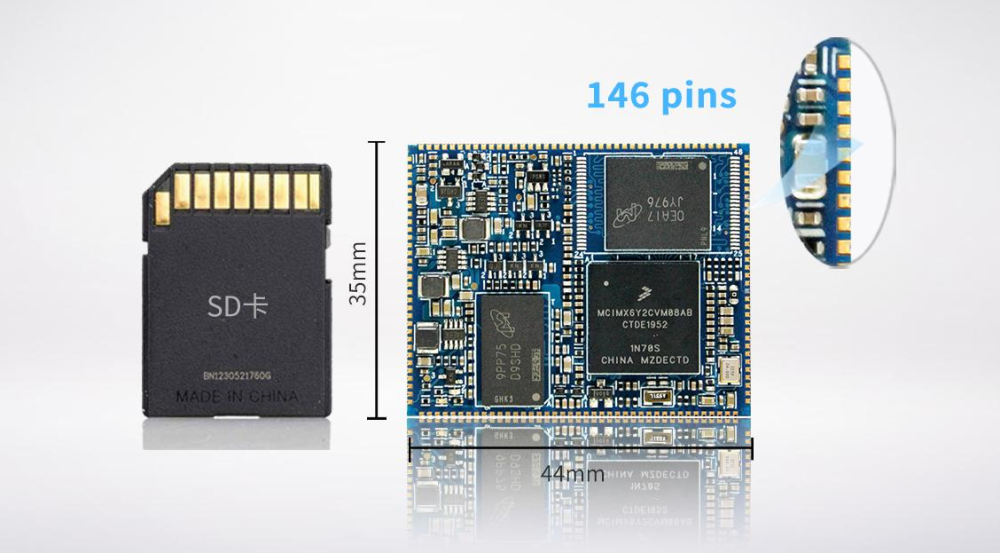
Introducing the FETMX6ULL-S System on Module (SoM) based on the powerful i.MX6ULL processor! This highly adaptable SoM features a dual native Ethernet ports, dual CAN controller, and octa UART, making it the perfect choice for a wide range of applications in various embedded systems and domains. With its compact size of 44*35mm, the FETMX6ULL-S SoM offers a perfect balance between performance and space efficiency. Whether you're working on media playing, digital camera integration, or WXGA display projects, this SoM has got you covered! Not only does it support 24-bit parallel LCD output up to WXGA (1366x768) for crystal-clear visuals, but it also boasts features like a 8/10/16/24-bit parallel camera sensor OV9650, three IIS interfaces, and ALSA audio form for an immersive multimedia experience. The FETMX6ULL-S SoM comes in both industrial-grade and expansion commerce-grade options, catering to various project requirements. Choose from 256MB DDR3L/512MB DDR3L RAM and 256MB NandFlash/4GB eMMC storage options to suit your needs. Rest assured, this SoM is well-supported with Linux 4.1.15 and QTGUI, ensuring a seamless development experience. With support for OTG, SD/TF card flashing mode, and separate kernel updates, you have the flexibility to customize and optimize your projects effortlessly.