Search the Community
Showing results for tags 'mqtt'.
Found 11 results
-
 What is Qubitro? Qubitro is an IoT (Internet of Things) platform that provides tools and services for connecting, managing, and analyzing IoT devices and data. It provides a cloud-based platform where users can securely connect their IoT devices and collect data from sensors and actuators. It supports a wide range of communication protocols and provides device management capabilities, monitoring device data, linking with third-party webhooks, and creating rules to trigger based on conditions, etc. All of it with a Great UI ❤ Get PCBs for Your Projects Manufactured You must check out PCBWAY for ordering PCBs online for cheap! You get 10 good-quality PCBs manufactured and shipped to your doorstep for cheap. You will also get a discount on shipping on your first order. Upload your Gerber files onto PCBWAY to get them manufactured with good quality and quick turnaround time. PCBWay now could provide a complete product solution, from design to enclosure production. Check out their online Gerber viewer function. With reward points, you can get free stuff from their gift shop. Getting Started To get started with Qubitro, we will first need to create an account. Go to the Qubitro website (https://www.qubitro.com/) and click on the "Sign Up" button. You will be prompted to enter Full Name, Email Address,Country, and password to create your account. Once, we have created the account, we can log in from https://portal.qubitro.com/login. However, we shall automatically be logged in to our account. Create a New Project Once you have logged in, you will be prompted to create a project. Enter a name for your project and mention a description for your project. Add Devices Next, you will need to add devices to your application. Go to the Project (if not already open), there we can see a button [+ New Source]. From this section, we will have 3 major sections - 1. Communication Protocol With a prompt to choose between LoRaWAN, MQTT, & Cellular. We can choose the protocol that best suits our use-case. I choose MQTT to get started with the platform basics. And since I shall be using Arduino IDE for programming the board, I went ahead with the MQTT Broker (Qubitro has its own broker - we shall see it in the upcoming section). In case you wish to know how the Toit platform works, you can check my Tutorial on Toit.io 2. Device Details I shall be using an ESP32 Dev Board, and therefore entered the details as per the image below - 3. Credentials In the next step, we receive credentials, to connect to the MQTT Broker. We can use this detail to connect to the broker as a client - to Publish or Subscribe. Now that we have the server, port, username and password we are all ready to send data to the Qubitro Cloud. Copy these details in a safe place (We can view them later in the device settings as well though) Hardware - From Device to Cloud Once you have configured your devices, you can start collecting data. Qubitro provides a range of tools for data collection and analysis, including real-time data visualization, data logging, and data filtering. We shall upload a code on ESP32 using Arduino IDE to send data to Qubitro - #include <WiFiClientSecure.h> #include <PubSubClient.h> #include <HTTPClient.h> #include <ArduinoJson.h> These are the necessary libraries for establishing an MQTT connection, handling HTTP requests, and working with JSON data. const char* ssid = "xxxxxxxxx"; const char* password = "xxxxxxxxx"; String topic = "xxxxx"; String mqtt_server = "broker.qubitro.com"; String mqttuser = "xxxxxxxxxxxxxxxxxxxxxx"; String mqttpass = "xxxxxxxxxxxxxxxxxxxxxx"; String clientId = "xxxxxxxxxxxxxxxxxxxxxx"; These variables store the Wi-Fi credentials (ssid and password), MQTT broker server address (mqtt_server), MQTT authentication credentials (mqttuser and mqttpass), MQTT client ID (clientId), and the MQTT topic (topic) to which the data will be published. WiFiClientSecure espClient; PubSubClient client(espClient); float humidity = 0; float temp = 0; Create an instance of WiFiClientSecure and PubSubClient classes to establish a secure connection with the MQTT broker. Also, initializing default value of temperature and humidity. #define MSG_BUFFER_SIZE (500) char msg[MSG_BUFFER_SIZE]; char output[MSG_BUFFER_SIZE]; Define the size of the message buffer for storing MQTT messages. void device_setup() { // ... Wi-Fi connection setup ... } This function sets up the Wi-Fi connection by connecting to the specified Wi-Fi network (ssid and password). void reconnect() { // ... MQTT reconnection logic ... } This function handles the reconnection to the MQTT broker in case of disconnection. void setup() { // ... Initialization code ... } The setup() function is the entry point of the code. It initializes the serial communication, sets up the device, establishes a connection with the MQTT broker, and prepares the secure connection using WiFiClientSecure and PubSubClient objects. void loop() { // ... Main code loop ... } The loop() function is the main execution loop of the code. It checks the MQTT connection, publishes the simulated temperature and humidity data to the MQTT topic, and then waits for a delay of 1 second before repeating the process. Inside the loop() function, you'll notice the following steps: if (!client.connected()) checks if the MQTT client is connected. If not, it calls the reconnect() function to establish the connection. client.loop() allows the MQTT client to maintain the connection and handle any incoming messages. The temp and humidity variables are randomly generated simulated values. A JSON document is created using the ArduinoJson library to store the temperature and humidity data. The JSON document is serialized into a string format using the serializeJson() function and stored in the output variable. The client.publish() function is used to publish the serialized JSON data to the specified MQTT topic. The serialized JSON data is printed to the serial monitor using Serial.println(). A delay of 1 second is added before repeating the loop. Full version of the code available in the Code Section. Now that we have written the code, upload it to the ESP32 board and wait for it to send data to cloud. To check data, go to Device Name that you created, and check for any incoming data in the table. (refresh the table in case data not retrieved) Create Dashboard Now that we were able to fetch for real-time data from the ESP32 board and view it on the table of Qubitro. Let us use the visualization feature to plot a graph of the data. Trust me, it takes seconds to setup the whole thing. Go to Dashboards, and create a New Dashboard. Give it a name. Once created, open it and go to Edit > Add Widget > Charts. Click on the new widget > three dots (settings) > Customization. Accordingly, select the data source, chart type and colour for data variables. Follow the below images for reference, and final Graph. Data source example above Data Point example above Finally, I received the above graph based on a 30-minute data logging. If we head back to the main dashboard page, we can have a proper view, and with a view configuration, receive live data in realtime on Qubitro. In the dashboard, click on the chart widget we created, click on edit and drag it to the middle. Stretch and play with the widget according to the need. Resizing it for proper viewing. Remember to save it. If you are facing trouble with viewing the data with 4 points in the graph period, you can change it in the View Mode's configuration of the graph widget. Now, using this we can view the data of our device based on our needs! Rules to Trigger and Integration Services Finally, Qubitro allows you to integrate with other services such as Twilio, Slack, MailGun, and SendGrid. We can also use the trigger for Webhooks (RAW HTTP request) triggering, You can do this by clicking on the "Rules" tab in the Device section and selecting the service you want to integrate with. Congratulations! You have now completed the Qubitro IoT Platform documentation tutorial. We hope that this tutorial has provided you with the information you need to get started with Qubitro and create your own IoT application. If you have any questions or need further assistance, please visit the Qubitro website or contact their support team. Hurray! 🎉 We have learned another IoT Platform - Qubitro Device Data Platform esp32_mqtt_qubitro.ino
 -
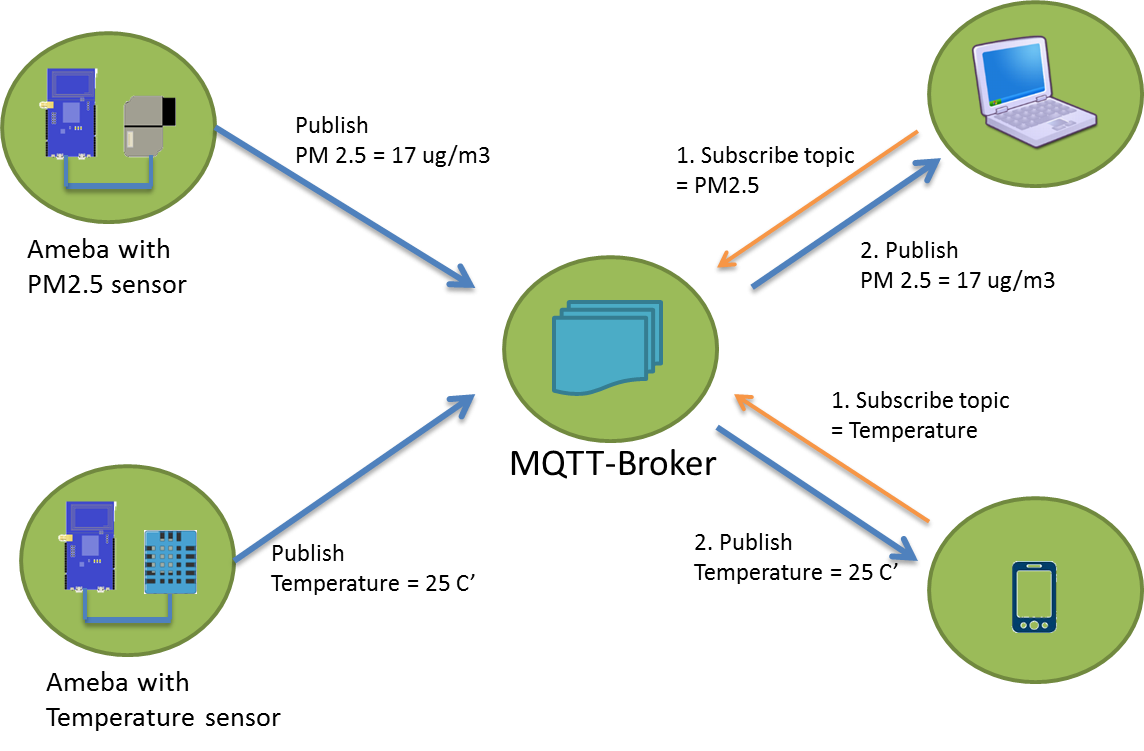
What is MQTT? MQTT stands for Message-Queue-Telemetry-Transport, is a publish/subscribe protocol for machine-to-machine communication. This simple protocol, is easy to implement for any client. Termed as the Pub and Sub, both are used for same purpose but with different methods. Get PCBs for Your Projects Manufactured You must check out PCBWAY for ordering PCBs online for cheap! You get 10 good-quality PCBs manufactured and shipped to your doorstep for cheap. You will also get a discount on shipping on your first order. Upload your Gerber files onto PCBWAY to get them manufactured with good quality and quick turnaround time. PCBWay now could provide a complete product solution, from design to enclosure production. Check out their online Gerber viewer function. With reward points, you can get free stuff from their gift shop. Getting Started Here, there are 2 sections - Publish and Subscribe. And then there is a middleman - Broker. Let us see in depth IoT Devices play the role to collect sensor data and send to the cloud (broker). While PC/Server/Mobile devices play the role to monitor and receive the sensor data to be viewed - Here, IoT Device is a Publisher, and PC Devices are Subscriber. According to the above analogy, the image that is published is the data, that was transferred from user1 to user2 📤. And that is the exact scenario in an MQTT Pub/Sub model. We have a more secure layer 🔒 to make sure the data is shared through a specific path, we call that 'topic', When user1 publishes data on topic, the subscriber automatically receives if already connected to the broker. Hence, the LOW latency. MQTT Broker Whenever there is a pub-sub model used as a message communication protocol, we require a broker that can transfer the information in the required device. This can be done by sending the message under correct topic. Let us understand this - A Broker is a runtime server (continuously running service), which can have 2 types of clients - Publisher (seller) & Subscriber (buyer) For instance, when a seller sells a product through a broker to a buyer, then it is using the Broker's service to reach & find a secured buyer. Similarly, when publisher publishes a piece of information, the data reaches to the subscriber through the Broker. The broker is responsible for having specific storage space where it can expect data from the publisher to store temporarily and then send to the subscriber. In the pub-sub MQTT, clients talk to each other through an MQTT broker. There are many MQTT Brokers in the market. It is even possible to create our own broker, or use an open-source broker 'paho'. For the current project, we shall first understand the mechanism and then watch a trial movement of data on Mosquitto MQTT Broker. Mosquitto Platform Now that we understand how MQTT works, let us use a cloud MQTT service and send data across the internet. In this article, we'll be using Mosquitto MQTT - test.mosquitto.org Under the Server section, we can see different ports provide feature-separated servers. These servers act like channels for sharing data over the cloud. Let us understand it first - MQTT Broker Port (default: 1883): This is the standard port used for MQTT communication. MQTT clients use I to connect to the Mosquitto broker and publish/subscribe to topics. It operates over TCP. MQTT Broker SSL/TLS Port (default: 8883): This is the secure version of the MQTT broker port. It uses SSL/TLS encryption to provide secure communication between MQTT clients and the Mosquitto broker. Clients connect to this port to establish a secure connection. WebSocket Port (default: 9001): Mosquitto also supports MQTT over WebSockets, allowing MQTT clients to connect to the broker using the WebSocket protocol. The WebSocket port is used for WebSocket-based MQTT communication. WebSocket SSL/TLS Port (default: 9443): This is the secure WebSocket port used for encrypted WebSocket-based MQTT communication. It provides a secure connection using SSL/TLS encryption. We shall be using 1883 port to send data and monitor. As we know, MQTT has 3 services - Publisher, Broker, and Subscriber. In this case, mosquito MQTT Cloud is already playing the role of a broker. Now, we'd be using ESP32 Dev Board, which has a wifi chip and is able to connect to the Internet, playing the role of a Publisher for sharing its temperature and humidity data from the sensor. On the other hand, we shall use the PC to view this data as a Subscriber. This will enable us to fully understand the working principle of the MQTT protocol used in IoT Communication between devices. Publisher (ESP32) To set up the ESP32 for MQTT, we need to install a library - PubSubClient. This library has functions that use variables as mentioned below to send data to the broker. mqtt_server: This variable represents the address or IP of the MQTT broker. We shall be using "test.mosquitto.org" mqtt_port: This variable represents the port number of the MQTT broker. In our case 1883. mqtt_topic: This variable represents the topic to which the publisher will send messages. For Example "schoolofiot/device1". Where 'schoolofiot' is the general-most topic level. And 'device1' is a sub-level. The provided code is an Arduino sketch that uses the ESP32 WiFi module and the PubSubClient library to connect to an MQTT broker and publish temperature and humidity data. Let's break down the code step by step: 1. Include necessary libraries: #include <WiFi.h> #include <PubSubClient.h> This code includes the required libraries for the ESP32 WiFi module and the MQTT client functionality. 2. Define WiFi & MQTT Server variables: const char* ssid = "XXXXXXXXXX"; const char* password = "XXXXXXXXXX"; const char* mqtt_server = "test.mosquitto.org"; These variables store the SSID (network name) and password for the WiFi network you want to connect to. The mqtt_server variable holds the IP address or hostname of the MQTT broker. 3. Declare global variables and objects: WiFiClient espClient; PubSubClient client(espClient); long lastMsg = 0; char msg[50]; int value = 0; float temperature = 0; float humidity = 0; Here, a WiFi client object (espClient) and an MQTT client object (client) are declared. The lastMsg variable stores the timestamp of the last message, and the msg is a character array for message storage. The value, temperature, and humidity variables are used to hold the respective sensor values. 4. Setup function: void setup() { Serial.begin(115200); setup_wifi(); client.setServer(mqtt_server, 1883); client.setCallback(callback); } The setup() function is called once at the start of the program. It initializes the serial communication, sets up the WiFi connection, configures the MQTT server and port, and sets the callback function to handle incoming messages. 5. WiFi setup function: void setup_wifi() { //... } The setup_wifi() function handles the connection to the WiFi network using the provided SSID and password. It waits until the connection is established and prints the local IP address to the serial monitor. 6. MQTT callback function: void callback(char* topic, byte* message, unsigned int length) { //... } This function is called when a message is received from the MQTT broker. It prints the received message along with the corresponding topic. 7. MQTT reconnection function: void reconnect() { //... } The reconnect() function is responsible for reconnecting to the MQTT broker if the connection is lost. It attempts to connect to the broker using a randomly generated client ID. If the connection is successful, it prints a success message. Otherwise, it waits for 5 seconds before retrying. 8. Main loop: void loop() { if (!client.connected()) { reconnect(); } client.loop(); long now = millis(); if (now - lastMsg > 2000) { lastMsg = now; sendData(); } } The loop() function is the main program loop that runs continuously after the setup() function. It checks if the MQTT client is connected and, if not, attempts to reconnect. It also calls the client.loop() function to maintain the MQTT client's internal state. Every 2 seconds, it calls the sendData() function to publish temperature and humidity data. 9. Publish sensor data function: void sendData() { //... } The sendData() function is responsible for publishing temperature and humidity data to specific MQTT topics. It generates random values for temperature and humidity, converts them to strings, and publishes them along with the corresponding topic. - Publish a gap message: client.publish("schoolofiot/gap", "--------------"); This line publishes a message consisting of a series of dashes (--------------) to the MQTT topic "schoolofiot/gap". It is used to indicate a separation or gap between different sets of data. - Read and publish temperature data: temperature = random(30, 40); char tempString[8]; dtostrf(temperature, 1, 2, tempString); Serial.print("Temperature: "); Serial.println(tempString); String tempdata = "Temperature: " + String(tempString); client.publish("schoolofiot/temperature", tempdata.c_str()); These lines generate a random temperature value between 30 and 40 degrees, store it in the temperature variable, and usedtostrf() function to convert decimal point data to String. The temperature value is then printed to the serial monitor and concatenated with the string "Temperature: ". The resulting string is stored in the tempdata variable. Finally, the tempdata string is published to the MQTT topic schoolofiot/temperature using the client.publish() function. - Read and publish humidity data: humidity = random(60, 70); char humString[8]; dtostrf(humidity, 1, 2, humString); Serial.print("Humidity: "); Serial.println(humString); String humdata = "Humidity: " + String(humString); client.publish("schoolofiot/humidity", humdata.c_str()); These lines generate a random humidity value between 60 and 70 percent, store it in the humidity variable. Overall, the sendData() function generates random temperature and humidity values, converts them to strings, and publishes them to specific MQTT topics for further processing or monitoring. Final Code can be found in the Code section But to confirm this, we also need to read the data from other the side - Subscriber. Subscriber (Windows PC) To set up the Subscriber on PC, we need to install Mosquitto MQTT Applcation. This application can create a broker, publisher & subscriber - all sections To install Mosquitto MQTT on your PC from the official website and make changes to the configuration file for listener 1883 and allow anonymous connections, you can follow these steps: 1. Download andInstall Mosquitto: Go to the official Mosquitto website (https://mosquitto.org/). Navigate to the "Downloads" section. Choose the appropriate installer for your operating system (Windows x64 in this case) and download it Install the application in desired location. 2. Edit Configuration File: Open the installation directory where Mosquitto is installed. Locate the mosquitto.conf file (usually found in the main directory). Open mosquitto.conf in a text editor of your choice.Add the below 2 lines - listener 1883 allow_anonymous true It should look somewhat like this - We can uncomment ad make changes in the file as well, but adding only 2 lines on the top is more simple and noticeable. 3. Run Mosquitto Subscriber We can run the Mosquitto broker and then subscribe to the topic we desire. But running directly the subscriber is best in our case. Open the folder/directory where the mosquitto.exe along with mosquitto_sub.exe is present. Run the PowerShell/CMD terminal from within the directory. For windows, open the directory > Press shift + right-mouse-button(right-click), and we'd see options for running a terminal like powershell. On the terminal, enter below command - > .\mosquitto_sub -h test.mosquitto.org -t "schoolofiot/#" In the above command, if you noticed, I did not subscribe to a specific topic. As per the topics we published (from ESP32), like "schoolofiot/gap", "schoolofiot/temperature" or "schoolofiot/humidity". The reason is, gap, temperature & humidity comes under the general topic of schoolofiot level. So, to access/view any data published as a sub-level of schoolofiot, we can use '#'. Apart from this, in case we need to subscribe to a specific topic (like temperature), we can use command like this - > .\mosquitto_sub -h test.mosquitto.org -t "schoolofiot/temperature" Therefore, no matter what name is put under the general topic, we can subscribe to it and view all of them together. Hurray! 🎉 We have learned another IoT Platform - Mosquitto MQTT (By Eclipse) Code #include <WiFi.h> #include <PubSubClient.h> // Replace the next variables with your SSID/Password combination const char* ssid = "XXXXXXXXXX"; const char* password = "XXXXXXXXXX"; // Add your MQTT Broker IP address, example: const char* mqtt_server = "test.mosquitto.org"; WiFiClient espClient; PubSubClient client(espClient); long lastMsg = 0; char msg[50]; int value = 0; float temperature = 0; float humidity = 0; void setup() { Serial.begin(115200); // default settings setup_wifi(); client.setServer(mqtt_server, 1883); client.setCallback(callback); } void setup_wifi() { delay(10); // We start by connecting to a WiFi network Serial.println(); Serial.print("Connecting to "); Serial.println(ssid); WiFi.begin(ssid, password); while (WiFi.status() != WL_CONNECTED) { delay(500); Serial.print("."); } Serial.println(""); Serial.println("WiFi connected"); Serial.println("IP address: "); Serial.println(WiFi.localIP()); } void callback(char* topic, byte* message, unsigned int length) { Serial.print("Message arrived on topic: "); Serial.print(topic); Serial.print(". Message: "); String messageTemp; for (int i = 0; i < length; i++) { Serial.print((char)message[i]); messageTemp += (char)message[i]; } Serial.println(); } void reconnect() { // Loop until we're reconnected while (!client.connected()) { Serial.print("Attempting MQTT connection..."); // Attempt to connect String clientId = "client-" + random(100, 999); if (client.connect(clientId.c_str())) { Serial.println("connected"); } else { Serial.print("failed, rc="); Serial.print(client.state()); Serial.println(" try again in 5 seconds"); // Wait 5 seconds before retrying delay(5000); } } } void loop() { if (!client.connected()) { reconnect(); } client.loop(); long now = millis(); if (now - lastMsg > 2000) { lastMsg = now; Serial.println(client.connected()); sendData(); } } void sendData(){ Serial.println(); client.publish("schoolofiot/gap", "--------------"); //Read Temperature temperature = random(30,40); char tempString[8]; dtostrf(temperature, 1, 2, tempString); Serial.print("Temperature: "); Serial.println(tempString); String tempdata = "Temperature: " + String(tempString); client.publish("schoolofiot/temperature", tempdata.c_str()); //Read Humidity humidity = random(60,70); char humString[8]; dtostrf(humidity, 1, 2, humString); Serial.print("Humidity: "); Serial.println(humString); String humdata = "Humidity: " + String(humString); client.publish("schoolofiot/humidity", humdata.c_str()); }
-
One of the most useful IoT applications is home security. Imagine a thief cutting your security camera wire while trying to break into your house. This won’t happen if your security system goes wireless and smart. This project demonstrates the capability of Realtek Ameba dev. board to conduct board-to-board communication via MQTT (FREE MQTT broker hosted at cloud.amebaiot.com). With this home security system, you will definitely be alarmed when your window/door is opened by the self-invited as the buzzer will make loud irritating noise while red LED flashes continuously. Of course, this project has left rooms to add your own logic to it. For example, sending MQTT messages to your phone to alert you, or to an IP camera to capture the image of the thief. Hardware Preparation - Ameba1 RTL8195AM x2 - Buzzer x1 - LED (red) x1 - Reed switch x1 - Magnet x1 - Jumpers x6 As 2 boards are needed to implement this project, there are 2 connection illustration as follows, https://github.com/Realtek-AmebaApp/Ameba_Examples/blob/master/RTL8195AM/006_HOME_SECURITY/WindowSecuritySystem_Switch_bb.png https://github.com/Realtek-AmebaApp/Ameba_Examples/blob/master/RTL8195AM/006_HOME_SECURITY/WindowSecuritySystem_Buzzer_bb.png Software Preparation 1. Check and make sure you have installed the ameba 1 board to Arduino IDE via adding this link into “additional boards manager URLs” under “Preference”, and install it in “board manager” under “Tools”, https://github.com/ambiot/amb1_arduino/raw/master/Arduino_package/package_realtek.com_ameba1_index.json 2. Copy the [buzzer source code](https://github.com/Realtek-AmebaApp/Ameba_Examples/blob/master/RTL8195AM/006_HOME_SECURITY/windowSecuritySystem_buzzer_Github.ino) and [switch source code](https://github.com/Realtek-AmebaApp/Ameba_Examples/blob/master/RTL8195AM/006_HOME_SECURITY/windowSecuritySystem_switch_Github.ino) you find in this repository to your Ameba1 RTL8195 boards respectively using arduino IDE 3. In order to connect to WiFi and MQTT server, you need to key in your WiFi SSID, WiFi passowrd, MQTT username and MQTT password, - username: same as your amebaiot.com username - password: same as your amebaiot.com password Done that's it! You have created a simple yet powerful home security system! To watch how how it is done, click link below,
-
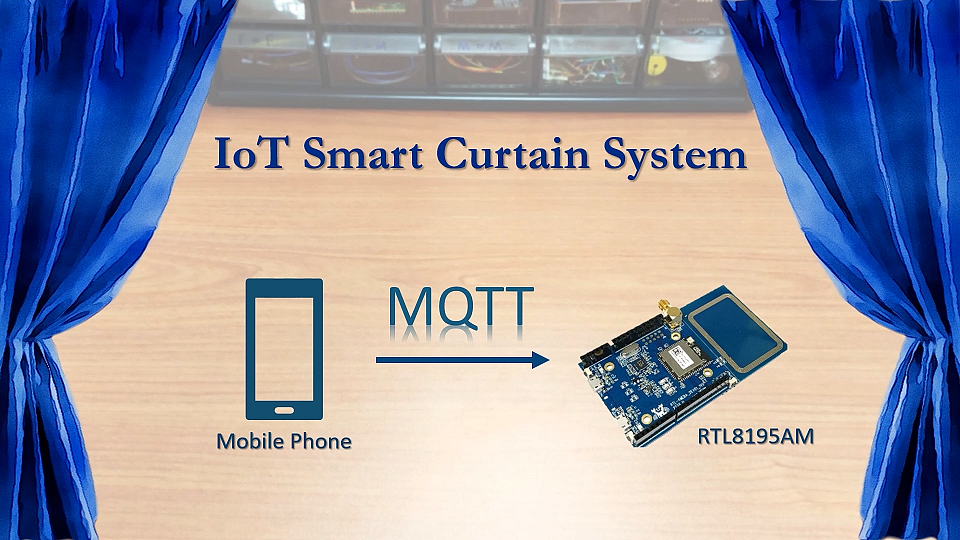
 The focus of this project is to demonstrates how easy it is for Ameba Wi-Fi Dev. board to communicate with our smart phone via MQTT protocol. Phone to microcontroller communication used to be very difficult as they use totally different hardware interface and phone get its data mainly through the network. Now with a Wi-Fi enabled microcontroller like Ameba RTL8195AM, communication with our phone becomes a bliss. Of course, in this video, only a mini window is used for demonstration purpose, but controlling a real window should not be a problem if you simply replace the servo motor with a bigger DC step motor and change the source code accordingly. With this smart curtain system, you may, 1. Remotely control your curtain to open or close instantaneously 2. Check your curtain status according to the MQTT message received 3. Link with the previous weather station project and automate your room from there GitHub page https://github.com/Realtek-AmebaApp/Ameba_Examples/tree/master/RTL8195AM/005_SMART_CURTAIN Official pages https://www.amebaiot.com.cn/en/ https://www.amebaiot.com/en/ Facebook pages https://www.facebook.com/groups/AmebaIoT/ BiliBili channel https://space.bilibili.com/45777743
-
 With COVID-19 still wreaking havoc globally, causing thousands of deaths, millions hospitalized, any useful medical device is on high demand, especially household medical device like IR non-contact thermometer. Handheld thermometer usually is on high price point and is hard to come by these days, but the components needed to make thermometer are not that expensive, that give us the perfect reason to DIY one during this lockdown period. This ThermoGun project use Ameba Dev. board RTL8710AF from Realtek, which connects to an OLED display to show temperature data obtained from the MLX90615 IR sensor. Pushing the push button not only perform data acquisition and visualization, but also publish the data via MQTT to all subscribers. Note: The MQTT service used in this project is a FREE MQTT broker hosted at cloud.amebaiot.com, which need to register at www.amebaiot.com . Details of registration is at the link below, https://www.amebaiot.com/en/cloud-getting-started/ For details of step-by-step guide and connections, please refer to Github page here, https://github.com/Realtek-AmebaApp/Ameba_Examples/tree/master/RTL8195AM/007_THERMOGUN Demo Video: https://youtu.be/Yl3arBRmyYI
 -
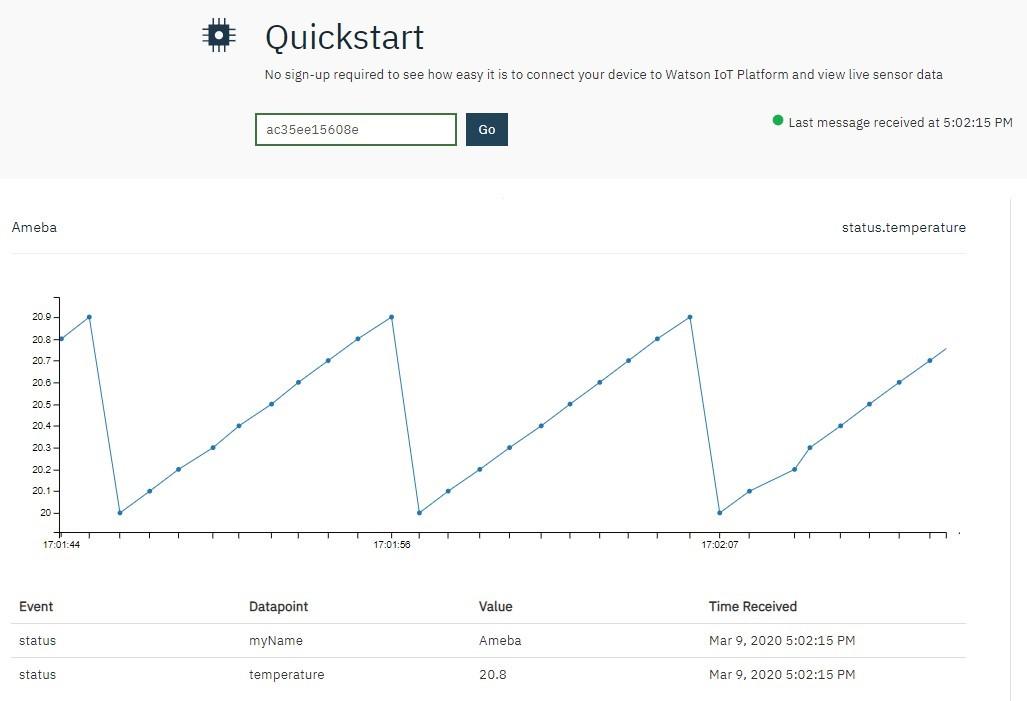
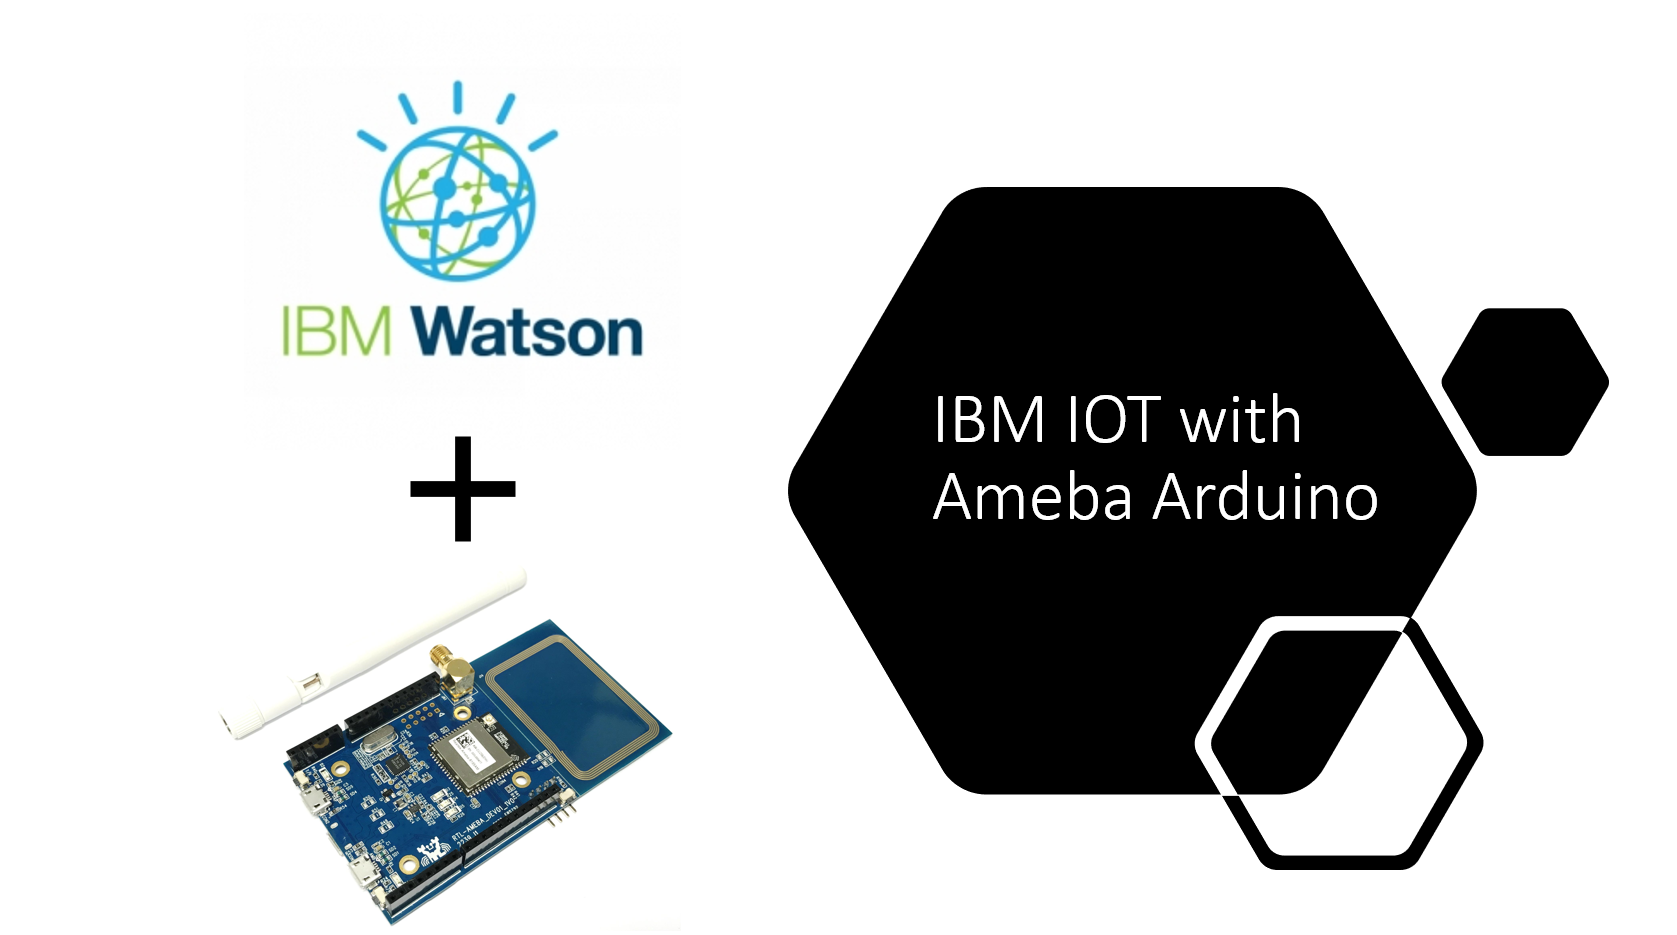
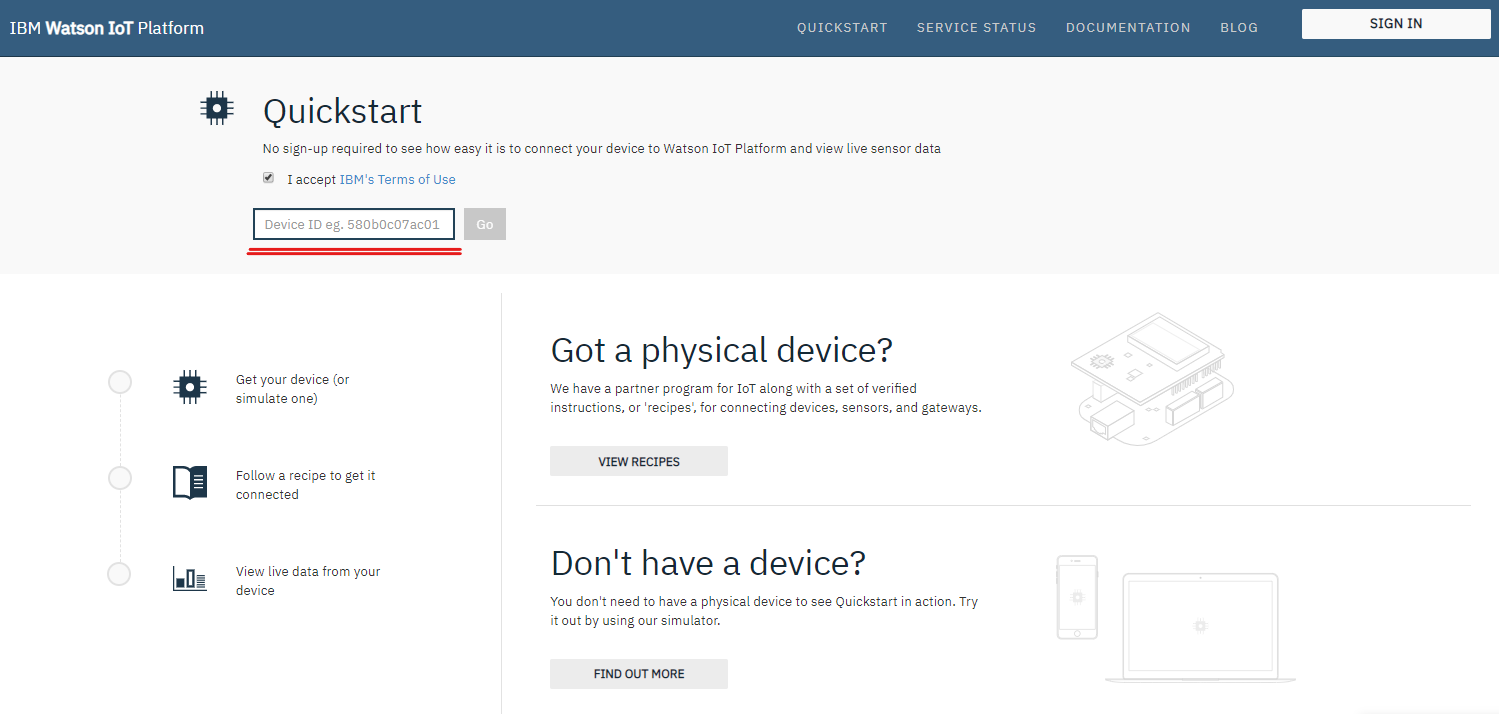
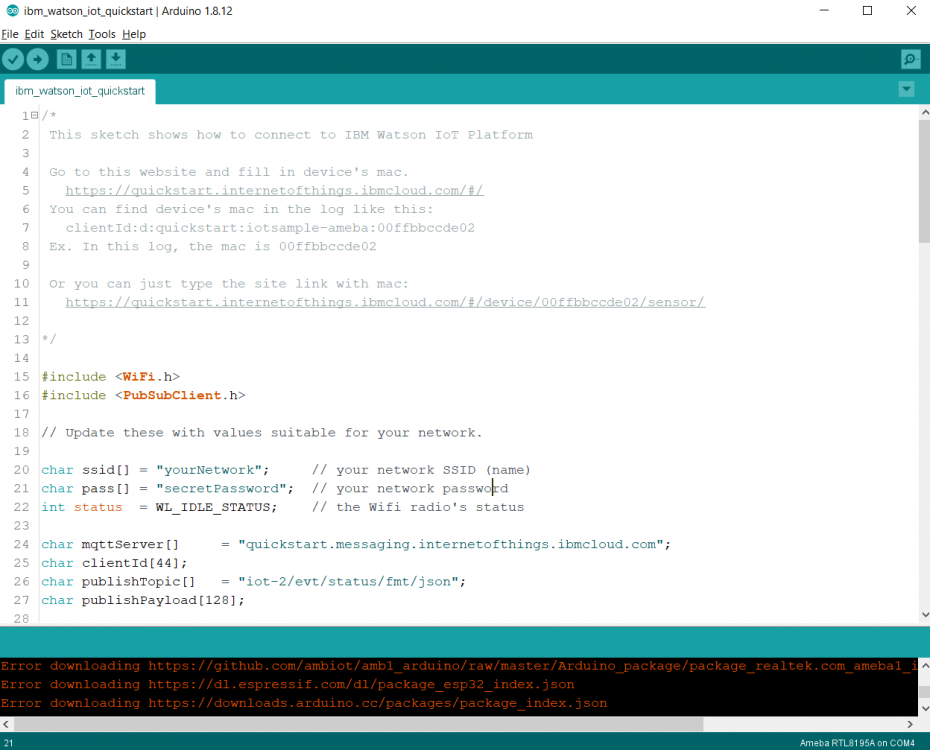
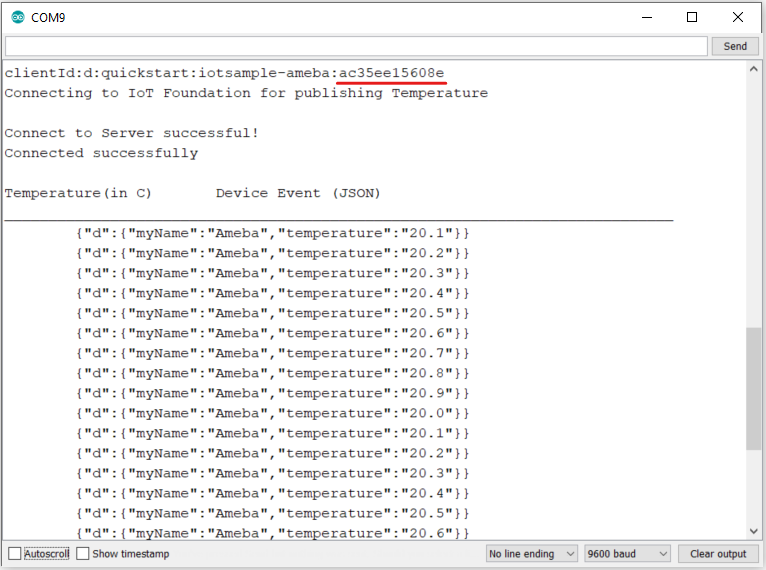
MQTT (Message Queuing Telemetry Transport) is a protocol proposed by IBM and Eurotech. IBM® Watson™ IoT Platform is, by the official definition, “A foundational cloud offering that can connect and control IoT sensors, appliances, homes, and industries. Built on IBM Cloud, Watson IoT Platform provides an extensive set of built-in and add-on tools. Use these tools to process IoT data with real-time and historical analytics, extract key performance indicators (KPIs) from your data, add “smarts” in the cloud for non-smart products, and securely connect your own apps and existing tools to the Watson IoT Platform infrastructure.” (IBM, 2020) This platform provides easy web interface to register, connect and visualize our IOT devices. For quick start and simple try-out, registration is not necessary, we may just run our program to get the device ID needed for this platform. Preparation § Ameba x 1 Example In this example, we will take a look at how to make use of IBM Watson IOT platform for out IOT project. Open the MQTT example “File” -> “Examples” -> “AmebaMQTTClient” -> “ibm_watson_iot_quickstart” Make sure the Wi-Fi information is properly filled in and we are ready to upload the code to ameba. Once uploading finished, open a serial monitor and we shall see information as follows, Important: Please take note of the string of characters on the first line of the picture above -- “clientId:quickstart:iotsample-ameba:ac35ee15608e” “ac35ee15608e” is the device ID as well as the MAC address of the ameba board used here which will NOT be the same for other cases, so make sure to copy down the device ID displayed on your serial monitor. Next, we click the IBM IOT platform link provided here and open our browser: https://quickstart.internetofthings.ibmcloud.com/#/ Paste the device ID we just copied into the box highlighted below, If the device ID keyed in is correct, some fake temperature data that our ameba published will be visualized like this, Done! Now you have FREE and working IOT cloud platform to help you visualize your IOT data in realtime~


-
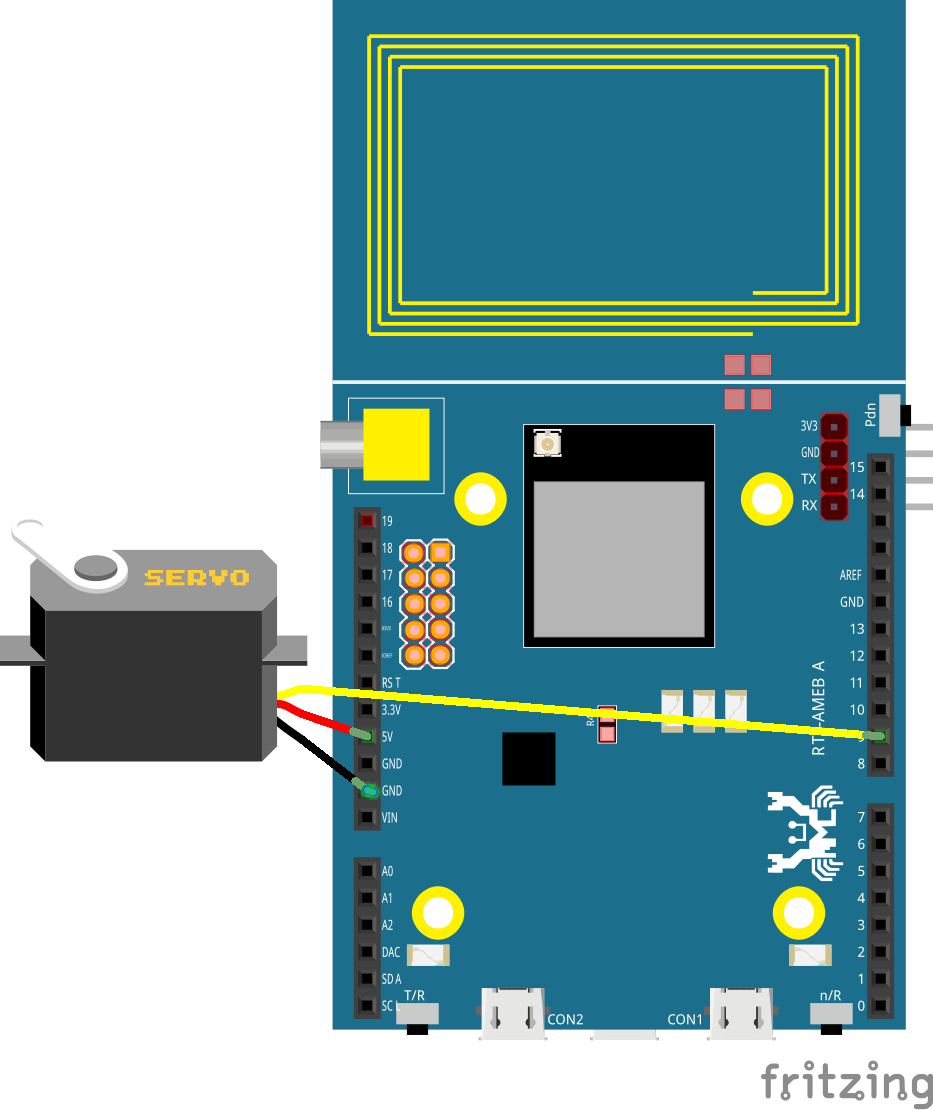
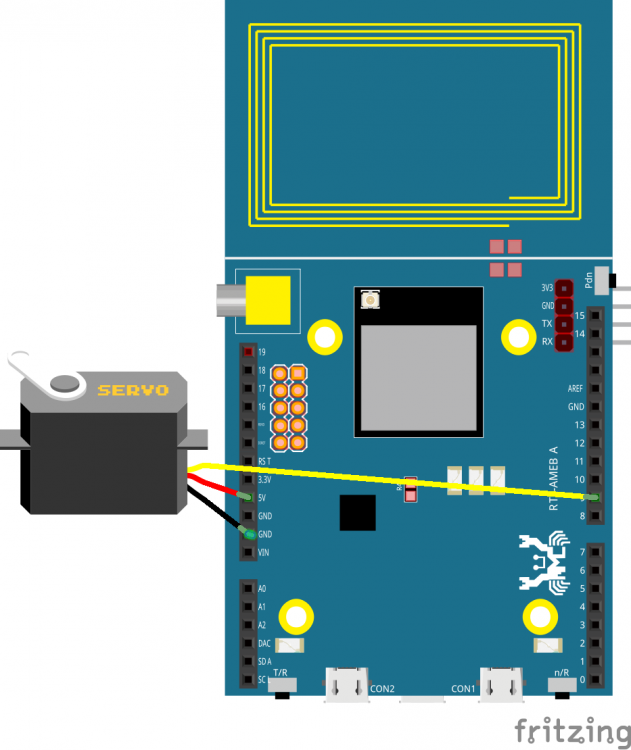
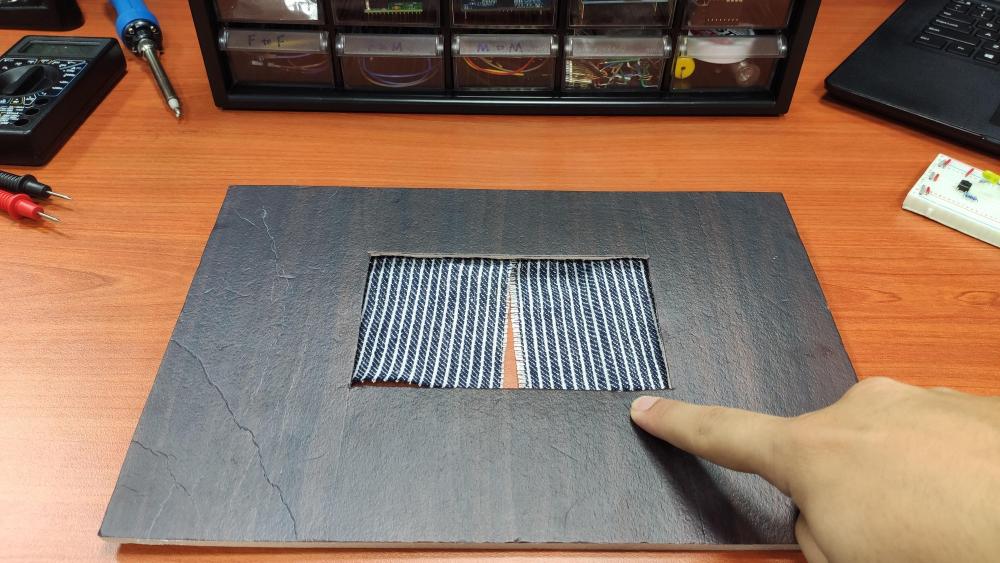
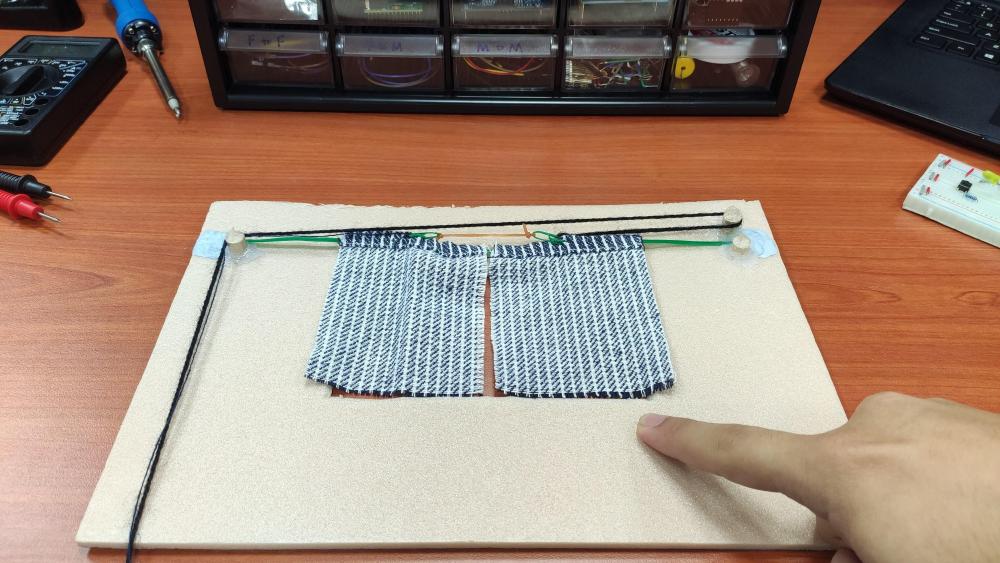
This project is the second one in the new IOT project series on Ameba RTL8195AM Dev. Board. The focus of this project is to demonstrates how easy it is for Ameba Wi-Fi Dev. board to communicate with our smart phone via MQTT protocol. Phone to microcontroller communication used to be very difficult as they use totally different hardware interface and phone get its data mainly through the network. Now with a Wi-Fi enabled microcontroller like Ameba RTL8195AM, communication with our phone becomes a bliss. Of course, in this project, only a mini hand-crafted window is used for demonstration purpose but controlling a real window should not be a problem if you simply replace the servo motor with a bigger DC step motor and change the source code accordingly. With this smart curtain system, you may, 1. Remotely control your curtain to open or close instantaneously 2. Check your curtain status according to the MQTT message received 3. Link with the previous weather station project and automate your room from there Hardware List of hardware needed Ameba 1 RTL8195AM x1 Servo motor x1 Jumper wires x3 DIY materials x3 Hardware connection is shown below, for the window, you may use a Lego house as substitute or simply build one using plywood or hard form board, the exact structure can also be found in this folder. Software 1. Check and make sure you have installed the ameba 1 board to Arduino IDE via adding this link into “additional boards manager URLs” under “Preference”, and install it in “board manager” under “Tools”, https://github.com/ambiot/amb1_arduino/raw/master/Arduino_package/package_realtek.com_ameba1_index.json 2. Upload source code to your Ameba1 RTL8195 board using arduino IDE 3. Install a MQTT client App on your smart device (android/iOS) a) To use a MQTT service, you must first get a free MQTT server address b) Go to www.amebaiot.com and register for a user c) Then go to cloud service tab and register your device d) Once approved, the same username and password used for registration can be used to make use of the MQTT service for free 4. Connect to your MQTT server by keying in the correct server address, port number, username and password • For Host name: cloud.amebaiot.com • For Port number: 1883 • For username: same as your amebaiot.com username • For password: same as your amebaiot.com password 5. Key in the topics that you specified in the code, always remember to swap the publish topic and subscribe topic when you want to monitor your microcontroller’s published data.
-
The project demonstrates how an IoT device (Ameba RTL8195) is applied in real-life scenarios. If you have watched previous demo videos, you should have no problem understanding how an LCD display, a DHT Temperature Humidity sensor and our Ameba RTL8195. It can be put together to form a fully functional smart weather station. Simply follow the instructions in our examples as follows to DIY your own weather station, 1. LCD 24H Clock https://www.electronics-lab.com/community/index.php?/topic/47704-realtek-ameba-rtl8195-lcd-24h-clock/ 2. MQTT https://www.electronics-lab.com/community/index.php?/topic/47715-realtek-ameba-rtl8195-mqtt-demo/ 3. DHT+MQTT https://www.electronics-lab.com/community/index.php?/topic/47735-realtek-ameba-rtl8195-iot-system-with-dht-mqtt/ The key to integrate these 3 examples successfully is to make sure that you have set up your MQTT server correctly and note that here we are using a different set of MQTT topics, namely “dht_data” and “dht_status”. Also, when connect DHT sensor, D13 pin is used as data input pin. GitHub page https://github.com/Realtek-AmebaApp/Ameba_Examples/tree/master/RTL8195AM/004_WEATHER_STATION Official pages https://www.amebaiot.com.cn/en/ https://www.amebaiot.com/en/ Facebook pages https://www.facebook.com/groups/AmebaIoT/ BiliBili channel https://space.bilibili.com/45777743
-
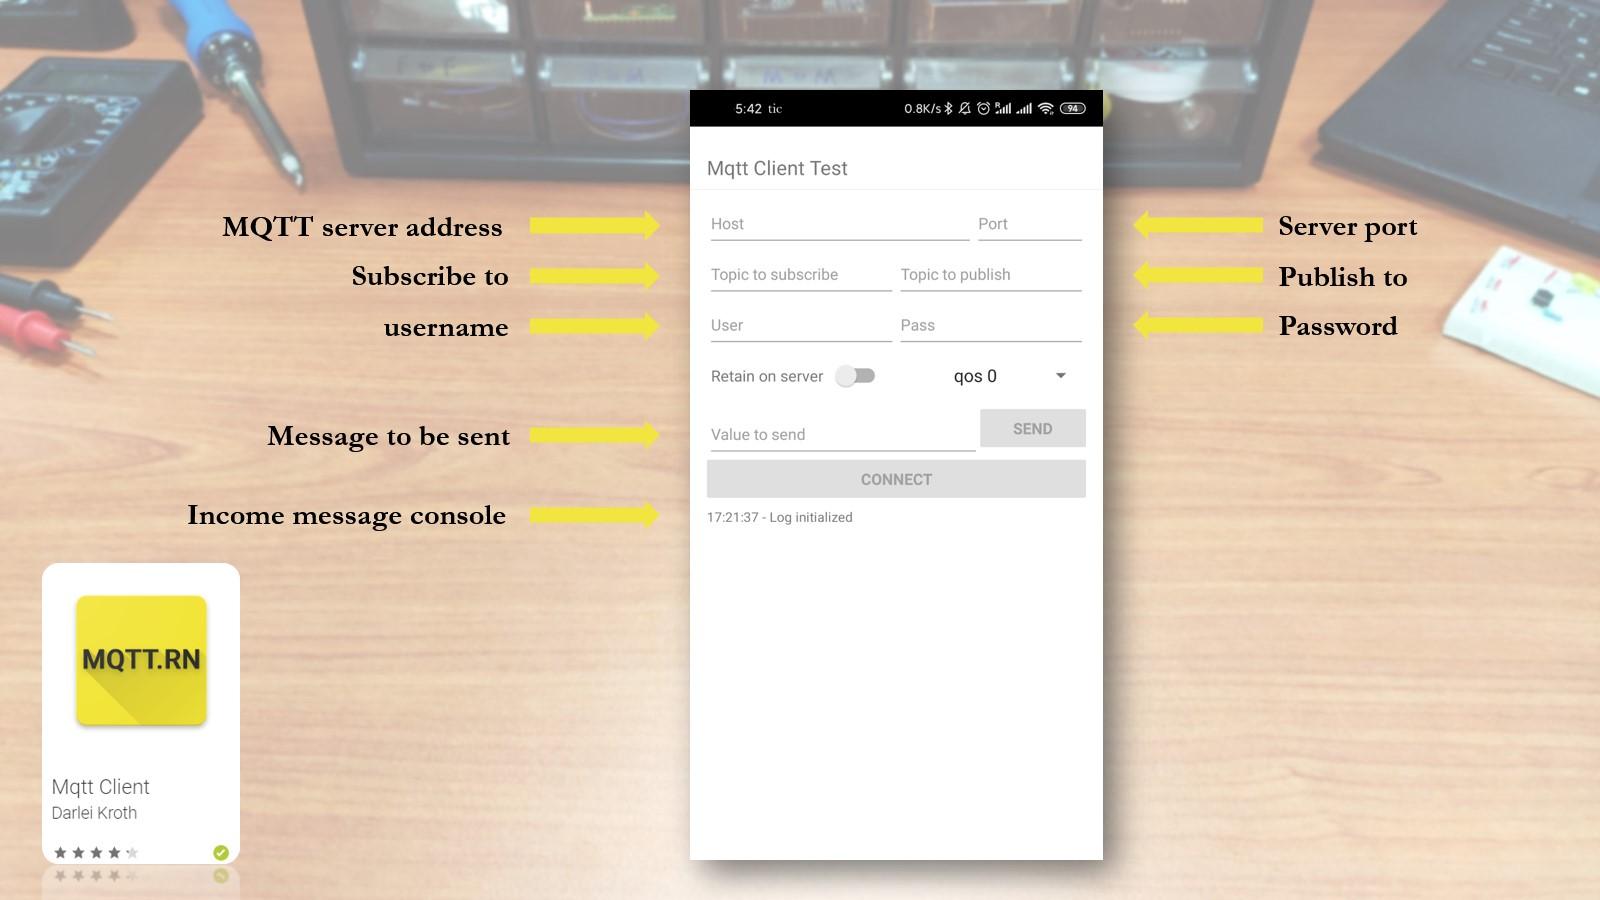
MQTT is a machine-to-machine (M2M)/"Internet of Things" (IOT) connectivity protocol. It was designed as an extremely lightweight publish/subscribe messaging transport. With an Arduino-compatible wireless soc, e.g. Realtek Ameba1 (RTL8195/RTL8710) dev. Board, we can create a MQTT client that sends our sensor data to the cloud or any other MQTT clients. The source code is available on github at, https://github.com/ambiot/amb1_arduino/blob/master/Arduino_package/hardware/libraries/MQTTClient/examples/mqtt_basic/mqtt_basic.ino The things that need to take note of, · The "mqttServer" refers to the MQTT-Broker, we use the MQTT sandbox "test.mosquitto.org", it is provided by IBM eclipse for developers to test MQTT. · "clientId" is an identifier for MQTT-Broker to identify the connected device. · "publishTopic" is the topic of the published message, we use "outTopic" in the example. The devices subscribe to "outTopic" will receive the message. · "publishPayload" is the content to be published. · "subscribeTopic" is to tell MQTT-broker which topic we want to subscribe to. Here we can use a chrome plugin "MQTTLens" to be a second MQTT client. You can find it in Chrome Web Store at, https://chrome.google.com/webstore/detail/mq-tt-lens-the-best/cgmogjdjpnemdlijokkdomfapcodiohh?utm_source=chrome-ntp-icon After setting up a “connection” and key in the same topics we used on Ameba, we should be able to see a “Hello World” message printed on the MQTT message console.
-
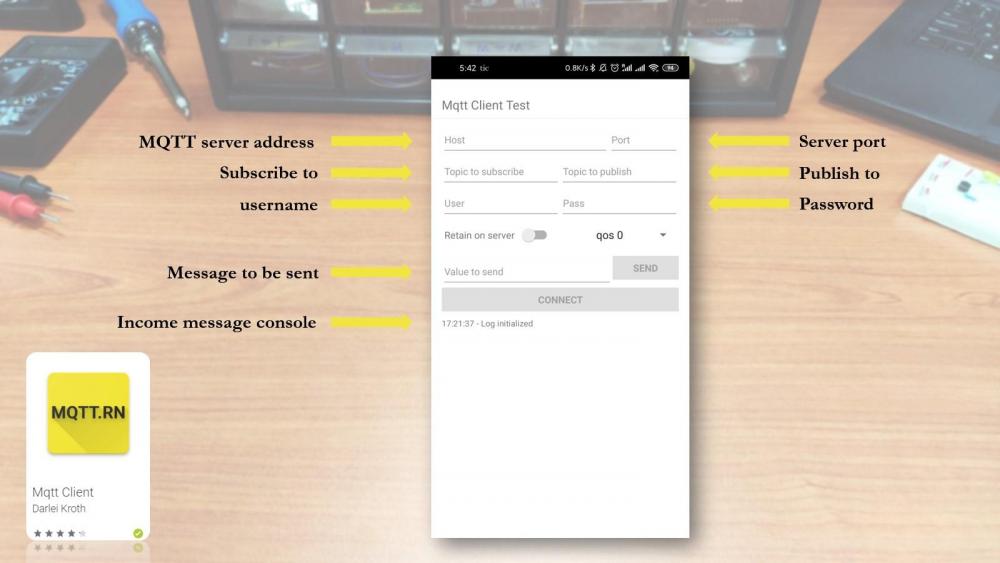
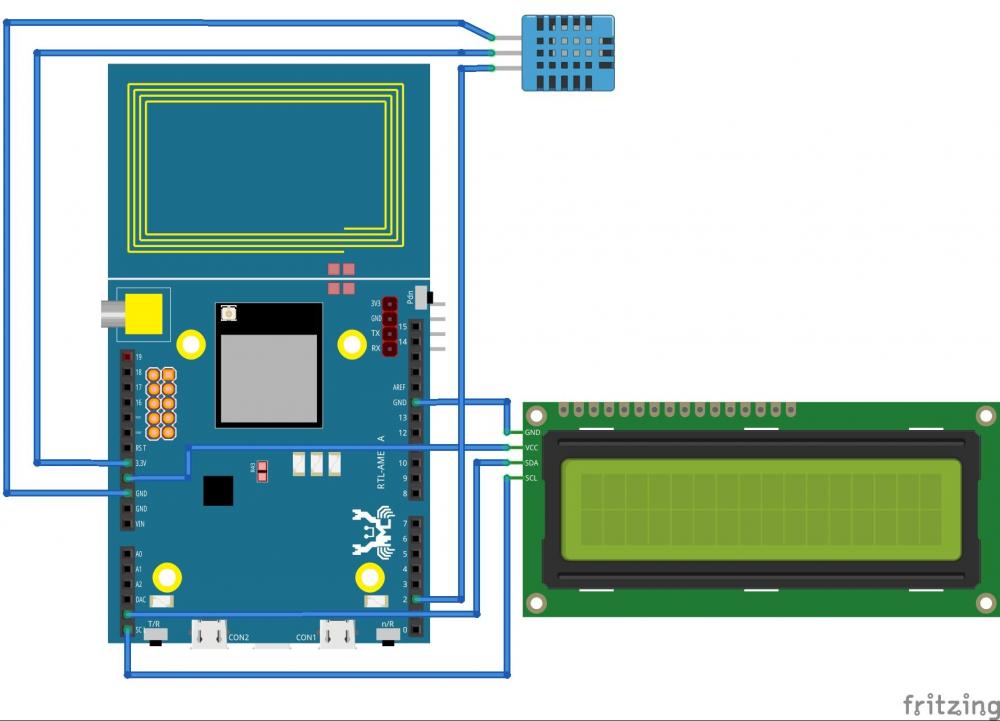
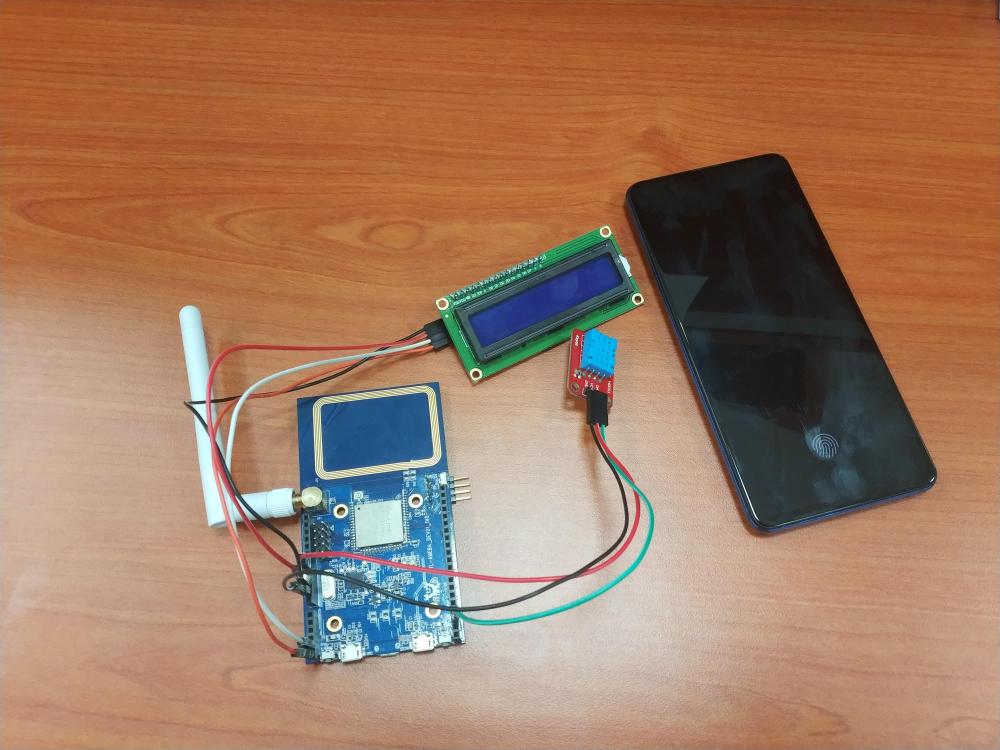
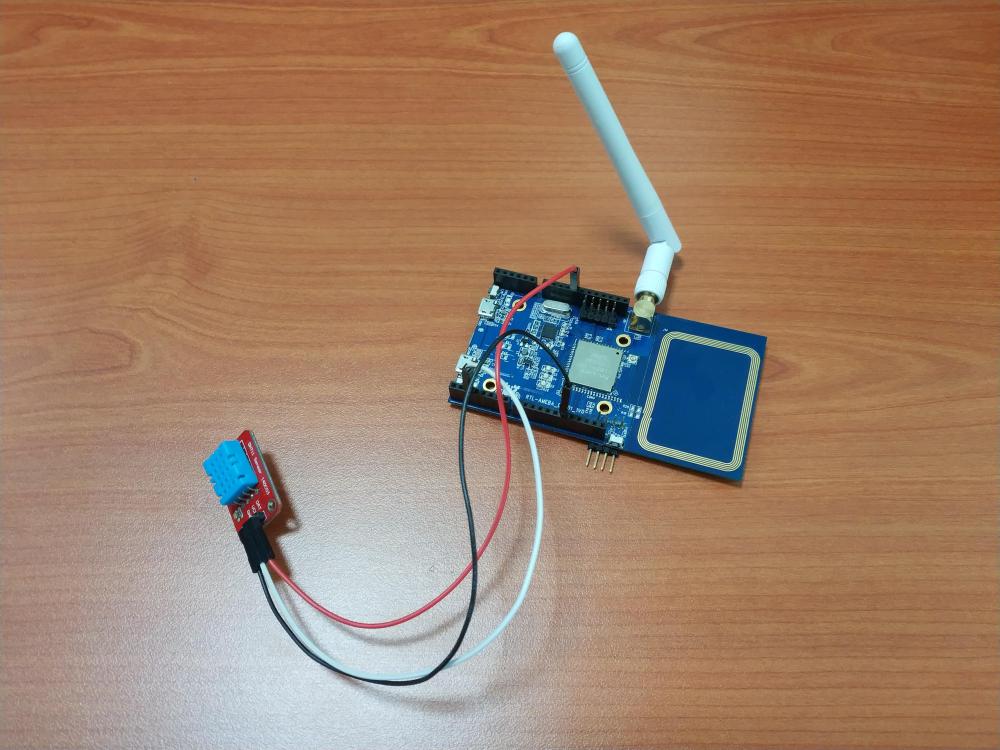
Temperature and humidity are 2 of the most important factors affecting people’s comfort level in an enclosed space. The DHT humidity and temperature sensor can read the ambient temperature and humidity every 2-3 seconds, and then pass the data to Ameba who will forward them to the server using MQTT protocol. Whoever “subscribing” to the right topic gets the data almost instantaneously. Users can then adjust the aircon mode or temperature according to the readings received. An android phone was used as an MQTT client and the Ameba RTL8195 Dev. Board acted as another MQTT client communicating with the android phone. Both clients have to connect to the same MQTT server before proceeding to the next step. The DHT sensor updates its data every 10 seconds to stay as accurate as possible. Once sensor data is received, Ameba then “publishes” the data to the MQTT server where all clients “subscribing” to the right topic gets the data displayed on the console. GitHub page https://github.com/Realtek-AmebaApp/Ameba_Examples/tree/master/RTL8195AM/003_DHT_MQTT Official pages https://www.amebaiot.com.cn/en/ https://www.amebaiot.com/en/ Facebook pages https://www.facebook.com/groups/AmebaIoT/ https://www.facebook.com/groups/AmebaIoTWW/ BiliBili channel https://space.bilibili.com/45777743
-
This is a simple IoT project based on the “mqtt basic” example that comes with the Arduino package when you install the RTL8195 on Arduino IDE. In this project, simple passive components are used to aid in demonstrating the power of bidirectional communication of MQTT protocol which is widely used in modern IoT applications for its advantages in speedy response and lightweight. In the video, an android tablet was used as a MQTT client and our Ameba RTL8195. Board acted as another MQTT client communicating with the android tablet. Both client have to connect to the same MQTT server before proceeding to the next step, you may choose to set up own MQTT server or using an online free server. Please refer to the video link, GitHub source code, https://github.com/Realtek-AmebaApp/Ameba_Examples/tree/master/RTL8195AM/002_MQTT_BASIC Official pages https://www.amebaiot.com.cn/en/ https://www.amebaiot.com/en/