Transistor/ Resistor Help

Angus

Jul 4, 2014
29
Joined
Jul 4, 2014
Messages
29
Hello,

The aim of the circuit below is that when the momentary switch is pushed it would 'drive' the load. The supply is 12V - but the load requires 5V.

Could someone suggest values for the transistor and resistors in the red clouds.

upload_2014-7-29_9-49-47.png
R1=150 K Ohm
R2=107 K Ohm
Base Current Resistor=1.4 M Ohm
Transistor = BC337 NPN

No luck.

All help appreciated.
Thankyou - Angus
 

Gryd3

Jun 25, 2014
4,098
Joined
Jun 25, 2014
Messages
4,098
Angus, is this for a project you are working on, or is this some kind of lesson/course?
Please keep in mind that there is a dedicated section for 'homework'

Also, depending on your load, that is a very poor way to drive it.
The voltage divider will not provide a constant or reliable voltage source, and your switch is in the wrong position.
 

Angus

Jul 4, 2014
29
Joined
Jul 4, 2014
Messages
29
It's for a project I am working on.

I actually want to provide an external manual switch (to change the COLOR or SPEED or MODE) for the LED driver in the photo attached.

I pulled it apart and when I connect the +VE and -VE for say the COLOR I measure 5V and 80 uAmps.

upload_2014-7-29_9-58-34.png

Thanks - Angus
 

Gryd3

Jun 25, 2014
4,098
Joined
Jun 25, 2014
Messages
4,098
You may be trying to reinvent the wheel.
There is already a button in that enclosure. So instead of building an additional 5V source that runs off of the 12V input of that device and trying into the input for the controlling ICs, why don't you just tack an additional switch in parallel to the ones already existing?

80μA is hardly a 'load' ;) it is most likely just an input to the controlling ICs inside the case.
If you have pulled it apart already to make your measurements, can you please take a picture of the inside for us to take a look?
 

Angus

Jul 4, 2014
29
Joined
Jul 4, 2014
Messages
29
upload_2014-7-29_10-26-5.png
Connect these 2 wires between the inner and outer 'pads' and the LED's scroll through different colors

upload_2014-7-29_10-26-39.png
Photo showing LED string and LED controller.

The reason I can't use a switch in parrallel is I also want a separate LED to light up at the same time.........as in below:

upload_2014-7-29_10-31-21.png
This is a photo of the button I want to use to scroll through the colors

upload_2014-7-29_10-32-2.png
This is the micro-switch inserted into the button - the LED should light up when the button is pushed.


So - when the button is pushed it should light up the LED and switch the LED controller to a new color.

I have tried looking for a double throw switch (as the micro-switch in the button) - but I can only find single throw switches.

Thanks - Angus
 

Attachments

  • upload_2014-7-29_10-25-33.png
    upload_2014-7-29_10-25-33.png
    543.3 KB · Views: 111

Gryd3

Jun 25, 2014
4,098
Joined
Jun 25, 2014
Messages
4,098
I take it the LED included in that switch is lit constantly which is why you were looking into that other circuit..
I would like to see a better picture of the component side of that board to try to determine if the buttons are responsible for an active high or active low signal to the IC.
I would also like to determine where the 5V on board source is from.
We may need to do this with a corrected version of your schematic. I am hoping that perhaps you could drive a transistor with the output from that switch to power the LED and not worry about providing the appropriate voltage to the IC yourself.
 
Last edited:

Angus

Jul 4, 2014
29
Joined
Jul 4, 2014
Messages
29
The LED in the switch only lights up when the switch is pushed.

I get 5V across the pads on the LED controller board - then when I connect the pads - it goes to zero. I measure this by putting a multimeter across the pads on the LED controller board.

I wonder if I could put the connection between the pads on the LED controller board in series with the LED in the switch.

I'll try that and also upload some better photos

Thanks.....
 

Angus

Jul 4, 2014
29
Joined
Jul 4, 2014
Messages
29
The LED in series with the pad connection idea did not work.

Here are some better photos demonstrating whats happening.

upload_2014-7-29_11-37-15.png
5V between the pads...........

upload_2014-7-29_11-38-29.png

Close to zero - when the pads are connected (green wire) - the color modes scroll when this green wire is connected.

upload_2014-7-29_11-40-20.png
Close up of the LED controller

upload_2014-7-29_11-40-54.png
Close up of the 3 'pads' inner and outer ....on the LED controller
 

Gryd3

Jun 25, 2014
4,098
Joined
Jun 25, 2014
Messages
4,098
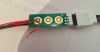
5V 'between' the pads does not do much good as that tells us that it is most likely 5V logic, but does not tell us if the IC that is receiving the signal is waiting to get pulled to 0V, or 5V. This does make a difference.
From the close-up you have provided, it looks as thought the inner ring has 5V on it. The outer ring has 0V on it. This leads me to believe, but not guarantee that the chip (technical term ;)) has a 5V pull-up resistor, and is pulled low when the button is pushed. (I base this on the fact that the outer ring is common on all 3 buttons, and has a very large trace. This does make a difference and is very important, as it will mean the difference between connecting 0V to the middle pad, or 5V if you make your own circuit to supply the signal.

The LED in the switch only lights up when the switch is pushed.
What is the required supply voltage for the LED?
Can you please confirm that the contacts on either side are for the LED. (I could only clearly see one side in the pictures)

The LED in series with the pad connection idea did not work.
I do not recall, or see that idea being presented by you or myself. (Unless I missed it.. it does happen)
If the LED only lights when the button is pushed by itself, then all you need to do is provide the appropriate source across the leads on either side of the button and that half is done. (Waiting confirmation on required supply for the LED)
The two remaining connections on the switch (bottom and back) will be directly connected to the wires you have soldered to the pads already.

That switch appears to be two separate distinct halves which should make this easy.
 

Angus

Jul 4, 2014
29
Joined
Jul 4, 2014
Messages
29
The 'pad's' on the chip - yes the inside is +VE and the outer ring is negative and common to all 3 pad's. Yes the inner ring has 5V and when connected to the outer ring it goes to zero.

The LED is 12V.

The switch.....here's a better photo - the outside tabs are the +VE and -VE for the LED - but the tabs are not connected to the switching mechanism.

upload_2014-7-29_13-35-44.png

When the switch is pressed - it only pushes down on the button above.
upload_2014-7-29_13-36-26.png
Tab either side - to power the LED in the switch
upload_2014-7-29_13-37-8.png
Thanks - Angus
 

(*steve*)

¡sǝpodᴉʇuɐ ǝɥʇ ɹɐǝɥd
Moderator
Jan 21, 2010
25,510
Joined
Jan 21, 2010
Messages
25,510
Use a double pole switch so that one pole lights the led, the other one closes the switch contacts.

Alternatively, use an optocoupler to drive the switch contacts. The collector would go to the part that has +5V on it when the switch is open, the emitter to the part with 0V.

An optocoupler's input is like a LED, so you would place a series resistor here, or just place it in series with the other LED you want to drive, assuming that the same current for both is acceptable.
 

Angus

Jul 4, 2014
29
Joined
Jul 4, 2014
Messages
29
Thanks Steve,

A double pole switch would be perfect - the thing is I cannot find one that with the right dimensions to be housed the 'housing'.

Opto-coupler - excellent - I will look into that.

Thanks - Angus
 
Top