Stuck! I changed the belt on the dymo disc painter and put it back together, it turns on but won’t move

AxG

Oct 19, 2023
9
Joined
Oct 19, 2023
Messages
9
Ok! So basically I am a complete novice when it comes to these things because i’ve never done this before, but how hard could it be to take something apart and put it back together right ? :D
Since this machine is so OLD there is 0 information about it online so that’s why i’m here :(
anyways, the silver circle plate in the middle moves, i put everything back together just fine (all the wires and what not are all good) but the problem is that the big black plastic square part in the first picture doesn’t move. when I attach the whole thing back together, it just WHHHIRRRSSSS and then stops. before i took it apart, it’d turn on, the black plastic part would move back and fourth like it was configuring itself but when i put the disk in and tried to print onto it , it wouldn’t spin, so now i fixed the belt but the black plastic part won’t move and i’m PRETTY SURE the problem is that thing I highlighted in yellow, i know it’s hard to tell what the problem is from just pictures but any help on how to fix this or some instructions online that i missed would be very helpful. Thank you!!!!

ps: if needed i can record a video too and attach that as a link or something
 

Attachments

  • IMG_5726.jpeg
    IMG_5726.jpeg
    372.3 KB · Views: 17
  • IMG_5729.jpeg
    IMG_5729.jpeg
    334.9 KB · Views: 17
  • IMG_5727.jpeg
    IMG_5727.jpeg
    325.9 KB · Views: 17

kellys_eye

Jun 25, 2010
6,512
Joined
Jun 25, 2010
Messages
6,512
The drawer may have 'ejected' a little too far. With the power on, give the draw a firm push to see if it starts moving.
 

Alec_t

Jul 7, 2015
3,817
Joined
Jul 7, 2015
Messages
3,817
Hard to tell from the pic, but is this a split in the black plastic part, perhaps from over-tightening the screw? If the plastic has splayed out or the screw is too tight it could stop the sliding action.
1697712014386.png
 

AxG

Oct 19, 2023
9
Joined
Oct 19, 2023
Messages
9
The drawer may have 'ejected' a little too far. With the power on, give the draw a firm push to see if it starts moving.
Ok! I did that but it’s moving at all, i can’t move it backwards manually unless that part i highlighted in yellow is taken out , here i’ll just make a video so it’s easier to show!
The machine did a loud WHHIRRR again , like something is stuck but i don’t know what
 

AxG

Oct 19, 2023
9
Joined
Oct 19, 2023
Messages
9
Hard to tell from the pic, but is this a split in the black plastic part, perhaps from over-tightening the screw? If the plastic has splayed out or the screw is too tight it could stop the sliding action.
View attachment 61117
It might be but i tried doing it both with and without the screw and it had the same problem , i did do a belt replacement as a i mentioned before maybe i made a mistake putting it back together? here’s a video if needed
 

kellys_eye

Jun 25, 2010
6,512
Joined
Jun 25, 2010
Messages
6,512
The 'thing' circled in yellow is the 'bracket' that is attached to the 'screw thread' which pulls the drawer shut via the stepper motor at the end of the screw shaft. Check the connector to that motor (with the red, black, brown and yellow wires) is inserted correctly. Sounds like you have the plug in 'upside down' and the motor is spinning in the wrong direction forcing the drawer to open when it should be closing.
 

Bluejets

Oct 5, 2014
7,374
Joined
Oct 5, 2014
Messages
7,374
here’s a video if needed
Warning to anyone trying to watch this video.....can be dangerous if you are subject to massive movements without focus..
When you post these things, do you people ever play it back before hand just to see how ridiculous the playback is....shows bugger all.
The drive with the "threaded rod" is a small stepper motor and they usually have very little torque....I suggest you've jammed the mechanism or broken something there. (as #3)
 

AxG

Oct 19, 2023
9
Joined
Oct 19, 2023
Messages
9
Warning to anyone trying to watch this video.....can be dangerous if you are subject to massive movements without focus..
When you post these things, do you people ever play it back before hand just to see how ridiculous the playback is....shows bugger all.
The drive with the "threaded rod" is a small stepper motor and they usually have very little torque....I suggest you've jammed the mechanism or broken something there. (as #3)
The video was crystal clear to me and my camera stayed focused the whole time so i think that’s just something on your end? even when i click the link and watch it the video is good for me, no unfocused camera or whatever so.. maybe i went too fast for you lol. and ok thanks for the advice
 

AxG

Oct 19, 2023
9
Joined
Oct 19, 2023
Messages
9
The 'thing' circled in yellow is the 'bracket' that is attached to the 'screw thread' which pulls the drawer shut via the stepper motor at the end of the screw shaft. Check the connector to that motor (with the red, black, brown and yellow wires) is inserted correctly. Sounds like you have the plug in 'upside down' and the motor is spinning in the wrong direction forcing the drawer to open when it should be closing.
i unplugged it and tried plugging it in the other direction but it wouldn’t go in so i don’t think that’s the problem, someone else said something might me jammed so i’ll just try taking it apart and putting it back together and see if that fixes it. thanks !
 

AxG

Oct 19, 2023
9
Joined
Oct 19, 2023
Messages
9
The 'thing' circled in yellow is the 'bracket' that is attached to the 'screw thread' which pulls the drawer shut via the stepper motor at the end of the screw shaft. Check the connector to that motor (with the red, black, brown and yellow wires) is inserted correctly. Sounds like you have the plug in 'upside down' and the motor is spinning in the wrong direction forcing the drawer to open when it should be closing.
i took it apart, here’s some pictures, it looks the same way it did when i was taking it apart before so i don’t think i broke anything? also, is there a shop i can take this thing too to get it fixed ? i don’t know what something like that would be called, i tried looking for a small shop that might fix stuff like this but didn’t have much luck. i couldn’t find one so that’s why i tried fixing it myself , thank you
 

Attachments

  • IMG_5772.jpeg
    IMG_5772.jpeg
    324.9 KB · Views: 12
  • IMG_5774.jpeg
    IMG_5774.jpeg
    226.8 KB · Views: 12
  • IMG_5775.jpeg
    IMG_5775.jpeg
    346.6 KB · Views: 11

Delta Prime

Jul 29, 2020
2,987
Joined
Jul 29, 2020
Messages
2,987
Since this machine is so OLD there is 0 information about it online so that’s why i’m here
A belated welcome to Maker Pro
I have not watched your videos yet so this is why I'm asking.
Does it have a model number?
Is the belt (OEM) 0riginal Equipment Manufacturer; or aftermarket? (Made by someone else)?
Would you happen to have the user's instruction manual?
If the ink cartridge or associated circuitry is fault, it will manifest in the symptoms; you have just described.
 
Last edited:
  • Like
Reactions: AxG

AxG

Oct 19, 2023
9
Joined
Oct 19, 2023
Messages
9
A belated welcome to Maker Pro
I have not watched your videos yet so this is why I'm asking.
Does it have a model number?
Is the belt (OEM) 0riginal Equipment Manufacturer; or aftermarket? (Made by someone else)?
Would you happen to have the user's instruction manual?
If the ink cartridge or associated circuitry is fault, it will manifest in the symptoms; you have just described.
Thanks!
Is the model number the same as the serial number? because the serial # is
93448-0004354
The belt is aftermarket, i got it off amazon
^ link!
I bought this online and it didn’t come with the manual but i did look at the manual online and it wasn’t of any help, it had 0 instructions on taking it apart or replacing parts.
I did some research into the right ink that I would need and i come across the
DoorStepInk Remanufactured Ink https://www.amazon.com/dp/B07NLLGCKD?ref=ppx_pop_mob_ap_share
In the reviews it said it works for dymo so i don’t think it’s the ink that’s the problem. When i first got the item it would push the disc in but it wouldn’t spin and just spill ink on top of the disk on one line, now i fixed the belt but the black plastic square won’t go back no matter how many times i take it apart and try putting it back together, i even tried to plug wires in the other direction but that didn’t work, im not sure what the problem is, is there any shop that fixes stuff like this since i can’t fix it? ;/
thank you.
 

kellys_eye

Jun 25, 2010
6,512
Joined
Jun 25, 2010
Messages
6,512
but the black plastic square won’t go back no matter how many times i take it apart and try putting it back together,

In the picture with the black square (in yellow circle)..... the threaded rod must screw into that part. Did you screw it in enough? Maybe a few more turns on it so a bit more of the screwed shaft is visible is needed?

Either way, such mechanisms have to detect where the platter is located and they do this by either using sensors (could be physical switches or a slotted opto-coupler) OR they count the rotations of the shaft. Can you see any physical position-sensing switches (or opto-couplers)?

Daft as this sounds, try winding the shaft until the draw is fully 'in' then power it up.
 

Delta Prime

Jul 29, 2020
2,987
Joined
Jul 29, 2020
Messages
2,987
im not sure what the problem is, is there any shop that fixes stuff like this since i can’t fix it? ;/
thank you

I have only read about those places in history books.
There called mom and pop shops.
But just like my great, great grandparents there all dead now.
I think it's for the best, they would probably kill themselves if they knew what they've done to this world.
 

73's de Edd

Aug 21, 2015
3,730
Joined
Aug 21, 2015
Messages
3,730
Sir AxG . . . . . . .

Well-yup . . . . .Here I goes
. . . . . . *** (a la Red Skelton)
Looks like your money shots are being the final 3 . . . particularly the last one.
You have the fixed bottom portion that your top "sled " drops down into, in order to "ride the rails ". You had the mobile sled portion lifted out and being hand held or else set near aside.
NOW look *** bewwy-bewwy cawefuwwy . . . (a la Elmer Pee Fudd Esq) . . . . . and in the final photo, you will see that a photo interrupter is mounted down in its top left rear corner. See its + and E and D sides.
Wel l l l l l l l l l l l there will be one? two? molded tabs on that lateral position , sticking down, on your mobile sled, that block that E-D light path at extreme inward driven limit . I possibly expect another mounted at the front end to detect out tray position limit.
OR the tray is stopped in its outer position and just waiting for you to press the close button and THEN the motor starts running until encountering that inner limit. You examine and confirm .

TWO . . . . .count 'em . . . . . . TWO . . . . . ALL REVEALING TESTS

Try putting your sled down at either extreme limits to see if it will then know where it is and then the electronics will interpret / know what mechanical action to do.

I see no mentioned belt, but suspicion it to be one going from the sleds platter driver motor to the disc platter shaft pulley.
Its problem . . .? . . .? it either going hard and its surfactal oxidized rubber or it going limp and saggy . . . . . or the rare factory mis-formulation used in its mix and it going to a soft gooey black liquid state . . . . . with time.

*** My spell check is being EVER so much smarter now, it fully knows, both, Red Skelton AND numerous Fudd-ecisms / catchecisms.

Now . . . . . . . . . . Sir AxG . . . . . . . . .go ye forth and . . . . . . Git 'er done !

Thaaaaaaaaaaaassit . . . . .

73's De Edd . . . . . . .

I jes' blocked SPELL CHECK frum correcticating my forum spellin' . . . . . and it shore feelded greeeeeeeeaaaaaaat.(a la Tony the Tiger).

.
 
Last edited:

AxG

Oct 19, 2023
9
Joined
Oct 19, 2023
Messages
9
Sir AxG . . . . . . .

Well-yup . . . . .Here I goes
. . . . . . *** (a la Red Skelton)
Looks like your money shots are being the final 3 . . . particularly the last one.
You have the fixed bottom portion that your top "sled " drops down into, in order to "ride the rails ". You had the mobile sled portion lifted out and being hand held or else set near aside.
NOW look *** bewwy-bewwy cawefuwwy . . . (a la Elmer Pee Fudd Esq) . . . . . and in the final photo, you will see that a photo interrupter is mounted down in its top left rear corner. See its + and E and D sides.
Wel l l l l l l l l l l l there will be one? two? molded tabs on that lateral position , sticking down, on your mobile sled, that block that E-D light path at extreme inward driven limit . I possibly expect another mounted at the front end to detect out tray position limit.
OR the tray is stopped in its outer position and just waiting for you to press the close button and THEN the motor starts running until encountering that inner limit. You examine and confirm .

TWO . . . . .count 'em . . . . . . TWO . . . . . ALL REVEALING TESTS

Try putting your sled down at either extreme limits to see if it will then know where it is and then the electronics will interpret / know what mechanical action to do.

I see no mentioned belt, but suspicion it to be one going from the sleds platter driver motor to the disc platter shaft pulley.
Its problem . . .? . . .? it either going hard and its surfactal oxidized rubber or it going limp and saggy . . . . . or the rare factory mis-formulation used in its mix and it going to a soft gooey black liquid state . . . . . with time.

*** My spell check is being EVER so much smarter now, it fully knows, both, Red Skelton AND numerous Fudd-ecisms / catchecisms.

Now . . . . . . . . . . Sir AxG . . . . . . . . .go ye forth and . . . . . . Git 'er done !

Thaaaaaaaaaaaassit . . . . .

73's De Edd . . . . . . .

I jes' blocked SPELL CHECK frum correcticating my forum spellin' . . . . . and it shore feelded greeeeeeeeaaaaaaat.(a la Tony the Tiger).

.
Hi! Sorry school had me busy so I didn’t have time to work on my machine, but anyways I was messing around with it some more and I found what I think is the exact problem. I did some research and I found that the problem is the Trapezoidal Threaded Nut aka The small black thingy with the hole in it, anyways when I take it off and power the machine on the rod spins, but when I put the nut onto the rod it stops the rod from spinning and just vibrates a ton. How do I fix this? :0

these are the images of what i’m talking about incase you forgot !
 

Attachments

  • IMG_6617.jpeg
    IMG_6617.jpeg
    254.9 KB · Views: 10
  • IMG_6611.jpeg
    IMG_6611.jpeg
    220.8 KB · Views: 7
Last edited:

kellys_eye

Jun 25, 2010
6,512
Joined
Jun 25, 2010
Messages
6,512
but when I put the nut onto the rod it stops the rod from spinning and just vibrates a ton.
This happens because the rod is either jumping on the thread (inside the 'nut') and is potentially caused by a restriction in movement of the platter. Does the platter move in/out by hand, without catching on anything, when the rod is disconnected? OR it is as a result of the driving motor having insufficient torque (one of the phases potentially missing) to turn the rod when the nut is attached.

So, does the platter move without restriction?
Does the 'nut' move down the threaded rod when the motor runs?
 

AxG

Oct 19, 2023
9
Joined
Oct 19, 2023
Messages
9
This happens because the rod is either jumping on the thread (inside the 'nut') and is potentially caused by a restriction in movement of the platter. Does the platter move in/out by hand, without catching on anything, when the rod is disconnected? OR it is as a result of the driving motor having insufficient torque (one of the phases potentially missing) to turn the rod when the nut is attached.

So, does the platter move without restriction?
Does the 'nut' move down the threaded rod when the motor runs?
Yes it does , if i don’t put the nut into it’s slot the tray will move back and forth freely , but also if the motor has insufficient torque why is it only a problem now and not before? because when i first got the printer the tray would move back and fourth just fine. and no the nut doesn’t move down it just spins but if it’s twisted on tighter it won’t spin at all
 

73's de Edd

Aug 21, 2015
3,730
Joined
Aug 21, 2015
Messages
3,730
Sir AxG . . . . .

Whut, with, all yore book larnin' smarts, what you dones be "apprehending "at skuls . . . . . . haven't you at least, by NOW!, figgered out that yore TDC cylinder 1 timing is being 180 degrees off ! **********

MY LEARNED SPECIFICS . . . .
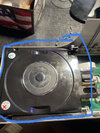
Let's assign your hand held removable portion as being the SLED hereafter and the stationary part that it drops down into as being the FIXED CARRIAGE MOUNT.

With all of the fudgemongering and diddlewhinging that the unit was subjected to during its initial disassemblage and final reassembling . . . . . it appears that some run time of the lead screw has occurred . . . .when the SLED was being outside of its FIXED CARRIAGE MOUNT.

NOW THE TIMING IS OFF ! (That's referring back to my ********* statement above.)
NOW it is thinking that the SLED is located in its parked /closed position, and is wanting to have the lead screw drive it , EVEN FURTHER, outward of its present End Of Travel positioning. BUT . . . .Alas, the lead / drive screw has previously already carried the internally threaded end
" Giz-a-mo-wha-dis " . . . . . which mechanically couples that corner of the SLED . . . . . to its max outward extension and is now engaging a protective rotational slip clutch.
(It's now gonna' be making a . . . . . CLACK!-CLACK!-CLACK! -yada -yada-yada-yada-yada sound)
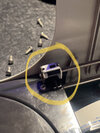
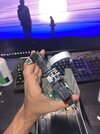
Now, for all of your pics taken , with one of them showing the all critical lead screw drive motor connected end of that l---o---n---g drive screw.
(It's being an ACME threaded rod,with its distinct square internal threading, versus the cutting /or/ use of conventional /or/common triangular threading .)
In its size, judging by your nearby fingernails dimensions, I want to guesstimate that is being an ~ 10-24 coarse threading . . . . . . unless it is being You Are A Peeing . . . metric sizing, where you need to convert accordingly.

NOW. . . . . PICTURE THIS . . .

SLED-Assemblage.png


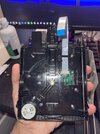
This is being a further mark up of my supposition of how the innards of the Giz-a-mo-Wha-dis-is constructed
So as to be minimally image invasive I marked the A lead screw at the far left.
Then there is the metal C wrap around of the internally molded black plastic ? bakelite? composite? portion.
Next is the B internally ACME threaded spacer, which I suspicion to be externally . . . peripherally . . . . hex sided.
How about taking a BLUE fine Sharpie marker and duplicate my 3 markings.
That way we can see if mechanical engagement results in the two B to C markings changing positions. The mark on the lead screw end just eases its detection of direction of rotation.
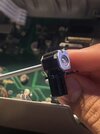
NOW . . .tell us . . . is there being a fine peripheral slot all around the end of the lead screw that either a hairpin retainer spring . . . . . or "C" clip fits into ? (Fig1)
Lastly are the D and D' marked points that screws are placed through, to clamp this part onto the motor side corner of the SLED.

Suspicions . . . . .is that the C encased inside of the black block is having a longitudinally oriented strip of flat spring stock that is formed into a arc that firmly presses down against 1 flat side of that spacers 6 sides.
Its tensioning is pressing against that single flat that it is engaging, is just adequately being strong enough to let the SLED be driven to either extreme.
Now if the
lead screw reaches an extreme limit and would otherwise jam up or stall, that spring tensioning would then be overcome and the hex spacer would rotate 1/6 of a turn to another hex flat.
That would produce your individual CLACK noise . . . . . each time that it still detects rotational restraint.

NOW . . . . . . POINTS OF PROOF . . . . .

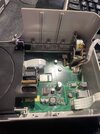
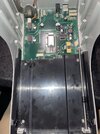
Make referencing to the next photo down . . . .
If you replaced a belt, it must be associated with the platter drive motor, as I see the lead screw being direct coupled to the dual pancake style stepper motor(s).
Your SLED is dependent upon half of it clipping into two places on a solid round guide rail and the other SLED half being tied into the SLED ACME screw and its coupling Giz-Mo-Whad-Is-Dis.
Using my two magnifying YELLOW and GREEN inserts . . . . and, using the easier to see GREEN one first .
There is a molded flexi-clip configuration that lets the clip slightly flex at the YELLOW dot surround and the guide rail snaps in. There is the same situation at the other YELLOW inserts position.
But that units slot is reversed and inverted. . . . . . . plus that photos definition at that end, almost looks like that is a shadow view.
Installation almost looks like a need to initially keep the GREEN end close in to its rail positioning and initially turn the SLED almost vertical to be able to snap the YELLOW end onto the rail and then snap the Green end into its rail position.
Then , finally install Giz-Mo . . . . .but . . . BUT . . . . .BUT! . . . . .what you are missing . . . .

A FACTOID . . . . . .
Is being my ALREADY mentioned . . . Bottom photo Fig 2 . . . optical interrupter that is mounted on the left rear . . . motor proximity corner . . . of the FIXED CARRIAGE MOUNT.
The blow up inset shows there is being a . . .probably . . .infrared LED diode that shoots its beam across the RED arrow path to a photo detector diode in the other half.
This is what detects your SLEDS near ends of travel positions to shut down the drive motor . . . . . . . .UNTIL . . . . . you press the tray open switch, which overides the motors stopped action, in order to initiate another cycle.
Inspect that corner of the sled to find that hanging down "tab" that slides in that slot between the Emitter and Diode via the YELLOW arrow path. Then find its companion tab at the front of the SLED.

FINALLY . . . . . .
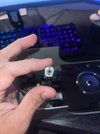
Have the GIZMO free of the SLED via its two set screws.
Slide the SLED to its max in position.
Either manually rotate the lead screw or Gizmo itself to end up with Gizmos mount holes mating up with the SLED holes and then installing those two screws.

NOW . . . . you . . . . . . . . Makee-Testee-Testee

That final photo Fig 1, was where I vaguely visioned . . . . . because, of how very ill defined that image is being. . . . either a hairpin spring clip or a "c" clip installed at the very end of that lead screw.

Thaaaaaassssssssit

73's de Edd . . . . .

A street solicitor asked me for a dollar. I told him that I only carry big bills.
He said give me one of those.
So I gave him my electric bill.


.
 
Top