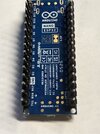
Arduino Nano built in RGB LEDs won't turn off

KennyIII65

May 24, 2026
12
Joined
May 24, 2026
Messages
12
Hello,

Newbie here.. Trying to get used to using IO on my Nano.

I can get the Orange LED to turn on and off, but the RGB LEDs will not shut off using digitalWrite(LED2, LOW);

Probably an easy answer...

Thanks in advance...
Kenny
 

bertus

Moderator
Nov 8, 2019
3,852
Joined
Nov 8, 2019
Messages
3,852
Hello,

I only see four leds on the nano marked tx , rx , on and l.
I see no rgb led.
Post a schematic of the used setup.
What kind of rgb led are you using?
Is it a bare led or has it a controller build in?

Bertus
 

KennyIII65

May 24, 2026
12
Joined
May 24, 2026
Messages
12
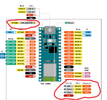
Here is a markup of the schematic. LEDs circled are mounted on the Nano...
 

Attachments

  • Screenshot 2026-08-09 at 18-45-43 ABX00083-full-pinout.pdf.png
    Screenshot 2026-08-09 at 18-45-43 ABX00083-full-pinout.pdf.png
    154.1 KB · Views: 9

KennyIII65

May 24, 2026
12
Joined
May 24, 2026
Messages
12
I guess what might help is that I can't find the header files that define the values in cpp for the Arduino hardware. For instance,
digitalWrite(LED2, LOW);
I defined LED2 = 14; Actually I used an array... int leds[] = { LED_BUILTIN, 14, 15, 16 };
Where is LOW defined? Where is LED_BUILTIN defined? Anybody have a directory for me?

Thanks,
Kenny
 

Martaine2005

May 12, 2015
5,299
Joined
May 12, 2015
Messages
5,299
What Nano have you got?
The 33BLE is active low, meaning they’re on. High turns the LED off.
 

bertus

Moderator
Nov 8, 2019
3,852
Joined
Nov 8, 2019
Messages
3,852
Hello,

That is not a standard arduino nano.
It shows an arduino nano esp32.

Bertus
 

KennyIII65

May 24, 2026
12
Joined
May 24, 2026
Messages
12
Well, after doing some more testing, I find if I turn on, say, the Blue LED and then turn it off, there is a background light of white(?) that stays on. Possibly for brightness? That is the light that doesn't turn off.... IDK...
 

KennyIII65

May 24, 2026
12
Joined
May 24, 2026
Messages
12
Did you read my link?.
It has a sketch.
I did.... Thanks...

Here's Mine...

/*
Hook yo WiFi & Blinky

*/


#include <WiFi.h>

const char* ssid = "WiFi Surveillance Van"; // Change this to your WiFi SSID
const char* password = "KeepOffMyLan"; // Change this to your WiFi password

int leds[] = { LED_BUILTIN, 14, 15, 16 };
int i = 0;

void setup() {
// put your setup code here, to run once:

for (int p : leds) pinMode(p, OUTPUT);

digitalWrite(leds, HIGH); // LED Orange ON

delay(1000); // chill for 1 sec.


Serial.begin(115200);
while(!Serial){delay(100);}

// We start by connecting to a WiFi network

Serial.println();
Serial.println("******************************************************");
Serial.print("Connecting to ");
Serial.println(ssid);

WiFi.begin(ssid, password);

while (WiFi.status() != WL_CONNECTED) {
delay(500);
Serial.print(".");
}

digitalWrite(leds, LOW); // turn Orange LED off (LOW is the voltage level)

delay(1000); // chill for 1 sec.

Serial.println(" ->");
}

void loop() {
// put your main code here, to run repeatedly:

for (int p : leds) digitalWrite(p, LOW);

// next LED
i = (i + 1) % 4;

delay(1000);

// turn next on
digitalWrite(leds, HIGH);


Serial.println(i);


delay(2000);

}
 

KennyIII65

May 24, 2026
12
Joined
May 24, 2026
Messages
12
I did.... Thanks...

Here's Mine...

/*
Hook yo WiFi & Blinky

*/


#include <WiFi.h>

const char* ssid = "WiFi Surveillance Van"; // Change this to your WiFi SSID
const char* password = "KeepOffMyLan"; // Change this to your WiFi password

int leds[] = { LED_BUILTIN, 14, 15, 16 };
int i = 0;

void setup() {
// put your setup code here, to run once:

for (int p : leds) pinMode(p, OUTPUT);

digitalWrite(leds, HIGH); // LED Orange ON

delay(1000); // chill for 1 sec.


Serial.begin(115200);
while(!Serial){delay(100);}

// We start by connecting to a WiFi network

Serial.println();
Serial.println("******************************************************");
Serial.print("Connecting to ");
Serial.println(ssid);

WiFi.begin(ssid, password);

while (WiFi.status() != WL_CONNECTED) {
delay(500);
Serial.print(".");
}

digitalWrite(leds, LOW); // turn Orange LED off (LOW is the voltage level)

delay(1000); // chill for 1 sec.

Serial.println(" ->");
}

void loop() {
// put your main code here, to run repeatedly:

for (int p : leds) digitalWrite(p, LOW);

// next LED
i = (i + 1) % 4;

delay(1000);

// turn next on
digitalWrite(leds, HIGH);


Serial.println(i);


delay(2000);

}
That copy & paste dropped my indexes... A few missing..... ahh... Forum italicizing.....
 

robertlunch

Aug 11, 2026
2
Joined
Aug 11, 2026
Messages
2
Most likely: the RGB LEDs are active-low, so you must set the pins to OUTPUT and write HIGH to turn them off. Leaving them unconfigured or writing LOW keeps them on.

Check your board's pin numbers (Nano 33 BLE: R=22/G=23/B=24; Nano 33 IoT: R=25/26/27) — classic Nano (328P) has no on-board RGB.
 

danadak

Feb 19, 2021
1,084
Joined
Feb 19, 2021
Messages
1,084
Also be aware modern LEDs even with uA current in them will glow. So depending
on drive circuit one can have this problem.

In your case you only have leakage so should be OK on this.
 

KennyIII65

May 24, 2026
12
Joined
May 24, 2026
Messages
12
OK. I finally actually read the comments in detail and my issue is the LED_BUILTIN is active HIGH and the RGB LEDs are active LOW. The White is all on. Mystery solved....

Thanks all!
Kenny
 
Top