Bosch AL1411 faulty? 7V only...

Yvautrin

Sep 30, 2024
12
Joined
Sep 30, 2024
Messages
12
Hiya all,
I just restored a old bosch NiMh battery with Li on batteries (6x18650 with bms), battery pack charges well on external charger, but gets a max of 7V when using the original bosch charger...
When reading directly on the charger, i get only 7V which makes sense...
How can i get 14v output from the charger? Any idea?
Thanks for your help!
 

Bluejets

Oct 5, 2014
7,374
Joined
Oct 5, 2014
Messages
7,374
Nimh charger is not suitable for lipo or Li ion cells.

Also, how do you have this new pack of 6 * 18650 cells connected?
What was original nimh configuration?
 

Yvautrin

Sep 30, 2024
12
Joined
Sep 30, 2024
Messages
12
Thank you for your reply!
My idea is to use the old charge as a base to charge my new batteries, as i have a bms on each battery pack, all i really need is to be able to get 14v output on the + and - metal contactors...
Question is what to bypass/shunt on the original control board...
 

Yvautrin

Sep 30, 2024
12
Joined
Sep 30, 2024
Messages
12
Original bosch control board
 

Attachments

  • 1000024069.jpg
    1000024069.jpg
    302.7 KB · Views: 18

Yvautrin

Sep 30, 2024
12
Joined
Sep 30, 2024
Messages
12
Nimh charger is not suitable for lipo or Li ion cells.

Also, how do you have this new pack of 6 * 18650 cells connected?
What was original nimh configuration?
1850 are in 3s2p config connected to a 3s 40A bms
 

Yvautrin

Sep 30, 2024
12
Joined
Sep 30, 2024
Messages
12
Ok, I got it, so my best option is to find a 14V Laptop charger and retrofit it in the original charger case for the drill battery?
 

Bluejets

Oct 5, 2014
7,374
Joined
Oct 5, 2014
Messages
7,374
No.
Laptop power supplies are usually 19v and have all the necessary charging regulators for voltage and current on the power/ or motherboard.
 

73's de Edd

Aug 21, 2015
3,730
Joined
Aug 21, 2015
Messages
3,730

Sir Yvautrin . . . . . . .​

No you do not.
As already stated, charger for nimh and lipo or li ion are completely different.


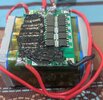
Not true . . . . . IF . . . . .his new BMS will be taking an ADEQUATE DC input voltage from the chargers raw DC supply (of which, its present mere 7 VDC is being waaaaay too low).
And then, the BMS will be distributing a proper constant current charging and auto cut off of the new Li Ion pack . . . which I believe that it WILL.
Now Yvautrin, (ya' know whuts ? my Spell Cheks thanks that youse shud be named . . . . . neutrino ?
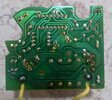
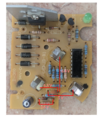
I need your visual inspection of that Bosch AL1411 charger . . . . and I would have also REALLY liked . . . a good photo of the foil path side of the board . . . for me to able to "read" it.


1000024069-jpg.64799


Initially I see wires pilled from X1 and X2.
Probably will be receiving raw 12?-----15?------18?'ish VAC from a hefty plug in wall wart transformer. Since this chargers spec sheet says it will be charging at a 1 amp and then dropping down to a 50 ma trickle charge level after a full charge is achieved.

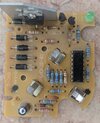
MY OBSERVATIONS AND PERCEIVED CIRCUIT DESIGN . . . . . . as available . . .to date . . .viewed data limits permit!

AC comes in at X1 and X2goes into the four side by side discrete 1N4002 FWB configured diodes, to give raw DC.
The ONLY filtering of that I then see, is that bucolic 47-100 ufd E-filter at bottom left corner of the board;
SOOOOOOOOOO with typically 1000 ufd min desired capacitance, for a minimally filtered DC level of 1 Ampere pull . . . . . I'm seeing pulsating DC going to those battery cells .
Thereby I'm expecting that sole E- cap relating to a power supply for the control electronics.
Somehow, I'm expecting that sole 16 pin I.C. to be a CD4060 . . . . which is a binary counter with a built-in oscillator. It can be used to produce selectable time delays or different frequencies.
Its RC oscillator configuration is probably using that sole small brown disc ceramic C2 and oscillates at a high audio frequency and divides down to minutes or hours at downstream Q outputs , if so configured for that specific time .
I times out a charge and eventually shifts down into trickle charge.
SOOOOOOOOO . . . .you wanna help me, in being my eyes and testing and filling in questions ?
THEN getting that original charger supplying your Li Ions voltage needs without external cobbling.

INITIALLY NEEDED INFO . . . . .
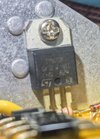
Look at that large heat sinked black transistor ? ? or I.C. (which I really ??? guesstimate??? to be a LM317 adjustable 3 terminal voltage regulator OR Constant current source. What does its markings tell us ?

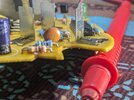
Hook up the wall wart to get AC into the unit at X1-X2 and measure that AC voltage

Measure and post the DC voltage being read across the small E cap and give its labeled capacitance and DC voltage rating.
ALSO do an AC voltage check of that just prior voltage to see if AC ripple of pulsating DC is a problem at present minimal / no loading conditions.
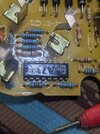
All of your part ID numbers seem to be obscured by their parts being mounted atop them . . . . .
Just aside, right of the E-cap, see the 500mw glass diode . . . . .I suspicion it to be a 6-8-9 zener diode, used for supplying low voltage DC for this boards discrete transistors, 1 green LED and that 16 pin I.C.
Power up board and do DC metering across that diode - meter lead to left side and + lead to right . . .banded . . . side and give voltage reading
measured.
Keep - meter probe on . . . . or back to . . . . the small E-caps negative and + probe to the two boards facing plug in connectors. Expecting them
to be the charger power outputs into yout battery pack . Tell us their polarities. After determining the - polarity, keep that - lead there and test with the + meter lead to the side plug in terminal with a black blob marking to its side. Any voltage ?
Now what I really think . . . . . . is that terminal is the secret to your charger . . . . . being able to flawlessly RECOGNIZE which battery packs of 5 different voltages, has been plugged into this versatile charger unit.
In your disassemblage, of the original battery pack innards, did you find ? a resistor being connected to this terminals countpart in the original state battery pack ?


CONFIRMATION . . . .

Your original battery pack was being STUFFED with 10? NI-MH cells and probably used 1800ma cells or upgraded to 2400ma cells if being a workmans HD unit
That would have 14VDC out with a full charge or 12VDC at mid level and 10VDC at near end of service.

Now, with your new Li Ion configured pack . . .you say . . .has 3 times 4.25VDC for 12.75VDC series cell output at full charge available at the batt terminals.
Use it somewhat, and at mid charge level 3 times 3.6VDC for 10.8 VDC output and finally after some use, until each cell drains down to cutoff level of 2.5VDC . . . . . or 3 times 2.5VDC for 7.5 VDC . . . . . THEN . . . . .your BMS unit should open conduction of a POWER FET in the battery negative supply line . . .thats all . . . . lights out.
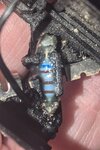
BTW . . . . .are your Li Ion cells being 18650 all metal cylindrical units ?

ARE WE HAVING FUN YET ? . . . . . . .talk to me !

73's de Edd . . . . .

1727770129907.png
.
 
Last edited:

Yvautrin

Sep 30, 2024
12
Joined
Sep 30, 2024
Messages
12
Thanks for you positive/encouraging intel! appreciate it!
Here are the picts of the original charger PCB backside, and my 'frankenstein like' battery pack (18650+BMS)!
it works well when charging directly on the +/- of the BMS with a standard 12V SMPS...

So now, all I am left to do is to shortcut/shunt/bypass some of the components on the bosh control board to be able to get the 14V I am looking for!

Anf FYI, the power transformer outputs 18V AC on X1/X2...
 

Attachments

  • PXL_20241001_094612698.jpg
    PXL_20241001_094612698.jpg
    368.8 KB · Views: 3
  • PXL_20241001_094632547.jpg
    PXL_20241001_094632547.jpg
    388.2 KB · Views: 3

Yvautrin

Sep 30, 2024
12
Joined
Sep 30, 2024
Messages
12
Here are more pictures, including one with the measurements you asked for!
Hope this helps!
Thanks for your time!
Cheers!
 

Attachments

  • capa.jpg
    capa.jpg
    130.2 KB · Views: 6
  • circuit-board.png
    circuit-board.png
    991.8 KB · Views: 4
  • ic.jpeg
    ic.jpeg
    227.4 KB · Views: 6
  • momo.jpeg
    momo.jpeg
    169.4 KB · Views: 6

73's de Edd

Aug 21, 2015
3,730
Joined
Aug 21, 2015
Messages
3,730

Sir @Yvautrin . . . . . . .​

Using your MOST helpful further info.
I now see that my suggestion of a 4060 timer ONLY has the commonality of both having 16 pins.
The 6HKB is an old ST custom-dedicated battery charger I.C. no longer in favor.
I can see that your power semiconductor is being a S/T brand of SCR.
I can also now evolve that this chargers circuitry design concept is the initial FWB rectification of the 18VAC input and ending up with a continual, side by non ending stream of ONLY the + nodes of that initial + and- swinging 50?60 cycle sine wave.
That stream of + power nodes go into the input of the SCR Anode and out the Cathode to charge the battery pack .
Now, how ever long the gate of that SCR is pulsed on (the 6HKB's job ), determines the effective voltage and current applied to the battery pack.
Now, do you remember the original battery pack tear down ? Or can you find this resistor I now show below . . .

1727863034691.png

Well, that resistor value is HOW this charger knows the proper voltage for the different battery voltages. Such that the charger can correctly accommodate, when whichever one of them is plugged into it !
This resistor feeds (shunts) into one leg of a voltage divider bridge resistor set that regulates output voltage. Additionally it has a multi-K-ohm neg temp coefficient bead thermistor that shunts across it. That thermistor kisses one Ni-Mh cell and any temp rise of that cell results in slight compensatory voltage correction.
Sooooooooooooo the exploratory eventual variance of that resistor value, along with voltage monitoring will get the voltage that you need.
PLUS the need to change from pulsating DC, which this charger is now putting out. This will be accomplished by incrementally adding E-cap filtering of that pulsating DC going to the battery output terminals of the charger.
The filtering ups the current supply capability of the charger while the resistors final found value, sets the max voltage.
Your Li Ion BMS takes care of the rest.
Start with minimal E-cap filtering added across the + and - batt terminals, checking voltage each time or if more capacitance is added.
Are you approaching that required voltage needed ?

73's de Edd . . . . .

.
 
Last edited:

Yvautrin

Sep 30, 2024
12
Joined
Sep 30, 2024
Messages
12
Hiya, here is a picture of the resistor shunt on the batterypack itself..as for the thermal resistor...it is gone...
so...what should i do now? I do not get what i am supposed to do in order to 'minimal E-cap filtering [...] added accross the +/- battery terminal'...
 

Attachments

  • WhatsApp Image 2024-10-02 at 13.36.47_6c6411e9.jpg
    WhatsApp Image 2024-10-02 at 13.36.47_6c6411e9.jpg
    171.8 KB · Views: 0

73's de Edd

Aug 21, 2015
3,730
Joined
Aug 21, 2015
Messages
3,730

Sir @Yvautrin . . . . . . .​

Hello . . .thermistor bead. . . . . . .


1727867723632.png

AS I said, that resistor pair SHUNTS across one of the already existing . . . .voltage divider resistor pairs presently on the board.
Therefore, just assume that nothing needs to be done with the resistor situation initially.
Then just start monitoring battery charger output voltage while you initially add capacitance across the battery output terminals.
If you are also a car person, it would be nice to use a 12V @1amp dome or accessory incandescent lamp as a load. then you could VISUALLY see any imparted changes. That, is in addition to verifiable voltage meter monitoring.
Hopefully you also have some, or know some/techno-nerd with some electronic " scrap" to borrow several E-caps from,for testing.
With them rated at 25 or 16VDC. Go progressively in your testing, upwards from 47-100-220-470-1000 ufd.
BUT I don't think that hi end capacitance need will ever be approached.

73's de Edd . . . . .
 

Yvautrin

Sep 30, 2024
12
Joined
Sep 30, 2024
Messages
12
Thermistor bead i can get as the original ones are just gone...
I do not have a Clue about what you mean by E-cap...nor how to wire them....
 

Yvautrin

Sep 30, 2024
12
Joined
Sep 30, 2024
Messages
12

Sir @Yvautrin . . . . . . .​

Hello . . .thermistor bead. . . . . . .


View attachment 64816

AS I said, that resistor pair SHUNTS across one of the already existing . . . .voltage divider resistor pairs presently on the board.
Therefore, just assume that nothing needs to be done with the resistor situation initially.
Then just start monitoring battery charger output voltage while you initially add capacitance across the battery output terminals.
If you are also a car person, it would be nice to use a 12V @1amp dome or accessory incandescent lamp as a load. then you could VISUALLY see any imparted changes. That, is in addition to verifiable voltage meter monitoring.
Hopefully you also have some, or know some/techno-nerd with some electronic " scrap" to borrow several E-caps from,for testing.
With them rated at 25 or 16VDC. Go progressively in your testing, upwards from 47-100-220-470-1000 ufd.
BUT I don't think that hi end capacitance need will ever be approached.

73's de Edd . . . . .
@73's de Edd After a bit of research, tell me if i am right, you mean that i have to play with the Blue E-capacitor on the charger side, trying to replace it with diferent values?
What about the resistor and the thermistor on the battery pack, are they mandatory (thermistor is gone, and resistance is dead at the moment...), or can i just solder a bypass ?
 

73's de Edd

Aug 21, 2015
3,730
Joined
Aug 21, 2015
Messages
3,730

Sir @Yvautrin . . . . . . . au France . . . .via Egypt​

TIME OUT !

For you to EXACTLY fill me in on your proposed procedure.
Your Bosch AL1411 charger should permit you to just drop the battery packs below, into it for charging.
Bosch BAT038 BAT048 BAT043 BAT045 BTA120 battery packs.
Now . . . . .what pack (s) do you have ?

SINCE . . . . . I was just perceiving of the "restuffing " of 18650 Li Ion cells into the original BOSCH housing.

What you have now shown is a rectangular block of 189650 cells and a battery management board is atop it . . . . . . .with it being silicone SEALED and that's VERY, VERY, VERY HEAVILY EMPHASIZED on the SEALED aspect. [#]
[#] I would have opted to cut out a clear plastic insulator sheet to size from some PolyEthylene-Terephthalate clam shell used for vegetable packing then affix it atop the BMS board with . . . . removable . . . . . 4-5 minor clear silicone blobs.
How does this new battery housing get connected / interfaced into the original battery holder with its end that slides into the the drill housing and makes 3 electrical connecions, along with 2 spring loaded snap in connections that holds the battery from falling out from the drill ?
I will then continue . . . . . .
UNLESS . . .there is no intent for re stuffing a BOSCH battery pack and this Li Ion cell block is for totally other uses and you merely wanted to be able to use an on hand BOSCH charger for keeping this new Li IOn battery block . . . . charged up.
Thaaaasssit.

73's de Edd . . . . .
 

Yvautrin

Sep 30, 2024
12
Joined
Sep 30, 2024
Messages
12

Sir @Yvautrin . . . . . . . au France . . . .via Egypt​

TIME OUT !

For you to EXACTLY fill me in on your proposed procedure.
Your Bosch AL1411 charger should permit you to just drop the battery packs below, into it for charging.
Bosch BAT038 BAT048 BAT043 BAT045 BTA120 battery packs.
Now . . . . .what pack (s) do you have ?

SINCE . . . . . I was just perceiving of the "restuffing " of 18650 Li Ion cells into the original BOSCH housing.

What you have now shown is a rectangular block of 189650 cells and a battery management board is atop it . . . . . . .with it being silicone SEALED and that's VERY, VERY, VERY HEAVILY EMPHASIZED on the SEALED aspect. [#]
[#] I would have opted to cut out a clear plastic insulator sheet to size from some PolyEthylene-Terephthalate clam shell used for vegetable packing then affix it atop the BMS board with . . . . removable . . . . . 4-5 minor clear silicone blobs.
How does this new battery housing get connected / interfaced into the original battery holder with its end that slides into the the drill housing and makes 3 electrical connecions, along with 2 spring loaded snap in connections that holds the battery from falling out from the drill ?
I will then continue . . . . . .
UNLESS . . .there is no intent for re stuffing a BOSCH battery pack and this Li Ion cell block is for totally other uses and you merely wanted to be able to use an on hand BOSCH charger for keeping this new Li IOn battery block . . . . charged up.
Thaaaasssit.

73's de Edd . . . . .
Battery pack is model D-70745, original batteries were 12V / 1.5 Ah NiCd.

I got some Ecaps from the local electronic shop, as well as thermistors, so I will begin with replacing the resistance and thermistor on the battery pack it self, and then will experiment with capacito replacement on the charger to see if I can get 12-14 V of out it!
 
Top