3D Gesture Controlled Robotic Arm using the Seeed MGC3130 and Raspberry Pi
Interested in controlling an object or device without physically touching it? So am I!
Interested in controlling an object or device without physically touching it? So am I! For today’s tutorial, we will look how to build a DIY based Gesture Controlled Robotic Arm using the Microchip MGC3130 based, Seeed 3D gesture and position tracking shield for Raspberry Pi.
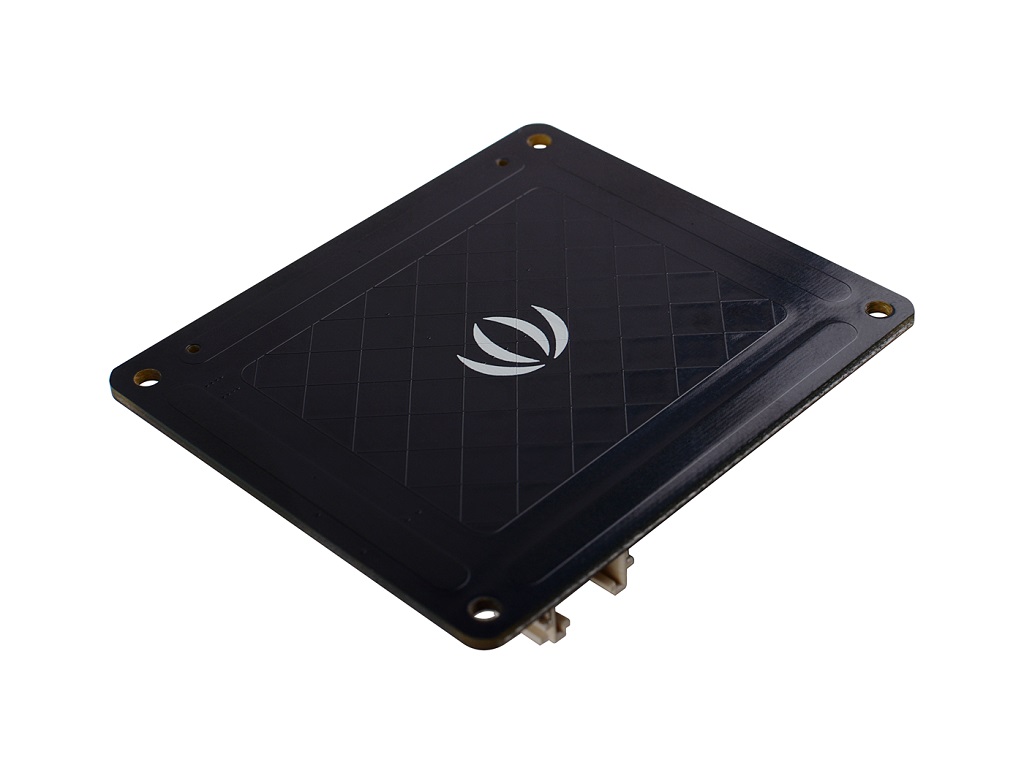
3D tracking has been one of the easiest ways of implementing Natural User Interfaces into devices as it allows users to interact with physical objects without touching them. This is exactly the capability that the Seeed 3D Gesture shield brings to the raspberry pi. This shield is based on the Microchip MGC3130 chip, which enables the Raspberry Pi with 3D gesture recognition and motion tracking function. It can capture x y z position information, can also do proximity sensing and touch sensing, support tap, and double click. As shown in the figure below, the recognition area is divided into two parts: the strip area distributed around and a central panel.
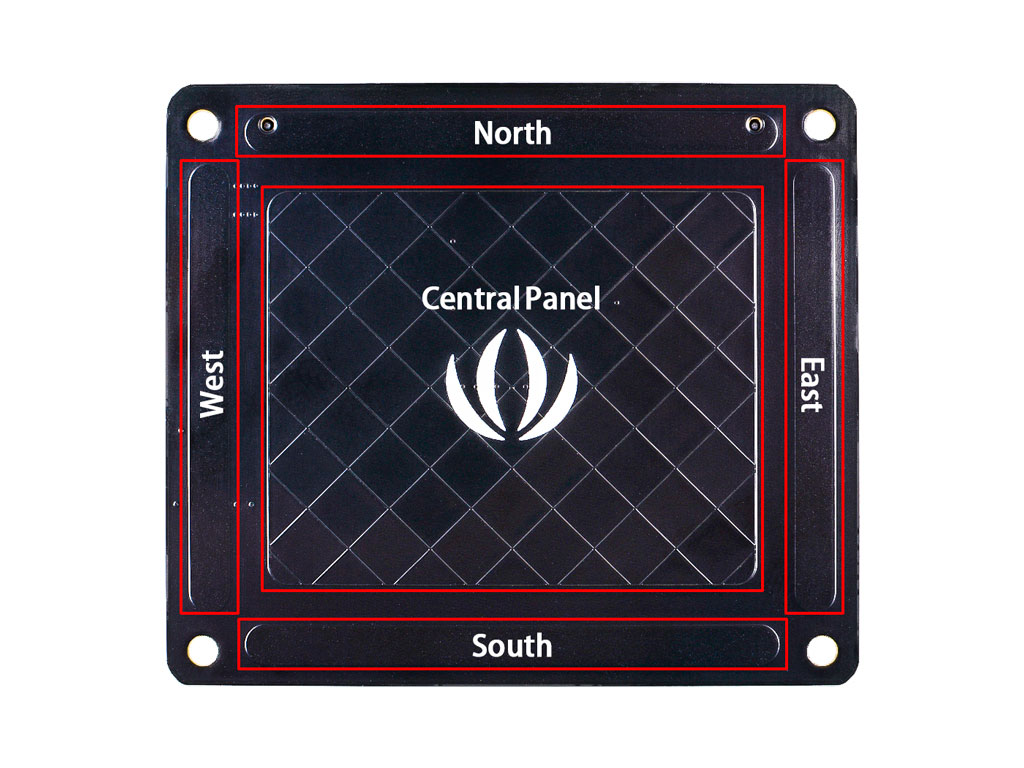
The strip areas can sense the orientation change, including the North, South, West, and East. The central area can sense touch, tap, double click, and gestures in the air area above the shield.
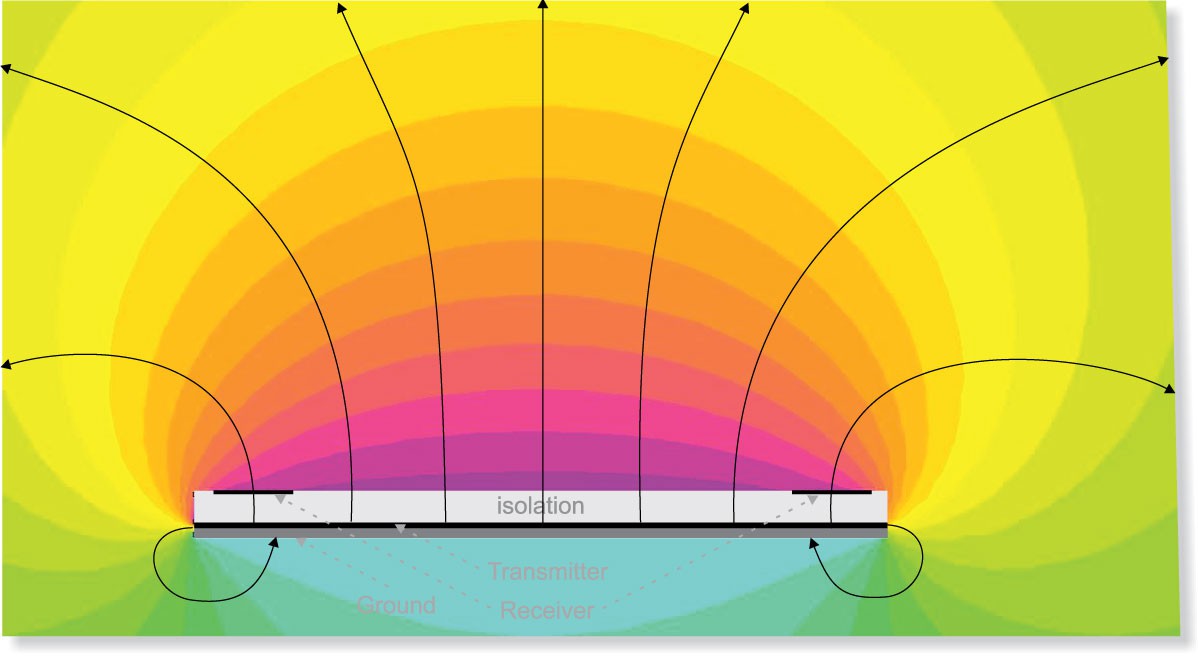
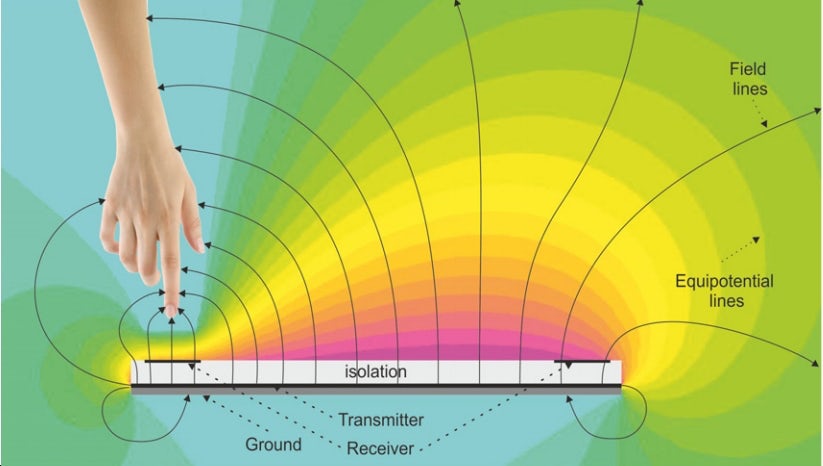
3D movements and gestures are detected by the shield using electrical near field sensing in line with Microchip’s patented GestIC® technology. The shield generates a magnetic field above the central panel and when the hand approaches, it will interfere with that magnetic field, and the magnetic field receiver below the shield will detect the change.
This hat communicates with Raspberry Pi via the I2C interface and also it has reserved a Grove I2C connector in case you need to work with other modules.
Some of the features of the shield include;
- Recognition of 3D Hand Gestures and x, y, z Positional Data
- Proximity and Touch Sensing
- Built-in Colibri Gesture Suite (running on-chip)
- Advanced 3D Signal Processing Unit
- Detection Range: 0 to 10 cm
- On-chip Auto Calibration
- Compatible with various models of Raspberry Pi 2, 3, 4, and zero
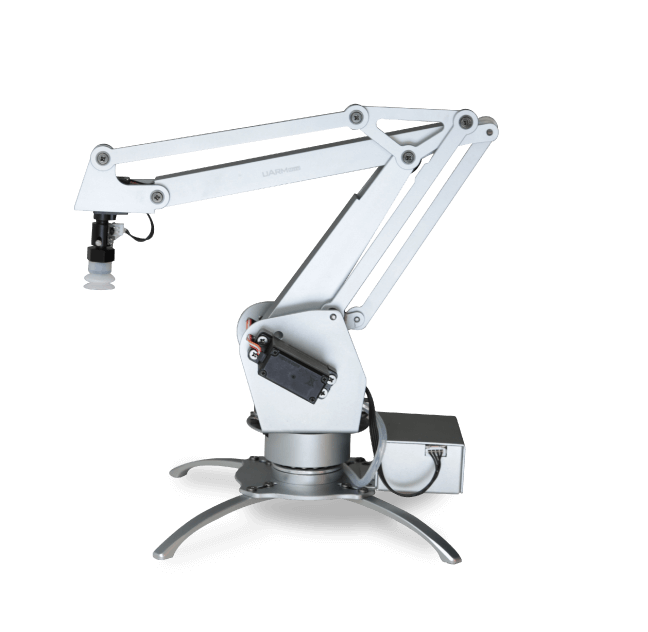
As mentioned in the introduction, for today’s tutorial, we will examine how a gestured controlled robotics arm can be built using this Gesture and Position shield, a Raspberry pi, and the uArm Metal Robotic Hand. The uArm Metal Robotic Arm is a DIY 4-axis parallel-mechanism, desktop robot arm, modeled after the ABB industrial PalletPack robot. It is made of metal but powered by small-sized more powerful servos, and can be controlled by an Arduino and other DIY boards.
At the end of today’s tutorial, you will know how to build 3D gesture and position-controlled projects using the 3D gesture tracking shield, and also learn how to interface the uArm Robot Arm with a Raspberry pi.
Required Components
The components required to build this project include;
- Raspberry Pi 3 (the Raspberry Pi 4, 2 or Zero will also work)
- Seeed MGC3130 Gesture and Position Tracking Shield
- uArm Metal Robotic Arm
The components can be bought via the attached links. if you do not have access to the uArm Metal Robotic arm, you could also decide to 3d print your own robotic arm and couple them with off-the-shelf Servo motors, but please note this will not be compatible with the uArm library used under the code section.
Schematics
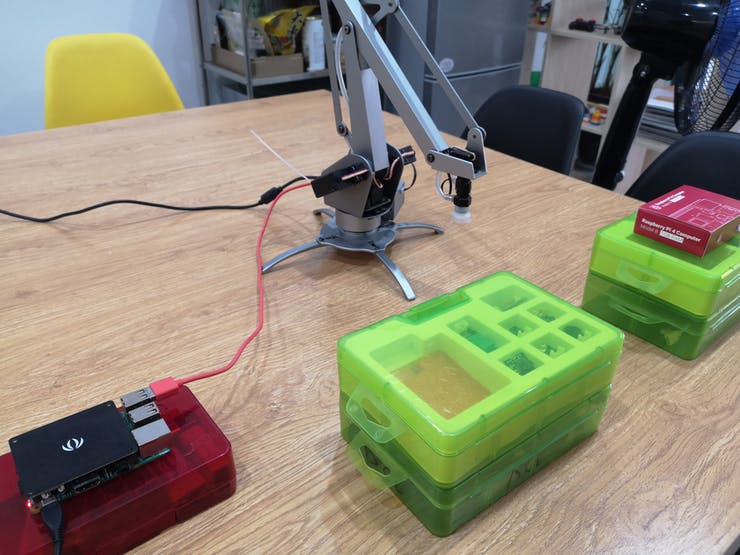
The Schematics for this project is quite simple due to the easy connection interface possessed by all the components. The 3D Gesture shield as the name implies comes as a shield, as such, it can be easily mounted on the raspberry pi as it is pin-compatible with the Raspberry Pi’s GPIO Layout. The uArm Robotic-arm also makes use of a USB interface through which it can be plugged directly into a USB port on the raspberry pi.
After connecting the components, your setup should look like the image below;
With this done you can now proceed to set up your raspberry pi and writing the python script for the project.
Preparing the Pi
Before we proceed to write the python script for the project, we need to set up the pi and install all the libraries that are necessary to get things going.
Today’s project as mentioned above is based on the Raspberry Pi 3 running the Raspbian stretch OS. While I believe it should work on the new operating system, I’d rather test before affirming. I will be assuming you understand the process of setting up Raspbian on the raspberry pi and connecting to it in headless mode via ssh or to a monitor via HDMI. If in doubt about any of these processes, you can check out several of our tutorials on setting up the Raspberry Pi.
Enable I2C
With the Pi up and running, the first thing we need to do is to enable I2C based Communication since the shield communicates with the Pi via I2C. To do this, if working with a monitor, click on the raspberry pi icon on the desktop, then select Preferences, and check the “enable” box for I2C.
If running in headless mode via a terminal software like putty, run;
sudo raspi-config
When the config panel opens, use the arrow keys on your keyboard to navigate and select “interface options”, select I2C and click enable and click yes when asked to reboot.
Install Libraries and Dependencies
With I2C enabled, we now need to install python libraries for MGC313o and uArm Robotic Arm.
To start with the uArm Robotic Arm library, Clone the git file by running;
git clone https://github.com/uArm-Developer/pyuarm.git
with that complete, Change directory to the folder you just downloaded;
cd pyuarm
then run the installation script using;
sudo python setup.py install
with this done, you should now have the python library for the uArm robotic hand installed.
With the uArm library up and running, the next task is to install “ncurses“. ncurses is a python library that provides API like interfaces that allows the programmer to write text-based user interfaces in a terminal-independent manner and it is one of the dependencies required by the Seeed MGC3130 library. No need to worry too much about this. Start ncurses install by changing into the home directory by running;
cd ~
then download it using the command;
wget https://invisible-mirror.net/archives/ncurses/ncurses-6.1.tar.gz
extract the zip file by running;
tar -xvf ncurses-6.1.tar.gz
change into its directory by running;
cd ncurses-6.1/
then run the following one after the other to configure, make and install the library.
./configure
make
sudo make install
With this done, you can test the installation by running;
ncurses6-config --version
This should give you some information on the version of ncurses installed, or throw an error if it’s not properly installed.
With all the dependencies installed, you can now proceed to download the MGC3130 python library by Linux-Downey. Do this by changing into the home directory and running;
cd ~
git clone https://github.com/linux-downey/seeed_mgc3x30_python.git
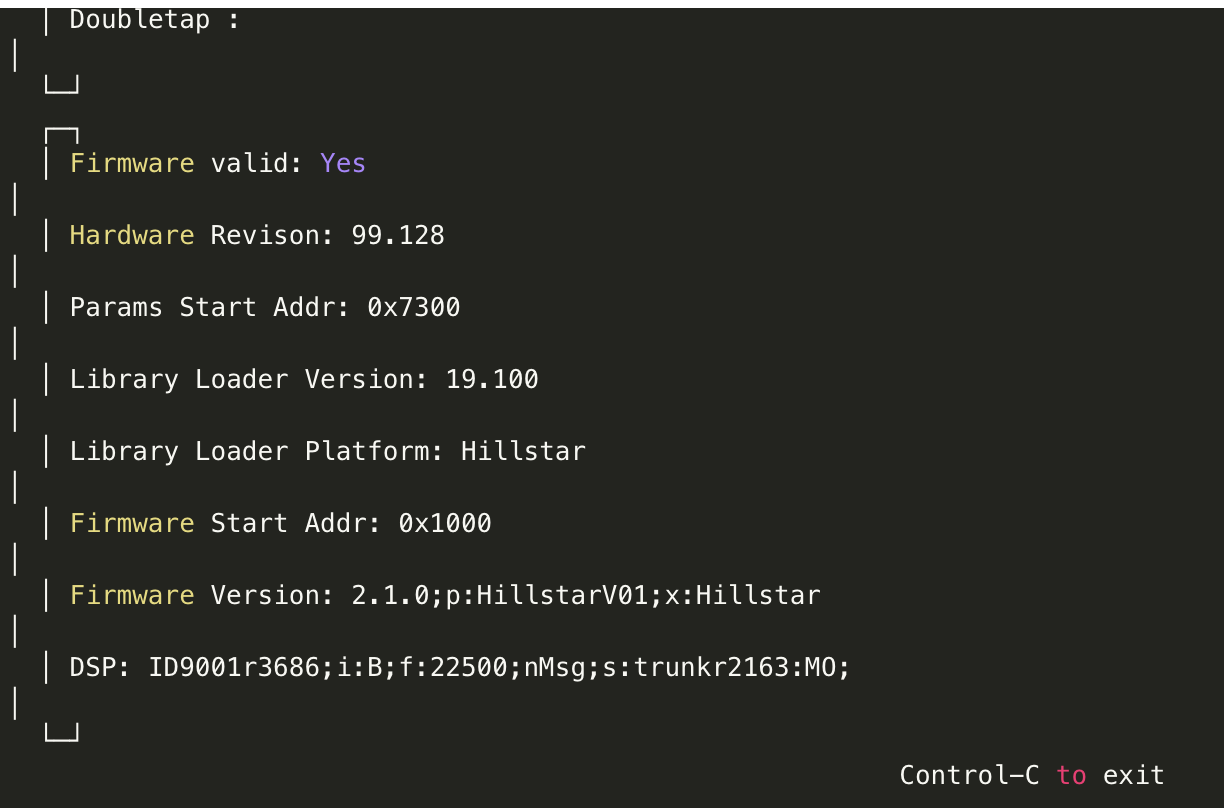
change into the library folder, and run the flickrdemo example to test the library installation.
cd seeed_mgc3x30_python
./flick-demo
You should see a result similar to the image below.
With this done, we are now ready to write the code for this project.
Code
Based on the dependencies we have installed you should be able to deduce that the code for this project will be written with python. The code for this project is a modification to the flickrdemo example that came with the MGC3130 library. We will basically add code to control the uArm, changing only three of the functions already written in the demo example.
Writing python code can be pretty difficult using the terminal, for this part, I will advise you to switch to the Pi’s Desktop. If running in the headless mode, you can simply set up VNC Viewer on your host machine and activate the VNC Server on the Pi. This will allow you to access the Pi’s desktop without using a monitor.
On the Pi’s desktop, click on the Raspberry Pi logo, -> select programming -> and double click on python 2.7. Feel free to also use python 3 if you have it installed.
With python now open we can begin writing the code for the project. I will do a brief run through the code highlighting the major changes to the flickrdemo example.
Like with all my projects, we start by importing all the dependencies required for the project. For this, the only addition made to the library example is the addition of the pyuarm library.
#!/usr/bin/env python

import signal
import flicklib
import time
import curses
from curses import wrapper
import pyuarmarm= pyuarm.UArm()
Next, we create functions that determine what happens when specific gestures are detected by the Gesture board. For this, we will be modifying only four of the functions from the library example.
The first function is move(). This function is supposed to return the coordinates of the direction in which a hand gesture is moving.
@flicklib.move()
def move(x, y, z):
    global xyztxt
    xyztxt = '{:5.3f} {:5.3f} {:5.3f}'.format(x,y,z)
Next, is the flick function. This function is used to move the tip of the robotic arm up or down for picking and placing.
@flicklib.flick()
def flick(start,finish):
    global flicktxt
    flicktxt = start + ' - ' + finish
    if flicktxt == "east - west":
        arm.set_servo_angle(2, 30)
    elif flicktxt == "west - east":
        arm.set_servo_angle(2, 35)
Next, is the air wheel function. This function basically states what you happen when you move your arms in a wheel form in front of the Gesture tracker. It is used to rotate the position of the robotic arm.
@flicklib.airwheel()
def spinny(delta):
    global some_value
    global airwheeltxt
    some_value += delta
    if some_value < 0:
        some_value = 0
    if some_value > 10000:
        some_value = 10000
    airwheeltxt = str(some_value/100)
    arm.set_servo_angle(0, some_value/100)
Next is the double-tap function. this function determines what happens when the gesture board is tapped twice. For this project, it is used to turn “off” the robotic arm.
@flicklib.double_tap()
def doubletap(position):
    global doubletaptxt
    doubletaptxt = position
    arm.set_pump(False)
Next, is the tap function. It dictates what happens when the 3D gesture tracker board is tapped once and was used in this project to turn the Robotic arm “on”.
@flicklib.tap()
def tap(position):
    global taptxt
    taptxt = position
    arm.set_pump(True)
Lastly the touch position function. This provides the coordinates of any point point on the gesture tracker that is touched.
@flicklib.touch()
def touch(position):
    global touchtxt
    touchtxt = position
The functions above were the only part of the example code that was modified, all that is left is the main function and it is the same as the example with all it does being the detection of gestures and translating it using parameters defined by the library. If the gestures match any of the conditions for the functions above, they are called and the code within the function is executed.
The main function starts by including all the global variables that will be used and initializing the variables to zero.
def main(stdscr):
    global xyztxt
    global flicktxt
    global airwheeltxt
    global touchtxt
    global taptxt
    global doubletaptxt

    xyztxt = ''
    flicktxt = ''
    flickcount = 0
    airwheeltxt = ''
    airwheelcount = 0
    touchtxt = ''
    touchcount = 0
    taptxt = ''
    tapcount = 0
    doubletaptxt = ''
    doubletapcount = 0
Next, the console is cleared and cursor hidden as Ncurses goes to work to create a GUI on the terminal.
# Clear screen and hide cursor
stdscr.clear()
curses.curs_set(0)
Next, the GUI is created with the title and footer also added.
# Add title and footer
 exittxt = 'Control-C to exit'
 title = '**** Flick Demo ****'
 stdscr.addstr( 0, (curses.COLS - len(title)) / 2, title)
 stdscr.addstr(22, (curses.COLS - len(exittxt)) / 2, exittxt)
 stdscr.refresh()

 fw_info = flicklib.getfwinfo()

 datawin = curses.newwin( 8, curses.COLS - 6,  2, 3)
 fwwin   = curses.newwin(10, curses.COLS - 6, 11, 3)
The firmware info part of the GUI Setup is filled. this just serves as a way of verifying that the PI is connected to the 3D gesture tracking sensor without issues.
# Fill firmware info window.
    fwwin.erase()
    fwwin.border()
    fwwin.addstr(1, 2, 'Firmware valid: ' + 'Yes' if fw_info['FwValid'] == 0xaa else 'No')
    fwwin.addstr(2, 2, 'Hardware Revison: ' + str(fw_info['HwRev'][0]) + '.' + str(fw_info['HwRev'][1]))
    fwwin.addstr(3, 2, 'Params Start Addr: ' + '0x{:04x}'.format(fw_info['ParamStartAddr']))
    fwwin.addstr(4, 2, 'Library Loader Version: ' + str(fw_info['LibLoaderVer'][0]) + '.' + str(fw_info['LibLoaderVer'][1]))
    fwwin.addstr(5, 2, 'Library Loader Platform: ' + 'Hillstar' if fw_info['LibLoaderPlatform'] == 21 else 'Woodstar')
    fwwin.addstr(6, 2, 'Firmware Start Addr: 0x' + '{:04x}'.format(fw_info['FwStartAddr']))
    fwver_part1, fwver_part2 = fw_info['FwVersion'].split(';DSP:')
    fwwin.addstr(7, 2, 'Firmware Version: ' + fwver_part1)
    fwwin.addstr(8, 2, 'DSP: ' + fwver_part2)
    fwwin.refresh()
With this done, the code then dives into a while loop which continuously polls the sensor to check for hand gestures and for every gesture that is recognized out of the 5 gestures we are looking for, it increments a variable matching that gesture by 1 which then triggers the function associated to it and the commands under the function are executed.
 # Update data window continuously until Control-C
    while True:
        datawin.erase()
        datawin.border()
        datawin.addstr(1, 2, 'X Y Z     : ' + xyztxt)
        datawin.addstr(2, 2, 'Flick     : ' + flicktxt)
        datawin.addstr(3, 2, 'Airwheel  : ' + airwheeltxt)
        datawin.addstr(4, 2, 'Touch     : ' + touchtxt)
        datawin.addstr(5, 2, 'Tap       : ' + taptxt)
        datawin.addstr(6, 2, 'Doubletap : ' + doubletaptxt)
        datawin.refresh()

        xyztxt = ''

        if len(flicktxt) > 0 and flickcount < 5:
            flickcount += 1
        else:
            flicktxt = ''
            flickcount = 0

        if len(airwheeltxt) > 0 and airwheelcount < 5:
            airwheelcount += 1
        else:
            airwheeltxt = ''
            airwheelcount = 0

        if len(touchtxt) > 0 and touchcount < 5:
            touchcount += 1
        else:
            touchtxt = ''
            touchcount = 0

        if len(taptxt) > 0 and tapcount < 5:
            tapcount += 1
        else:
            taptxt = ''
            tapcount = 0

        if len(doubletaptxt) > 0 and doubletapcount < 5:
            doubletapcount += 1
        else:
            doubletaptxt = ''
            doubletapcount = 0

        time.sleep(0.1)

wrapper(main)
The Complete code for the project is available below and also attached along with the library under the download section of the tutorial.
#!/usr/bin/env python

import signal
import flicklib
import time
import curses
from curses import wrapper
import pyuarmarm= pyuarm.UArm()

some_value = 5000


@flicklib.move()
def move(x, y, z):
    global xyztxt
    xyztxt = '{:5.3f} {:5.3f} {:5.3f}'.format(x,y,z)

@flicklib.flick()
def flick(start,finish):
    global flicktxt
    flicktxt = start + ' - ' + finish
    if flicktxt == "east - west":
        arm.set_servo_angle(2, 30)
    elif flicktxt == "west - east":
        arm.set_servo_angle(2, 35)

@flicklib.airwheel()
def spinny(delta):
    global some_value
    global airwheeltxt
    some_value += delta
    if some_value < 0:
        some_value = 0
    if some_value > 10000:
        some_value = 10000
    airwheeltxt = str(some_value/100)
    arm.set_servo_angle(0, some_value/100)


@flicklib.double_tap()
def doubletap(position):
    global doubletaptxt
    doubletaptxt = position
    arm.set_pump(False)

@flicklib.tap()
def tap(position):
    global taptxt
    taptxt = position
    arm.set_pump(True)

@flicklib.touch()
def touch(position):
    global touchtxt
    touchtxt = position


#
# Main display using curses
#

def main(stdscr):
    global xyztxt
    global flicktxt
    global airwheeltxt
    global touchtxt
    global taptxt
    global doubletaptxt

    xyztxt = ''
    flicktxt = ''
    flickcount = 0
    airwheeltxt = ''
    airwheelcount = 0
    touchtxt = ''
    touchcount = 0
    taptxt = ''
    tapcount = 0
    doubletaptxt = ''
    doubletapcount = 0

    # Clear screen and hide cursor
    stdscr.clear()
    curses.curs_set(0)

    # Add title and footer
    exittxt = 'Control-C to exit'
    title = '**** Flick Demo ****'
    stdscr.addstr( 0, (curses.COLS - len(title)) / 2, title)
    stdscr.addstr(22, (curses.COLS - len(exittxt)) / 2, exittxt)
    stdscr.refresh()

    fw_info = flicklib.getfwinfo()

    datawin = curses.newwin( 8, curses.COLS - 6,  2, 3)
    fwwin   = curses.newwin(10, curses.COLS - 6, 11, 3)

    # Fill firmware info window.
    fwwin.erase()
    fwwin.border()
    fwwin.addstr(1, 2, 'Firmware valid: ' + 'Yes' if fw_info['FwValid'] == 0xaa else 'No')
    fwwin.addstr(2, 2, 'Hardware Revison: ' + str(fw_info['HwRev'][0]) + '.' + str(fw_info['HwRev'][1]))
    fwwin.addstr(3, 2, 'Params Start Addr: ' + '0x{:04x}'.format(fw_info['ParamStartAddr']))
    fwwin.addstr(4, 2, 'Library Loader Version: ' + str(fw_info['LibLoaderVer'][0]) + '.' + str(fw_info['LibLoaderVer'][1]))
    fwwin.addstr(5, 2, 'Library Loader Platform: ' + 'Hillstar' if fw_info['LibLoaderPlatform'] == 21 else 'Woodstar')
    fwwin.addstr(6, 2, 'Firmware Start Addr: 0x' + '{:04x}'.format(fw_info['FwStartAddr']))
    fwver_part1, fwver_part2 = fw_info['FwVersion'].split(';DSP:')
    fwwin.addstr(7, 2, 'Firmware Version: ' + fwver_part1)
    fwwin.addstr(8, 2, 'DSP: ' + fwver_part2)
    fwwin.refresh()

    # Update data window continuously until Control-C
    while True:
        datawin.erase()
        datawin.border()
        datawin.addstr(1, 2, 'X Y Z     : ' + xyztxt)
        datawin.addstr(2, 2, 'Flick     : ' + flicktxt)
        datawin.addstr(3, 2, 'Airwheel  : ' + airwheeltxt)
        datawin.addstr(4, 2, 'Touch     : ' + touchtxt)
        datawin.addstr(5, 2, 'Tap       : ' + taptxt)
        datawin.addstr(6, 2, 'Doubletap : ' + doubletaptxt)
        datawin.refresh()

        xyztxt = ''

        if len(flicktxt) > 0 and flickcount < 5:
            flickcount += 1
        else:
            flicktxt = ''
            flickcount = 0

        if len(airwheeltxt) > 0 and airwheelcount < 5:
            airwheelcount += 1
        else:
            airwheeltxt = ''
            airwheelcount = 0

        if len(touchtxt) > 0 and touchcount < 5:
            touchcount += 1
        else:
            touchtxt = ''
            touchcount = 0

        if len(taptxt) > 0 and tapcount < 5:
            tapcount += 1
        else:
            taptxt = ''
            tapcount = 0

        if len(doubletaptxt) > 0 and doubletapcount < 5:
            doubletapcount += 1
        else:
            doubletaptxt = ''
            doubletapcount = 0

        time.sleep(0.1)

wrapper(main)
With the code complete, we can now proceed to try things out.
Demo
Save the code with whatever name you desire and run it. you should now be able to control the robotic hand by moving your hand in a different direction over the 3D Gesture tracker.
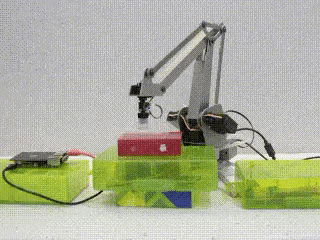
To better understand how the hand movements work, you can watch the video below to see the project in action.
Going Forward
While the application of the 3D gesture tracker in today’s project may not exactly fit your use case, it provides the basic building blocks for you to go on and build a powerful gesture tracking solution. From a gesture-controlled Robot to a gesture-controlled mouse for your computer, the possibilities are truly endless.
That’s it for this tutorial guys. Thanks for reading and following through. Feel free to reach out to me via the comment section with questions about any part of the project.