

Using the 1.44″ Color TFT display (ILI9163C) with Arduino
- Nick Koumaris
- https://educ8s.tv
- info@educ8s.tv
- 33.071 Views
- easy
- Tested
- 0 Likes

Hi guys, over the past few tutorials, we have been discussing TFT displays, how to connect and use them in Arduino projects, especially the 1.8″ Colored TFT display. In a similar way, we will look at how to use the 1.44″ TFT Display (ILI9163C) with the Arduino.
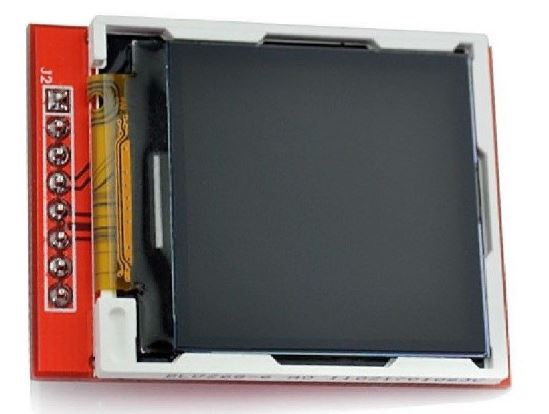
The ILI9163C based 1.44″ colored TFT Display, is a SPI protocol based display with a resolution of 128 x 128 pixels. It’s capable of displaying up to 262,000 different colors. The module can be said to be a sibling to the 1.8″ TFT display, except for the fact that it is much faster and has a better, overall cost to performance ratio when compared with the 1.8″ TFT display. Some of the features of the display are listed below;
- Size: 1.44 inch
- Interface: SPI
- Resolution: 128*128 pixel
- Visual area: 1:1 square
- TFT color screen, the effect is far better than other small CSTN screen
- Drive IC: ILI9163
- Fully compatible and alternative 5110 interface
- Onboard LDO, support 5V/3.3V input voltage, the LED backlight, 3.3V input
For this tutorial, we will focus on demonstrating how to use this display with Arduino to display texts, shapes and Images.
Required Components
The following components are required to replicate this tutorial.
Each of these components can be bought through the links attached to them.
Schematics
TheTFT Display, as earlier stated, communicates with the microcontroller over SPI, thus to use it, we need to connect it to the SPI pins of the Arduino as shown in the schematics below.
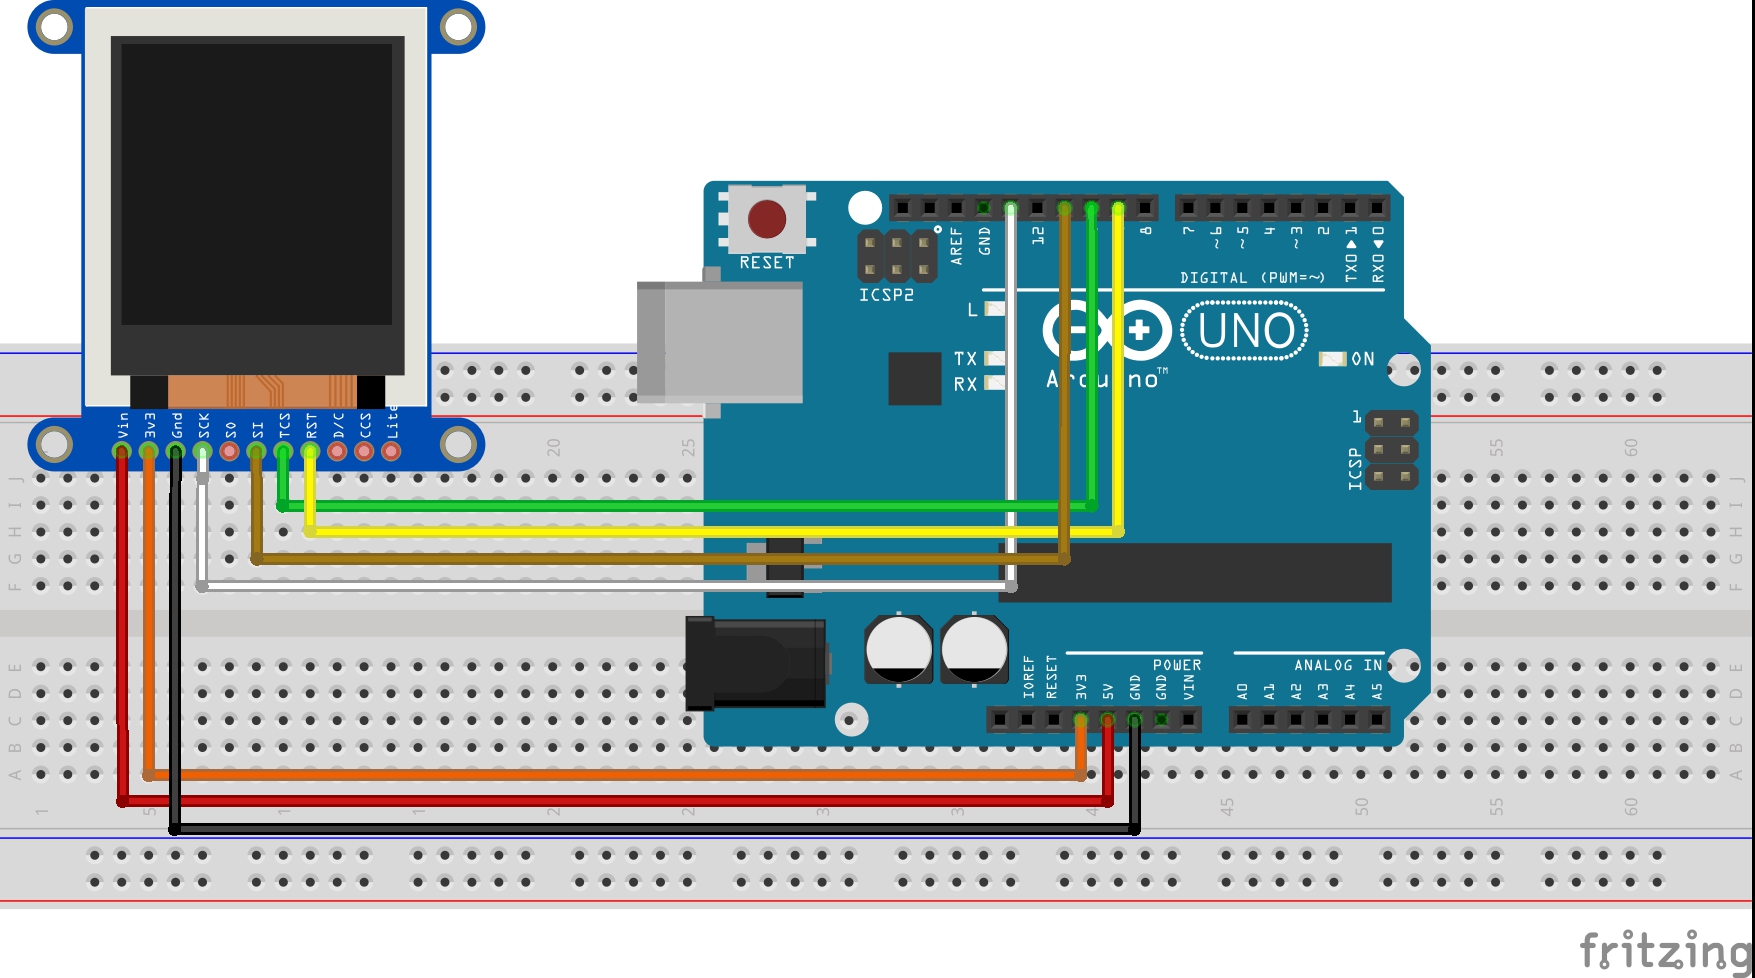
Please note that the version of the display used for this tutorial is not available on fritzing which is the software used for the schematics, so follow the pin connection list below to further understand how each pin of the TFT display should be connected to the Arduino.
1.44″TFT – Arduino
VCC - 5v
GND - GND
CS - D10
RST - D9
A0 - D8
SDA -D11
SCK - D13
LED - 3.3v
When connecting the display, ensure that has a voltage regulator (shown in the image below) before connecting it directly to the 5v logic level of the Arduino. This is because the display could be destroyed if the version of the display you have does not have the regulator.
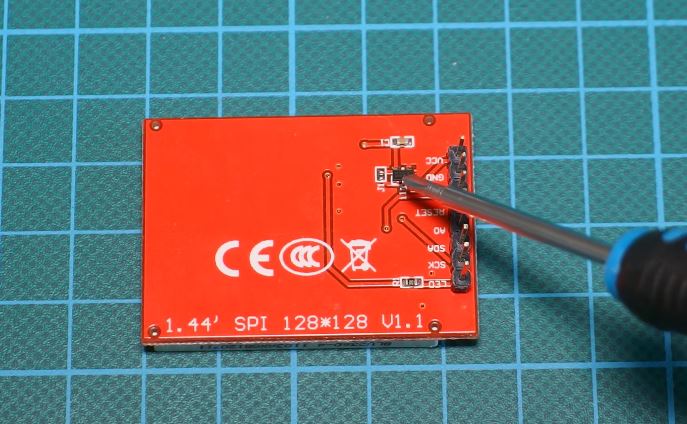
If the display does not have a voltage regulator, you can use any logic level converter/shifter in between the display and the Arduino.
Check the connections once again to be sure everything is connected as it should be before proceeding to the next section.
Code
In order to allow the Arduino to work with the display, we need two Arduino libraries; the sumotoy TFT ILI9163C Arduino library which can be downloaded from this link and the popular Adafruit GFX Arduino library which we have used extensively in several tutorials. Download these libraries and install them in the Arduino IDE.
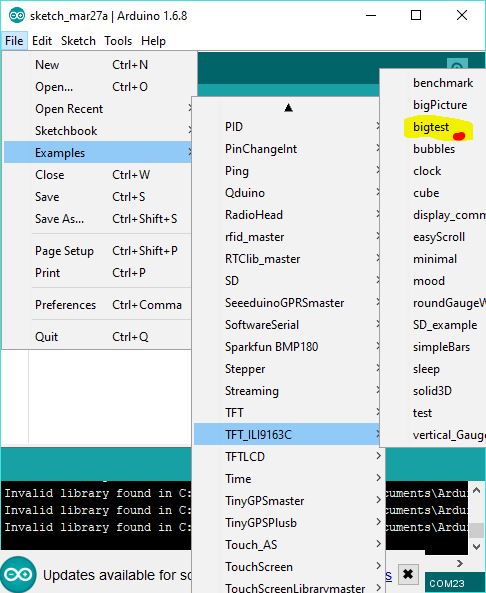
For today’s tutorial, we will be using the bigtest example which is one of the example codes that comes with the sumotoy ILI9163C Arduino library to show how to use the TFT display.
The example can be opened by going to File–>Examples–>TFT_ILI9163c–>bigtest as shown in the image below. It should be noted that this will only be available after the sumotoy library has been installed.
To explain the code, as usual, the first thing that was done is the inclusion of all the libraries needed for the code.
#include <SPI.h>
#include <Adafruit_GFX.h>
#include <TFT_ILI9163C.h>
Next, we define some of the colors that will be used along with the corresponding hex values. If you’ve gone through any of our previous tutorials where we used the Adafruit GFX library, you would have noticed that this code contains a lot from the GFX library and it should be easier for you to follow.
// Color definitions
#define BLACK   0x0000
#define BLUE    0x001F
#define RED     0xF800
#define GREEN   0x07E0
#define CYAN    0x07FF
#define MAGENTA 0xF81F
#define YELLOW  0xFFE0
#define WHITE   0xFFFF
Next, the pins of the Arduino to which the CS and DC pin of the TFT display are connected is declared.
#define __CS 10
#define __DC 9
Next, an object of the ILI9163c library named “display” was created with CS and DC parameter as inputs but due to the kind of display being used, we need to include the pin of the Arduino to which the A0 pin of the TFT display is connected which is D8.
TFT_ILI9163C display = TFT_ILI9163C(__CS,8, __DC);
With this done, we move to the void setup() function. Under this function, we issue the commands that initialize the display then create a time variable updated by millis, after which we issue a command to clear the screen and display some random text on it.
void setup(void) {
  display.begin();


  uint16_t time = millis();
  time = millis() - time;

//  lcdTestPattern();
//  delay(1000);

  display.clearScreen();
  display.setCursor(0,0);
  display.print("Lorem ipsum dolor sit amet, consectetur adipiscing elit. Curabitur adipiscing ante sed nibh tincidunt feugiat. Maecenas enim massa");
  delay(1000);
Some of the functions which perform actions ranging from displaying fastlines, drawing rectangles etc are then called with a delay after each function so the text or graphics stays long enough on the screen to be visible.
tftPrintTest();
  delay(2000);

  //a single pixel
  display.drawPixel(display.width()/2, display.height()/2, GREEN);
  delay(500);

  // line draw test
  testlines(YELLOW);
  delay(500);

  // optimized lines
  testfastlines(RED, BLUE);
  delay(500);

  testdrawrects(GREEN);
  delay(1000);

  testfillrects(BLUE, YELLOW);
  delay(1000);

  randomRect(0);
  delay(100);
  randomCircles(0);
  delay(100);
  randomLines();
  delay(100);
  randomPoints();
  delay(500);

  display.clearScreen();
  testfillcircles(10, BLUE);
  testdrawcircles(10, WHITE);
  delay(1000);

  testroundrects();
  delay(500);

  testtriangles();
  delay(500);
Up next is the void loop function. The void loop function also calls some of the same functions called under the void setup() function to display circles, rectangles etc including the testline function which is essentially used to test the screen.
void loop() {
  testlines(random(0x0010,0xFFFF));
  randomLines();
  //randomCircles(1);
  randomCircles(0);
  randomRect(1);
  randomRect(1);
  randomRect(1);
  randomRect(1);
  randomRect(1);
  randomRect(0);
  randomRect(0);
  randomRect(0);
  randomRect(0);
  randomRect(0);
  randomRect(0);
  randomPoints();
}
The rest of the code is for the functions that were called and may not be too difficult to follow.
The complete code for this project is available below and under the example section of the Arduino IDE as described at the beginning of this section.
#include <SPI.h>
#include <Adafruit_GFX.h>
#include <TFT_ILI9163C.h>

// Color definitions
#define BLACK   0x0000
#define BLUE    0x001F
#define RED     0xF800
#define GREEN   0x07E0
#define CYAN    0x07FF
#define MAGENTA 0xF81F
#define YELLOW  0xFFE0
#define WHITE   0xFFFF

/*
Teensy3.x and Arduino's
You are using 4 wire SPI here, so:
 MOSI:  11//Teensy3.x/Arduino UNO (for MEGA/DUE refere to arduino site)
 MISO:  12//Teensy3.x/Arduino UNO (for MEGA/DUE refere to arduino site)
 SCK:   13//Teensy3.x/Arduino UNO (for MEGA/DUE refere to arduino site)
 the rest of pin below:
 */
#define __CS 10
#define __DC 9
/*
Teensy 3.x can use: 2,6,9,10,15,20,21,22,23
Arduino's 8 bit: any
DUE: check arduino site
If you do not use reset, tie it to +3V3
*/


float p = 3.1415926;

void setup(void) {
  display.begin();


  uint16_t time = millis();
  time = millis() - time;

//  lcdTestPattern();
//  delay(1000);

  display.clearScreen();
  display.setCursor(0,0);
  display.print("Lorem ipsum dolor sit amet, consectetur adipiscing elit. Curabitur adipiscing ante sed nibh tincidunt feugiat. Maecenas enim massa");
  delay(1000);

  tftPrintTest();
  delay(2000);

  //a single pixel
  display.drawPixel(display.width()/2, display.height()/2, GREEN);
  delay(500);

  // line draw test
  testlines(YELLOW);
  delay(500);

  // optimized lines
  testfastlines(RED, BLUE);
  delay(500);

  testdrawrects(GREEN);
  delay(1000);

  testfillrects(BLUE, YELLOW);
  delay(1000);

  randomRect(0);
  delay(100);
  randomCircles(0);
  delay(100);
  randomLines();
  delay(100);
  randomPoints();
  delay(500);

  display.clearScreen();
  testfillcircles(10, BLUE);
  testdrawcircles(10, WHITE);
  delay(1000);

  testroundrects();
  delay(500);

  testtriangles();
  delay(500);

}

void loop() {
  testlines(random(0x0010,0xFFFF));
  randomLines();
  //randomCircles(1);
  randomCircles(0);
  randomRect(1);
  randomRect(1);
  randomRect(1);
  randomRect(1);
  randomRect(1);
  randomRect(0);
  randomRect(0);
  randomRect(0);
  randomRect(0);
  randomRect(0);
  randomRect(0);
  randomPoints();
}

void testlines(uint16_t color) {
  display.clearScreen();
  for (int16_t x=0; x < display.width()-1; x+=6) {
    display.drawLine(0, 0, x, display.height()-1, color);
  }
  for (int16_t y=0; y < display.height()-1; y+=6) {
    display.drawLine(0, 0, display.width()-1, y, color);
  }
  display.clearScreen();
  for (int16_t x=0; x < display.width()-1; x+=6) {
    display.drawLine(display.width()-1, 0, x, display.height()-1, color);
  }
  for (int16_t y=0; y < display.height()-1; y+=6) {
    display.drawLine(display.width()-1, 0, 0, y, color);
  }

  display.clearScreen();
  for (int16_t x=0; x < display.width()-1; x+=6) {
    display.drawLine(0, display.height()-1, x, 0, color);
  }
  for (int16_t y=0; y < display.height()-1; y+=6) {
    display.drawLine(0, display.height()-1, display.width()-1, y, color);
  }
  display.clearScreen();
  for (int16_t x=0; x < display.width()-1; x+=6) {
    display.drawLine(display.width()-1, display.height()-1, x, 0, color);
  }
  for (int16_t y=0; y < display.height()-1; y+=6) {
    display.drawLine(display.width()-1, display.height()-1, 0, y, color);
  }
  delay(500);
}


void testdrawtext(char *text, uint16_t color) {
  display.setTextSize(1);
  display.setTextColor(WHITE);
  display.setCursor(0,0);

  for (uint8_t i=0; i < 168; i++) {
    if (i == '\n') continue;
    display.write(i);
    if ((i > 0) && (i % 21 == 0))
      display.println();
  }
}

void testfastlines(uint16_t color1, uint16_t color2) {
  display.clearScreen();
  for (int16_t y=0; y < display.height()-1; y+=5) {
    display.drawFastHLine(0, y, display.width()-1, color1);
  }
  for (int16_t x=0; x < display.width()-1; x+=5) {
    display.drawFastVLine(x, 0, display.height()-1, color2);
  }
}

void testdrawrects(uint16_t color) {
  display.clearScreen();
  for (int16_t x=0; x < display.height()-1; x+=6) {
    display.drawRect((display.width()-1)/2 -x/2, (display.height()-1)/2 -x/2 , x, x, color);
  }
}

void testfillrects(uint16_t color1, uint16_t color2) {
  display.clearScreen();
  for (int16_t x=display.height()-1; x > 6; x-=6) {
    display.fillRect((display.width()-1)/2 -x/2, (display.height()-1)/2 -x/2 , x, x, color1);
    display.drawRect((display.width()-1)/2 -x/2, (display.height()-1)/2 -x/2 , x, x, color2);
  }
}

void testfillcircles(uint8_t radius, uint16_t color) {
  for (uint8_t x=radius; x < display.width()-1; x+=radius*2) {
    for (uint8_t y=radius; y < display.height()-1; y+=radius*2) {
      display.fillCircle(x, y, radius, color);
    }
  }
}

void testdrawcircles(uint8_t radius, uint16_t color) {
  for (int16_t x=0; x < (display.width()-1)+radius; x+=radius*2) {
    for (int16_t y=0; y < (display.height())-1+radius; y+=radius*2) {
      display.drawCircle(x, y, radius, color);
    }
  }
}

void testtriangles() {
  display.clearScreen();
  int color = 0xF800;
  int t;
  int w = display.width()/2;
  int x = display.height();
  int y = 0;
  int z = display.width();
  for(t = 0 ; t <= 15; t+=1) {
    display.drawTriangle(w, y, y, x, z, x, color);
    x-=4;
    y+=4;
    z-=4;
    color+=100;
  }
}

void testroundrects() {
  display.clearScreen();
  int color = 100;
  int i;
  int t;
  for(t = 0 ; t <= 4; t+=1) {
    int x = 0;
    int y = 0;
    int w = display.width();
    int h = display.height();
    for(i = 0 ; i <= 24; i+=1) {
      display.drawRoundRect(x, y, w, h, 5, color);
      x+=2;
      y+=3;
      w-=4;
      h-=6;
      color+=1100;
    }
    color+=100;
  }
}

void tftPrintTest() {
  display.clearScreen();
  display.setCursor(0, 5);
  display.setTextColor(RED);
  display.setTextSize(1);
  display.println("Hello World!");
  display.setTextColor(YELLOW, GREEN);
  display.setTextSize(2);
  display.print("Hello Wo");
  display.setTextColor(BLUE);
  display.setTextSize(3);
  display.print(12.57);
  delay(1500);
  display.setCursor(0, 5);
  display.clearScreen();
  display.setTextColor(WHITE);
  display.setTextSize(0);
  display.println("Hello World!");
  display.setTextSize(1);
  display.setTextColor(GREEN);
  display.print(p, 5);
  display.println(" Want pi?");
  display.print(8675309, HEX);
  display.print(" Print HEX");
  display.setTextColor(WHITE);
  display.println("Sketch has been");
  display.println("running for: ");
  display.setTextColor(MAGENTA);
  display.print(millis() / 1000);
  display.setTextColor(WHITE);
  display.print(" sec.");
}


void randomRect(bool fill){
  display.clearScreen();
  uint8_t k,c;
  for (k = 0; k < 16; k++) {
    for (c = 0; c < 32; c++) {
      uint8_t cx, cy, x, y, w, h;
      //  center
      cx = random(0,display.width());
      cy = random(0,display.height());
      //  size
      w = random(0,30 + 6);
      h = random(0,20 + 4);
      //  upper-left
      x = cx - w / 2;
      y = cy - h / 2;
      if (x < 0) x = 0;
      if (y < 0) y = 0;
      //  adjust size
      if (x + w > display.width()) w = display.width() - x;
      if (y + h > display.height()) h = display.height() - y;
      if (fill){
        display.fillRect(x, y, w, h,random(0x0010,0xFFFF));
      }
      else {
        display.drawRect(x, y, w, h,random(0x0010,0xFFFF));
      }

    }
    display.clearScreen();
  }
}

void randomCircles(bool fill){
  display.clearScreen();
  uint8_t k,c;
  for (k = 0; k < display.height(); k++) {
    for (c = 0; c < display.height()/2; c++) {
      //  coordinates
      uint8_t x = random(0,120 + 3), y = random(0,90 + 2), r = random(0,40 + 1);
      if (x - r <  0) r = x;
      if (x + r > (display.width()-1)) r = (display.width() - 1) - x;
      if (y - r <  0) r = y;
      if (y + r > (display.height()-1)) r = (display.height() - 1) - y;
      if (fill){
        display.fillCircle(x, y, r,random(0x0010,0xFFFF));
      }
      else {
        display.drawCircle(x, y, r,random(0x0010,0xFFFF));
      }
    }
    if (!fill)display.clearScreen();
  }
}


void randomLines(){
  display.clearScreen();
  uint8_t k,c;
  for (k = 0; k < display.height(); k++) {
    for (c = 0; c < display.height()/2; c++) {
      uint8_t x1 = random(0,display.width()), y1 = random(0,display.height()), x2 = random(0,display.width()), y2 = random(0,display.height());
      display.drawLine(x1, y1, x2, y2,random(0x0010,0xFFFF));
    }
    display.clearScreen();
  }
}


void randomPoints(){
  display.clearScreen();
  int k,c;
  for (k = 0; k < 128; k++) {
    for (c = 0; c < 1000; c++) {
      uint8_t x = random(0,display.width()), y = random(0,display.height());
      display.drawPixel(x, y,random(0x0010,0xFFFF));
    }
    display.clearScreen();
  }
}
Demo
With the libraries installed, open an instance of the Arduino IDE, open the examples as described initially, don’t forget to make the A0 pin (D8) correction to the code then upload to the Arduino board. You should see different kind of text and graphics being displayed on the screen. I captured the screen in action and its shown in the image below.
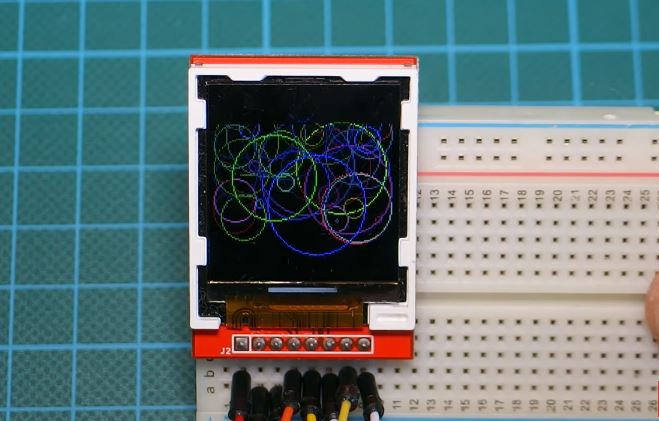
Awesome, yes?
That’s it for this tutorial guys, what interesting thing are you going to build with this display? Let’s get the conversation started. Feel free to reach me via the comment section if you have any questions about the tutorial.
Till next time!
You can watch the video of this tutorial on youtube here
Please follow and like us:


Hello. The top part of my display starts off with noise and nothing else is drawn there ?
Regards, Mel
I found the Bodmer library TFT_ILI9163 solved the problem..
thanks Mel
Good, could you point to the library download to help others with the same issue ?
Hi,
The display only shows a white screen, no matter what code you put in.
How can I fix this?
White screen with the sketch but I troed the example under ST7735 and it workls fine
Nothing works. Absolutely nothing of this works. All I get is a white screen. Tried Arduino Mega and Arduino Duo, on Duo wont even compile. So useless.. And then you wonder why there is no interest in these things. Well, here is your answer – because it does not work. Spent 2 days googling and reading, this all is an absolute chaos, there is no consistency even in naming or pin labels.. What a waste of time and money.