Good for you following the recommended manufacturers advice as this would have been invaluable had the unit still been in warranty. Now that it is out of warranty I can say that there's nothing in there that would suffer in ANY way from the mains voltage being 248V i.e. 10% higher than recommended and, probably, varying over the day due to local loads??? If there WAS stuff in there that couldn't cope then it was poorly designed equipment in the first place.
Why do I say this? Because the controlling devices (mainly ONLY the solenoid) is driven via transformed voltages - in the case of the lower holding magnetism this is from a 10:1 mains supply reduction via an internal transformer so the volts to the holding coil will be either 220/10 (22V - lets discount the rectification) or 248/10 (24.8V), the differences being 'negligible'. When it comes to FULL hold you'd want as much as possible without exceeding the dissipation of the coil. Again, the +10% wouldn't seem to make much difference in my estimation.
That said, it's not my machine so your own approach and caution isn't derided in any way and the additional expense of the buck-boost is yours to bear.
The thyristor test in #14 shows the actual SWITCHING of the device rather than just the relevant P-N junctions so try the test as I described and post the results. I suspect it will be OK.
The main concern should be C4 and you will need to determine its value. If you can't then just replace it anyway as they are cheap in the scheme of things.
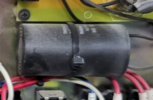
The holding coil is magnetised by the pure DC from bridge rectifier ZL2 and smoothing cap C1 via the thyristor switch but the HALF clamping is due to the inclusion of C4 in series with the AC to ZL2 which acts as a DROPPER and gives the lower DC voltage.
The demagnetising by the application of fullwave (but unsmoothed) voltage delivered by ZL1 bridge rectifier.
The problem is that when I turn the power on it is immediately clamping, pulling a lot of current though the thyristor, even though the contactors are in the off position.
That state is ONLY possible if there is AC to ZL2 and that would require SB2, SB3 KM1 or the FOOTSWITCH to be activated - have you checked the footswitch?
SB2 and SB3 are the green start switch and are normally-open contacts wired in parallel - get that wrong and you'll have permanent AC to ZL2 when the power is on.
To test all this SAFELY:
Remove wires 20 and 21 (the DC from ZL2) and the wires 10 and 11 (the AC to ZL1).
You can now test for AC and DC at those wires to check that all the power, start and operation buttons deliver the correct AC/DC to those terminals with the appropriate POWER, START and FOOTSWITCH operation without actually passing DC to the control board and holding coil thus preventing any damage and removing them all from suspicion for now.
Check that you get the 120VAC/220VAC to ZL2 (low hold/firm hold) and 12VAC to ZL1 on release. Report back.