Menu on Nokia 5110 LCD display with Arduino
- Nick Koumaris
- http://educ8s.tv
- info@educ8s.tv
- 15.215 Views
- moderate
- Tested
- 0 Likes

We have published quite a number of tutorials using different displays with the Arduino, with the most recent being the tutorial on displaying graphics on all kind of displays with Arduino. For today’s tutorial, we will look into achieving more with displays by implementing a menu based system with the Nokia 5110 LCD display and the Arduino. The menu is one of the easiest and most intuitive ways through which users interact with products that require navigation. From mobile phone to PCs, its applications are endless. Today we will explore how to add this cool feature to your Arduino project.
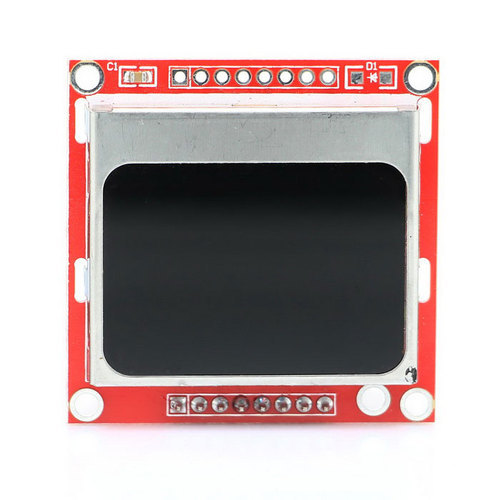
At the heart of today’s project is the Nokia 5110 LCD Display. The Nokia 5110 LCD is one of the most popular LCD display among makers. It was originally developed for use as a screen for cell phones and was used in lots of mobile phones during the 90’s. The display uses a low power CMOS LCD controller/driver, the PCD8544, which drives the 84×48px graphics display. In a normal state, the display consumes about 6 to 7mA which makes it quite ideal for low power devices. We have published quite a number of tutorials on this display that might help you understand how to drive such a display.
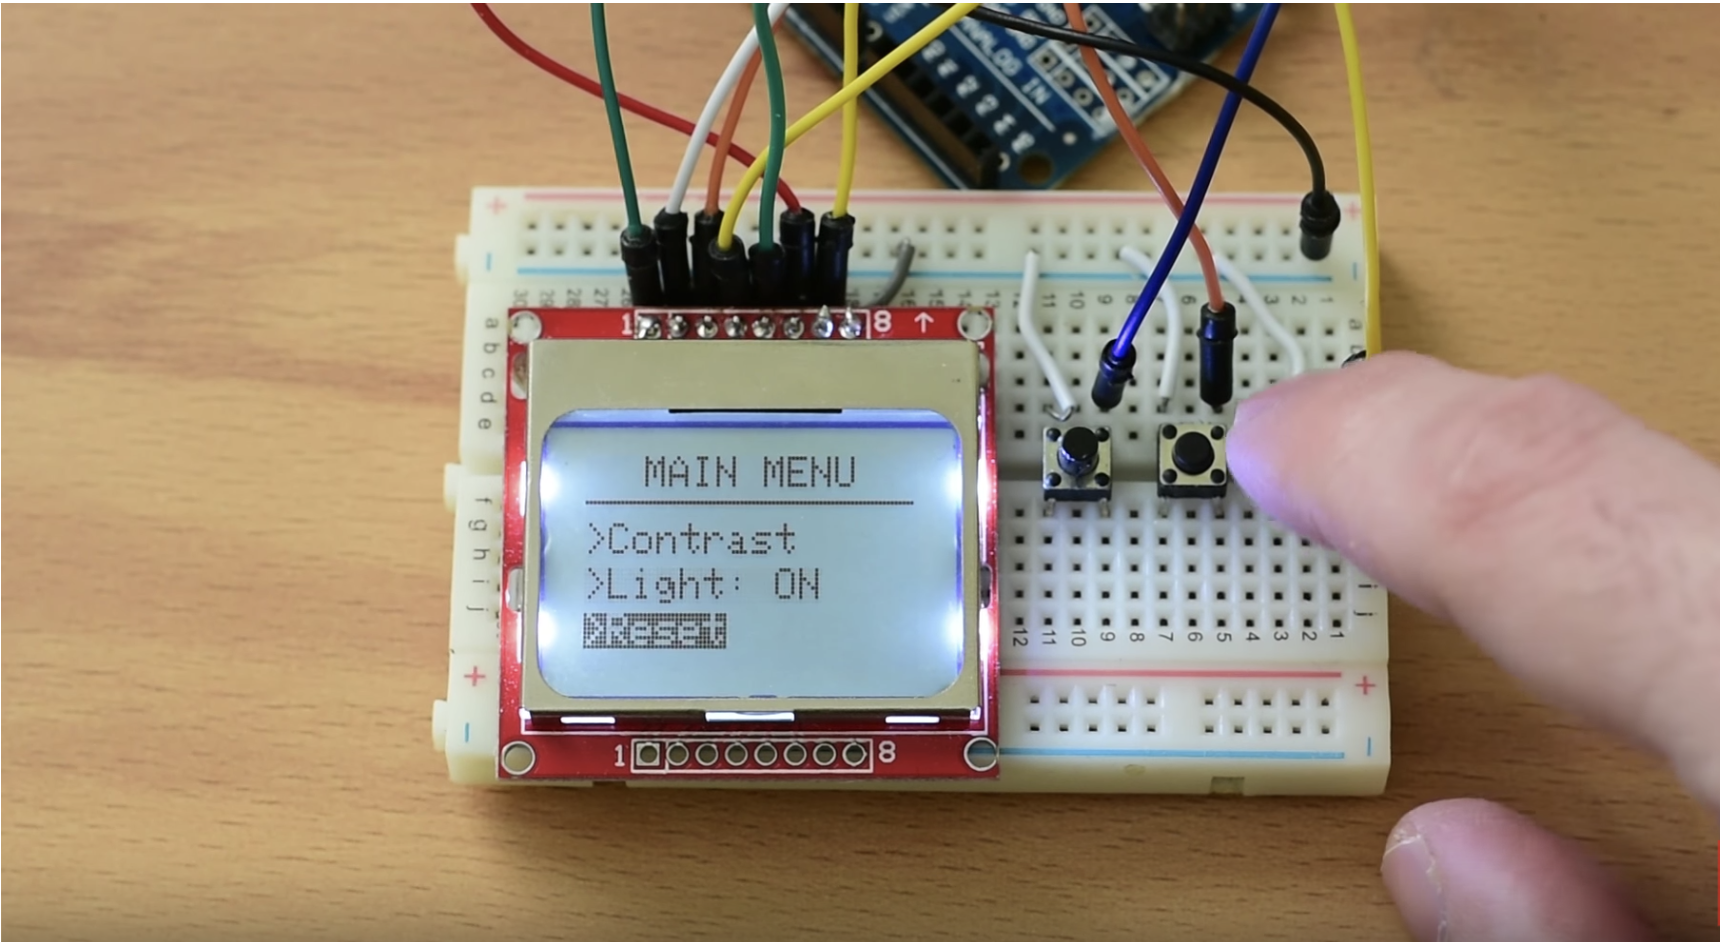
To showcase how to create the menu on a display with the Arduino, we will build a simple demo menu with three pages. To navigate through the menu, we will use 3x push buttons. The first to scroll up, the second to scroll down and the third one to select a highlighted option. The first screen/page of the menu will serve as the home page and will host the options that open the next two screens/pages. The second page will open after the first menu option on the homepage has been selected. Users will be able to change the contrast of the display using the up and down push buttons to increase or reduce it respectively. By pressing the select button, users will be able to go back to the home page. The second option on the homepage displays the third page, where users will be able to turn the backlight of the display on/off by pressing the select item button.
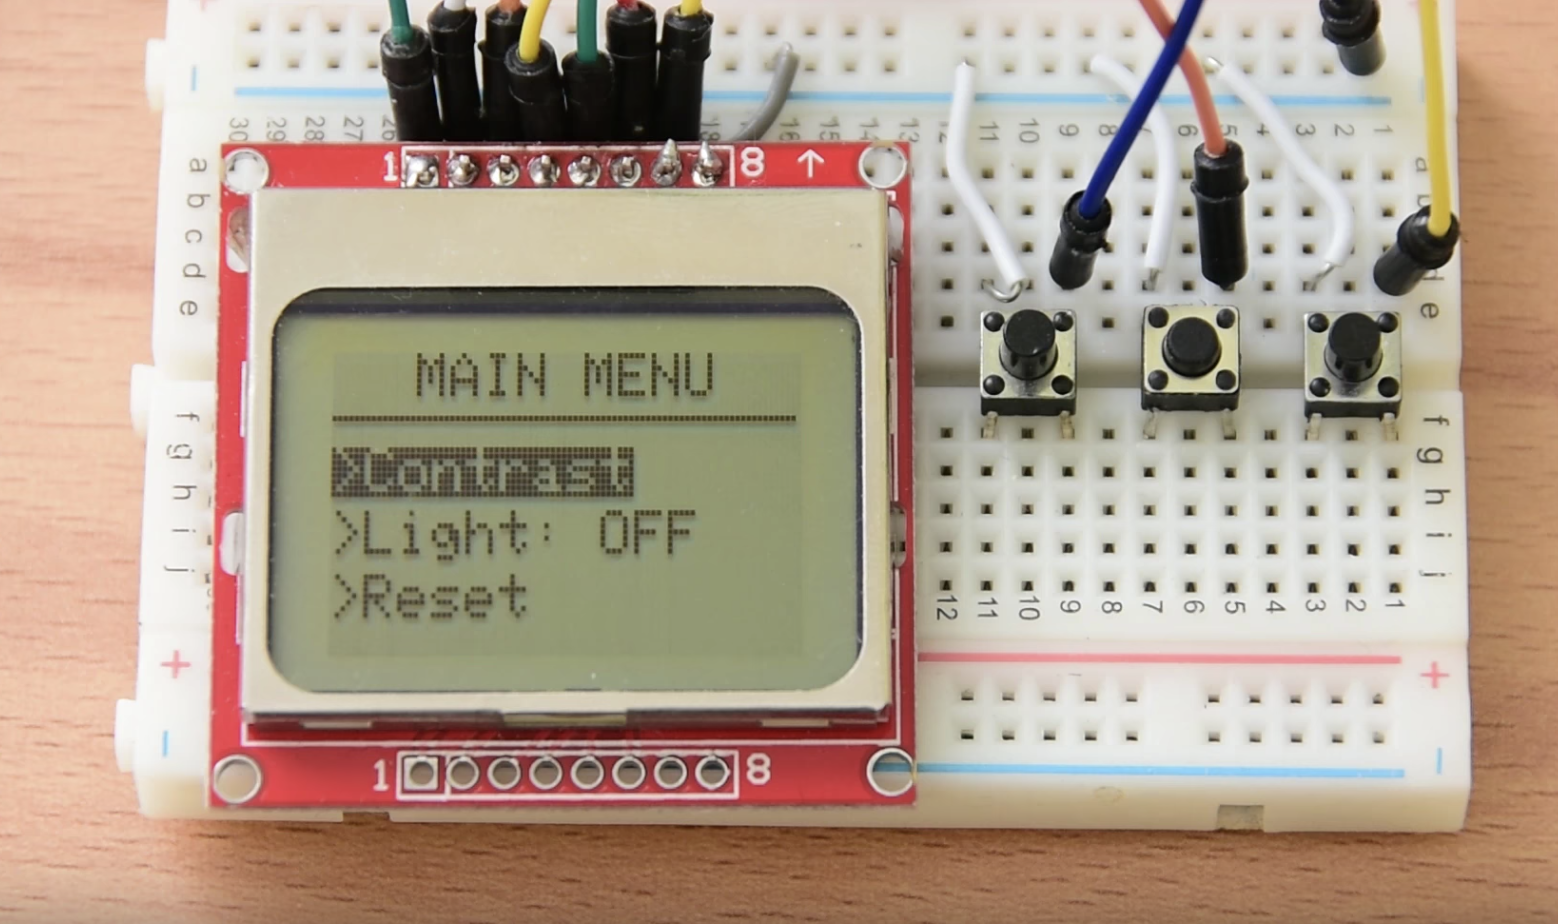
Selecting the last option on the homepage does what it is labeled for, it clears all the previous settings for the contrast and backlight. This is a fun and interesting project which I believe can be very useful to anyone irrespective of your technical know-how level.
That’s it for introduction, Let’s now see how to build this project.
Required Components
The following components are required to build this project;
As usual, the exact components used for this tutorial can be bought via the link attached to each of them.
Schematics
The schematics for this project is quite simple, connect the components as shown in the schematics below.

To make the schematics easy to follow, a pin map of the connection between the Arduino Uno and the Nokia 5110, which isthe major component, is shown below.
LCD - Arduino
RST - D12
CE  - D11
DC  - D10
DIN - D9
CLK - D8
VCC - VCC
LIGHT - D7
GND - GND
Looking at the schematics, you will see that the push buttons are connected to the Arduino without the common pull-up or pull-down resistors. This is because we will use the Arduino’s internal pull-up resistor. You can read more about using pull-up/down resistors here. If you have any challenges understanding the concept, do reach out to me via the comment section.
With the connections all done, we can now proceed to the code for the project. It might be useful to go over the entire connection one more time to ensure everything is as it should be.
Code
To be fair, the code for today’s tutorial is a little bit complex and while I will do my best to break it down and ensure you understand the basics, it might take you building your own menu to fully grab the concept. The code for today is heavily dependent on two major libraries; The Adafruit GFX library and the Adafruit Nokia 5110 LCD Library. The Adafruit GFX library is probably one of the libraries we use the most in our tutorials. It makes it easy to display graphics and perform simple animations on supported displays. The Nokia 5110 LCD library, on the other hand, reduces the amount of work and code required to interact with the LCD.
We start the code as with other sketches by including all the libraries required for the project which in this case, are the Adafruit GFX and Nokia 5110 LCD libraries.
#include <Adafruit_GFX.h>
#include <Adafruit_PCD8544.h>
Next, we declare the pins to which the buttons are connected and also declare all the variables that we will use for the project. I believe the variable name provides enough insight into what each variable stands for.
boolean backlight = true;
int contrast=50;

int menuitem = 1;
int page = 1;

volatile boolean up = false;
volatile boolean down = false;
volatile boolean middle = false;

int downButtonState = 0;
int upButtonState = 0;
int selectButtonState = 0;
int lastDownButtonState = 0;
int lastSelectButtonState = 0;
int lastUpButtonState = 0;
Next, we write the void setup function. Here we declare all the pins to which the push buttons are connected as inputs and set digital pin 7 as output since the Light pin of the LCD is connected to it. This pin will be used to turn the backlight on/off later on.
void setup() {

  pinMode(2, INPUT_PULLUP);
  pinMode(1, INPUT_PULLUP);
  pinMode(0, INPUT_PULLUP);
  pinMode(7,OUTPUT);
After setting the pin modes, we initialize serial communication, initialize the screen, and set the screen contrast to 50 which serves as a default value (to be varied later using the menu buttons) and use the display.display() function to apply the changes.
Serial.begin(9600);

display.begin();
display.setContrast(contrast); //Set contrast to 50
display.clearDisplay();
display.display();
Next, we write the void loop function. We start the void loop function by calling the drawmenu() function which contains the code to create the menu objects on the screen.
void loop() {

 drawMenu();
Next, we read the buttons to check if any of them has been pressed.
downButtonState = digitalRead(2);
selectButtonState = digitalRead(1);
upButtonState =   digitalRead(0);

checkIfDownButtonIsPressed();
checkIfUpButtonIsPressed();
checkIfSelectButtonIsPressed();
The state of the buttons is then fed into a series of if-else statements which checks which button was pressed and which of the screens is currently being displayed to determine what action is done next. For instance, the first if statement checks if the menu is currently on page 1 and if the up button is pressed. If this is the case, it then checks the position of the menu cursor and adjusts it accordingly.
  if (up && page == 1 ) {
    up = false;
    menuitem--;
    if (menuitem==0)
    {
      menuitem=3;
    }
  }else if (up && page == 2 ) {
    up = false;
    contrast--;
    setContrast();
  }


  if (down && page == 1) {
    down = false;
    menuitem++;
    if (menuitem==4)
    {
      menuitem=1;
    }
  }else if (down && page == 2 ) {
    down = false;
    contrast++;
    setContrast();
  }


  if (middle) {
    middle = false;

    if (page == 1 && menuitem==2)
    {
      if (backlight)
      {
        backlight = false;
        turnBacklightOff();
        }
      else
      {
        backlight = true;
        turnBacklightOn();
       }
    }

    if(page == 1 && menuitem ==3)
    {
      resetDefaults();
    }


else if (page == 1 && menuitem==1) {
      page=2;
     }
else if (page == 2) {
      page=1;
     }
   }

  }
The remaining part of the sketch are the functions called within the loop function.
void drawMenu()
  {

  if (page==1)
  {
    display.setTextSize(1);
    display.clearDisplay();
    display.setTextColor(BLACK, WHITE);
    display.setCursor(15, 0);
    display.print("MAIN MENU");
    display.drawFastHLine(0,10,83,BLACK);
    display.setCursor(0, 15);

    if (menuitem==1)
    {
      display.setTextColor(WHITE, BLACK);
    }
    else
    {
      display.setTextColor(BLACK, WHITE);
    }
    display.print(">Contrast");
    display.setCursor(0, 25);

    if (menuitem==2)
    {
      display.setTextColor(WHITE, BLACK);
    }
    else
    {
      display.setTextColor(BLACK, WHITE);
    }
    display.print(">Light: ");

    if (backlight)
    {
      display.print("ON");
    }
    else
    {
      display.print("OFF");
    }
    display.display();

    if (menuitem==3)
    {
      display.setTextColor(WHITE, BLACK);
    }
    else
    {
      display.setTextColor(BLACK, WHITE);
    }
    display.setCursor(0, 35);
    display.print(">Reset");
    display.display();
  }


  else if (page==2)
  {

    display.setTextSize(1);
    display.clearDisplay();
    display.setTextColor(BLACK, WHITE);
    display.setCursor(15, 0);
    display.print("CONTRAST");
    display.drawFastHLine(0,10,83,BLACK);
    display.setCursor(5, 15);
    display.print("Value");
    display.setTextSize(2);
    display.setCursor(5, 25);
    display.print(contrast);

    display.setTextSize(2);
    display.display();
  }

  }

  void resetDefaults()
  {
    contrast = 50;
    setContrast();
    backlight = true;
    turnBacklightOn();
  }

  void setContrast()
  {
    display.setContrast(contrast);
    display.display();
  }

  void turnBacklightOn()
  {
    digitalWrite(7,LOW);
  }

    void turnBacklightOff()
  {
    digitalWrite(7,HIGH);
  }
The complete code for the project is available below and attached under the download section at the end of the tutorial.
#include <Adafruit_GFX.h>
#include <Adafruit_PCD8544.h>

boolean backlight = true;
int contrast=50;

int menuitem = 1;
int page = 1;

volatile boolean up = false;
volatile boolean down = false;
volatile boolean middle = false;

int downButtonState = 0;
int upButtonState = 0;
int selectButtonState = 0;
int lastDownButtonState = 0;
int lastSelectButtonState = 0;
int lastUpButtonState = 0;

Adafruit_PCD8544 display = Adafruit_PCD8544( 5, 4, 3);

void setup() {

  pinMode(2, INPUT_PULLUP);
  pinMode(1, INPUT_PULLUP);
  pinMode(0, INPUT_PULLUP);
  pinMode(7,OUTPUT);

  digitalWrite(7,LOW); //Turn Backlight ON

  Serial.begin(9600);

  display.begin();
  display.setContrast(contrast); //Set contrast to 50
  display.clearDisplay();
  display.display();
}

void loop() {

  drawMenu();

  downButtonState = digitalRead(2);
  selectButtonState = digitalRead(1);
  upButtonState =   digitalRead(0);

  checkIfDownButtonIsPressed();
  checkIfUpButtonIsPressed();
  checkIfSelectButtonIsPressed();

  if (up && page == 1 ) {
    up = false;
    menuitem--;
    if (menuitem==0)
    {
      menuitem=3;
    }
  }else if (up && page == 2 ) {
    up = false;
    contrast--;
    setContrast();
  }


  if (down && page == 1) {
    down = false;
    menuitem++;
    if (menuitem==4)
    {
      menuitem=1;
    }
  }else if (down && page == 2 ) {
    down = false;
    contrast++;
    setContrast();
  }


  if (middle) {
    middle = false;

    if (page == 1 && menuitem==2)
    {
      if (backlight)
      {
        backlight = false;
        turnBacklightOff();
        }
      else
      {
        backlight = true;
        turnBacklightOn();
       }
    }

    if(page == 1 && menuitem ==3)
    {
      resetDefaults();
    }


else if (page == 1 && menuitem==1) {
      page=2;
     }
else if (page == 2) {
      page=1;
     }
   }

  }

  void checkIfDownButtonIsPressed()
  {
    if (downButtonState != lastDownButtonState)
  {
    if (downButtonState == 0)
    {
      down=true;
    }
    delay(50);
  }
   lastDownButtonState = downButtonState;
  }

void checkIfUpButtonIsPressed()
{
  if (upButtonState != lastUpButtonState)
  {
    if (upButtonState == 0) {
      up=true;
    }
    delay(50);
  }
   lastUpButtonState = upButtonState;
}

void checkIfSelectButtonIsPressed()
{
   if (selectButtonState != lastSelectButtonState)
  {
    if (selectButtonState == 0) {
      middle=true;
    }
    delay(50);
  }
   lastSelectButtonState = selectButtonState;
}


  void drawMenu()
  {

  if (page==1)
  {
    display.setTextSize(1);
    display.clearDisplay();
    display.setTextColor(BLACK, WHITE);
    display.setCursor(15, 0);
    display.print("MAIN MENU");
    display.drawFastHLine(0,10,83,BLACK);
    display.setCursor(0, 15);

    if (menuitem==1)
    {
      display.setTextColor(WHITE, BLACK);
    }
    else
    {
      display.setTextColor(BLACK, WHITE);
    }
    display.print(">Contrast");
    display.setCursor(0, 25);

    if (menuitem==2)
    {
      display.setTextColor(WHITE, BLACK);
    }
    else
    {
      display.setTextColor(BLACK, WHITE);
    }
    display.print(">Light: ");

    if (backlight)
    {
      display.print("ON");
    }
    else
    {
      display.print("OFF");
    }
    display.display();

    if (menuitem==3)
    {
      display.setTextColor(WHITE, BLACK);
    }
    else
    {
      display.setTextColor(BLACK, WHITE);
    }
    display.setCursor(0, 35);
    display.print(">Reset");
    display.display();
  }


  else if (page==2)
  {

    display.setTextSize(1);
    display.clearDisplay();
    display.setTextColor(BLACK, WHITE);
    display.setCursor(15, 0);
    display.print("CONTRAST");
    display.drawFastHLine(0,10,83,BLACK);
    display.setCursor(5, 15);
    display.print("Value");
    display.setTextSize(2);
    display.setCursor(5, 25);
    display.print(contrast);

    display.setTextSize(2);
    display.display();
  }

  }

  void resetDefaults()
  {
    contrast = 50;
    setContrast();
    backlight = true;
    turnBacklightOn();
  }

  void setContrast()
  {
    display.setContrast(contrast);
    display.display();
  }

  void turnBacklightOn()
  {
    digitalWrite(7,LOW);
  }

    void turnBacklightOff()
  {
    digitalWrite(7,HIGH);
  }
Demo
Go through the schematics one more time to ensure everything is connected as it should be, then connect the Arduino to your computer and upload the code. After a couple of seconds, you should see the menu displayed on the LCD and it should respond to the push buttons when pressed.
That’s it for today’s tutorial. Thanks for reading. While this is certainly not a project that is useful on its own, it will be a fantastic feature to add to your existing or new projects. Feel free to reach out via the comment section with your questions, suggestions, and comments on today’s tutorial. I will try to reply to them as soon as possible.
The video version of today’s tutorial is available on Youtube.
Please follow and like us:


Subscribe
Login
0 Comments