PiNAS: Raspberry Pi Based Network Attached Storage (NAS)
Network Attached Storage (NAS) are high-capacity storage devices that are connected to a local home or office network to provide everyone (with designated "clearance") on that network with access to the files on the drive without the need to plug into it directly. This facilitates things like in-house sharing of large files like movies and other multimedia, without the need to move drives around.
Network Attached Storage (NAS) are high-capacity storage devices that are connected to a local home or office network to provide everyone (with designated “clearance”) on that network with access to the files on the drive without the need to plug into it directly. This facilitates things like in-house sharing of large files like movies and other multimedia, without the need to move drives around.
While high-grade consumer NAS Devices are readily available in stores, the advent of SOCs, and SBCs like the Raspberry Pi, has made Network Attached Storage one of the coolest things people build with SBCs. As a result of this, I recently decided it might be a good idea to share a tutorial, and while there were dozens of NAS DIY projects online, the project by Instructables user Aramybox caught my attention, and I will be chronicling his build for today’s tutorial.
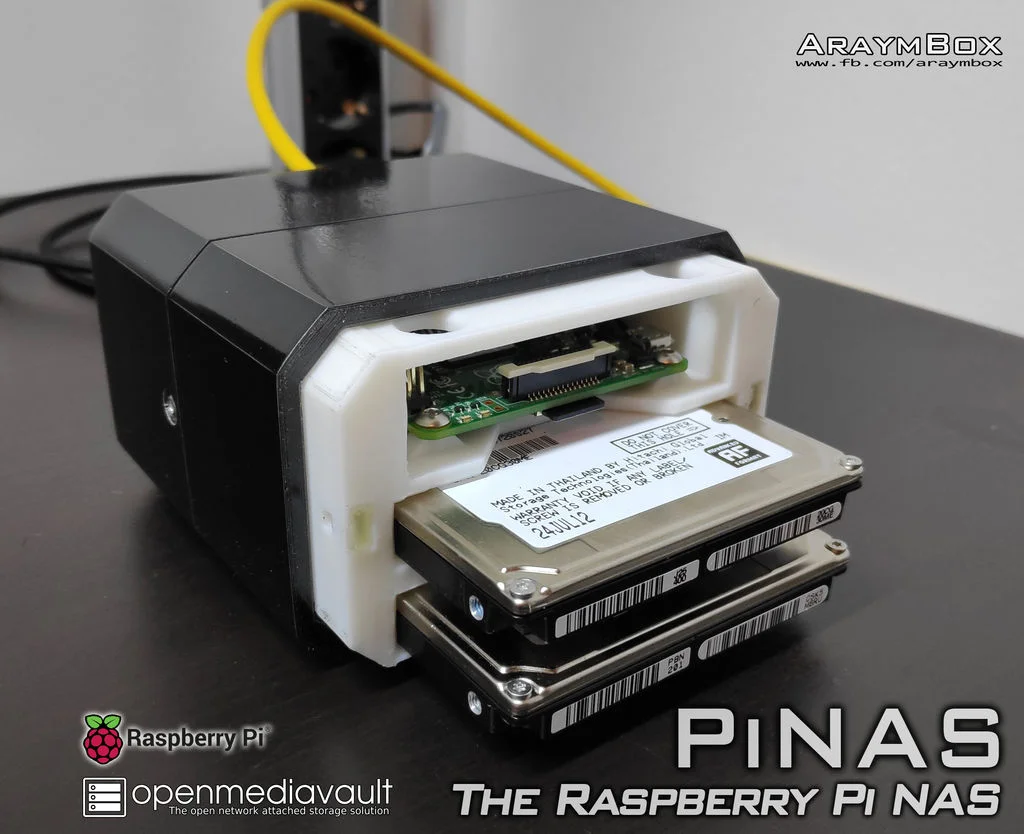
Aramybox‘s Project called the PiNAS, is one of the simplest and most elegant of DIY NAS Solutions I found online. The project is based on a Raspberry Pi with two Hard drives, all enclosed with an innovative, 3D printed Enclosure. Performing all the NAS Gymnastics at the heart of the project is the Open Media Vault (OMV) OS running on the Raspberry Pi. OMV is a Network Attached Storage (NAS) solution based on Debian Linux, that contains services like SSH, (S)FTP, SMB/CIFS, DAAP media server, RSync, BitTorrent client and many more. It is primarily designed to be used in small offices or home offices but is not limited to those scenarios. It is a simple and easy to use out-of-the-box solution that will allow everyone to install and administrate a Network Attached Storage without deeper knowledge.
The advent of single-board computers like the Raspberry Pi democratized access to solutions like this, giving users the ability to build powerful but cheap applications.
At the end of this tutorial, you should be able to build your own PiNAS and probably throw in some upgrades to Aramybox‘s work.
Required Components
The following components are required to build this project;
- 1x Raspberry Pi 3 or 4
- 1x micro SD Card – 8GB or 16GB [$5.79]
- Female Micro USB breakout board [$6.99]
- SATA to USB adapter [$7.99] x 2
- 2.5″ Hard drives x 2
- Raspberry Pi power supply (5V / min. 2A) [$9.99] x 1
- Wires
- 4x Bolts: M3x8mm
- 4x Bolts: M3x6mm
- 4x Nuts: M3 square
Asides the electronics components, access to the following will be useful in creating the enclosure for the project;
- Soldering Utilities
- Screwdrivers
- Hot glue gun
- 3D Printer or Access to a 3D Printing service
The bolts and nuts are based on the enclosure design by “Aramybox”. If you are going to create your own enclosure, with adjustments that may affect the bolt and nuts specifications, then you may need to ignore the ones listed and just get what works for you.
Enclosure Design
One of the best things about this project is the interesting enclosure that was designed for it. The enclosure which was 3D Printed comprises of only 4 parts and it was designed in such a way that it can be held together by just 4 bolts and can be opened easily to switch the drives or perform other maintenance.

To make the enclosure easy for people to replicate, the STL files are attached in the download section at the bottom of the page. You can also access the design files via project’s page on Thingiverse.
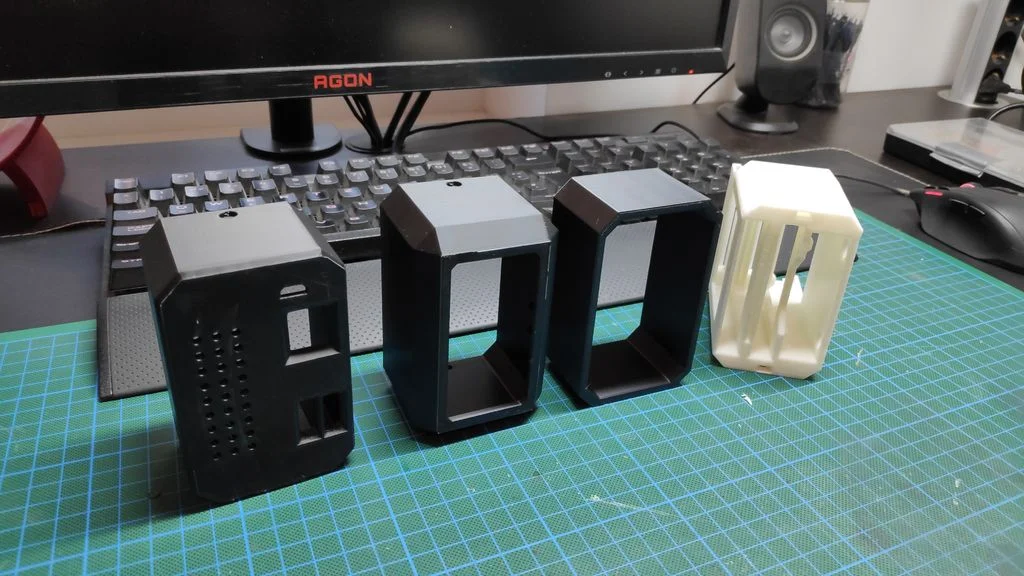
For printing materials, Aramybox used PLA for the inner part and ABS for the three outer shells. To improve the outlook of the enclosures and remove some of the imperfections due to 3D printing, a couple of Sanding paper, and painting actions were carried out.
Schematics and Components Connections
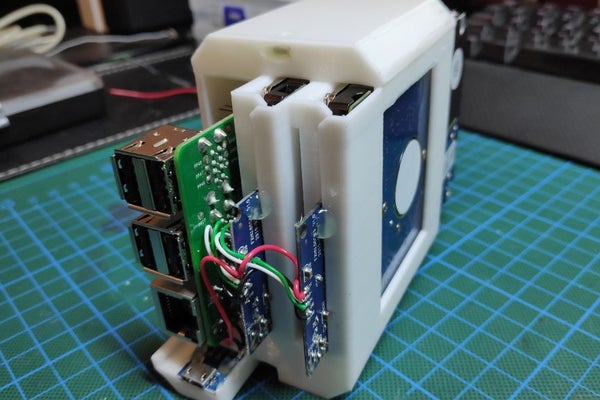
To make the project compact, “Aramybox” opened up the SATA to USB Adapters and desoldered the wires that go from the HDD end to the USB end. With the aid of jumper wires, the salvaged HDD end of the adapter is then soldered directly to corresponding pins on the USB ports of the Pi. Enough care should be taken at this point to ensure the Pi is not damaged and the existing connections on the board are not bridged. Asides the SATA connectors, “Aramybox” also connected a female MicroUSB power board to the Pi. It will provide an easy way to Power the Pi and other components like the SATA connectors, all at once.
A schematics showing the described connections is provided below.

In place of soldering the wires directly on the SATA connector, you can choose to use male/female header pins. Just to make things neat and presentable.
The setup with all the components connected should look like the image below.
With this done, we are ready to explore the software for the project.
Software and Configurations
To make our setup function as a NAS, we will use a modified version of the Raspberry Pi OS called; Open Media Vault, as the brain of the project.
We start the process by flashing the SD card with an image of the Open Media Vault OS. At this point, I will assume you understand how to flash an SD Card with a Raspbian OS using tools like Balena (for macOS and Windows users). If you are completely new to this task, then you can check out some of our tutorials that cover that topic online.
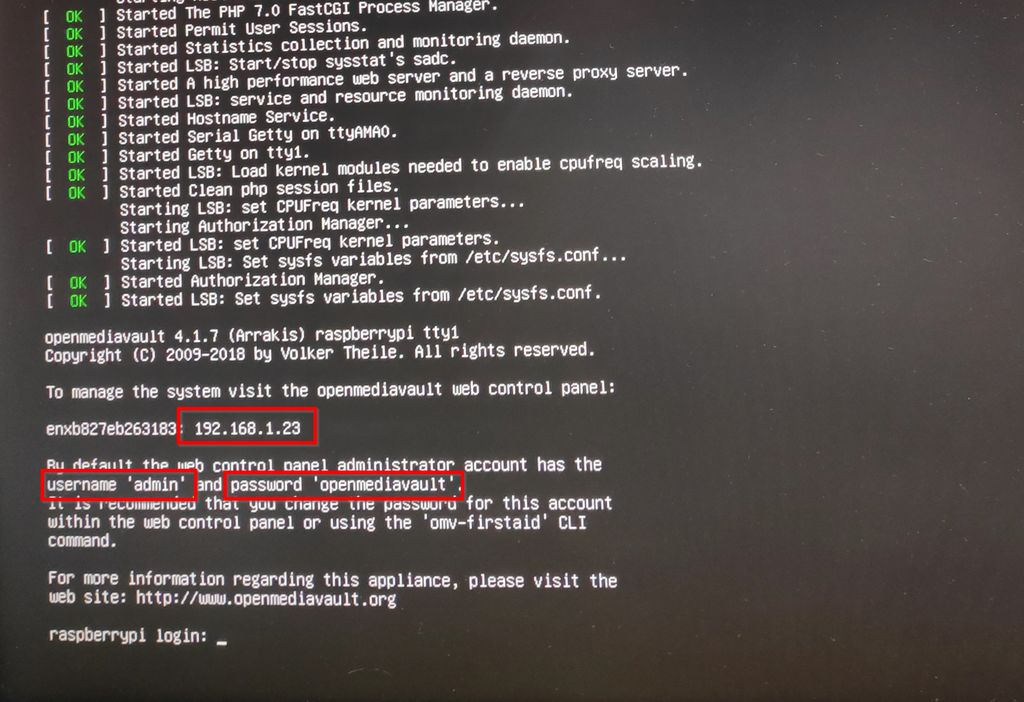
With the SD card successfully flashed with the OS, install the card into its slot on the Pi, connect the Pi to your network via an Ethernet cable, and power up the system. Powering up the setup for the first time, it is advisable to have a monitor connected to the Pi. This will allow you to access important information like the IP Address, along with Username and Password
With this info obtained, you can now disconnect the Pi from the monitor and proceed to configure Open Media Vault. 5 main sections of the Open Media Vault needs to be configured are:
- System
- Storage
- Access Rights Management
- Services
- Diagnostics
Follow the steps below as described by “Aramybox” to configure these sections:
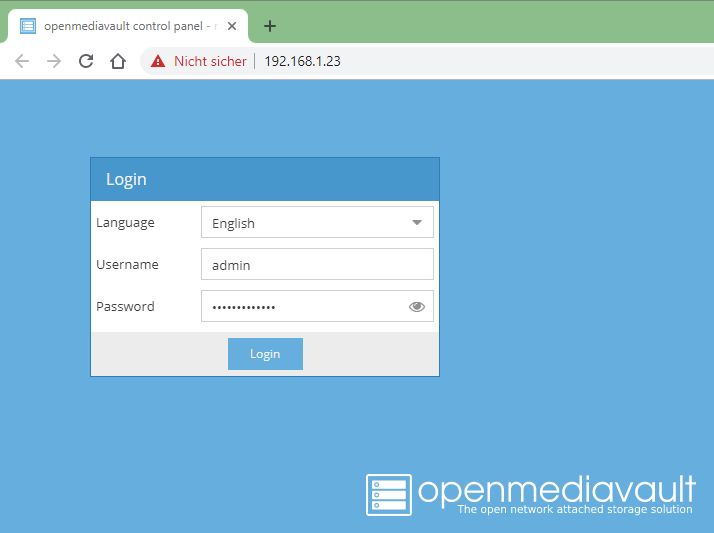
1. With the IP Address, Username, and Password all at hand, launch your favorite internet browser (firefox, chrome, ie, etc.) on a device (PC, smartphone, etc.) that is on the same network as the Pi.2.
2. Type in the IP-address of the PiNAS into the address bar of the browser.
3. You should now see the authentication screen of Open Media Vault.
4. Enter the username, password and click Login.
5. After successful Login, we proceed to the configurations starting with the System configurations.
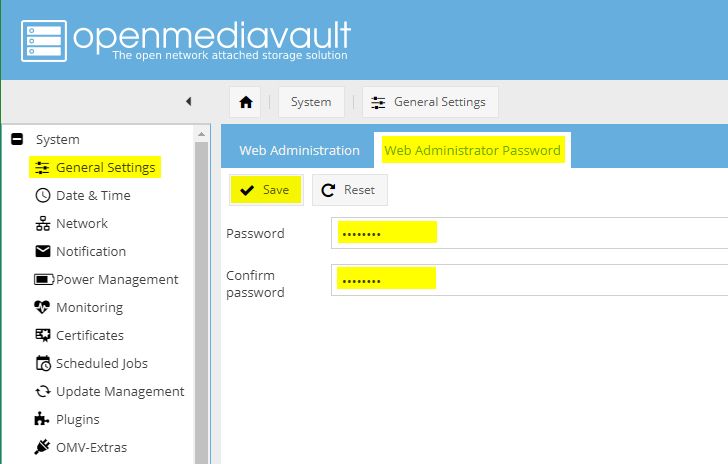
6. For the system configurations, we start with security. To ensure security, it is important to reset the password and username to one you can remember. To do this, click on the general settings tab. on the resulting page, click on the Web Administrator Password panel and fill in the new password. Click on the Save button.
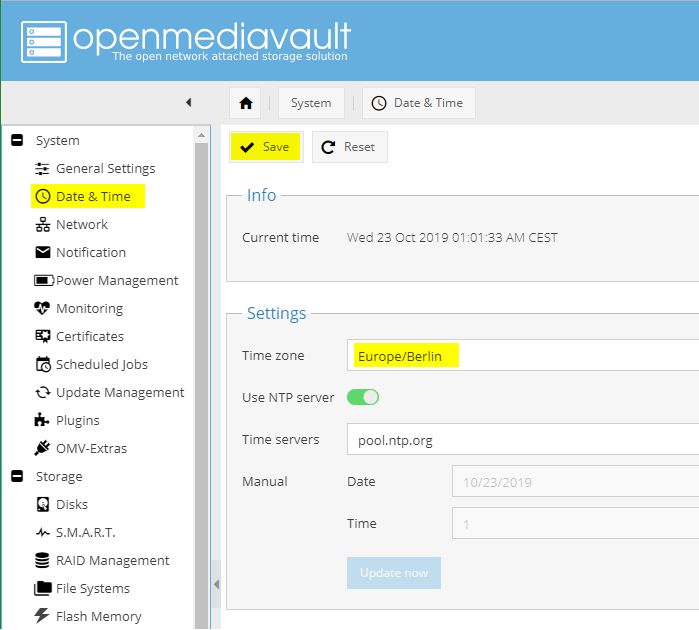
7. Next, we set the time and date of the system. Do this by clicking on the time and date tab. On the resulting window, select your time zone, enable the NTP (Network Time Protocol) feature, and set a time server. Click the save button to save this setting.
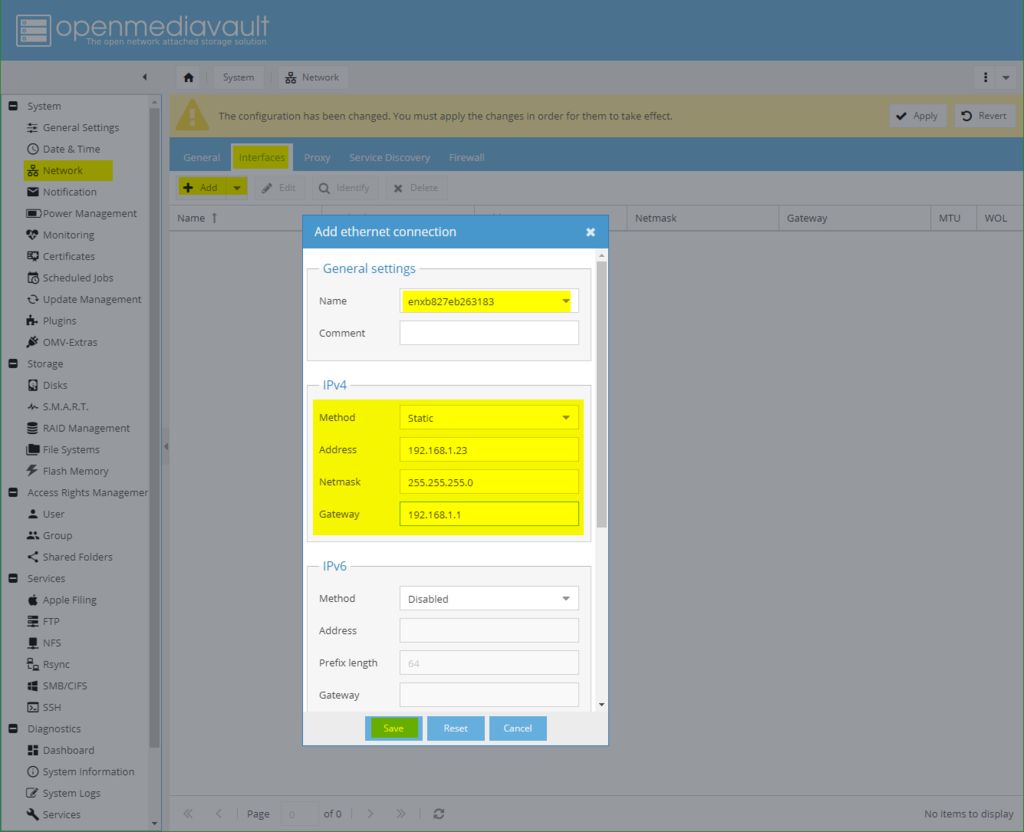
8. Next, we configure the network identity. Click on Network and go through each of the tabs giving your PiNAS a hostname, Set a Static IPv4 address so it does not change after reboot, and activate the services you desire in the Service discovery tab.
9. Next, we configure parameters related to Storage. under Storage, we will set up the disks, RAID management, and a filesystem for easy addressing.
Disks
- Click on the Disks button
- Make sure both hard drives were identified and listed on the resulting page
- Run through the following steps for both disks:
i. select the disk, click Edit and enable write cache.
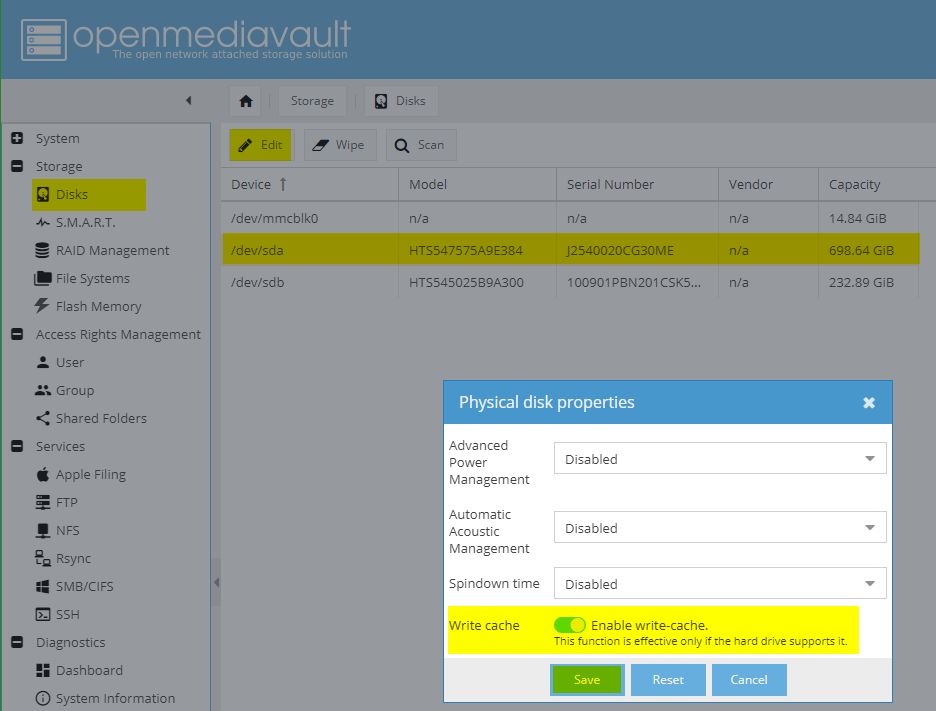
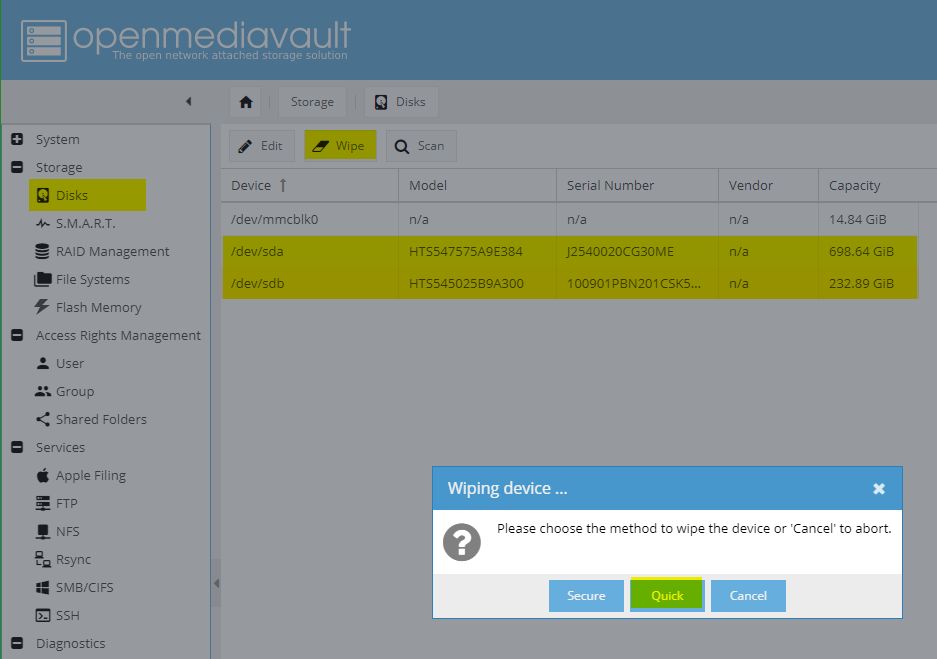
ii. Select the disk, click Wipe, and click on the quick button to wipe all data from the disk and give the system a clean slate to work with.
RAID Management
1. Select RAID() management in the dropdown on the right and click on the create button.
2. On the resulting window, fill In parameters like the name of your RAID e.g. raid1, the RAID Level e.g Mirror (RAID Level 1), Select devices you want to add to the RAID (select both your disks).
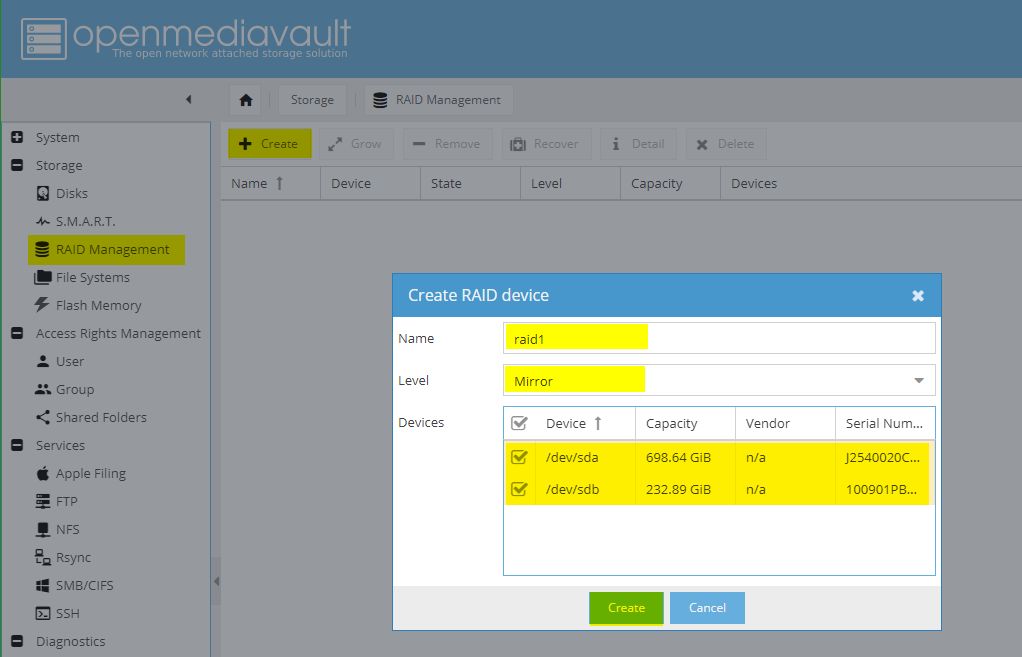
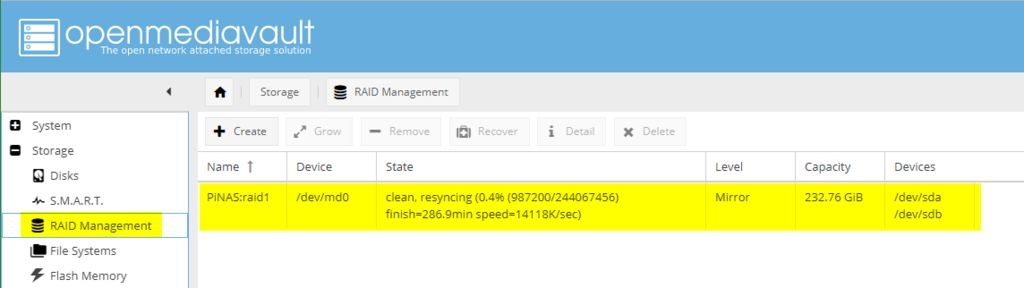
3. With the above done, Click Create to create the RAID using the selected disks. The RAID should take some time to re-sync. After syncing, the state of the raid would change to clean.
File System
- Select File Systems in the dropdown on the right and click on the create button.
- Select your Device which in this case should be the previously created “raid1”(or whatever name you gave it)
- Give your file system a Label to identify it easily
- Select your desired file system type
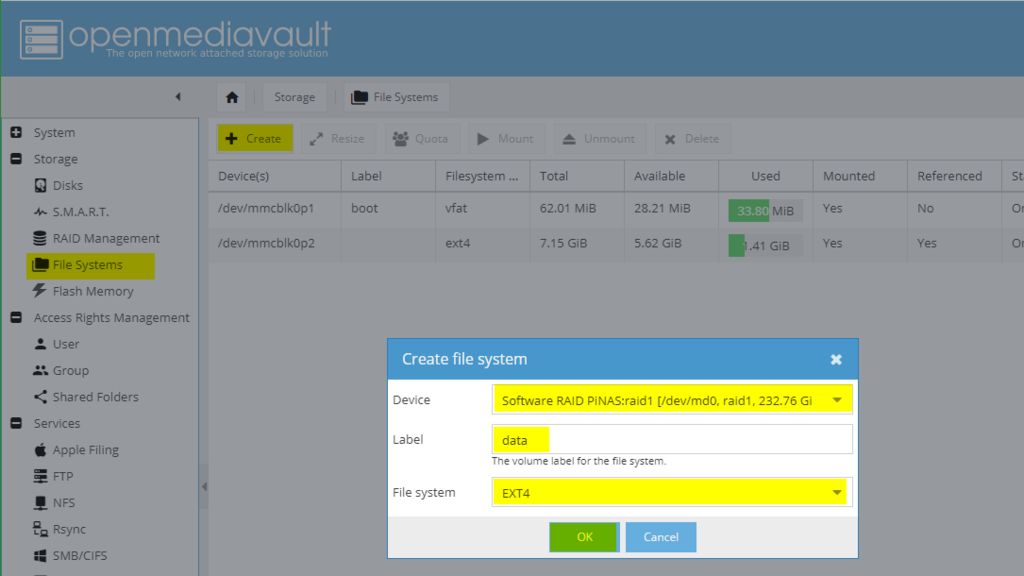
- Click OK to create the file system
- Wait for your file system to finish initializing (Status has to be Online)
- Select your initialized file system and press Mount to make it available
Next, we go through configurations related to Access Right Management. For this, we will create users and user groups which will be used to assign access. we will also be creating shared folders so the file system on the PiNAS can be accessed similarly to how files are accessed on PCs.
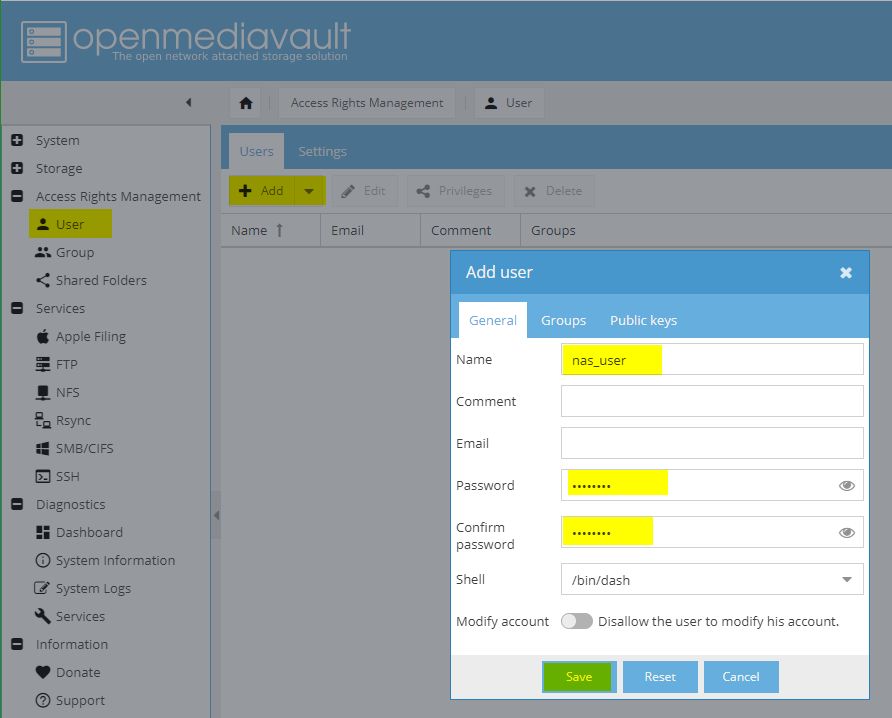
Create Users
User accounts are necessary for file system access.
- Expand the Access Rights Management dropdown and click on the user’s tab.
- Click “Add” to create a new user and in the resulting window, fill in the Name, and password, and hit the “Save” button when done.
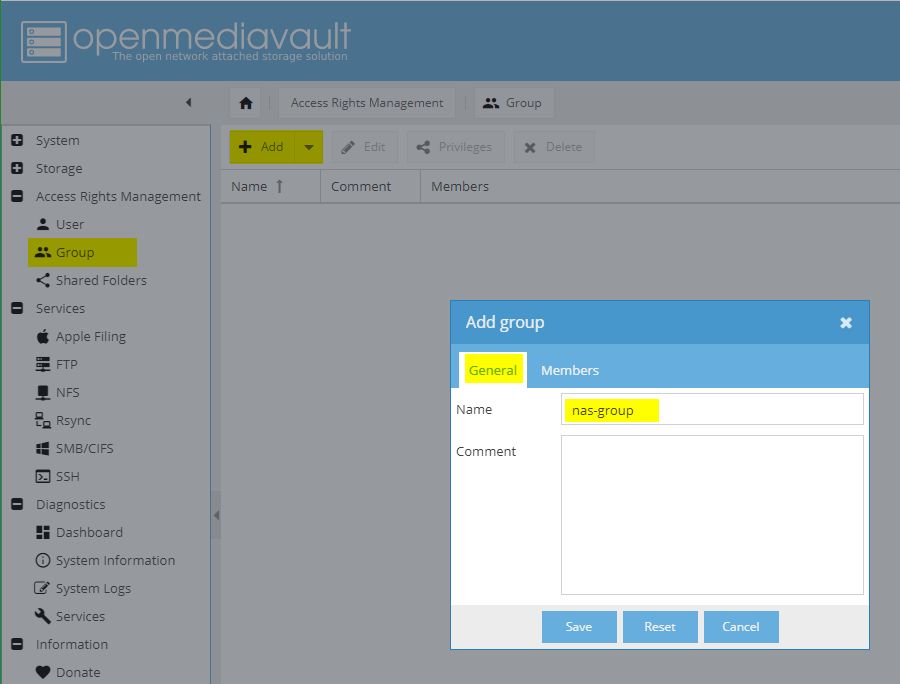
Create User Groups
User Groups makes it easy to manage access. For instance, you can restrict access to multiple users by, restricting access to their group. Follow the steps below to create user groups.
- Click on the Group tab under Access Right Management.
- Click “Add” to create a new user group.
- On the resulting window, enter your preferred name for the group.
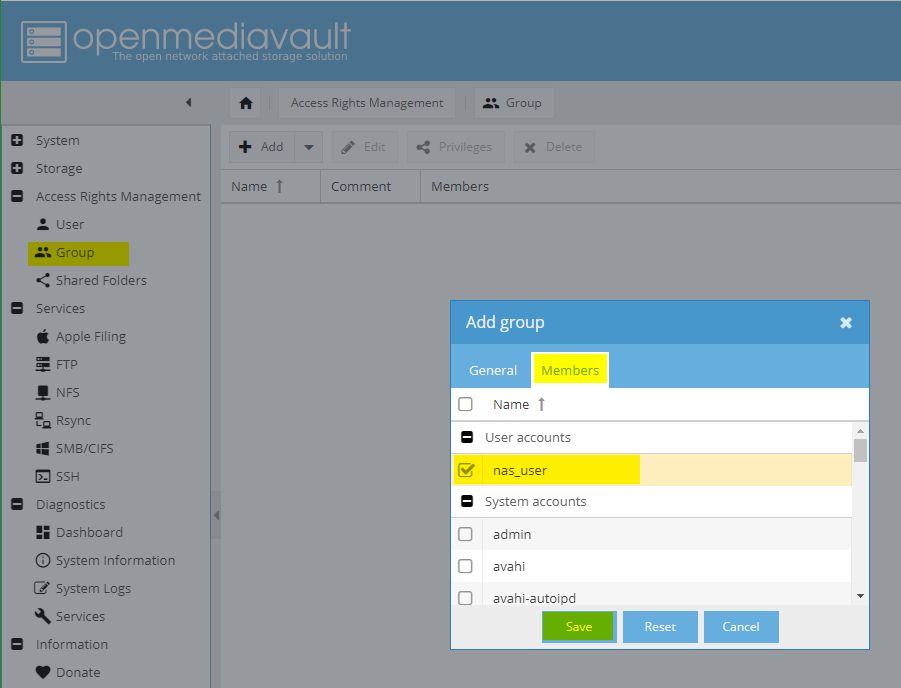
- Select the users (must be created first) that you want in that group via the member’s tab. Hit the save button when done.
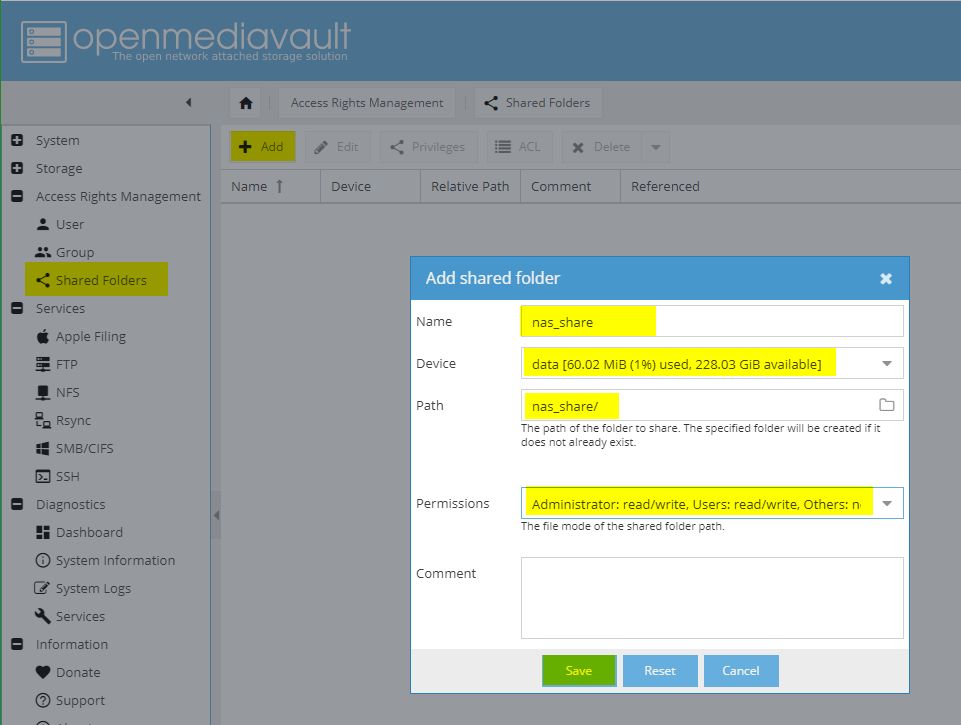
Create Shared Folders
- Click on the shared folder under Access Right Management Window.
- On the resulting window, click ”Add” to create a new shared folder
- Enter a Name for the new share folder (this name will be connected to other machines)
- Select the Device (your previously created file system) where the shared folder will be created on
- Select or enter the Path of your shared folder
- Set your desired Permissions for this shared folder (more permissions will be set in the next steps)
- Click Save to create the shared folder
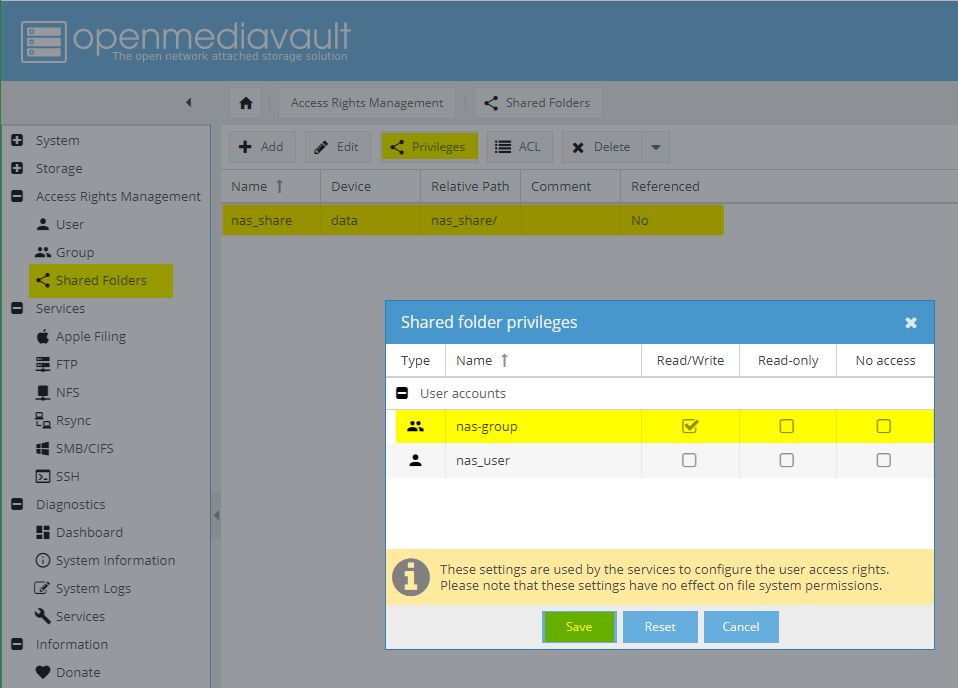
- Click Privileges to set them for users or user groups
- Set your desired privileges to your users or/and groups
- Click Save to save your settings
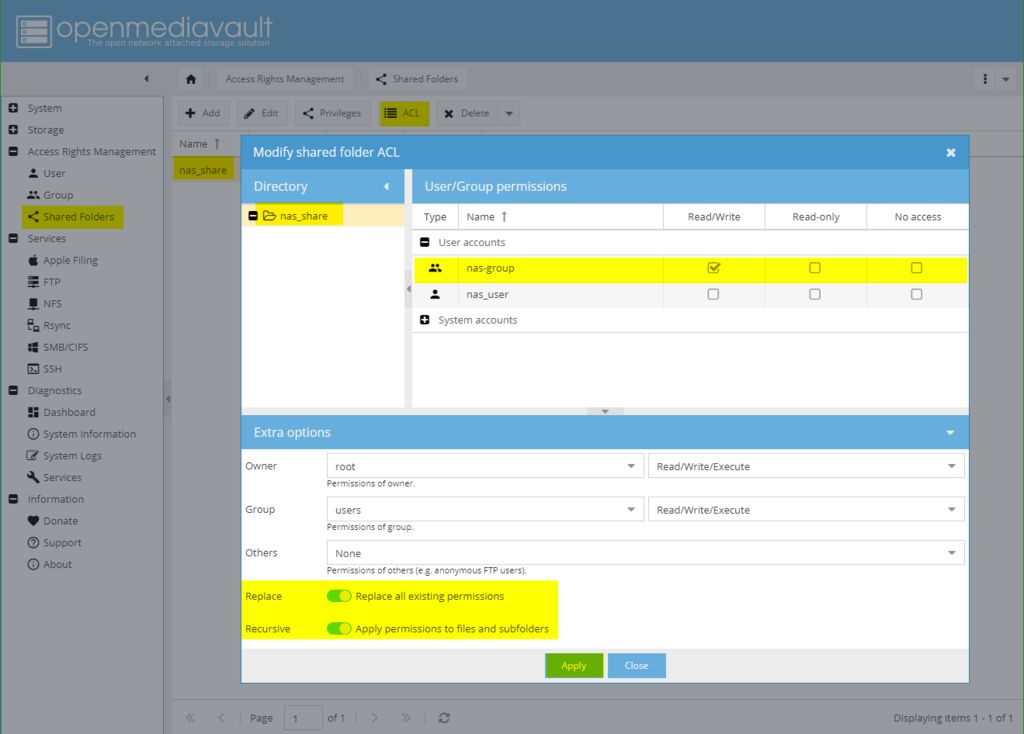
- Click ACL to create a new Access Control List for your shared folder
- Set your desired User/Group permissions (e.g. Read/Write) for your users and groups
- Enable “Replace all existing permission” and “Apply permissions to files and subfolders”
- Click “Apply” to create and apply the ACL
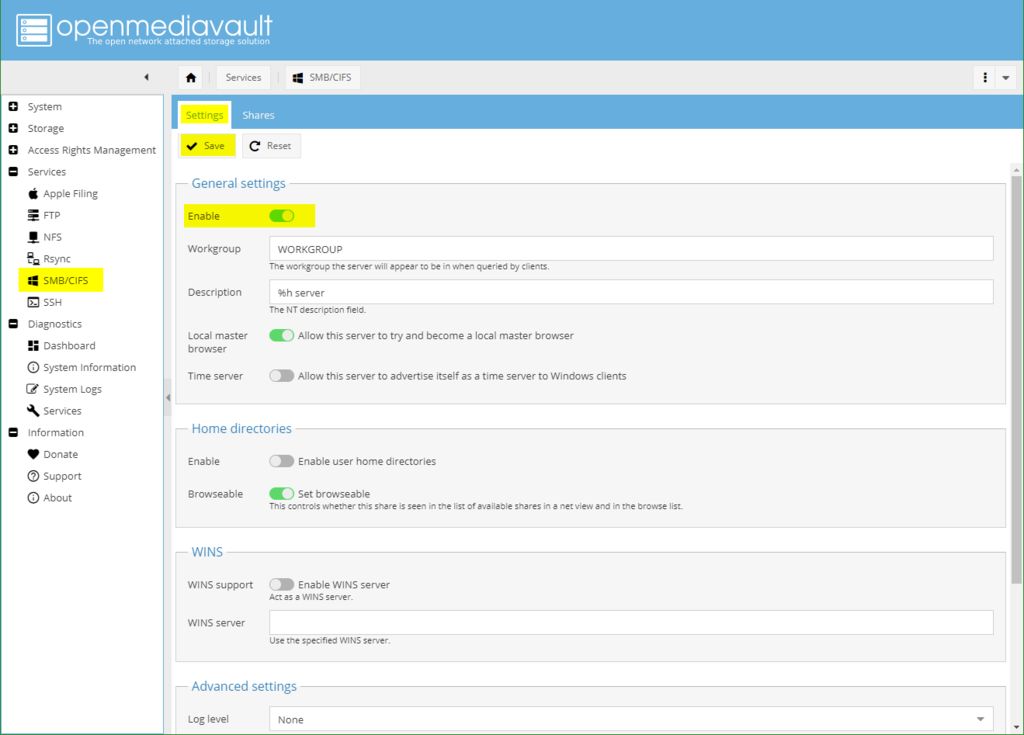
- Finally, we need to configure the Services i.e how your PiNAS is presented to other devices in your network.
SMB/CIFS
Under the services section, we will only be configuring the SMB/CIFS section.
- Expand the Services tab and select SMB/CIFS
- On the resulting page, click the settings tab and enable SMB/CIFS
- Open tab Settings
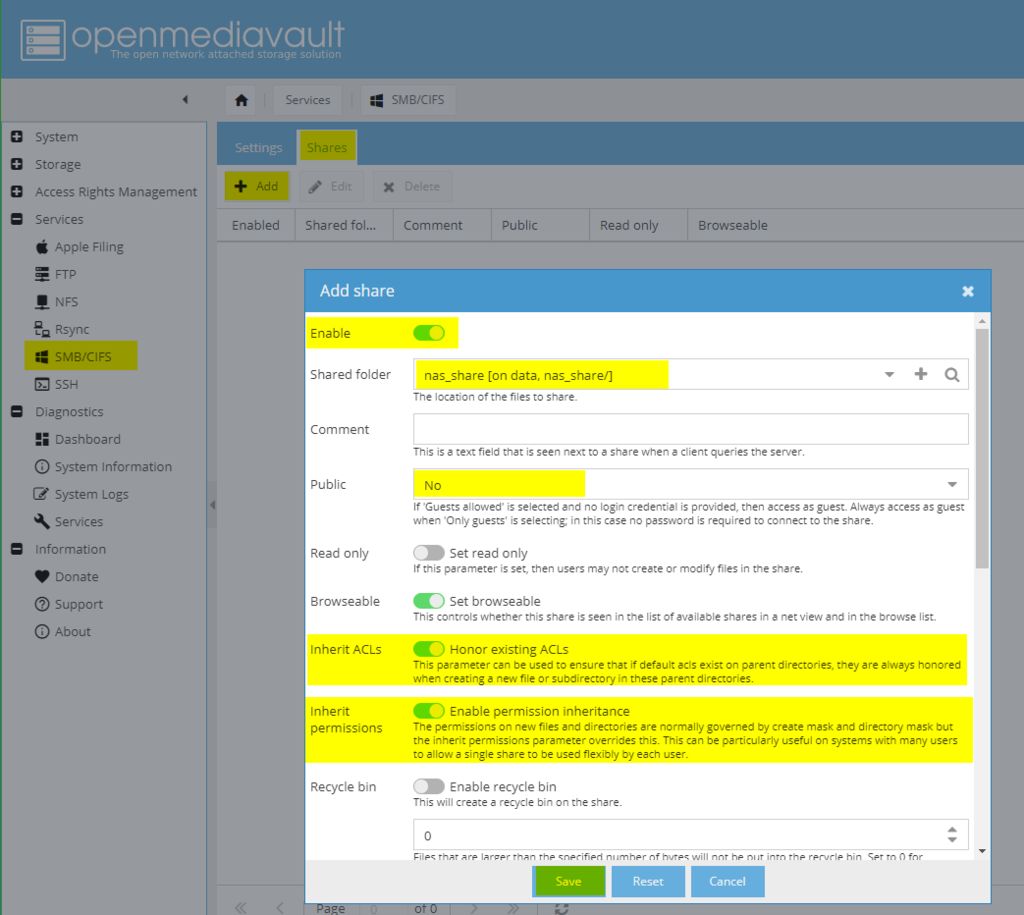
- Next, click on the “Shares” tab and click on the “Add” button to create a new SMB share
- Enable the new share
- Select a shared folder (the one you created before)
- Select if the share will be Public (visibly listed by PiNAS)
- Enable Honor existing ACLs (inherit ACLs)
- Enable permission inheritance
- Finally, click “Save” to create the new SMB share
With all this done, Your PiNAS is now ready for use.
Using the PiNAS
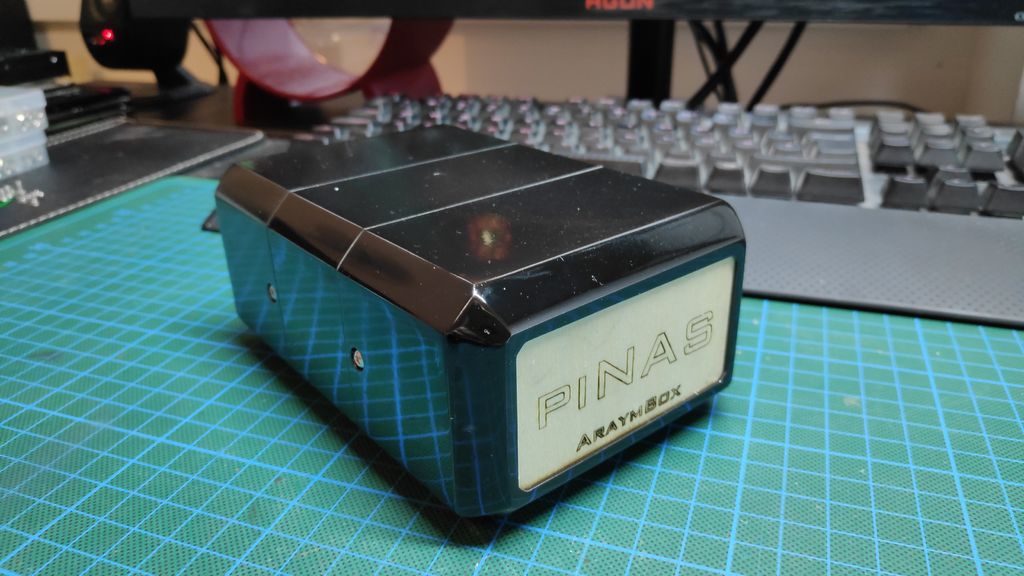
After the configurations, you can now go ahead and fully enclose the PiNAS. It should look like the image below.
To use the PiNAS with your PC, it is important to connect the PiNAS share to your computer.
Follow the steps below to do this.
- Press the Windows button on your keyboard, type cmd and press Enter. A Windows command prompt should pop up.
- Type the following command to connect the PiNAS share:
net use N: \\PiNAS\nas_share
- The command prompt should now ask you for a username to authenticate with. Enter the PiNAS username nas_user.
- Now the command prompt wants the password for nas_user – type it in and hit Enter.
- The command prompt should say something like The command completed successfully.
With this done, you should now see a new group; Network Location, when you open an instance of the Window Explorer.
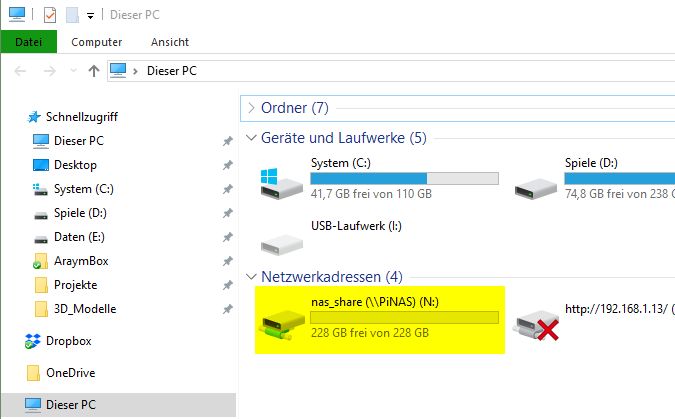
The new group will contain all your mapped network folders – just like the connected nas_share, and you should now be able to drag and drop data to this drive and back it up on the two mirrored disks of the PiNAS.
That’s it for this tutorial. Feel free to explore and add more features to the project.
Project Credits: Aramybox