IoT: Log Sensor Data to Google Sheets using NodeMCU
Data is regarded as the major value proposition of IoT. The ability to receive real time data from different sources, store it and process it into actionable insights to transform and optimize processes either in real time or not is of immense value.
Data is regarded as the major value proposition of IoT. The ability to receive real time data from different sources, store it and process it into actionable insights to transform and optimize processes either in real time or not is of immense value. This is one of the reasons why device cloud is one of the most important (and sometimes most expensive) part of the architecture of any IoT solution/Project, since the data must be stored in a place where it can be readily accessed for further analysis. For individuals looking to deploy pilots and prototypes of scalable projects on a budget, coughing up the huge sums required for data storage on platforms like Azure, can be quite the burden, and while there are tons of free IoT platforms that can be used, they sometimes have one restriction or the other that makes them not suitable in certain situations. For today’s tutorial, we will look at a cheap/free alternative way to store your data in the cloud. We will look at how you can connect your IoT based devices to Google Sheet so to be able to log data.

Google sheet is most commonly used in place of Microsoft Excel to develop spreadsheet documents. It provides a good way to store or process data in spreadsheet form and it can be integrated with dozens of other services provided by Google like Maps, to create truly innovative solutions. Through APIs and the use of Google script (Gscript), Google made it easy for developers to programmatically fill in data into a google sheet thus making it easy to build solutions using their services and this is what we will use for this tutorial..
As an example to show the use of Google Sheets as the device cloud, we will build a simple temperature and humidity based IoT weather monitor. The device will obtain temperature and humidity from the environment using DHT11 and upload the data over WiFi to a Google Sheet file.
Ready? let’s jump in.
Required Components
The following components are required to build this project;
- ESP8266 NodeMCU
- DHT11 Temperature and Humidity Sensor
- LED
- Jumper wires
- Bread Board
The nodeMCU is being used because of its popularity and robust WiFi implementation. Any of the other ESP-12e based boards can also be used without much modification to the setup and code.
Schematics
The schematics for this project is quite straight forward. We only need to connect the LED and DHT to the Nodemcu as shown in the image below.
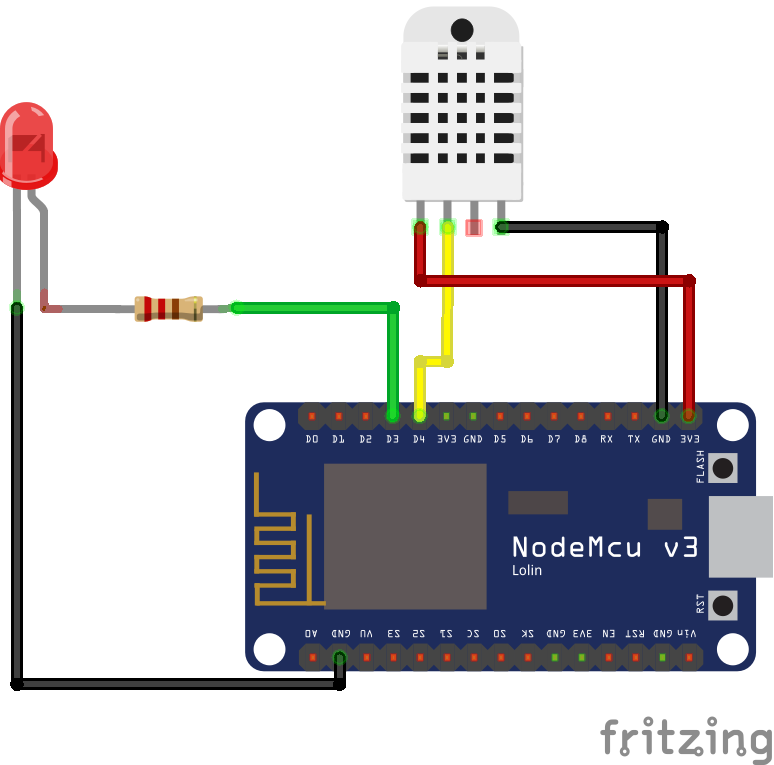
The pin to pin map of the connection between the NodeMCU and the DHT is also illustrated below to make things clearer.
NodeMCU - DHT
3.3V - VCC
GND -  GND
A0 - DO
Go over the connection to ensure everything is as it should be before proceeding to the next section.
Creating and Preparing the Google Sheet.
To send data to a google sheet, we need to first create the sheet and then prepare it to receive data from the device by creating a Gscript (Google Script) to tie the sheet to our device.
Follow the steps below to do this:
1. Point your web browser to docs.google.com.You might need to sign in to your google account or create a new one before you can access the link.
2. When the page opens, click on the menu button and select the Google sheet from the drop-down of applications.
3. The above will launch a new page where you can choose the option of creating a new sheet.
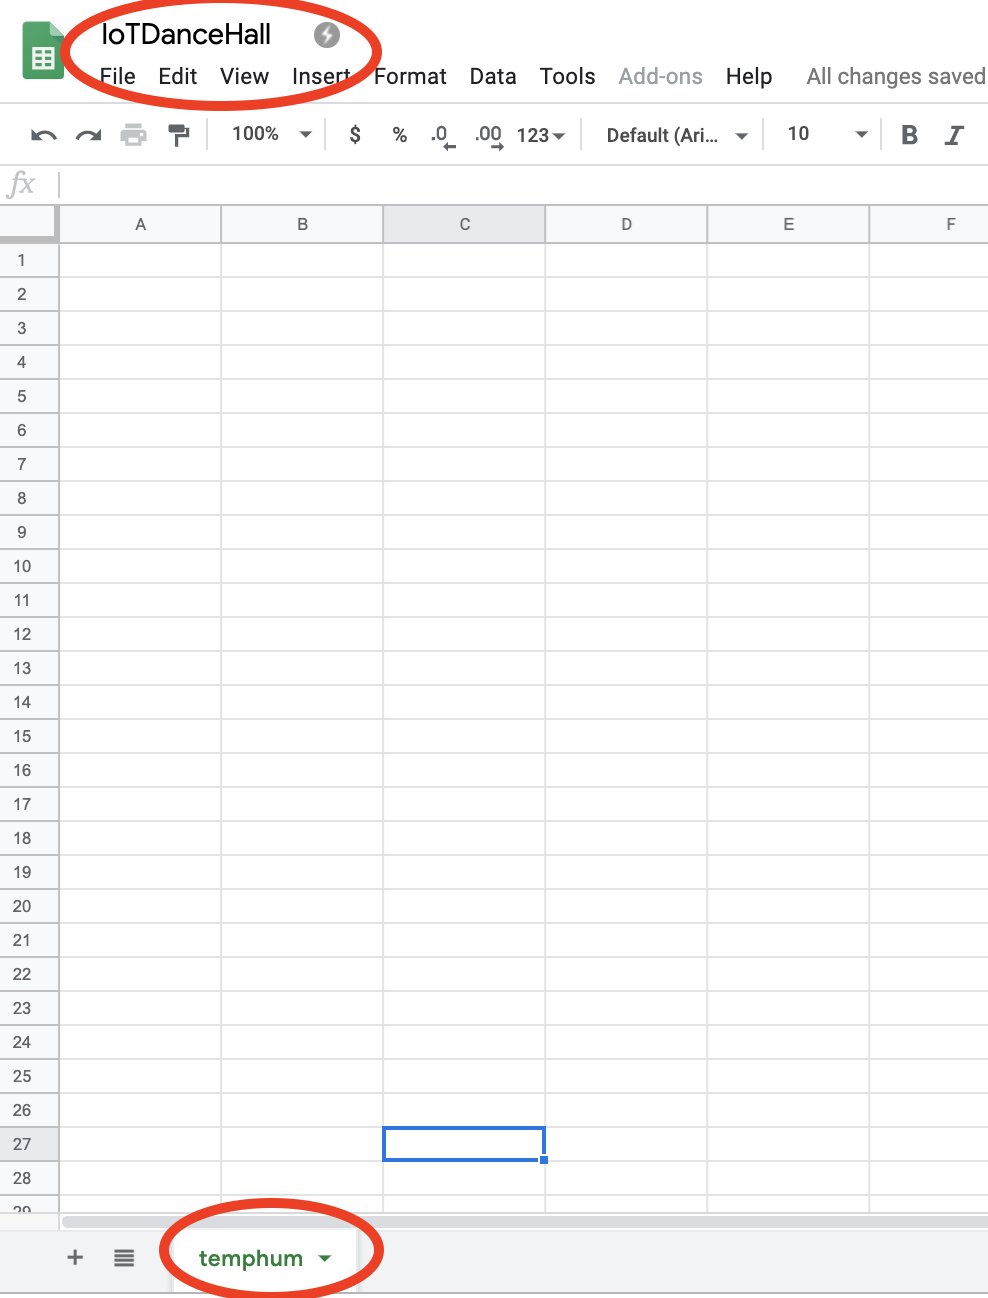
4. When the new Spreadsheet opens, Give it a name (Document title) that is easy to reference. Under every GoogleSheet document you can create multiple sheets, but for this project, we will only use the default sheet 1, also change the sheet name to something that resonates with you. In my case, the document title is IoTDanceHall while the sheet is name temphum.
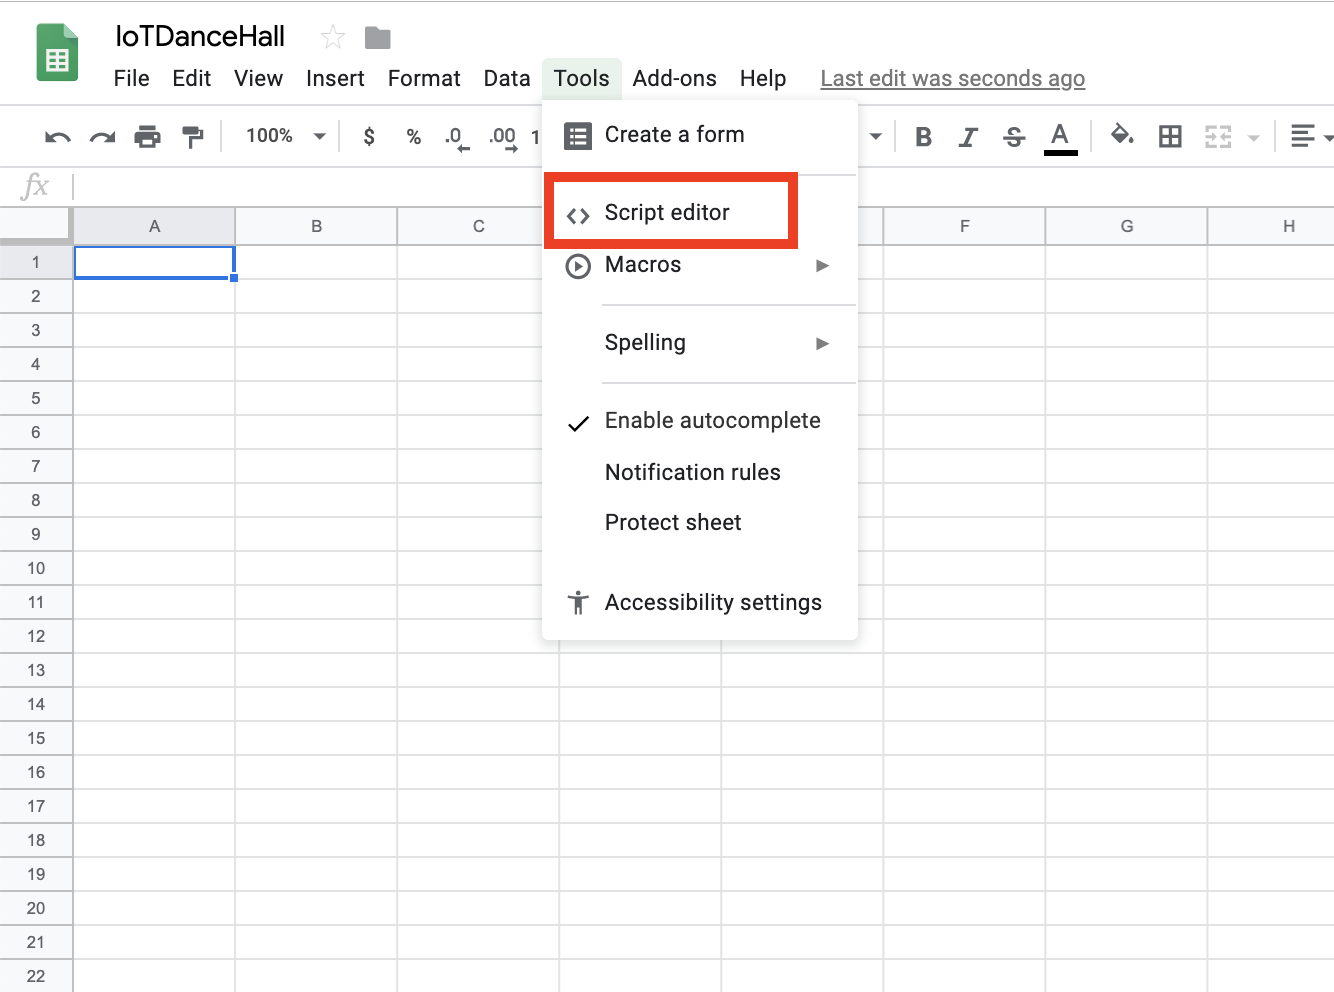
5. With the sheet created and the names changed, it is now time to create the google sheet file for the project. Go to Tools on the menu bar and select script editor as shown in the image below.
6. It will launch a new tab which will open the Google Script Editor. Rename the Google script file to a name you can relate with. For this tutorial, I will be calling the file “temphum_log“.
7. Next, we will borrow the script developed by Sujay which uses the google calendar to create blanks on a designated google sheet for the data being sent from the device to fill, making it easy to read and write to a GoogleSheet. The script is attached under the download section. Copy the script content and paste in the editor.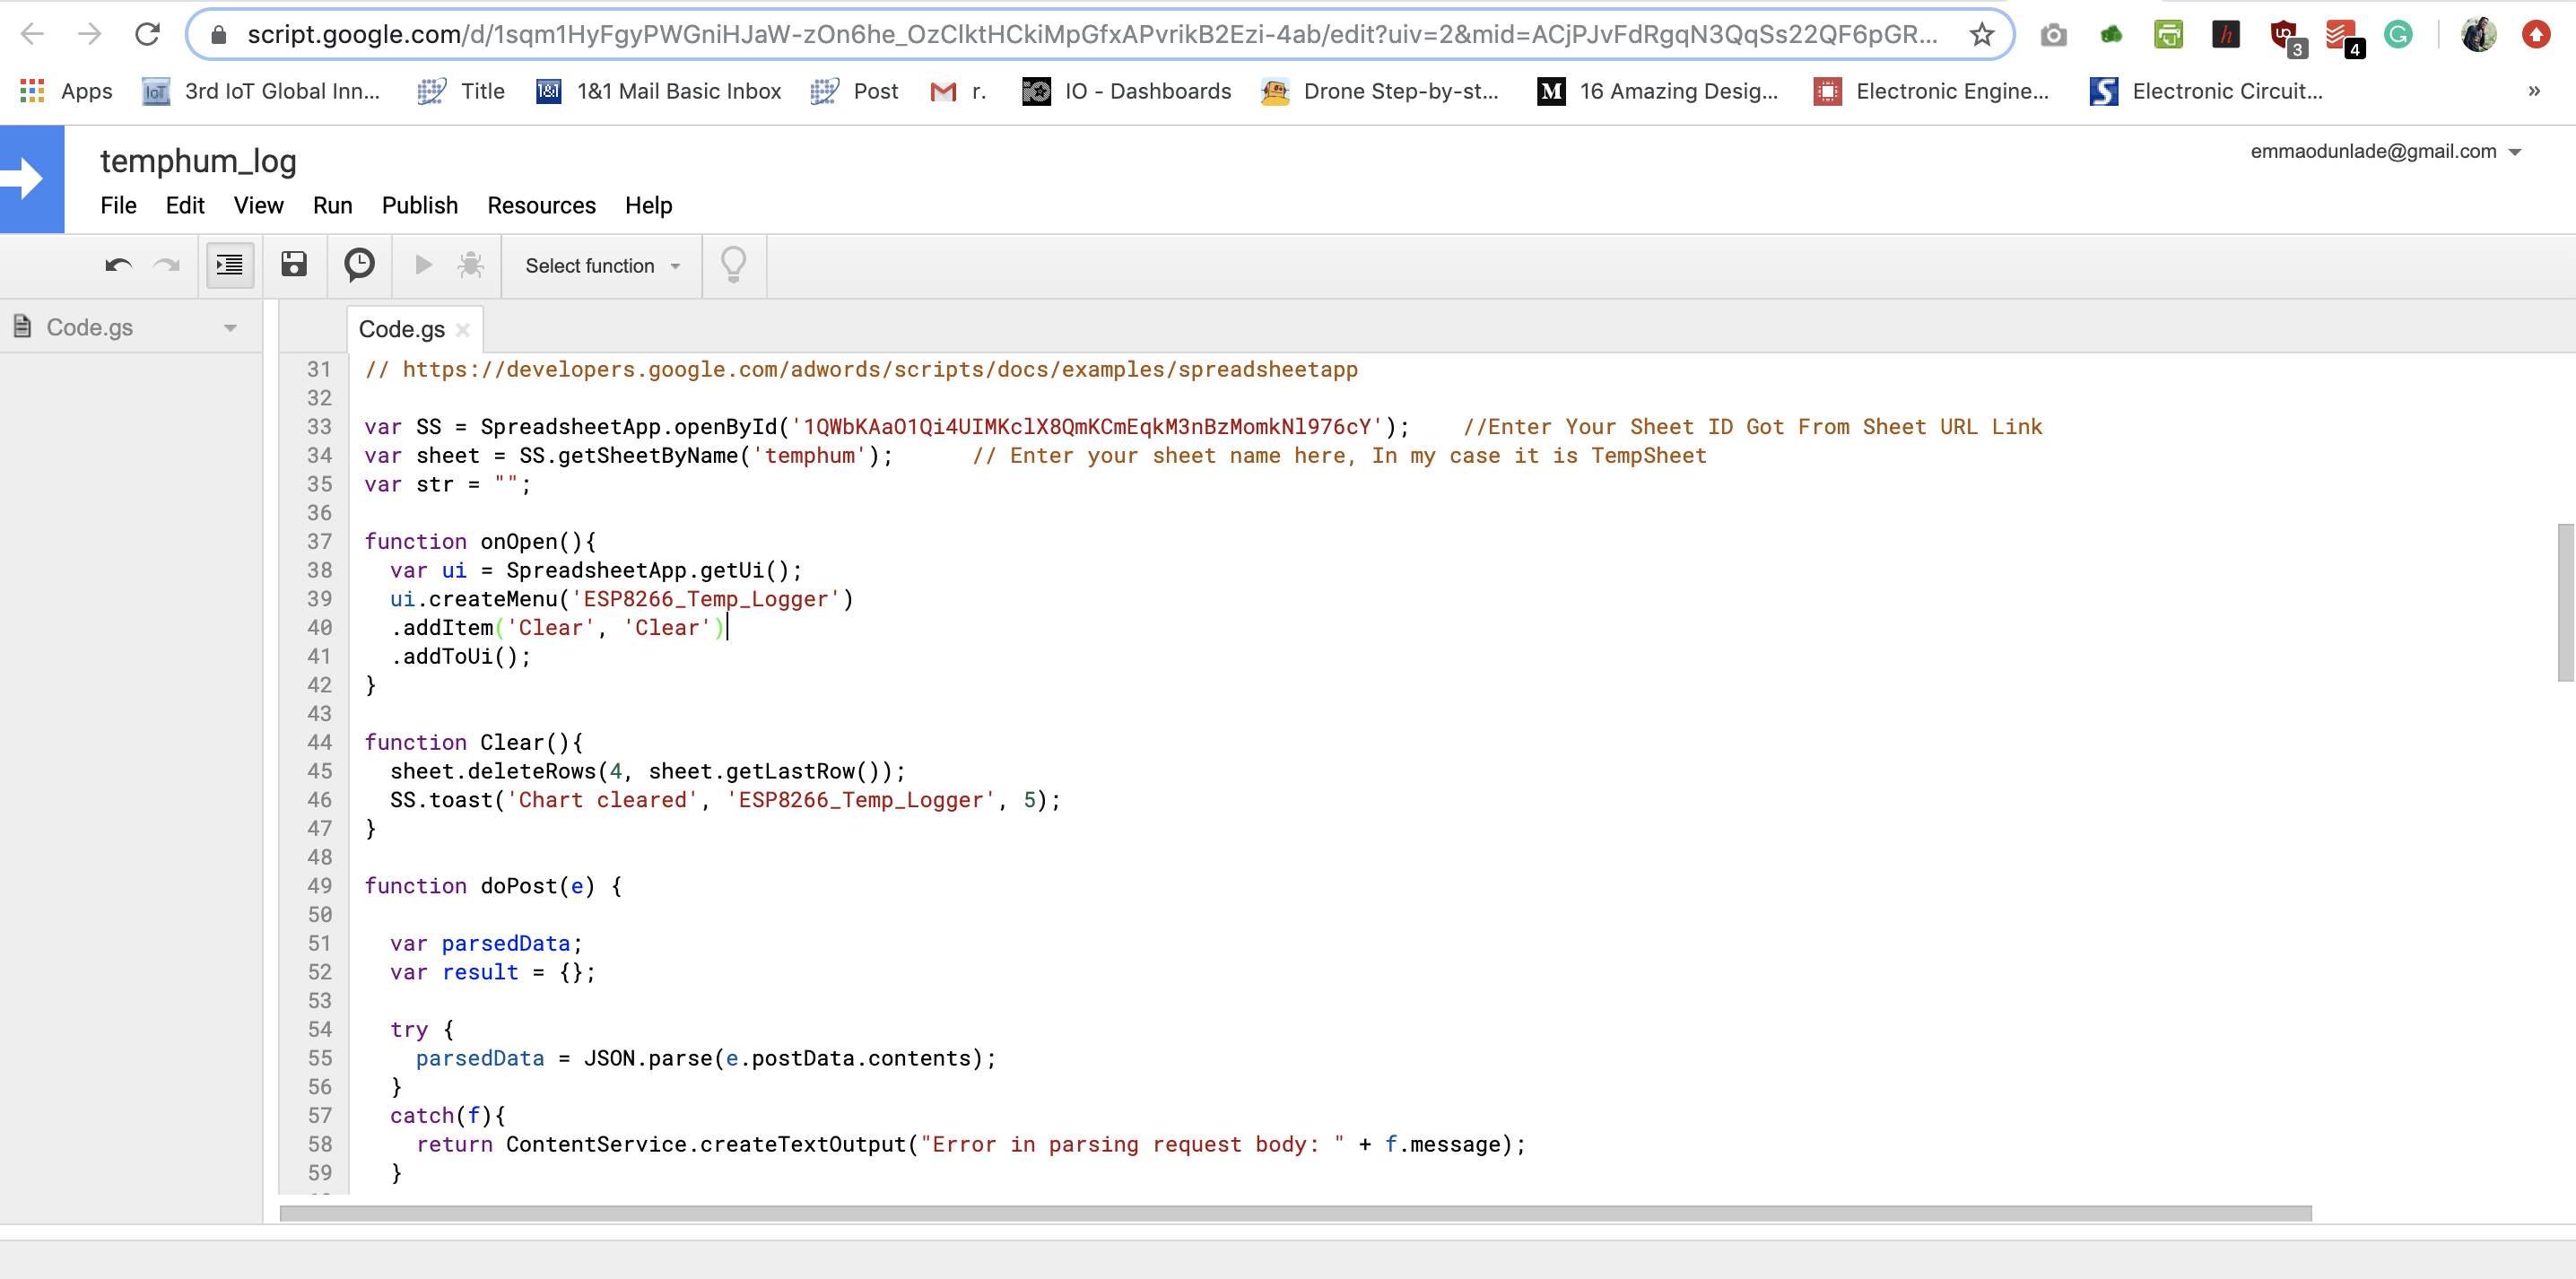 8. Edit the sheet name and sheet ID in the code to match with your own sheet name (which is “temphum” in my case ) and your own sheet ID.
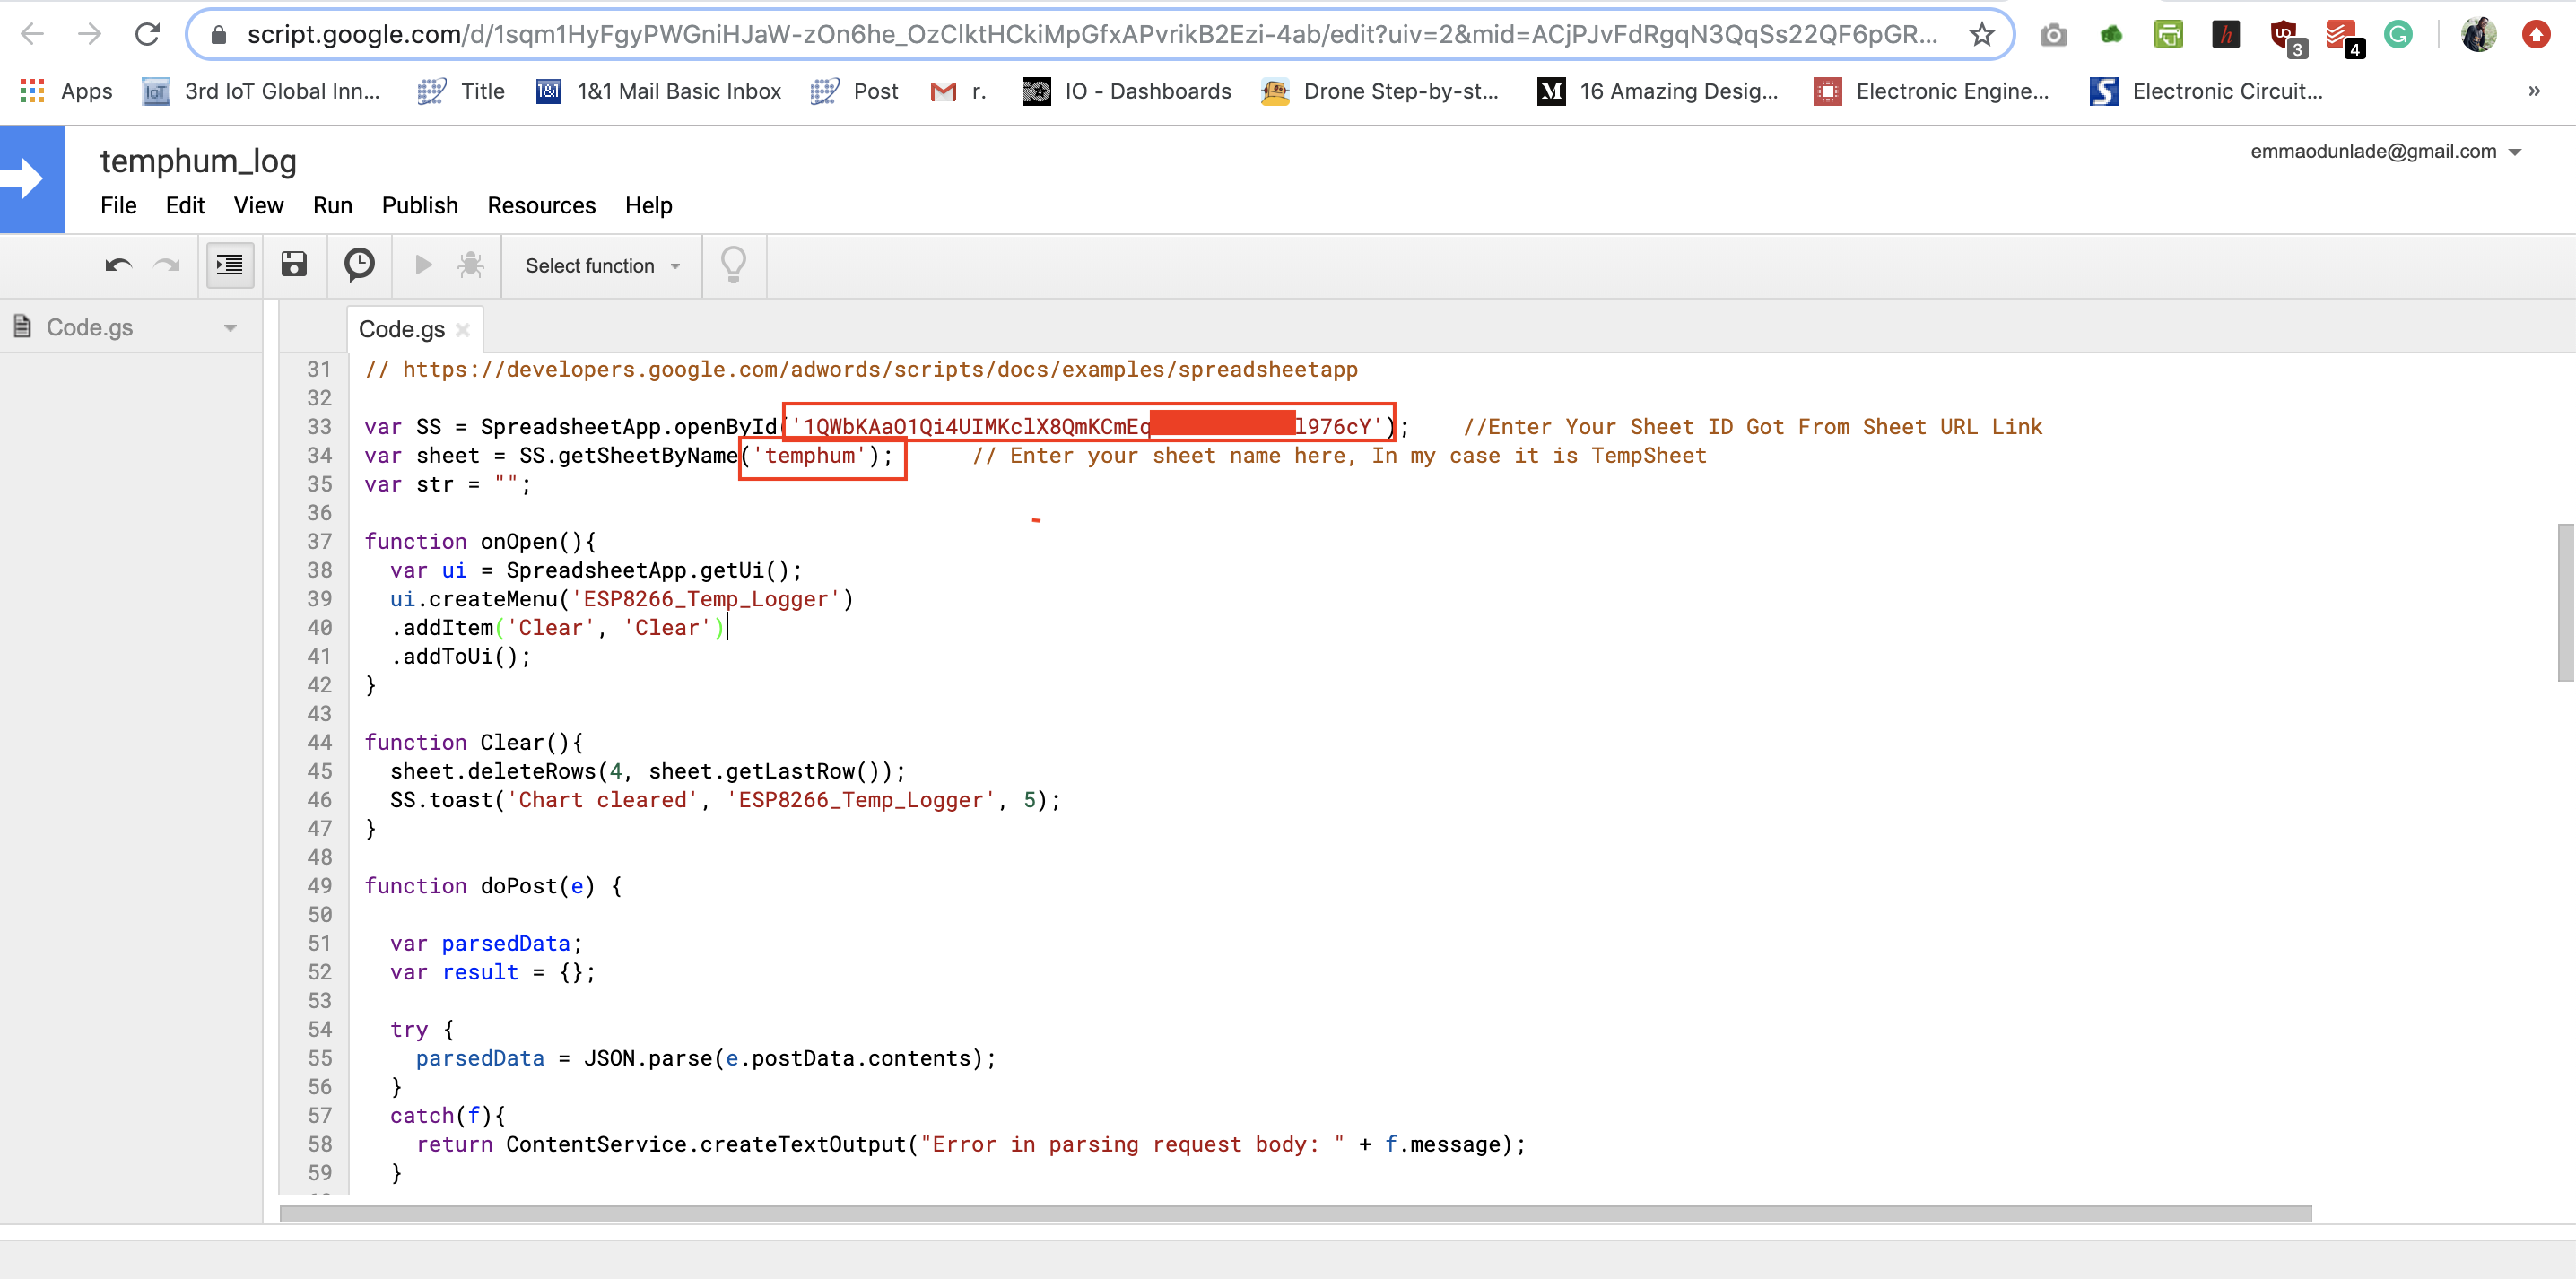
Your sheet ID is part of your sheet URL. It occupies the position between the backslash after “d” and the one before “edit” highlighted below in the URL

Double-check it before pasting to ensure nothing was omitted as the script will not be able to interact with your sheet if the ID is incorrect. Also Keep this ID safe for future use.
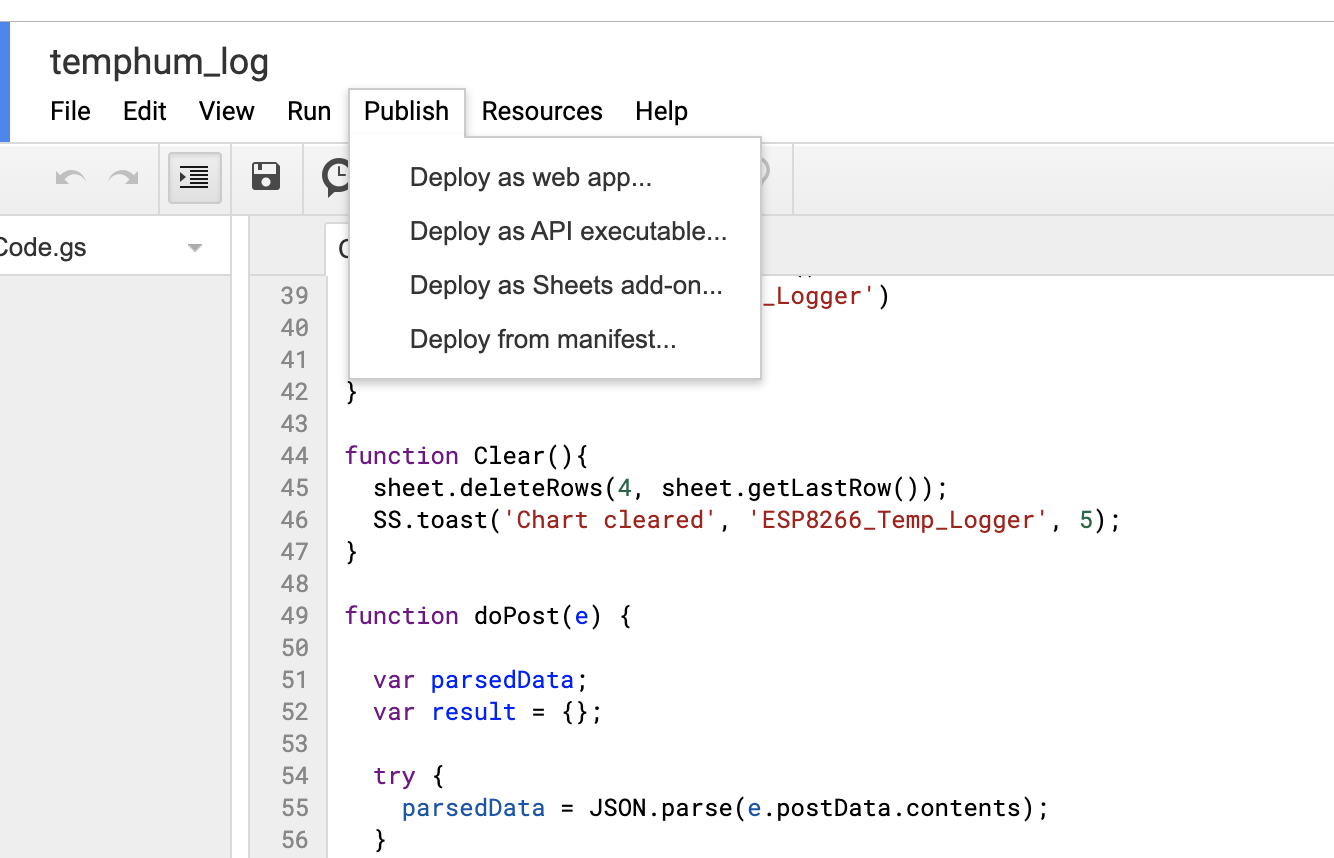
9. With the Gscript editing complete, click on the publish button on the top tool bar and select “deploy as web app” from the drop down.
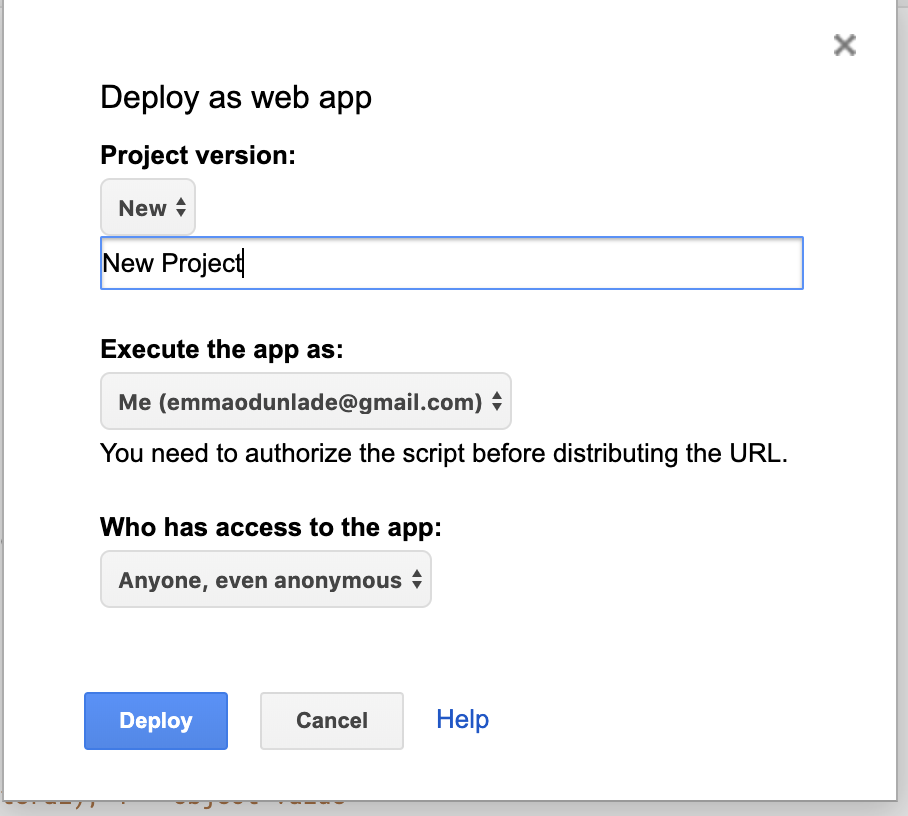
10. It will launch an interface where you will need to fill a bunch of information. Fill as shown in the image below with the Project version set to new, your email ID selected, and given anyone, even anonymous access to the app. With that done, click on the deploy button.
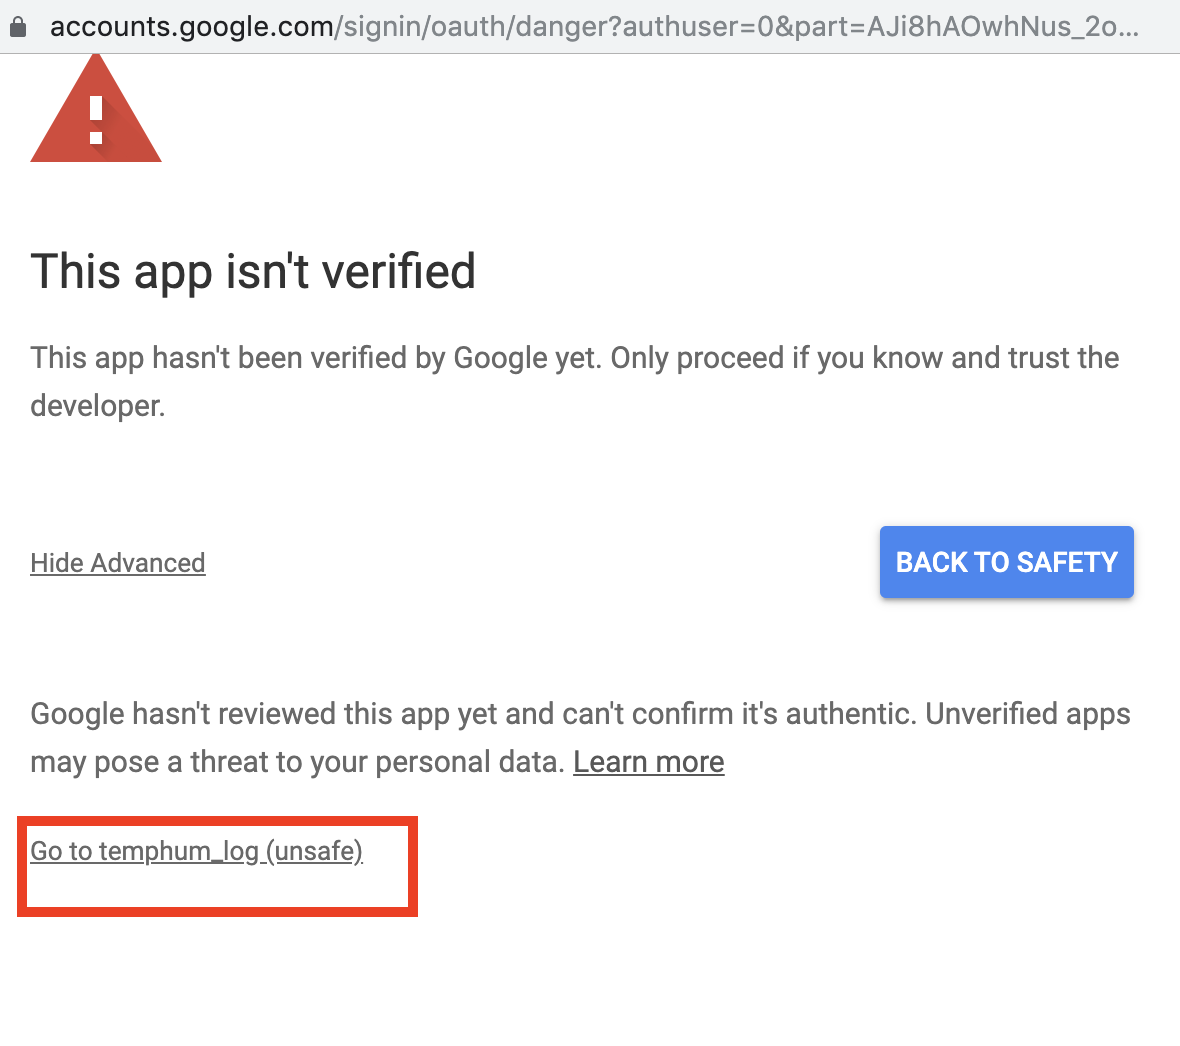
11. Deploying will require that you give the script some permissions. Click on review permissions when prompted. Since the script is not a verified google app, it will throw a warning as shown below. Review this by clicking the advanced button in the image below.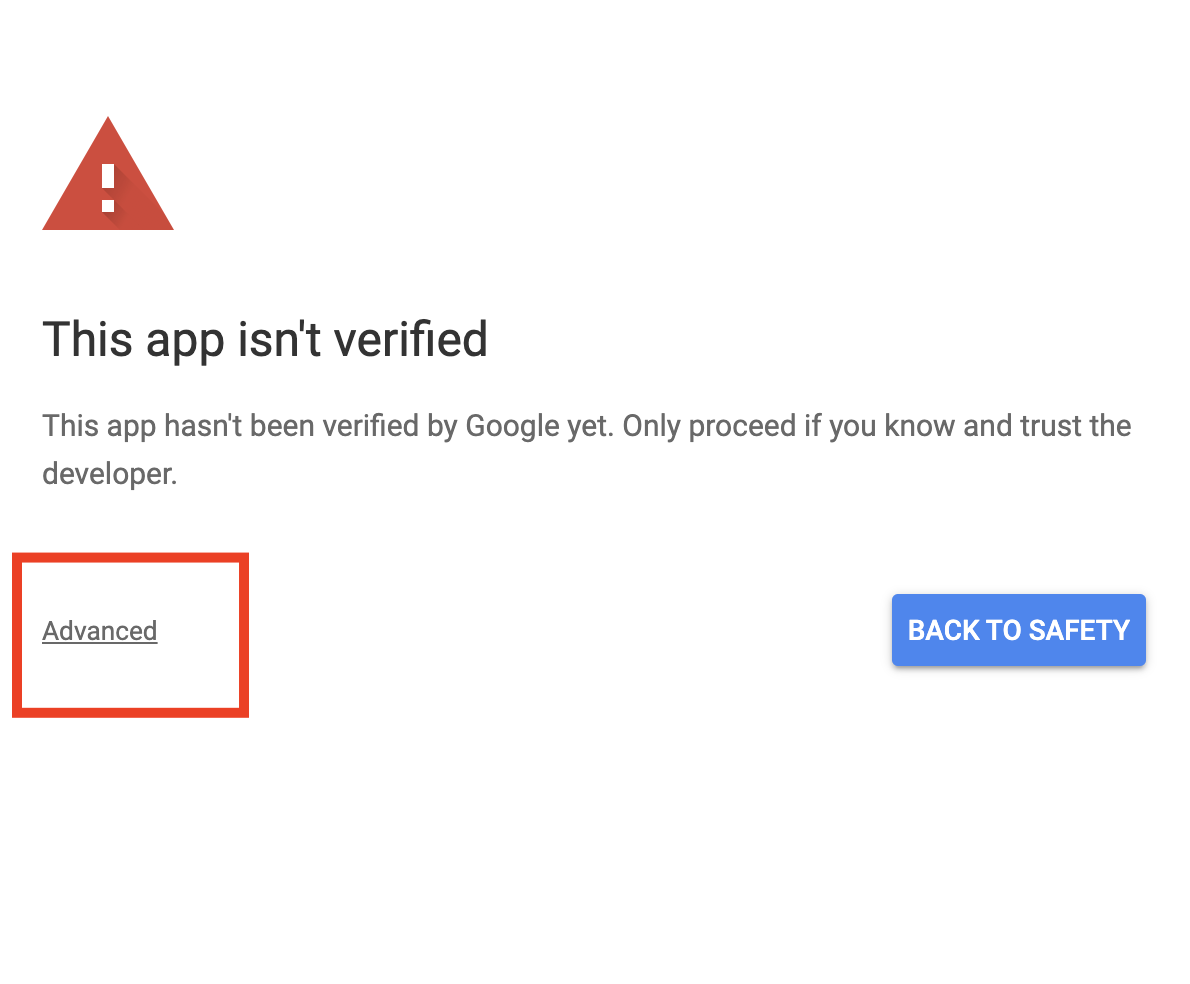
12. Proceed by clicking the goto “your script name”(unsafe) button highlighted below.
13. Ascribe permissions to the script and allow its connection to your google account and the google sheet we created, by clicking on the allow button.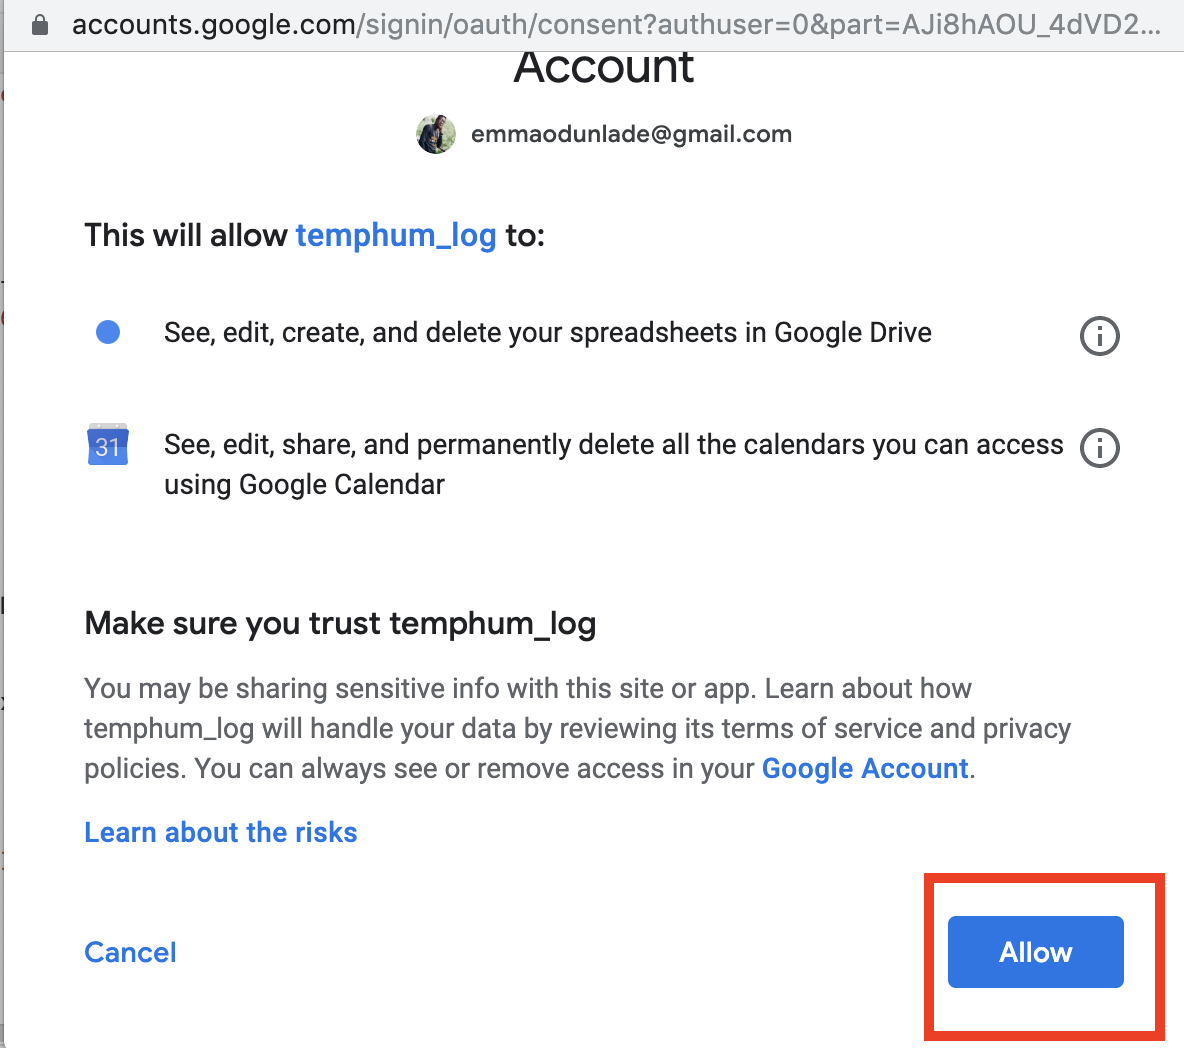
Click on allow button to connect script.
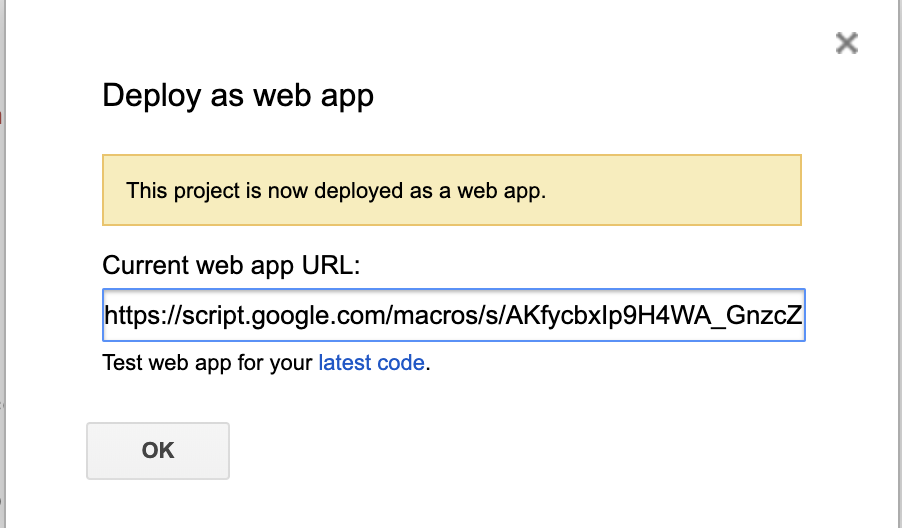
14. With this done you should now see the success page. It will provide you with the web app URL. Copy this URL and keep safe as the script ID embedded in the web app URL will be used by the Arduino code to access the google sheet.
With this done, we are now ready to write the code for our ESP8266.
Code
The algorithm behind the sketch for today’s project is quite straightforward, but the implementation, to someone not familiar with https and JSON, might require some level of practice. The main task of the code is to obtain temperature and humidity data from the DHT11 and forward the data to the google sheet via WiFi connection to the internet.
We will develop the code for today’s project using the Arduino IDE as such, if this is the first time you are developing a sketch for the Nodemcu with the Arduino IDE, you will need to install the ESP8266 board support files for the Arduino IDE. For some help on getting that done, check out this tutorial we did on the topic a while back.
To simplify the code and reduce the amount of work that needs to be done, we will use 4 major libraries including; the ESP8266WiFi library, the HTTPSRedirect library, the DebugMacros which is part of the HTTPSRedirect library, and the DHT library. The ESP8266WiFi library is installed when the ESP8266 board support files are installed for the Arduino IDE. It provides an easy way for users to access the robust WiFi implementation on the NodeMCU. The HTTPSRedirect library is based on the Wifi library. It provides the user with feature rich easy of communicating with servers via http or https. One of the requirements for HTTPS communication is connection certificates or in this case SHA-1 fingerprints of the websites. The debug macros library helps store and process request in that line. Finally, ther is the DHT library. It is used to facilitate easy interaction with the DHT11 to pull the temperature and humidity data with few lines of code.
As usual, I will do a “run through” of the code explaining the parts I feel might be new or difficult to grab.
We start the sketch, as usual, by including the libraries that will be used, followed by the declaration of the pin of the NodeMCU to which the DHT11 is connected and the creation of an instance of the DHT library.
#include <ESP8266WiFi.h>
#include "HTTPSRedirect.h"
#include "DebugMacros.h"
#include <DHT.h>

#define DHTPIN D4                   // Pin to which DHT is connected
#define DHTTYPE DHT11               // Declare DHT Type
DHT dht(DHTPIN, DHTTYPE);
Next, define variables that will be used to store temperature and humidity data after which we provide the credentials of the WiFi (router) through which our device is meant to access the internet.
float h;
float t;
String sheetHumid = "";
String sheetTemp = "";

const char* ssid = " ";                //Put wifi ssid within the quotes
const char* password = " ";         //Put WiFi password within the quotes
Next, we create variables to hold several google server credentials including the host address, the Gscript ID we obtained earlier and the port number which is usually 443 for https.
const char* host = "script.google.com";
const char *GScriptId = "enter your GSCript ID here"; // Replace with your own google script id
const int httpsPort = 443; //the https port is same
Next we define the URL to the Google Sheet where the data will be written, using the Gscript ID as the reference. After that we create a payload with formatted in JSON to specify how the data should be sent to the google sheet.
// echo | openssl s_client -connect script.google.com:443 |& openssl x509 -fingerprint -noout
const char* fingerprint = "";

//const uint8_t fingerprint[20] = {};

String url = String("/macros/s/") + GScriptId + "/exec?value=Temperature";  // Write Teperature to Google Spreadsheet at cell A1
// Fetch Google Calendar events for 1 week ahead
String url2 = String("/macros/s/") + GScriptId + "/exec?cal";  // Write to Cell A continuosly

//replace with sheet name not with spreadsheet file name taken from google
String payload_base =  "{\"command\": \"appendRow\", \
                    \"sheet_name\": \"temphum\", \
                       \"values\": ";
String payload = "";
With that done, we then create an Https client which will be managing all the connections and move to the void setup() function.
HTTPSRedirect* client = nullptr;
We start the void setup by initializing serial communication to enable us use the serial monitor for debugging.
void setup() {
  delay(1000);
  Serial.begin(115200);
Next, we initialize the DHT and initiate WiFi connection to the access point provided.
dht.begin();     //initialise DHT11

Serial.println();
Serial.print("Connecting to wifi: ");
Serial.println(ssid);

WiFi.begin(ssid, password);
while (WiFi.status() != WL_CONNECTED) {
  delay(500);
  Serial.print(".");
}
Serial.println("");
Serial.println("WiFi connected");
Serial.println("IP address: ");
Serial.println(WiFi.localIP());
Next, we create a client using the httpsredirect library for connection purposes. One notable thing done within this block of code is that we set the security status of the connection as insecure. This is to enable us connect without necessarily verifying the certificate of the server. The connection is retried severally and its status is displayed on the serial monitor for debug purposes.
// Use HTTPSRedirect class to create a new TLS connection
client = new HTTPSRedirect(httpsPort);
client->setInsecure();
client->setPrintResponseBody(true);
client->setContentTypeHeader("application/json");
Serial.print("Connecting to ");
Serial.println(host);          //try to connect with "script.google.com"

// Try to connect for a maximum of 5 times then exit
bool flag = false;
for (int i = 0; i < 5; i++) {
  int retval = client->connect(host, httpsPort);
  if (retval == 1) {
    flag = true;
    break;
  }
  else
    Serial.println("Connection failed. Retrying...");
}

if (!flag) {
  Serial.print("Could not connect to server: ");
  Serial.println(host);
  Serial.println("Exiting...");
  return;
}
If the connection is successful, the client fetches the spreadsheet details as well as the google calendar details to know which row was data last updated to. The buffer is then cleared by deleting the client to reduce the amount of memory being used.
  Serial.println("\nWrite into cell 'A1'");
  Serial.println("------>");
  // fetch spreadsheet data
  client->GET(url, host);

  Serial.println("\nGET: Fetch Google Calendar Data:");
  Serial.println("------>");
  // fetch spreadsheet data
  client->GET(url2, host);

 Serial.println("\nStart Sending Sensor Data to Google Spreadsheet");


  // delete HTTPSRedirect object
  delete client;
  client = nullptr;
}
Next, we move to the void loop() function.
We start the function by obtaining temperature and humidity information from the DHT, checking to see if there is any error in the Data and displaying the data obtained on the serial monitor.
h = dht.readHumidity();                                              // Reading temperature or humidity takes about 250 milliseconds!
 t = dht.readTemperature();                                           // Read temperature as Celsius (the default)
 if (isnan(h) || isnan(t)) {                                                // Check if any reads failed and exit early (to try again).
   Serial.println(F("Failed to read from DHT sensor!"));
   return;
 }
 Serial.print("Humidity: ");  Serial.print(h);
 sheetHumid = String(h) + String("%");                                         //convert integer humidity to string humidity
 Serial.print("%  Temperature: ");  Serial.print(t);  Serial.println("°C ");
 sheetTemp = String(t) + String("°C");
Next, we create connection session variables and add the data obtained from the DHT to the header payload.
static int error_count = 0;
  static int connect_count = 0;
  const unsigned int MAX_CONNECT = 20;
  static bool flag = false;

  payload = payload_base + "\"" + sheetTemp + "," + sheetHumid + "\"}";
The client is created, connected to the host and the new payload is uploaded to the google sheet. If any error is detected, the system retries for 3 times after which it clears its buffer and automatically restarts the Nodemcu by triggering the watchdog timer.
if (!flag) {
  client = new HTTPSRedirect(httpsPort);
  client->setInsecure();
  flag = true;
  client->setPrintResponseBody(true);
  client->setContentTypeHeader("application/json");
}

if (client != nullptr) {
  if (!client->connected()) {
    client->connect(host, httpsPort);
    client->POST(url2, host, payload, false);
    Serial.print("Sent : ");  Serial.println("Temp and Humid");
  }
}
else {
  DPRINTLN("Error creating client object!");
  error_count = 5;
}

if (connect_count > MAX_CONNECT) {
  connect_count = 0;
  flag = false;
  delete client;
  return;
}

Serial.println("POST or SEND Sensor data to Google Spreadsheet:");
if (client->POST(url2, host, payload)) {
  ;
}
else {
  ++error_count;
  DPRINT("Error-count while connecting: ");
  DPRINTLN(error_count);
}

if (error_count > 3) {
  Serial.println("Halting processor...");
  delete client;
  client = nullptr;
  Serial.printf("Final free heap: %u\n", ESP.getFreeHeap());
  Serial.printf("Final stack: %u\n", ESP.getFreeContStack());
  Serial.flush();
  ESP.deepSleep(0);
}
A delay of 2 seconds is provided at the end of the code to give a breather to the DHT as specified in its datasheet.
  delay(2000);    // keep delay of minimum 2 seconds as dht allow reading after 2 seconds interval and also for google sheet
}
The code runs in a loop so whenever a new data is provided by the DHT, it Is uploaded to the google sheet.
The complete code for the project is provided below and attached under the download section.
#include <ESP8266WiFi.h>
#include "HTTPSRedirect.h"
#include "DebugMacros.h"
#include <DHT.h>

#define DHTPIN D4                                                           // what digital pin we're connected to
#define DHTTYPE DHT11                                                       // select dht type as DHT 11 or DHT22
DHT dht(DHTPIN, DHTTYPE);

float h;
float t;
String sheetHumid = "";
String sheetTemp = "";

const char* ssid = " ";                //Put wifi ssid within the quotes
const char* password = " ";         //Put WiFi password within the quotes

const char* host = "script.google.com";
const char *GScriptId = "enter your GSCript ID here"; // Replace with your own google script id
const int httpsPort = 443; //the https port is same

// echo | openssl s_client -connect script.google.com:443 |& openssl x509 -fingerprint -noout
const char* fingerprint = "";

//const uint8_t fingerprint[20] = {};

String url = String("/macros/s/") + GScriptId + "/exec?value=Temperature";  // Write Teperature to Google Spreadsheet at cell A1
// Fetch Google Calendar events for 1 week ahead
String url2 = String("/macros/s/") + GScriptId + "/exec?cal";  // Write to Cell A continuosly

//replace with sheet name not with spreadsheet file name taken from google
String payload_base =  "{\"command\": \"appendRow\", \
                    \"sheet_name\": \"temphum\", \
                       \"values\": ";
String payload = "";

HTTPSRedirect* client = nullptr;

// used to store the values of free stack and heap before the HTTPSRedirect object is instantiated
// so that they can be written to Google sheets upon instantiation

void setup() {
  delay(1000);
  Serial.begin(115200);
  dht.begin();     //initialise DHT11

  Serial.println();
  Serial.print("Connecting to wifi: ");
  Serial.println(ssid);

  WiFi.begin(ssid, password);
  while (WiFi.status() != WL_CONNECTED) {
    delay(500);
    Serial.print(".");
  }
  Serial.println("");
  Serial.println("WiFi connected");
  Serial.println("IP address: ");
  Serial.println(WiFi.localIP());

  // Use HTTPSRedirect class to create a new TLS connection
  client = new HTTPSRedirect(httpsPort);
  client->setInsecure();
  client->setPrintResponseBody(true);
  client->setContentTypeHeader("application/json");
  Serial.print("Connecting to ");
  Serial.println(host);          //try to connect with "script.google.com"

  // Try to connect for a maximum of 5 times then exit
  bool flag = false;
  for (int i = 0; i < 5; i++) {
    int retval = client->connect(host, httpsPort);
    if (retval == 1) {
      flag = true;
      break;
    }
    else
      Serial.println("Connection failed. Retrying...");
  }

  if (!flag) {
    Serial.print("Could not connect to server: ");
    Serial.println(host);
    Serial.println("Exiting...");
    return;
  }
// Finish setup() function in 1s since it will fire watchdog timer and will reset the chip.
//So avoid too many requests in setup()

  Serial.println("\nWrite into cell 'A1'");
  Serial.println("------>");
  // fetch spreadsheet data
  client->GET(url, host);

  Serial.println("\nGET: Fetch Google Calendar Data:");
  Serial.println("------>");
  // fetch spreadsheet data
  client->GET(url2, host);

 Serial.println("\nStart Sending Sensor Data to Google Spreadsheet");


  // delete HTTPSRedirect object
  delete client;
  client = nullptr;
}

void loop() {

  h = dht.readHumidity();                                              // Reading temperature or humidity takes about 250 milliseconds!
  t = dht.readTemperature();                                           // Read temperature as Celsius (the default)
  if (isnan(h) || isnan(t)) {                                                // Check if any reads failed and exit early (to try again).
    Serial.println(F("Failed to read from DHT sensor!"));
    return;
  }
  Serial.print("Humidity: ");  Serial.print(h);
  sheetHumid = String(h) + String("%");                                         //convert integer humidity to string humidity
  Serial.print("%  Temperature: ");  Serial.print(t);  Serial.println("°C ");
  sheetTemp = String(t) + String("°C");

  static int error_count = 0;
  static int connect_count = 0;
  const unsigned int MAX_CONNECT = 20;
  static bool flag = false;

  payload = payload_base + "\"" + sheetTemp + "," + sheetHumid + "\"}";

  if (!flag) {
    client = new HTTPSRedirect(httpsPort);
    client->setInsecure();
    flag = true;
    client->setPrintResponseBody(true);
    client->setContentTypeHeader("application/json");
  }

  if (client != nullptr) {
    if (!client->connected()) {
      client->connect(host, httpsPort);
      client->POST(url2, host, payload, false);
      Serial.print("Sent : ");  Serial.println("Temp and Humid");
    }
  }
  else {
    DPRINTLN("Error creating client object!");
    error_count = 5;
  }

  if (connect_count > MAX_CONNECT) {
    connect_count = 0;
    flag = false;
    delete client;
    return;
  }

  Serial.println("POST or SEND Sensor data to Google Spreadsheet:");
  if (client->POST(url2, host, payload)) {
    ;
  }
  else {
    ++error_count;
    DPRINT("Error-count while connecting: ");
    DPRINTLN(error_count);
  }

  if (error_count > 3) {
    Serial.println("Halting processor...");
    delete client;
    client = nullptr;
    Serial.printf("Final free heap: %u\n", ESP.getFreeHeap());
    Serial.printf("Final stack: %u\n", ESP.getFreeContStack());
    Serial.flush();
    ESP.deepSleep(0);
  }

  delay(2000);    // keep delay of minimum 2 seconds as dht allow reading after 2 seconds interval and also for google sheet
}
Demo
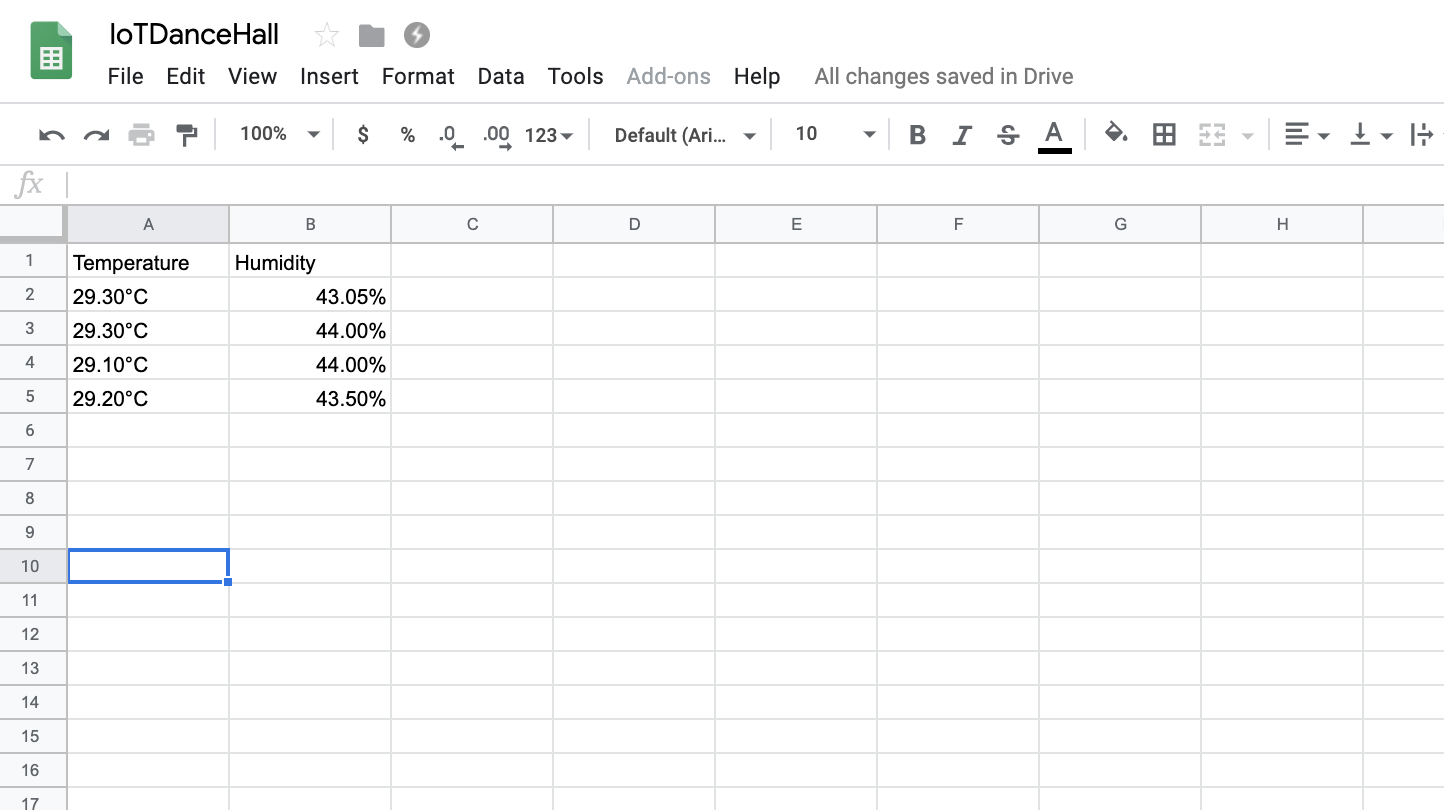
Connect the setup to your computer, launch the Arduino IDE, paste the code, verify and upload to your board. With the upload done, open the serial monitor to ensure the WiFi is connected and there are no issues. Head to the Google sheet, you should now see temperature and humidity data as they stream to the cloud from your device.
To take things further, you can hook up a python script to parse the data being logged on the google sheet and generate all sort of graphs and insights. One other thing you could do is to add location data to the spreadsheet, and display it all on Google map.
That’s it for today’s tutorial guys. Thanks for reading and as usual, feel free to reach out to me via the comment section if you get stuck anywhere.
How to include timestamp with this data in separate column?
For Accuracy, you could connect a DS3231 to the NodeMCU and add that data to the payload line like:
payload = payload_base + “\”” + timestamp + “,” + sheetTemp + “,” + sheetHumid + “\”}”;
Of course this means you would have obtained the time stamp and formated it into a string
00:10:55.730 -> …
00:10:56.713 -> WiFi connected
00:10:56.713 -> IP address:
00:10:56.747 -> 192.168.0.106
00:10:56.747 -> Connecting to script.google.com
00:10:57.801 ->
00:10:57.801 -> Write into cell ‘A1’
00:10:57.801 -> ——>
00:10:57.970 -> Error with request. Response status code: 404
00:10:57.970 ->
00:10:57.970 -> GET: Fetch Google Calendar Data:
00:10:57.970 -> ——>
00:10:58.248 -> Error with request. Response status code: 404
00:10:58.282 ->
00:10:58.282 -> Start Sending Sensor Data to Google Spreadsheet
00:10:58.282 -> Humidity: 64.00% Temperature: 30.90°C
00:10:59.576 -> Error with request. Response status code: 404
00:10:59.576 -> Sent : Temp and Humid
00:10:59.576 -> POST or SEND Sensor data to Google Spreadsheet:
00:10:59.643 -> Error with request. Response status code: 0
00:11:01.676 -> Humidity: 68.00% Temperature: 29.50°C
00:11:01.676 -> POST or SEND Sensor data to Google Spreadsheet:
00:11:01.913 -> Error with request. Response status code: 0
00:11:03.957 -> Humidity: 67.00% Temperature: 29.50°C
00:11:03.957 -> POST or SEND Sensor data to Google Spreadsheet:
00:11:04.125 -> Error with request. Response status code: 404
00:11:06.139 -> Humidity: 67.00% Temperature: 29.60°C
00:11:06.139 -> POST or SEND Sensor data to Google Spreadsheet:
00:11:06.479 -> Error with request. Response status code: 0
00:11:06.479 -> Halting processor…
00:11:06.479 -> Final free heap: 49424
00:11:06.479 -> Final stack: 1280
I also had have same error as you. after change Google Script ID by remain only id string (remove url, remained only ID. Ex. only pasted AKfycbztyMeCrdSmXeypsfbNhAdsafkkQRVkTbI7-x8V0AWZ98kLo and it works !
For all of this, I would like to thanks author for the tutorial.
I was succes with project above,but how to add some colomb,in this project data just wite into A1 and B1 how about write data to C1?
This was a great tutorial. Thanks for sharing
This worked great for me… Is the À in front of ºC intentional?
22:15:58.692 -> Errorebody {background-color: #fff; margin: 0; padding: 0;}.errorMessage {font-family: Arial,sans-serif; font-size: 12pt; font-weight: bold; line-height: 150%; padding-top: 25px;}Funzione script non trovata: doPost
not work.. function script no found
In this task, you are required to design an IOT based system which is able to represent incoming data on Google Spreadsheet. Your solution should cover the following course of actions.
a) As you are already familiar with Arduino. Install ESP8266.lib for Arduino IDE in order to get access to Wi-Fi features.
b) Program will send binary numbers ‘1’ and ‘0’ periodically in an infinite loop having a delay of 5 seconds inbetween.
c) Configure Google JavaScript to represent the incoming data in Google Spreadsheet.
d) By creating access points, you will be able to send data to google spreadsheets via Internet.
Is this supposed to keep logging? It work for me but stops after it pushes data one time.
I AM GETTING AN ERROR SAYING, “multiple definition of `host’;”
SAME IS THE CASE FOR PASSWORD,SSID,GSCRIPTID.
PLEASE HELP!!
I AM GETTING ERRORS SAYING,
multiple definition of
GScriptId';hostmultiple definition of
multiple definition of
password,ssid.multiple definition of
PLEASE HELP ASAP. THANKYOU.
any one know automatically change data sheets after complete one
it seems all is OK , but in google tabs I have only A1 temperature, B1 Humidity but values are missing, cann enybody help where is the problem?
thank You.