

MP3 player using Arduino and DFPlayer mini
- Nick Koumaris
- http://educ8s.tv
- info@educ8s.tv
- 126.546 Views
- moderate
- Tested
- 2 Likes

Hi guys, welcome to this tutorial. Today, we will build an mp3 player using an Arduino and the DFPlayer mini MP3 module.
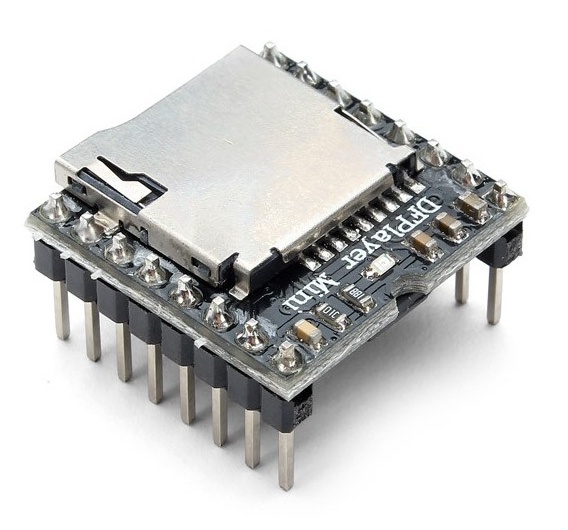
The DFplayer mini is a small, low-cost mp3 module with a simplified audio output that can be connected directly to a speaker or an earphone jack. The module can be used as a stand-alone module with attached battery, speaker, and push buttons or used in combination with a microcontroller or development board like the Arduino, enabled for RX/TX (Serial) communication, thus through simple serial commands we can play music and perform other functions like playing the next and previous song, shuffle, pause the song currently being played etc. The module comes with an SDcard slot and supports both FAT16, FAT32 file system.
Some of the features of the DF player mini include:
- Support of sampling rate of 8KHz, 11.025KHz, 12KHz, 16KHz, 22.05KHz, up to 48KHz
- 24-bit DAC output, dynamic range support 90dB, SNR supports 85dB
- Supports FAT16, FAT32 file system, maximum support 32GB TF card
- A variety of control modes, serial mode, AD key control mode
- The broadcast language spots feature, you can pause the background music being played
- Built-in 3W amplifier
- The audio data is sorted by folder; supports up to 100 folders, each folder can be assigned to close to 1000 songs
- 30 levels of volume adjustable, 10 levels EQ adjustable.
The goal of this tutorial is to demonstrate the use of this module with Arduino, using the push buttons to instruct the Arduino to send serial commands to the module and control mp3. We will use three buttons to achieve this. The first button will serve as the “previous” button that will enable us to play the previous song. The second button will be to “play/pause” the file currently being played and the third button will be used to play the next file.
Required Components
The following components are required to build this project;
As usual, each of this components can be bought via the link attached to them in the list above.
Schematics
The schematics for this project is fairly easy
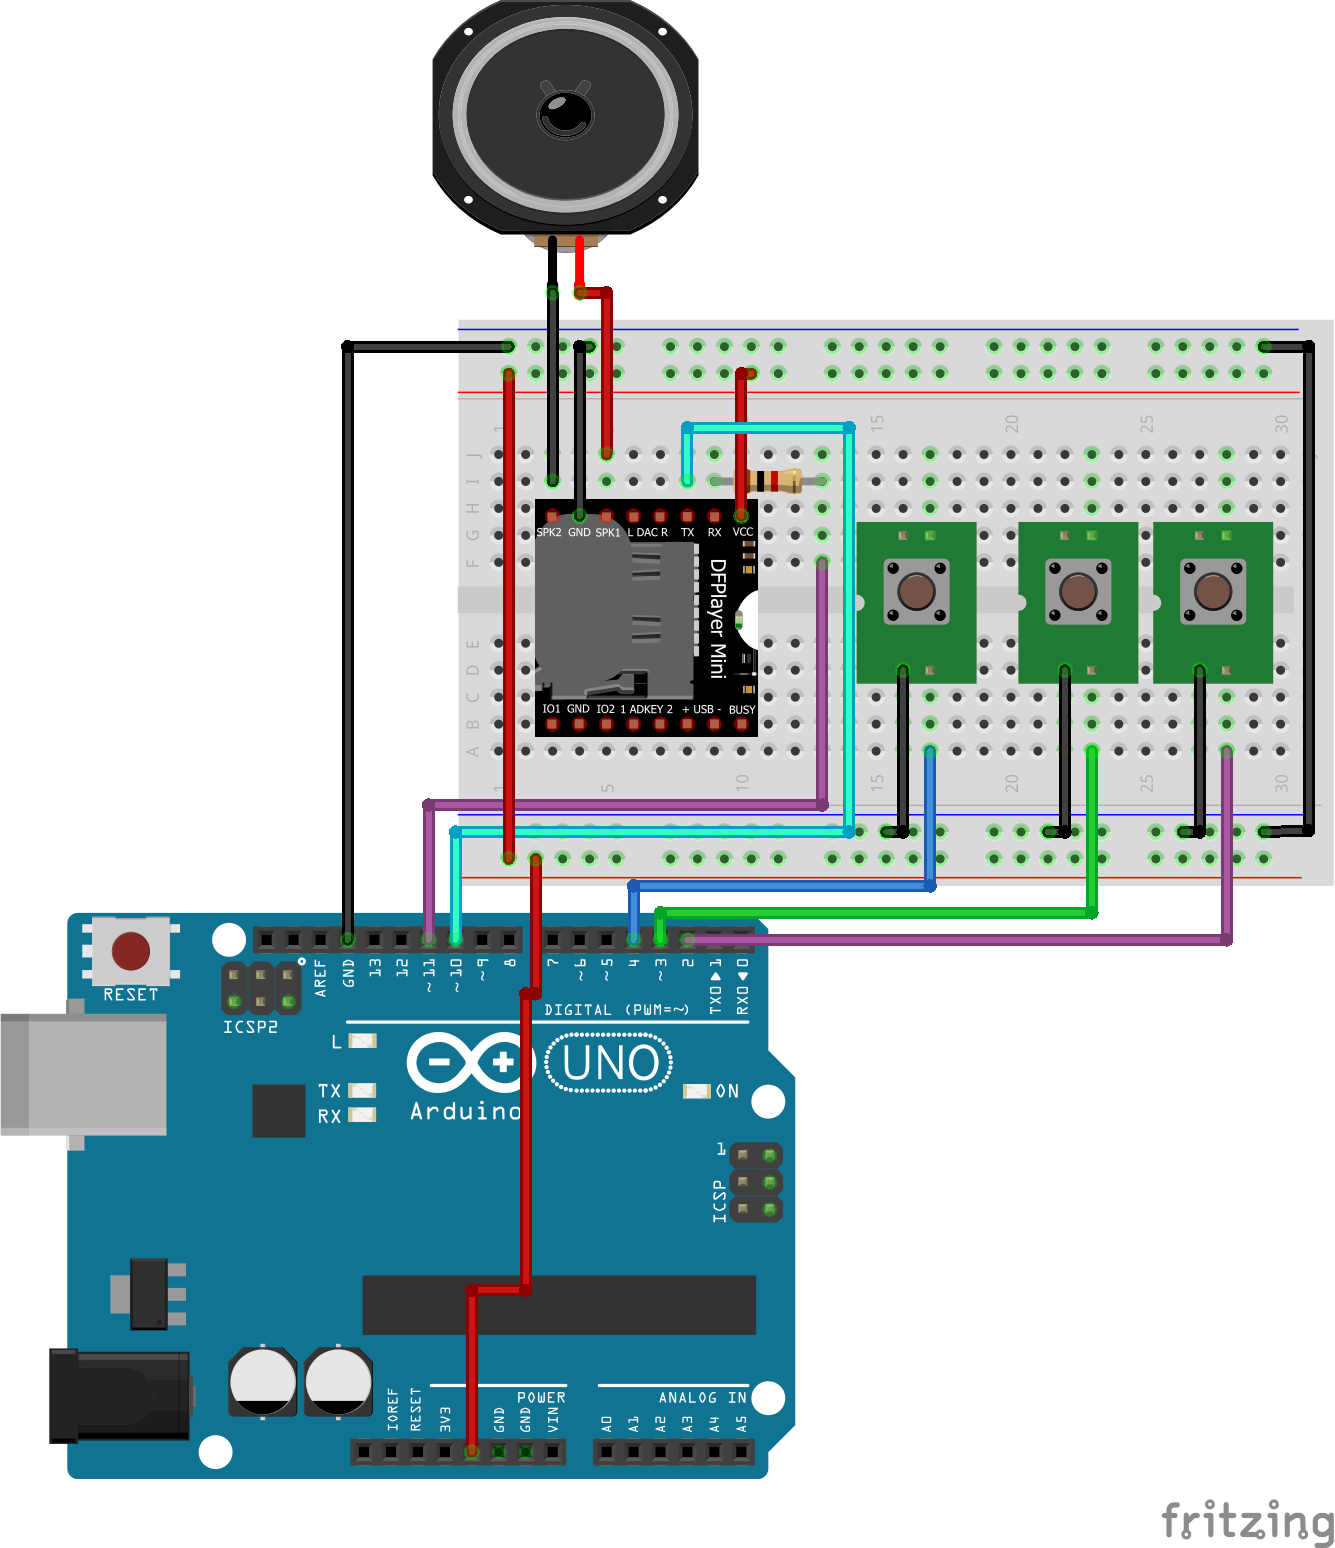
As seen above the connection between the Arduino and the DFplayer mini is very simple as we only need to connect two pins aside VCC and GND. It should be noted that the 1k resistor added in between the Rx pin of the module and the Arduino was added to reduce noise but it’s not necessary if your module setup is not accompanied with noise on the Rx line. The connection is described below for clarity.
DFplayer Mini – Arduino
Rx - D11
Tx - D10
VCC - 5v
Gnd - Gnd
Go over the connections once again to ensure everything is as it should be. Our switches are intentionally connected without pull up (or down) resistors because we will enable the Arduino internal pull up resistors.
Code
To send commands from the Arduino to the DFplayer mini, based on the button pressed, we will use the Arduino software serial library. While we could have used the hardware serial to send commands from the Arduino to the DFplayermini, the Arduino hardware serial pins (0 and 1) are the same pins used by the Arduino to communicate with the computer and may prevent code to uploaded smoothly if connected to any other device. So to communicate in a stress-free manner we will use the software serial library with pins 10 and 11.
The code for this tutorial is simple, while the DFPlayer mini has a library which contains different functions for controlling the mp3 player, we will write our own functions for the fun of it and to help show how the module really works.
The first thing we do in the code, as usual, is to include the libraries that we will use which in this case is the software serial library, creating an object of the library while declaring the Rx and Tx pins (10 and 11 respectively).
///              MP3 PLAYER PROJECT
/// http://educ8s.tv/arduino-mp3-player/
//////////////////////////////////////////


#include "SoftwareSerial.h"
SoftwareSerial mySerial(10, 11);
Next, we define some of the commands that we will use specifying the hex values.
# define Start_Byte 0x7E
# define Version_Byte 0xFF
# define Command_Length 0x06
# define End_Byte 0xEF
# define Acknowledge 0x00 //Returns info with command 0x41 [0x01: info, 0x00: no info]
Next, we declare the pins of the Arduino to which the push buttons are connected.
int buttonNext = 2;
int buttonPause = 3;
int buttonPrevious = 4;
Next, we move to the void setup function where we set the pin mode of the pins to which the buttons are connected and set those pins “high”. With this done we start the software serial communication with a 9600 baud rate.
void setup () {

pinMode(buttonPause, INPUT);
digitalWrite(buttonPause,HIGH);
pinMode(buttonNext, INPUT);
digitalWrite(buttonNext,HIGH);
pinMode(buttonPrevious, INPUT);
digitalWrite(buttonPrevious,HIGH);

mySerial.begin (9600);
Next, we play the first song on the storage device using the playfirst() function and set the isPlaying boolean variable to true to indicate that one of the files is currently playing.
delay(1000);
playFirst();
isPlaying = true;
Moving to the void loop function, this function basically checks for the button press and sends the corresponding command to the DFPlayer mini which then either plays (depending on the value of the “isplaying” variable) or pause the current song, or go to the next or previous song.
void loop () {

 if (digitalRead(buttonPause) == ACTIVATED)
  {
    if(isPlaying)
    {
      pause();
      isPlaying = false;
    }else
    {
      isPlaying = true;
      play();
    }
  }


 if (digitalRead(buttonNext) == ACTIVATED)
  {
    if(isPlaying)
    {
      playNext();
    }
  }

   if (digitalRead(buttonPrevious) == ACTIVATED)
  {
    if(isPlaying)
    {
      playPrevious();
    }
  }
}
The complete code for the project is available below and can be downloaded from the download section of this tutorial.
///              MP3 PLAYER PROJECT
/// http://educ8s.tv/arduino-mp3-player/
//////////////////////////////////////////


#include "SoftwareSerial.h"
SoftwareSerial mySerial(10, 11);
# define Start_Byte 0x7E
# define Version_Byte 0xFF
# define Command_Length 0x06
# define End_Byte 0xEF
# define Acknowledge 0x00 //Returns info with command 0x41 [0x01: info, 0x00: no info]

# define ACTIVATED LOW

int buttonNext = 2;
int buttonPause = 3;
int buttonPrevious = 4;
boolean isPlaying = false;


void setup () {

pinMode(buttonPause, INPUT);
digitalWrite(buttonPause,HIGH);
pinMode(buttonNext, INPUT);
digitalWrite(buttonNext,HIGH);
pinMode(buttonPrevious, INPUT);
digitalWrite(buttonPrevious,HIGH);

mySerial.begin (9600);
delay(1000);
playFirst();
isPlaying = true;


}


void loop () {

 if (digitalRead(buttonPause) == ACTIVATED)
  {
    if(isPlaying)
    {
      pause();
      isPlaying = false;
    }else
    {
      isPlaying = true;
      play();
    }
  }


 if (digitalRead(buttonNext) == ACTIVATED)
  {
    if(isPlaying)
    {
      playNext();
    }
  }

   if (digitalRead(buttonPrevious) == ACTIVATED)
  {
    if(isPlaying)
    {
      playPrevious();
    }
  }
}

void playFirst()
{
  execute_CMD(0x3F, 0, 0);
  delay(500);
  setVolume(20);
  delay(500);
  execute_CMD(0x11,0,1);
  delay(500);
}

void pause()
{
  execute_CMD(0x0E,0,0);
  delay(500);
}

void play()
{
  execute_CMD(0x0D,0,1);
  delay(500);
}

void playNext()
{
  execute_CMD(0x01,0,1);
  delay(500);
}

void playPrevious()
{
  execute_CMD(0x02,0,1);
  delay(500);
}

void setVolume(int volume)
{
  execute_CMD(0x06, 0, volume); // Set the volume (0x00~0x30)
  delay(2000);
}

void execute_CMD(byte CMD, byte Par1, byte Par2)
// Excecute the command and parameters
{
// Calculate the checksum (2 bytes)
word checksum = -(Version_Byte + Command_Length + CMD + Acknowledge + Par1 + Par2);
// Build the command line
byte Command_line[10] = { Start_Byte, Version_Byte, Command_Length, CMD, Acknowledge,
Par1, Par2, highByte(checksum), lowByte(checksum), End_Byte};
//Send the command line to the module
for (byte k=0; k<10; k++)
{
mySerial.write( Command_line[k]);
}
}
Demo
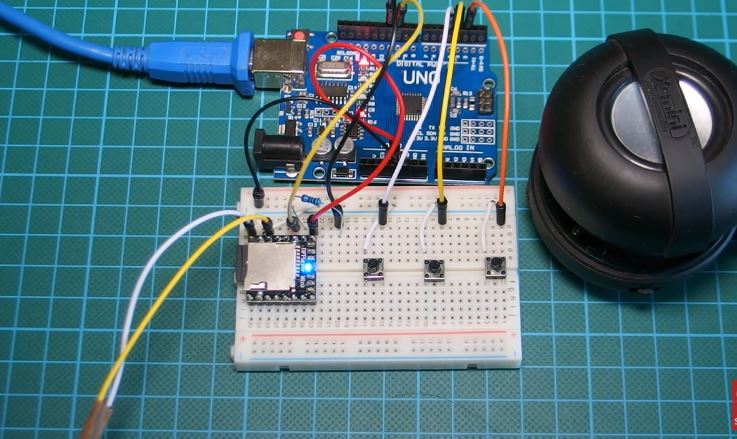
Load an SD card with songs and insert into the DFplayer mini, then upload the code to your Arduino and connect the wires from speaker to the speaker pins of the DFPlayer mini. You should hear songs start streaming out from the connected speaker. Your final setup should look like the image below.
Some of the applications of this tutorials are listed below and I hope it gives you the inspiration to build something really cool.
Applications
- Fire alarm voice prompts
- Toll stations voice prompts
- Electricity, communications, financial business hall voice prompts
- Multi-channel voice alarm or equipment operating guide voice
That’s it for this tutorial guys, thanks for following. If you get stuck anywhere feel free to send your questions via the comment section.
Till next time!
The video tutorial for this tutorial can be watched on youtube here.


The ground from Arduino to player should not go there. It should connect to the other ground on the player to prevent unwanted noise. GND and GND are not the same.
You mean the other ground should also be connected to the common ground? If that ground is not connected to the Arduino’s Ground the module will NOT come on. But if you mean connect the other second ground on the module to the common ground for the Arduino then yes, that can be done if you discover you have noise. but connecting ground to ground without connecting to the common ground won’t work.
I hope you understand.
The player’s GND you are using is for the speakers. It need not be connected to the Arduino. The other GND which is not used in this sketch should go to Arduino’s GND. One GND to the speakers, the other to Arduino. That is the only way to stop the unwanted noise.
How to add volume up and down button
The volume is predefined in the code in the range 0-30. So ,to add Vol up and Vol down you will have to modify code to increase and decrease the volume in “void setVolume” function. Alternative you can check another example here: https://www.dfrobot.com/wiki/index.php/DFPlayer_Mini_SKU:DFR0299 which has volume control.
Hey is it possible to add a button function to record and save voice messages?
DFPlayer Mini can only play mp3 files. If you want a device that is able to record and play a message then please visit: https://www.electronics-lab.com/project/60-seconds-voice-record-playback-module/ https://www.electronics-lab.com/project/voice-recordplayback-module-using-isd1932-isd1964/ https://www.electronics-lab.com/project/120-seconds-voice-record-play-back/ https://www.electronics-lab.com/project/20-seconds-voice-record-playback/ https://www.electronics-lab.com/project/20-to-80-seconds-voice-record-playback/
Hello, this is really helpful for beginners like me! I just have some concerns.
1.) I would like to build an mp3 player with arduino uno, dfplayer, amplifier pam8403 soon.
The situation is this: In my SD card, I would like to upload atmost 5 mp3 files. Then, instead of play/pause button, I only need to program my player with next and previous buttons. So, if I trigger the next button, it would play track 1 only, for example, then hitting it again, would play track 2 and so on. and by clicking the previous button, it would play, of course, the previous one.
Then this would go on a loop. like if I just played track 5, the next trigger button would play track 1. or if I am on track 1, if I hit the previous, it would play track 5. Just like most talking toys do.
Can I do this?
2.) Do you have any instructions when you add an amplifier am8403 on this set up?
3.) It says that the DFplayer can play on folders as well. Is it possible to set up push buttons that would select the folders it would play? Like button A will play the mp3 files on folder 1 while button B on folder 2 and so on?
All you asked is possible and done by using variables.
I have set this up exactly as mentioned and it works great as long as I do not push the previous or next button. If I do so then the next songs plays for few seconds and then the clicking noise starts. I am not sure what am doing wrong.
I did exactly as has been provided in the instructions. But once I press the previous or next button the next song plays for few seconds and then the clicking noise starts.
The diagram presented on this page is wrong. The player has two GND (ground) connections. The top one on the diagram is for the speaker. The bottom one is the electricity input. The two are not one and the same as the diagram would make you believe. Don’t mix the grounds and the clicking will dissapear.
Thanks a lot Emilio for your help !! Your suggestion helped in stopping the noise. But I have one more issue. If I press next or previous buttons the next/previous song plays and then stops.It does not automatically play the next song in the list. Is this expected behaviour or I need to do some change in the code ?
It’s all done in the code. The player doesn’t know what you call “next”. I saw code examples for this player where the arduino gets the “I’m done” message from the player. Another way is simply by throwing the next song at the player once a certain known time has elapsed.
The diagram is wrong. The top GND is only for the speaker. The lower GND is for the power source. In the diagram both are interconnected causing the clicking noise.
Is there a way to set playback to random? Sending execute_CMD(0x08,0,3) doesnt seem to make any difference?
No no no… GND is GND and they should all be connected. Avoid loops however though. Ground loops will act like an antenna to pick up hum noise pops and clicks. Remember that this module has a dirt cheap class D amplifier, so it is never going to sound out of this world like a high-end class AB.
I need a stand alone sound module that can play a sound from a trigger on a mobile device to simulate rotational noises of the machine. The sound would be triggered every revolution and needs to increase with rotational speed. Can this gizmo work that way without the Arduino for a sound .
You can MUCH more easily control and query your DFPlayerMini by using a library like DFPlayerMini_Fast.h: https://github.com/PowerBroker2/DFPlayerMini_Fast — It is installable via the Arduino IDE’s Libraries Manager
wonderfull ! I’m a beginner and I tried a lot of things and this one works great !
1 . for my projetct (a coinpusher), I need music (so this is done)…. and I want to ad 3 DC motors on that program and LED ligths…
Maybe I think too big for a beginner….
Can someone help me with the code for this ?
Motors just have to be on … nothing more.
RGB leds have to change colour… 🙂
2. and another issue is that I want the music to go louder… can I add an amplifier to this?
3. can I add something to the code so the players plays Random and only stops when I push ‘next’ or ‘pauze’ or ‘prev’ ?
thanks a lot for your help !
Greets from Belgium …. Stay Safe.
Is it possible to capture the MP3ID or filename ? I want to add a display to the project …
I dont think so. I just added a counter and displayed the same using a OLED Display.
Hi everyone, thanks to the author of this tutorial, one of the best I have found up to now.
I’m just starting Arduino and I have a projet of a simple MP3 device that I can use with the app I’ve coded on App Inventor 2 using a HS_06.
Everything works just fine, which is surprising knowing I received my Elegoo uno r3 only 5 days ago. So I guess I’m making progress rather fast.
The only thing I really need to do now is find a way to retreive data from DFPlayer module to my App. I’m using a silly Text send from app inventor to arduino in order to select the mp3 file I want to play.
But I really need to figure out how I can send the track list on the SSD card.
I don’t need much data, just the number of tracks on the ssd, in order to choose a track to play.
Does anyone know if such thing is possible? I’m sorry if it’s a silly or obvious question. I’am a true noob starter here.
Thanks
James
Tough luck James, sd card is not accessible through pins on df player board, not impossible I guess, but definitely not easy.
Is there anyway to have this just run one sound file on a continuous loop?
After you start the track that you want to loop, add this…
execute_CMD(0x19, 0, 0);
That worked for me, at least 🙂
Hope it helps.
I added a function that I use for playing, that accepts a bool Loop and when Loop is true, it loops the audio, otherwise just plays one shot.
void PlayTrack(int num, bool Loop)
{
execute_CMD(0x03, 0, num);
if (Loop)
execute_CMD(0x19, 0, 0);
}
Hope this helps!
-Larry
I made the same and it is working fine. Thanks for this article.. It’s is really helpful.
I have one doubt. I connected speaker at SPK_1 & SPK_2 pins and a 3.5mm audio jack at DAC_R & DAC_L pins. Is their a way to detect headphone and disable speaker like it used to happen in phone and laptop.
Most devices do this mechanically. When the headphones are inserted it pushes a leaf switch away, and physically disconnects the wire feeding the speakers.
Why you don’t use more white and small font on this site? It can be made even less readable 🙂
I think it’s time to re-adjust your monitor, what is the issue here ?
I’d love to use this with a LED push button which lights up when the audio is NOT playing, so it prompts the user to press next. Is that possible please? Also, can you make it reset to the first track if no button is pressed for x amount of time?
Thanks
I don’t know what’s going on I checked my work so many times. When I load up the sketch it starts playing but it pulses on and off I pulled one wire out at a time and when I pulled the wire going from the button number two to pin two I believe it stops pulsing. It’s the strangest thing I’ve ever seen I cannot solve this
Hi,.
I was wondering if I could get some help using the DFRobot Mp3 Player Mini, specifically I have an SD card with 19 folders numbered 01, 02 03 etc, and in each folder I have songs numbered 001.mp3, 002.mp3, 003.mp3 etc. my code works, starts playing folder 01, song 001 sequentially great!, BUT now I need to change folders, maybe the next folder(folder 02). Any ideas? I can use this code– execute_CMD(0x0F01, 001); and it plays the correct song and STOPS, any ideas how to get it to continue to the next song?, I have tried — “playNext” and even “play()” to no avail. Any help would be greatly appreciated
Hi its from Korea doing this project. We want to know how to put the MP3 files in the SD card. We uploaded the files in the card but when we press the button, it doesn’t play. Is there any form we should follow while putting the file in the card? Does the file name have to be a number?
Can a earphone be used instead of speakers for the output of sound, if yes – Please explain the process.
Thank you.
what are the green things around the buttons in the scamatics
I want to replace the buttons with an ir remote. How can I modify the code and the wiring? The remote should change the files by the buttons, 1, 2, 3, 4 and 5.
i updated your code to such that, when i press the push button, the speaker plays the sound i saved in sd card, i also have another program that i want to integrate into your code but unable to do so as im not familiar with byte commands that you used.
/// MP3 PLAYER PROJECT
/// http://educ8s.tv/arduino-mp3-player/
//////////////////////////////////////////
#include “SoftwareSerial.h”
SoftwareSerial mySerial(3, 2);
# define Start_Byte 0x7E
# define Version_Byte 0xFF
# define Command_Length 0x06
# define End_Byte 0xEF
# define Acknowledge 0x00 //Returns info with command 0x41 [0x01: info, 0x00: no info]
# define ACTIVATED LOW
int buttonNext = 7;
boolean isPlaying = false;
void setup () {
pinMode(buttonNext, INPUT);
digitalWrite(buttonNext,HIGH);
mySerial.begin (9600);
isPlaying = false;
}
void loop () {
if (digitalRead(buttonNext) == LOW)
{
if(isPlaying)
{
pause();
isPlaying = true;
}else
{
isPlaying = false;
play();
}
}
}
void pause()
{
execute_CMD(0x0E,0,0);
delay(500);
}
void play()
{
execute_CMD(0x0D,0,1);
delay(500);
}
void setVolume(int volume)
{
execute_CMD(0x06, 0, volume); // Set the volume (0x00~0x30)
delay(2000);
}
void execute_CMD(byte CMD, byte Par1, byte Par2)
// Excecute the command and parameters
{
// Calculate the checksum (2 bytes)
word checksum = -(Version_Byte + Command_Length + CMD + Acknowledge + Par1 + Par2);
// Build the command line
byte Command_line[10] = { Start_Byte, Version_Byte, Command_Length, CMD, Acknowledge,
Par1, Par2, highByte(checksum), lowByte(checksum), End_Byte};
//Send the command line to the module
for (byte k=0; k<10; k++)
{
mySerial.write( Command_line[k]);
}
}
program to fade an led when a push button is pressed.
const int BUTTON_PIN = 4; // Arduino pin connected to button’s pin
const int LED_PIN = 5; // Arduino pin connected to LED’s pin
// variables will change:
int ledState = LOW; // the current state of LED
int lastButtonState; // the previous state of button
int currentButtonState; // the current state of button
void setup() {
Serial.begin(9600); // initialize serial
pinMode(BUTTON_PIN, INPUT_PULLUP); // set arduino pin to input pull-up mode
pinMode(LED_PIN, OUTPUT); // set arduino pin to output mode
currentButtonState = digitalRead(BUTTON_PIN);
}
void loop() {
lastButtonState = currentButtonState; // save the last state
currentButtonState = digitalRead(BUTTON_PIN); // read new state
if(lastButtonState == HIGH && currentButtonState == LOW) {
Serial.println(“The button is pressed”);
// toggle state of LED
ledState = !ledState;
// control LED arccoding to the toggled state
digitalWrite(LED_PIN, ledState);
}
}
now i want to integrate these two programs such that when i press the push button, the speaker should play the sound and the led should start fading. can you please suggest how to implement the led fading code into the first program ??