Arduino Menu Tutorial with a Rotary Encoder and a Nokia 5110 LCD display
In our last tutorial, we examined how to create a menu for your Arduino project on a Nokia 5110 LCD, with push buttons to navigate through it. In today's tutorial, we will build a modified version of it which will make use a rotary encoder (in place of the push buttons) for menu navigation.
In our last tutorial, we examined how to create a menu for your Arduino project on a Nokia 5110 LCD, with push buttons to navigate through it. In today’s tutorial, we will build a modified version of it which will make use a rotary encoder (in place of the push buttons) for menu navigation.
A menu is one of the easiest ways through which users can interact with devices with diverse features. From Smartphones to PCs and even TVs, it is used in almost every electronic device with a screen and navigating through it is done usually by pressing certain buttons to move up/down, right/left and make selections. However, in some recent smart devices, either for aesthetics or for an improved form factor, a knob-like approach is employed for navigation. For today’s tutorial, we will explain how to create a menu with the same Knob style control, using a rotary encoder.
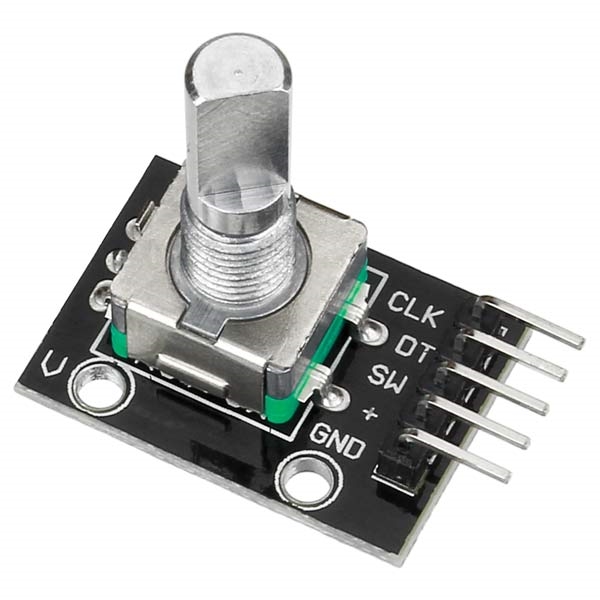
Rotary Encoders are used in several systems where precision and feedback in terms of rotational motion or angular position are required. By turning the shaft to the right or left, we either get an increase or decrease in value (depending on the configuration). One of the major advantages of rotary encoders is the fact that their rotation is limitless. If the maximum position, (which is 20 for the particular rotary encoder used in this tutorial) is reached, the device starts the position counting all over again while the value attached to the position continues to increase/decrease with every turn of the knob in the same direction. Another good feature which will be handy for this tutorial is that they come with buttons attached, so it can be clicked by pressing the knob and is recognized by the Arduino just as any other button or switch.
Required Components
The following components are required to build this project;
As usual, the exact components used for this tutorial can be purchased via the links attached to each of them.
Schematics
The schematics for today’s project is almost similar to the one of the last tutorial. We will take out the three push-buttons and add a rotary encoder. Connect the components as shown in the schematics below.
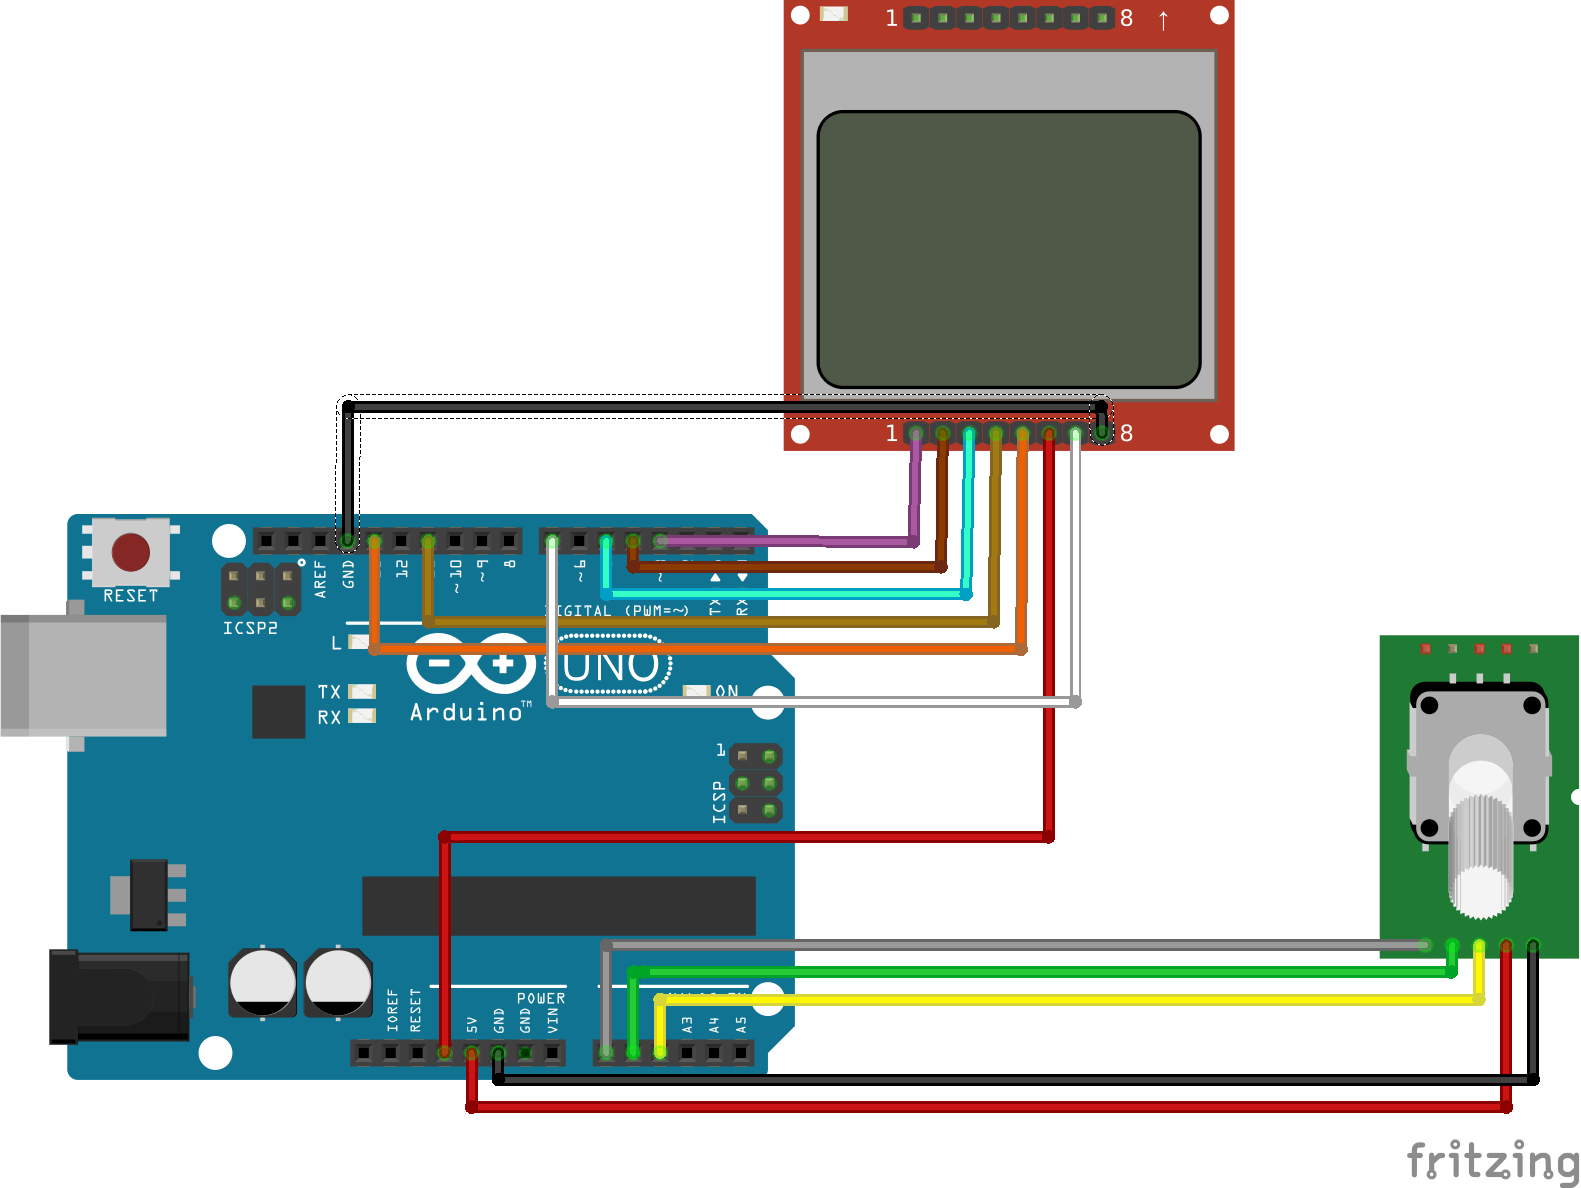
The rotary encoder used is an analog device, and for that reason all its three output pins are connected to analog pins on the Arduino.
To make the connections easier to follow, a pin map between the components is provided below.
LCD – Arduino
Reset - D3
pin2 - D4
pin3 - D5
pin4 - D11
pin5 - D13
VCC - 3.3v
Backlight - D7
GND - GND
Rotary Encoder – Arduino
GND - GND
VCC - VCC
SW - A2
DT - A1
CLK - A0
You can check out our previous tutorials on the Nokia 5110 LCD Display and the Rotary Encoder to better understand how they work.
Go over the schematics once again to ensure everything is as it should be then let’s proceed to write the code.
Code
The code for this version of the tutorial is a little bit more complex compared to that of the last tutorial and you may need to replicate it yourself before you really understand the full scope of it.
To simplify/reduce the amount of work we need to do, we will use four libraries. Two of the libraries; the Adafruit GFX library and the Nokia 5110 LCD library, will be used to interact with the display while the other two; the Encoder Library and the TimerOne library, will reduce the amount of code we write to interact with the rotary encoder. Each of the libraries can be downloaded via the links attached to them or installed via the Arduino Library Manager.
To briefly explain the code;
As usual, we start by including the libraries that will be used for the project.
//////////////////////////////////////////////
  //       Arduino Rotary Encoder Menu        //
 //                 v1.0                     //
//           http://www.educ8s.tv           //
/////////////////////////////////////////////

#include <Adafruit_GFX.h>
#include <Adafruit_PCD8544.h>
#include <ClickEncoder.h>
#include <TimerOne.h>
Next, we create variables to hold the menus alongside an object of the click encoder and the LCD library.
int menuitem = 1;
int frame = 1;
int page = 1;
int lastMenuItem = 1;

String menuItem1 = "Contrast";
String menuItem2 = "Volume";
String menuItem3 = "Language";
String menuItem4 = "Difficulty";
String menuItem5 = "Light: ON";
String menuItem6 = "Reset";

boolean backlight = true;
int contrast=60;
int volume = 50;

String language[3] = { "EN", "ES", "EL" };
int selectedLanguage = 0;

String difficulty[2] = { "EASY", "HARD" };
int selectedDifficulty = 0;

boolean up = false;
boolean down = false;
boolean middle = false;
ClickEncoder *encoder;
int16_t last, value;

Adafruit_PCD8544 display = Adafruit_PCD8544( 5, 4, 3);//This only works with recent Adafruit Nokia 5110 library. Ensure yours is up to date
Next, we write the void setup() function. We start by declaring the pin to which the LCD’s backlight is connected (D7) as output and then proceed to create an encoder object before initializing the display and the rotary encoder, setting it to start at zero. We also create an interrupt routine which will be used to detect button press within any of the menu pages.
void setup() {

  pinMode(7,OUTPUT);
  turnBacklightOn();

  encoder = new ClickEncoder(A1, A0, A2);
  encoder->setAccelerationEnabled(false);

  display.begin();
  display.clearDisplay();
  setContrast();

  Timer1.initialize(1000);
  Timer1.attachInterrupt(timerIsr);

  last = encoder->getValue();
}
Up next is the void loop() function. This function is the most complex part of the whole code. The function basically creates the menu and uses the variables created initially to keep track of the previous, current and next state so when the rotary encoder is turned, it knows the right menu to display. The menu selection part of the code is also handled by a routine within the void loop() function.
We start by creating the menu using the drawMenu() function.
void loop() {

  drawMenu();
Next, we call the readRotaryEncoder function to obtain the control inputs from the rotary encoder.
readRotaryEncoder();

 ClickEncoder::Button b = encoder->getButton();
 if (b != ClickEncoder::Open) {
 switch (b) {
    case ClickEncoder::Clicked:
       middle=true;
      break;
  }
}
Next, Data from the encoder is fed into a series of if-else statements which checks if the encoder was clicked or turned in a particular direction and which of the screens is currently being displayed to determine what action is to be done next. For instance, the first if statement checks if the menu is currently on page 1 and if the encoder is turned to the right (indicates up). If this is the case, it then checks the position of the menu cursor and adjusts it accordingly.
  if (up && page == 1 ) {

    up = false;
    if(menuitem==2 && frame ==2)
    {
      frame--;
    }

     if(menuitem==4 && frame ==4)
    {
      frame--;
    }
      if(menuitem==3 && frame ==3)
    {
      frame--;
    }
    lastMenuItem = menuitem;
    menuitem--;
    if (menuitem==0)
    {
      menuitem=1;
    }
  }else if (up && page == 2 && menuitem==1 ) {
    up = false;
    contrast--;
    setContrast();
  }
  else if (up && page == 2 && menuitem==2 ) {
    up = false;
    volume--;
  }
  else if (up && page == 2 && menuitem==3 ) {
    up = false;
    selectedLanguage--;
    if(selectedLanguage == -1)
    {
      selectedLanguage = 2;
    }
  }
    else if (up && page == 2 && menuitem==4 ) {
    up = false;
    selectedDifficulty--;
    if(selectedDifficulty == -1)
    {
      selectedDifficulty = 1;
    }
  }

  if (down && page == 1) //We have turned the Rotary Encoder Clockwise
  {

    down = false;
    if(menuitem==3 && lastMenuItem == 2)
    {
      frame ++;
    }else  if(menuitem==4 && lastMenuItem == 3)
    {
      frame ++;
    }
     else  if(menuitem==5 && lastMenuItem == 4 && frame!=4)
    {
      frame ++;
    }
    lastMenuItem = menuitem;
    menuitem++;
    if (menuitem==7)
    {
      menuitem--;
    }

  }else if (down && page == 2 && menuitem==1) {
    down = false;
    contrast++;
    setContrast();
  }
  else if (down && page == 2 && menuitem==2) {
    down = false;
    volume++;
  }
   else if (down && page == 2 && menuitem==3 ) {
    down = false;
    selectedLanguage++;
    if(selectedLanguage == 3)
    {
      selectedLanguage = 0;
    }
  }
  else if (down && page == 2 && menuitem==4 ) {
    down = false;
    selectedDifficulty++;
    if(selectedDifficulty == 2)
    {
      selectedDifficulty = 0;
    }
  }

  if (middle) //Middle Button is Pressed
  {
    middle = false;

    if (page == 1 && menuitem==5) // Backlight Control
    {
      if (backlight)
      {
        backlight = false;
        menuItem5 = "Light: OFF";
        turnBacklightOff();
        }
      else
      {
        backlight = true;
        menuItem5 = "Light: ON";
        turnBacklightOn();
       }
    }

    if(page == 1 && menuitem ==6)// Reset
    {
      resetDefaults();
    }


    else if (page == 1 && menuitem<=4) {
      page=2;
     }
      else if (page == 2)
     {
      page=1;
     }
   }
  }
The remaining pieces of code are the functions used within the loop including the drawmenu() function and the function to read the rotary encoder.
  void drawMenu()
  {

  if (page==1)
  {
    display.setTextSize(1);
    display.clearDisplay();
    display.setTextColor(BLACK, WHITE);
    display.setCursor(15, 0);
    display.print("MAIN MENU");
    display.drawFastHLine(0,10,83,BLACK);

    if(menuitem==1 && frame ==1)
    {
      displayMenuItem(menuItem1, 15,true);
      displayMenuItem(menuItem2, 25,false);
      displayMenuItem(menuItem3, 35,false);
    }
    else if(menuitem == 2 && frame == 1)
    {
      displayMenuItem(menuItem1, 15,false);
      displayMenuItem(menuItem2, 25,true);
      displayMenuItem(menuItem3, 35,false);
    }
    else if(menuitem == 3 && frame == 1)
    {
      displayMenuItem(menuItem1, 15,false);
      displayMenuItem(menuItem2, 25,false);
      displayMenuItem(menuItem3, 35,true);
    }
     else if(menuitem == 4 && frame == 2)
    {
      displayMenuItem(menuItem2, 15,false);
      displayMenuItem(menuItem3, 25,false);
      displayMenuItem(menuItem4, 35,true);
    }

      else if(menuitem == 3 && frame == 2)
    {
      displayMenuItem(menuItem2, 15,false);
      displayMenuItem(menuItem3, 25,true);
      displayMenuItem(menuItem4, 35,false);
    }
    else if(menuitem == 2 && frame == 2)
    {
      displayMenuItem(menuItem2, 15,true);
      displayMenuItem(menuItem3, 25,false);
      displayMenuItem(menuItem4, 35,false);
    }

    else if(menuitem == 5 && frame == 3)
    {
      displayMenuItem(menuItem3, 15,false);
      displayMenuItem(menuItem4, 25,false);
      displayMenuItem(menuItem5, 35,true);
    }

    else if(menuitem == 6 && frame == 4)
    {
      displayMenuItem(menuItem4, 15,false);
      displayMenuItem(menuItem5, 25,false);
      displayMenuItem(menuItem6, 35,true);
    }

      else if(menuitem == 5 && frame == 4)
    {
      displayMenuItem(menuItem4, 15,false);
      displayMenuItem(menuItem5, 25,true);
      displayMenuItem(menuItem6, 35,false);
    }
      else if(menuitem == 4 && frame == 4)
    {
      displayMenuItem(menuItem4, 15,true);
      displayMenuItem(menuItem5, 25,false);
      displayMenuItem(menuItem6, 35,false);
    }
    else if(menuitem == 3 && frame == 3)
    {
      displayMenuItem(menuItem3, 15,true);
      displayMenuItem(menuItem4, 25,false);
      displayMenuItem(menuItem5, 35,false);
    }
        else if(menuitem == 2 && frame == 2)
    {
      displayMenuItem(menuItem2, 15,true);
      displayMenuItem(menuItem3, 25,false);
      displayMenuItem(menuItem4, 35,false);
    }
    else if(menuitem == 4 && frame == 3)
    {
      displayMenuItem(menuItem3, 15,false);
      displayMenuItem(menuItem4, 25,true);
      displayMenuItem(menuItem5, 35,false);
    }
    display.display();
  }
  else if (page==2 && menuitem == 1)
  {
   displayIntMenuPage(menuItem1, contrast);
  }

  else if (page==2 && menuitem == 2)
  {
   displayIntMenuPage(menuItem2, volume);
  }
   else if (page==2 && menuitem == 3)
  {
   displayStringMenuPage(menuItem3, language[selectedLanguage]);
  }
  else if (page==2 && menuitem == 4)
  {
   displayStringMenuPage(menuItem4, difficulty[selectedDifficulty]);
  }
  else if (page==2 && menuitem == 4)
  {
   displayStringMenuPage(menuItem4, difficulty[selectedDifficulty]);
  }

  }
The remaining piece of code are the functions used to perform different tasks like reading of the potentiometer, drawing of the menu, etc.
 void resetDefaults()
  {
    contrast = 60;
    volume = 50;
    selectedLanguage = 0;
    selectedDifficulty = 0;
    setContrast();
    backlight = true;
    menuItem5 = "Light: ON";
    turnBacklightOn();
  }

  void setContrast()
  {
    display.setContrast(contrast);
    display.display();
  }

  void turnBacklightOn()
  {
    digitalWrite(7,LOW);
  }

    void turnBacklightOff()
  {
    digitalWrite(7,HIGH);
  }

  void timerIsr() {
  encoder->service();
}

void displayIntMenuPage(String menuItem, int value)
{
    display.setTextSize(1);
    display.clearDisplay();
    display.setTextColor(BLACK, WHITE);
    display.setCursor(15, 0);
    display.print(menuItem);
    display.drawFastHLine(0,10,83,BLACK);
    display.setCursor(5, 15);
    display.print("Value");
    display.setTextSize(2);
    display.setCursor(5, 25);
    display.print(value);
    display.setTextSize(2);
    display.display();
}

void displayStringMenuPage(String menuItem, String value)
{
    display.setTextSize(1);
    display.clearDisplay();
    display.setTextColor(BLACK, WHITE);
    display.setCursor(15, 0);
    display.print(menuItem);
    display.drawFastHLine(0,10,83,BLACK);
    display.setCursor(5, 15);
    display.print("Value");
    display.setTextSize(2);
    display.setCursor(5, 25);
    display.print(value);
    display.setTextSize(2);
    display.display();
}

void displayMenuItem(String item, int position, boolean selected)
{
    if(selected)
    {
      display.setTextColor(WHITE, BLACK);
    }else
    {
      display.setTextColor(BLACK, WHITE);
    }
    display.setCursor(0, position);
    display.print(">"+item);
}

void readRotaryEncoder()
{
  value += encoder->getValue();

  if (value/2 > last) {
    last = value/2;
    down = true;
    delay(150);
  }else   if (value/2 < last) {
    last = value/2;
    up = true;
    delay(150);
  }
}
The complete code for the project is provided below and also attached under the download section of this tutorial.
   //////////////////////////////////////////////
  //       Arduino Rotary Encoder Menu        //
 //                 v1.0                     //
//           http://www.educ8s.tv           //
/////////////////////////////////////////////

#include <Adafruit_GFX.h>
#include <Adafruit_PCD8544.h>
#include <ClickEncoder.h>
#include <TimerOne.h>

int menuitem = 1;
int frame = 1;
int page = 1;
int lastMenuItem = 1;

String menuItem1 = "Contrast";
String menuItem2 = "Volume";
String menuItem3 = "Language";
String menuItem4 = "Difficulty";
String menuItem5 = "Light: ON";
String menuItem6 = "Reset";

boolean backlight = true;
int contrast=60;
int volume = 50;

String language[3] = { "EN", "ES", "EL" };
int selectedLanguage = 0;

String difficulty[2] = { "EASY", "HARD" };
int selectedDifficulty = 0;

boolean up = false;
boolean down = false;
boolean middle = false;

ClickEncoder *encoder;
int16_t last, value;

Adafruit_PCD8544 display = Adafruit_PCD8544( 5, 4, 3); //Download the latest Adafruit Library in order to use this constructor

void setup() {

  pinMode(7,OUTPUT);
  turnBacklightOn();

  encoder = new ClickEncoder(A1, A0, A2);
  encoder->setAccelerationEnabled(false);

  display.begin();
  display.clearDisplay();
  setContrast();

  Timer1.initialize(1000);
  Timer1.attachInterrupt(timerIsr);

  last = encoder->getValue();
}

void loop() {

  drawMenu();

  readRotaryEncoder();

   ClickEncoder::Button b = encoder->getButton();
   if (b != ClickEncoder::Open) {
   switch (b) {
      case ClickEncoder::Clicked:
         middle=true;
        break;
    }
  }

  if (up && page == 1 ) {

    up = false;
    if(menuitem==2 && frame ==2)
    {
      frame--;
    }

     if(menuitem==4 && frame ==4)
    {
      frame--;
    }
      if(menuitem==3 && frame ==3)
    {
      frame--;
    }
    lastMenuItem = menuitem;
    menuitem--;
    if (menuitem==0)
    {
      menuitem=1;
    }
  }else if (up && page == 2 && menuitem==1 ) {
    up = false;
    contrast--;
    setContrast();
  }
  else if (up && page == 2 && menuitem==2 ) {
    up = false;
    volume--;
  }
  else if (up && page == 2 && menuitem==3 ) {
    up = false;
    selectedLanguage--;
    if(selectedLanguage == -1)
    {
      selectedLanguage = 2;
    }
  }
    else if (up && page == 2 && menuitem==4 ) {
    up = false;
    selectedDifficulty--;
    if(selectedDifficulty == -1)
    {
      selectedDifficulty = 1;
    }
  }

  if (down && page == 1) //We have turned the Rotary Encoder Clockwise
  {

    down = false;
    if(menuitem==3 && lastMenuItem == 2)
    {
      frame ++;
    }else  if(menuitem==4 && lastMenuItem == 3)
    {
      frame ++;
    }
     else  if(menuitem==5 && lastMenuItem == 4 && frame!=4)
    {
      frame ++;
    }
    lastMenuItem = menuitem;
    menuitem++;
    if (menuitem==7)
    {
      menuitem--;
    }

  }else if (down && page == 2 && menuitem==1) {
    down = false;
    contrast++;
    setContrast();
  }
  else if (down && page == 2 && menuitem==2) {
    down = false;
    volume++;
  }
   else if (down && page == 2 && menuitem==3 ) {
    down = false;
    selectedLanguage++;
    if(selectedLanguage == 3)
    {
      selectedLanguage = 0;
    }
  }
  else if (down && page == 2 && menuitem==4 ) {
    down = false;
    selectedDifficulty++;
    if(selectedDifficulty == 2)
    {
      selectedDifficulty = 0;
    }
  }

  if (middle) //Middle Button is Pressed
  {
    middle = false;

    if (page == 1 && menuitem==5) // Backlight Control
    {
      if (backlight)
      {
        backlight = false;
        menuItem5 = "Light: OFF";
        turnBacklightOff();
        }
      else
      {
        backlight = true;
        menuItem5 = "Light: ON";
        turnBacklightOn();
       }
    }

    if(page == 1 && menuitem ==6)// Reset
    {
      resetDefaults();
    }


    else if (page == 1 && menuitem<=4) {
      page=2;
     }
      else if (page == 2)
     {
      page=1;
     }
   }
  }

  void drawMenu()
  {

  if (page==1)
  {
    display.setTextSize(1);
    display.clearDisplay();
    display.setTextColor(BLACK, WHITE);
    display.setCursor(15, 0);
    display.print("MAIN MENU");
    display.drawFastHLine(0,10,83,BLACK);

    if(menuitem==1 && frame ==1)
    {
      displayMenuItem(menuItem1, 15,true);
      displayMenuItem(menuItem2, 25,false);
      displayMenuItem(menuItem3, 35,false);
    }
    else if(menuitem == 2 && frame == 1)
    {
      displayMenuItem(menuItem1, 15,false);
      displayMenuItem(menuItem2, 25,true);
      displayMenuItem(menuItem3, 35,false);
    }
    else if(menuitem == 3 && frame == 1)
    {
      displayMenuItem(menuItem1, 15,false);
      displayMenuItem(menuItem2, 25,false);
      displayMenuItem(menuItem3, 35,true);
    }
     else if(menuitem == 4 && frame == 2)
    {
      displayMenuItem(menuItem2, 15,false);
      displayMenuItem(menuItem3, 25,false);
      displayMenuItem(menuItem4, 35,true);
    }

      else if(menuitem == 3 && frame == 2)
    {
      displayMenuItem(menuItem2, 15,false);
      displayMenuItem(menuItem3, 25,true);
      displayMenuItem(menuItem4, 35,false);
    }
    else if(menuitem == 2 && frame == 2)
    {
      displayMenuItem(menuItem2, 15,true);
      displayMenuItem(menuItem3, 25,false);
      displayMenuItem(menuItem4, 35,false);
    }

    else if(menuitem == 5 && frame == 3)
    {
      displayMenuItem(menuItem3, 15,false);
      displayMenuItem(menuItem4, 25,false);
      displayMenuItem(menuItem5, 35,true);
    }

    else if(menuitem == 6 && frame == 4)
    {
      displayMenuItem(menuItem4, 15,false);
      displayMenuItem(menuItem5, 25,false);
      displayMenuItem(menuItem6, 35,true);
    }

      else if(menuitem == 5 && frame == 4)
    {
      displayMenuItem(menuItem4, 15,false);
      displayMenuItem(menuItem5, 25,true);
      displayMenuItem(menuItem6, 35,false);
    }
      else if(menuitem == 4 && frame == 4)
    {
      displayMenuItem(menuItem4, 15,true);
      displayMenuItem(menuItem5, 25,false);
      displayMenuItem(menuItem6, 35,false);
    }
    else if(menuitem == 3 && frame == 3)
    {
      displayMenuItem(menuItem3, 15,true);
      displayMenuItem(menuItem4, 25,false);
      displayMenuItem(menuItem5, 35,false);
    }
        else if(menuitem == 2 && frame == 2)
    {
      displayMenuItem(menuItem2, 15,true);
      displayMenuItem(menuItem3, 25,false);
      displayMenuItem(menuItem4, 35,false);
    }
    else if(menuitem == 4 && frame == 3)
    {
      displayMenuItem(menuItem3, 15,false);
      displayMenuItem(menuItem4, 25,true);
      displayMenuItem(menuItem5, 35,false);
    }
    display.display();
  }
  else if (page==2 && menuitem == 1)
  {
   displayIntMenuPage(menuItem1, contrast);
  }

  else if (page==2 && menuitem == 2)
  {
   displayIntMenuPage(menuItem2, volume);
  }
   else if (page==2 && menuitem == 3)
  {
   displayStringMenuPage(menuItem3, language[selectedLanguage]);
  }
  else if (page==2 && menuitem == 4)
  {
   displayStringMenuPage(menuItem4, difficulty[selectedDifficulty]);
  }
  else if (page==2 && menuitem == 4)
  {
   displayStringMenuPage(menuItem4, difficulty[selectedDifficulty]);
  }

  }

  void resetDefaults()
  {
    contrast = 60;
    volume = 50;
    selectedLanguage = 0;
    selectedDifficulty = 0;
    setContrast();
    backlight = true;
    menuItem5 = "Light: ON";
    turnBacklightOn();
  }

  void setContrast()
  {
    display.setContrast(contrast);
    display.display();
  }

  void turnBacklightOn()
  {
    digitalWrite(7,LOW);
  }

    void turnBacklightOff()
  {
    digitalWrite(7,HIGH);
  }

  void timerIsr() {
  encoder->service();
}

void displayIntMenuPage(String menuItem, int value)
{
    display.setTextSize(1);
    display.clearDisplay();
    display.setTextColor(BLACK, WHITE);
    display.setCursor(15, 0);
    display.print(menuItem);
    display.drawFastHLine(0,10,83,BLACK);
    display.setCursor(5, 15);
    display.print("Value");
    display.setTextSize(2);
    display.setCursor(5, 25);
    display.print(value);
    display.setTextSize(2);
    display.display();
}

void displayStringMenuPage(String menuItem, String value)
{
    display.setTextSize(1);
    display.clearDisplay();
    display.setTextColor(BLACK, WHITE);
    display.setCursor(15, 0);
    display.print(menuItem);
    display.drawFastHLine(0,10,83,BLACK);
    display.setCursor(5, 15);
    display.print("Value");
    display.setTextSize(2);
    display.setCursor(5, 25);
    display.print(value);
    display.setTextSize(2);
    display.display();
}

void displayMenuItem(String item, int position, boolean selected)
{
    if(selected)
    {
      display.setTextColor(WHITE, BLACK);
    }else
    {
      display.setTextColor(BLACK, WHITE);
    }
    display.setCursor(0, position);
    display.print(">"+item);
}

void readRotaryEncoder()
{
  value += encoder->getValue();

  if (value/2 > last) {
    last = value/2;
    down = true;
    delay(150);
  }else   if (value/2 < last) {
    last = value/2;
    up = true;
    delay(150);
  }
}
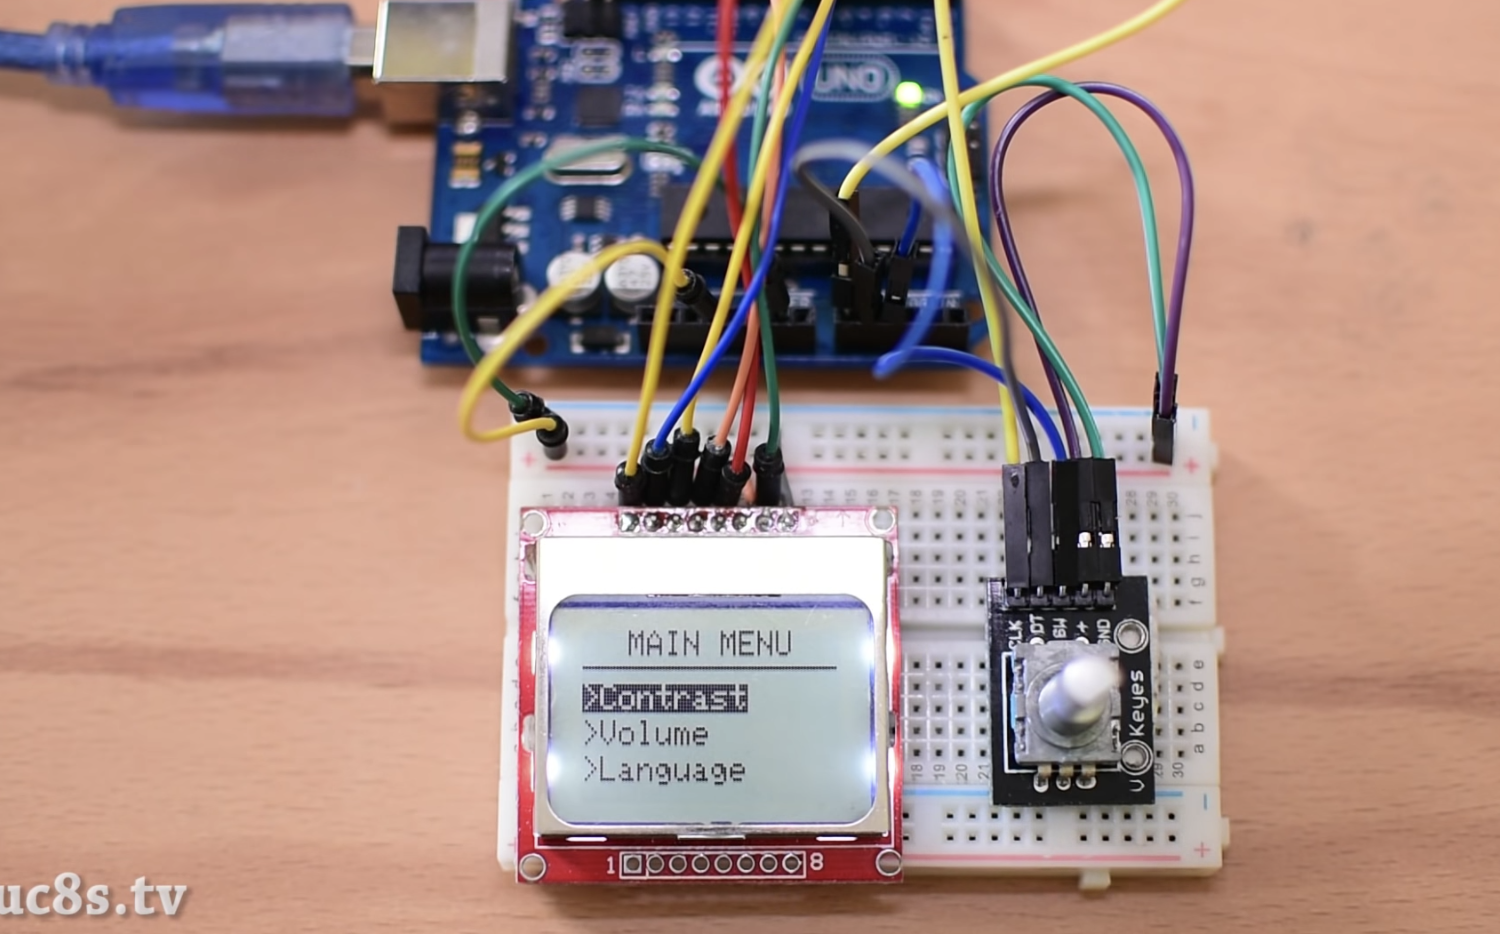
Demo
Verify your connections, by comparing with the schematics above, to ascertain that everything is as it should be. With that done, connect your board to the computer and upload the sketch to it. You should see the screen come on with the menu displayed. Try to turn the knob in different directions to navigate the menu and use the click feature of the knob to select an option.
That’s it for today’s tutorial, thanks for reading and building along. What project will you add this cool feature to? Share via the comment section below. Also, reach out via the comment section if you have any question.
Till next time!
The video version of this tutorial is available on Youtube.
On your LCD PIN OUT it would be good to know the actual name of the pins as my LCD is not the same PIN out as yours. The one I have is the Sparkfun version, and its pin out is 1.VCC, 2. GND, 3, SCS, 4. RST, 5. D/C, 6. DNK, 7. SCLK, 8. LED. So if you provided yours I could translate ito the lay out my LCD 5110 has. But thank you for this tutorial,
This is good, but could you actually comment the code? Your explanations are very high level, and will not be very useful in identifying what any given line is intended to to. You’re using a sentence or two to explain up to about a hundred lines of code, which is not very educational.