Rotary Encoder with Arduino and Nokia 5110 LCD Tutorial
Introduction Today we will take a look at using a rotary encoder with Arduino and displaying rotation data on the Nokia 5110 LCD display. A rotary encoder is an electro-mechanical device that converts angular position or the rotation of a shaft into analog or digital values.
Introduction
Today we will take a look at using a rotary encoder with Arduino and displaying rotation data on the Nokia 5110 LCD display.
A rotary encoder is an electro-mechanical device that converts angular position or the rotation of a shaft into analog or digital values. They are mainly of two types, absolute and incremental rotary encoders. The output of the absolute encoders indicates the current position of the shaft, making it more of an angle transducer. The output of incremental encoders provides information about the motion of the shaft, this can then be further processed to give information such as speed, distance and position among others.
By turning the shaft to the right or left, we either get an increase or decrease in value. One of the major advantage of rotary encoders is the fact that rotation is limitless. If the maximum position, (which is 20 for the particular rotary encoder used in this tutorial) is reached, the device starts the position counting all over again while the value attached to the position continues to increase/decrease with every turn of the knob in the same direction. This means we could still keep increasing the value associated with turning the rotary encoder so far we keep rotating in the same direction.
Rotary encoders are used in many applications that require precision and limitless rotation, like industrial controls, Robotics, computers and micro-controller based applications like the one we are working on today.
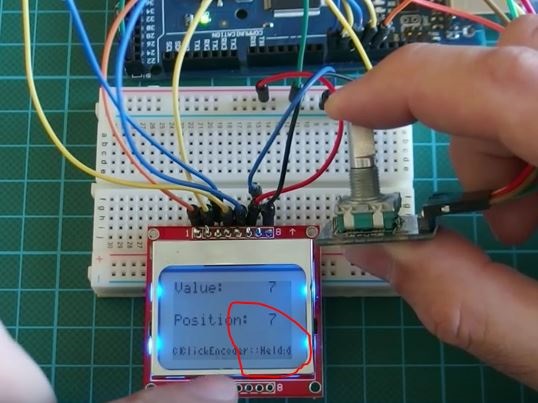
Another good thing about this rotary encoder is the fact that it comes with a button attached so you can click by pressing the nob as shown in the image below and the click/press will be recognized by the Arduino like a button input press, just as it will if it were any other button.
When the button is clicked and held down, Arduino will recognize that and when released the Arduino will also recognize it has been released.
This feature makes the rotary encoder very useful and versatile.
Project parts
For this project, we will need the following components.
These components can be bought from the links attached.
Schematics
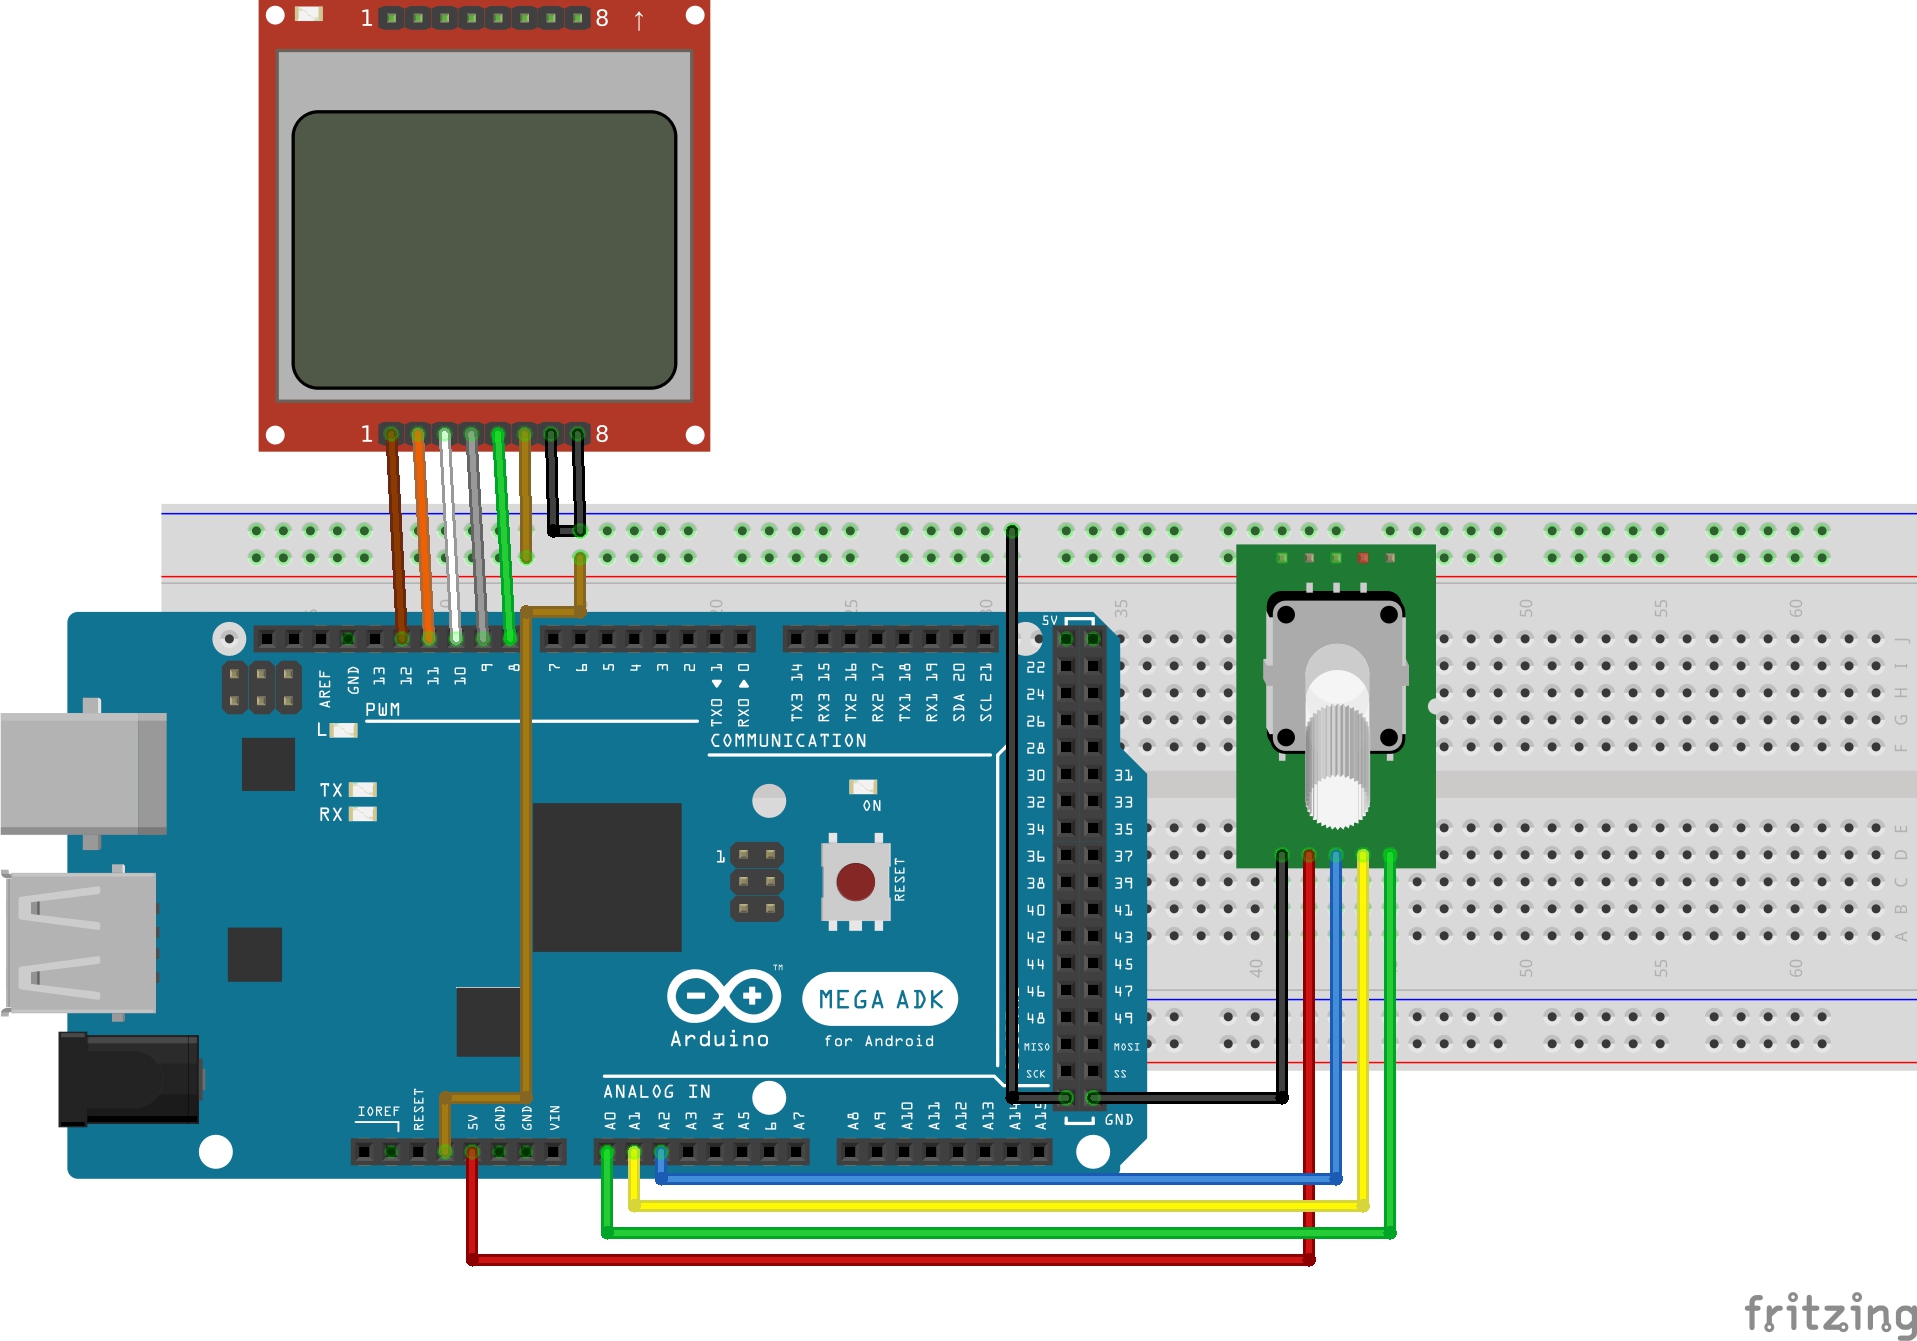
Its time to connect the components as described.
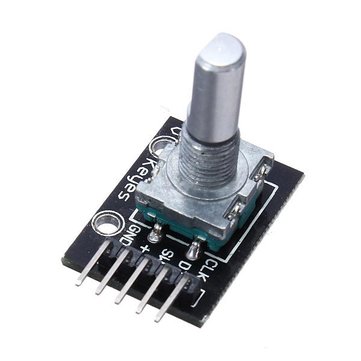
The rotary encoder used in this tutorial is available on ebay for $1 – $2. This rotary encoder has 20 positions and it can be clicked as earlier described. It has 5 pins and it is connected to the Arduino as shown in the schematics below.
For more clarity here is a pin map
Rotary Encoder - Arduino
Pin 1(GND) - GND
Pin 2(5v) - 5v
Pin 3(SW)- A2
Pin 4(DT) - A1
Pin 5(CLK) - A0
from the last tutorial, we went through the connection for the LCD but just in case you missed it, connect the LCD also as shown in the schematics above.
Nokia 5110 - Arduino
Pin 1(RST) – D12
Pin 2(CE) – D11
Pin 3(DC) – D10
Pin 4(DIN) – D9
Pin 5(CLK) – D8
Pin 6(VCC) - VCC
Pin 7(LIGHT) - GND
Pin 8(GND) - GND
The light pin, when connected to ground turns the backlight “ON” while connecting it to VCC turns it “OFF”.
The display has two sides to which the headers pins can be connected. You can pick one of the sides and solder header pins so that the display can fit firmly on the breadboard. This display works best when on 3.3 volts, so its probably best to power it with 3.3v.
With all connected. we can move to write the code.
Code
The code for this project is heavily dependent on the Timerone and the encoder libraries which can be downloaded from the links attached to them. Install these libraries in your arduino IDE and launch the IDE to start coding. You can learn how to install Arduino Libraries from several other tutorials on this website.
Before I drop the entire code, as usual, here is a code breakdown to show why each part of the code is important.
This first few lines of code below include all the needed libraries for this code. Without the libraries, it would have been more time consuming than normal so we say thank you to the authors of these wonderful libraries.
//Written by Nick Koumaris
//info@educ8s.tv
//educ8s.tv
#include <ClickEncoder.h>
#include <TimerOne.h>
#include <LCD5110_Graph.h>
After including the Libraries the next thing we did was perform necessary setups to use the LCD like declaring the pins to which it is connected and setting up the fonts to be used.
LCD5110 lcd(8,9,10,12,11);
extern unsigned char SmallFont[];
extern unsigned char TinyFont[];
We round up the declaration by creating an encoder object and the variable value.
ClickEncoder *encoder;
int16_t last, value;
The timerisr() function uses the encoder service function
void timerIsr() {
  encoder->service();
}
We then proceed to the setup function.
The first thing we did under the setup function was to handle the initialization of the LCD, then setting up the font we in which we would like the text to be displayed.
lcd.InitLCD();
lcd.setFont(TinyFont);
We then display an introductory message “Rotary encoder” with the added center parameter indicating we want it printed at the center of the screen. We print “demo” immediately after it then the lcd.update method is called to display the rotary encoder followed by demo on the screen.
lcd.print("Rotary Endcoder",CENTER,0);
lcd.print("DEMO",CENTER,20);
lcd.update();
We then set a delay to allow the text to spend some time on the screen.
After the delay, we proceed to create the click encoder object with the pins to which our encoder was connected as parameters.
delay(2000);
lcd.setFont(SmallFont);
encoder = new ClickEncoder(A1, A0, A2);
encoder->setAccelerationEnabled(false);
After the setup function, we move to the loop function. The first few lines of code within the loop function handles the creation of variables that will be used later in the code, the include encoder value which increases when the encoder is turned continuously in the same direction and the encoder position which goes from 0 to 20, but since our encoder has no rotational limit, it starts again from zero.
void loop() {
  int encoderValue;
  int encoderPosition;
  lcd.setFont(SmallFont);
  char encoderValueArray[3];
  char encoderPositionArray[3];
The value variable is increased by each turn of the rotary encoder (increase in position).
value += encoder->getValue();
The next part of the code handles the display of the value generated from the rotation of the encoder and the position of the rotation.
if (value/4 != last) {
    encoderValue = value/4;
    encoderPosition = encoderValue%20;

    last = encoderValue;

    lcd.clrScr();
    lcd.print("Value: ",LEFT,0);
    dtostrf(encoderValue, 3, 0, encoderValueArray);
    lcd.print(encoderValueArray,LEFT+55,0);

    dtostrf(encoderPosition, 3, 0, encoderPositionArray);
    lcd.print("Position:",LEFT,20);

    if(encoderPosition <0)
      encoderPosition = -encoderPosition;
    lcd.print(encoderPositionArray,LEFT+55,20);

    //Serial.print("\n");
    lcd.update();
  }
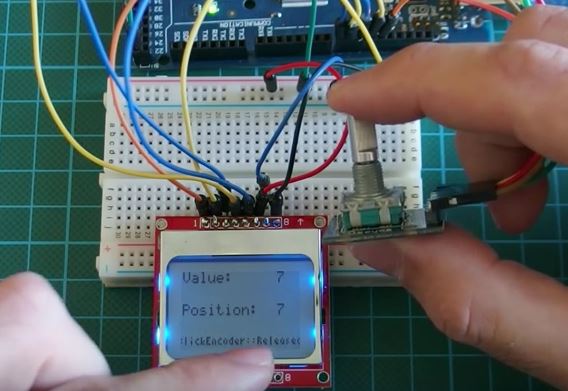
With the rotary part handled, the next part of the code handles the click event. The click event is in four forms; pressed, Held, Released, click and double click. Each of this action was programmed to display its status at the bottom of the screen.
ClickEncoder::Button b = encoder->getButton();
 if (b != ClickEncoder::Open) {
   #define VERBOSECASE(label) case label:lcd.setFont(TinyFont);lcd.print(#label,CENTER,40);lcd.update(); break;
   switch (b) {
     VERBOSECASE(ClickEncoder::Pressed);
     VERBOSECASE(ClickEncoder::Held)
     VERBOSECASE(ClickEncoder::Released)
     VERBOSECASE(ClickEncoder::Clicked)
     case ClickEncoder::DoubleClicked:
         encoder->setAccelerationEnabled(!encoder->getAccelerationEnabled());
       break;
The projects complete code is found below and in the attachment at the end of the tutorial.
//Written by Nick Koumaris
//info@educ8s.tv
//educ8s.tv

#include <ClickEncoder.h>
#include <TimerOne.h>
#include <LCD5110_Graph.h>

LCD5110 lcd(8,9,10,12,11);
extern unsigned char SmallFont[];
extern unsigned char TinyFont[];

ClickEncoder *encoder;
int16_t last, value;

void timerIsr() {
  encoder->service();
}

void setup() {

  lcd.InitLCD();
  lcd.setFont(TinyFont);
  lcd.print("Rotary Endcoder",CENTER,0);
  lcd.print("DEMO",CENTER,20);
  lcd.update();
  delay(2000);
  lcd.setFont(SmallFont);
  encoder = new ClickEncoder(A1, A0, A2);
  encoder->setAccelerationEnabled(false);

  Timer1.initialize(1000);
  Timer1.attachInterrupt(timerIsr);
  last = -1;
}

void loop() {
  int encoderValue;
  int encoderPosition;
  lcd.setFont(SmallFont);
  char encoderValueArray[3];
  char encoderPositionArray[3];

  value += encoder->getValue();

  if (value/4 != last) {
    encoderValue = value/4;
    encoderPosition = encoderValue%20;

    last = encoderValue;

    lcd.clrScr();
    lcd.print("Value: ",LEFT,0);
    dtostrf(encoderValue, 3, 0, encoderValueArray);
    lcd.print(encoderValueArray,LEFT+55,0);

    dtostrf(encoderPosition, 3, 0, encoderPositionArray);
    lcd.print("Position:",LEFT,20);

    if(encoderPosition <0)
      encoderPosition = -encoderPosition;
    lcd.print(encoderPositionArray,LEFT+55,20);

    //Serial.print("\n");
    lcd.update();
  }

  ClickEncoder::Button b = encoder->getButton();
  if (b != ClickEncoder::Open) {
    #define VERBOSECASE(label) case label:lcd.setFont(TinyFont);lcd.print(#label,CENTER,40);lcd.update(); break;
    switch (b) {
      VERBOSECASE(ClickEncoder::Pressed);
      VERBOSECASE(ClickEncoder::Held)
      VERBOSECASE(ClickEncoder::Released)
      VERBOSECASE(ClickEncoder::Clicked)
      case ClickEncoder::DoubleClicked:
          encoder->setAccelerationEnabled(!encoder->getAccelerationEnabled());
        break;
    }
  }
}
Copy the code into your Arduino IDE after library installation and upload to the Arduino board. It should work like a charm.
The code is also attached as a zip file at the bottom of this tutorial.
You can watch the video tutorial of this project on youtube here.
That’s it guys, see you soon.