Programming the ATtiny10 with Platform.io IDE
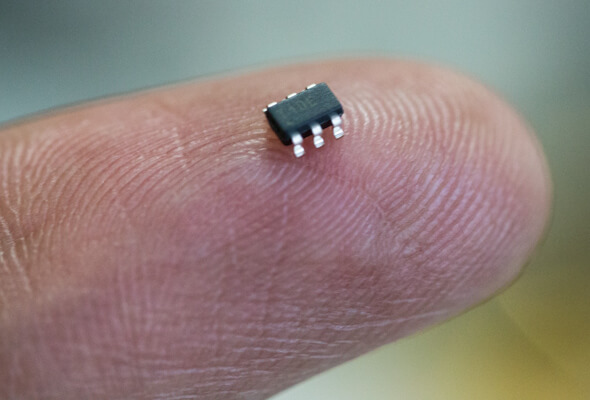
The ATtiny10 is a high-performance, low-power Microchip 8-bit AVR RISC-based microcontroller which combines 1KB ISP flash memory, 32B SRAM, 4x general-purpose I/O lines, 16 general purpose working registers, a 16-bit timer/counter with two PWM channels, internal and external interrupts, programmable watchdog timer with internal oscillator, an internal calibrated oscillator, a 4-channel/8-bit A/D converter, and four software selectable power saving modes, all these into a tiny 6 pin SOT23 package. For DIY enthusiasts and product designers who are looking to build products with low power consumption and a form factor, the ATtiny10 is definitely one of the microcontrollers that should be considered as it supports voltage levels between 1.8V and 5.5V.
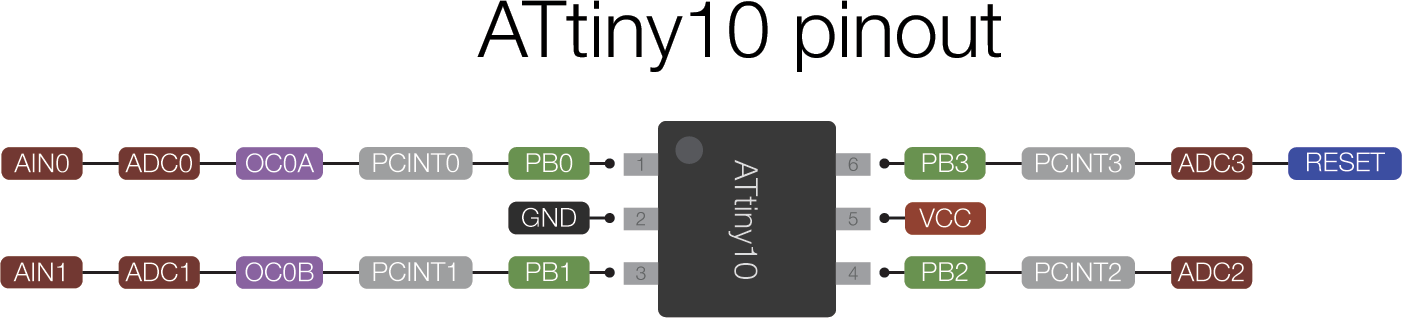
The ATtiny10 is a high-performance, low-power Microchip 8-bit AVR RISC-based microcontroller which combines 1KB ISP flash memory, 32B SRAM, 4x general-purpose I/O lines, 16 general purpose working registers, a 16-bit timer/counter with two PWM channels, internal and external interrupts, programmable watchdog timer with internal oscillator, an internal calibrated oscillator, a 4-channel/8-bit A/D converter, and four software selectable power saving modes, all these into a tiny 6 pin SOT23 package. For DIY enthusiasts and product designers who are looking to build products with low power consumption and a form factor, the ATtiny10 is definitely one of the microcontrollers that should be considered as it supports voltage levels between 1.8V and 5.5V.
One of the challenges using ATtiny10, however, is the difficulty in programming. It traditionally requires familiarity with Softwares like the AVR Atmel studio which is not as common as it used to be and does not offer the ease associated with other platforms like the Arduino IDE.
In one of our recently published articles, we examined how you could program ATtiny microcontrollers using the Arduino IDE, to enjoy the same ease that is experienced when programming the Arduino development boards. So for today’s tutorial, we will take things a notch higher and examine how you can program these tiny microcontrollers using a more robust tool; the Platform.io IDE.
A lot of professional firmware developers using the Arduino IDE find it quite problematic, and with the full-version launch of the Arduino Pro IDE which is supposed to come with the amazing features like code IntelliSense and debugging features that we all crave, still in limbo, one tool that has continued to grow in reputation among DIY enthusiast and even professionals is the Platform.io IDE. The IDE is used as an extension for editors like Visual Studio Code and Atom, and it provides users with control, debugging, code completion, and other interesting features that you’d desire from an IDE.
The process is not yet entirely out-of-the-box, but the complexity level is low and you should be up to speed in no time. For the demonstration, we will program the ATtiny10 to run the Blink LED example. Turning on and off an LED connected to one of its pins at time intervals.
Ready? Let’s go
Required Components
The following components are required for this tutorial;
- Attiny10
- 6pin SOT23 to DIP Adapter (PCB Board or Socket)
- 220R Resistor
- LED
- Breadboard
- Jumper Wire
- USBASP programmer
All of these components can be bought from your favorite online components store. Since the Attiny10 comes in a SOT23 non-breadboard friendly form-factor, an easy way to use it is to get the MCU on a the 6 pin SoT23 to DIP adapter.
Setting up Platform.io IDE
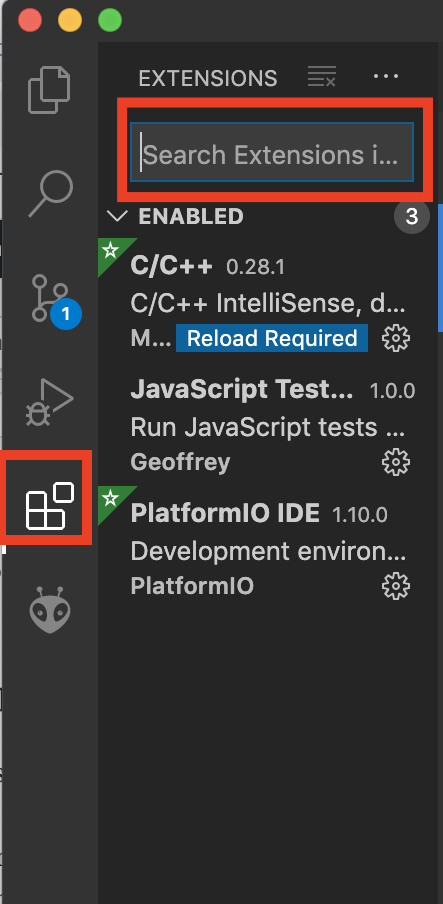
Feel free to skip this paragraph if you already use Platform.io. For first time users however, the first thing you will need to do is to download and install Visual Studio Code or Atom. I prefer to use the Visual Studio Code as its more stable. With your Visual Studio Installed, click on the Extensions icon. Enter Platform.io in the extensions search bar and hit the install button when its in view.
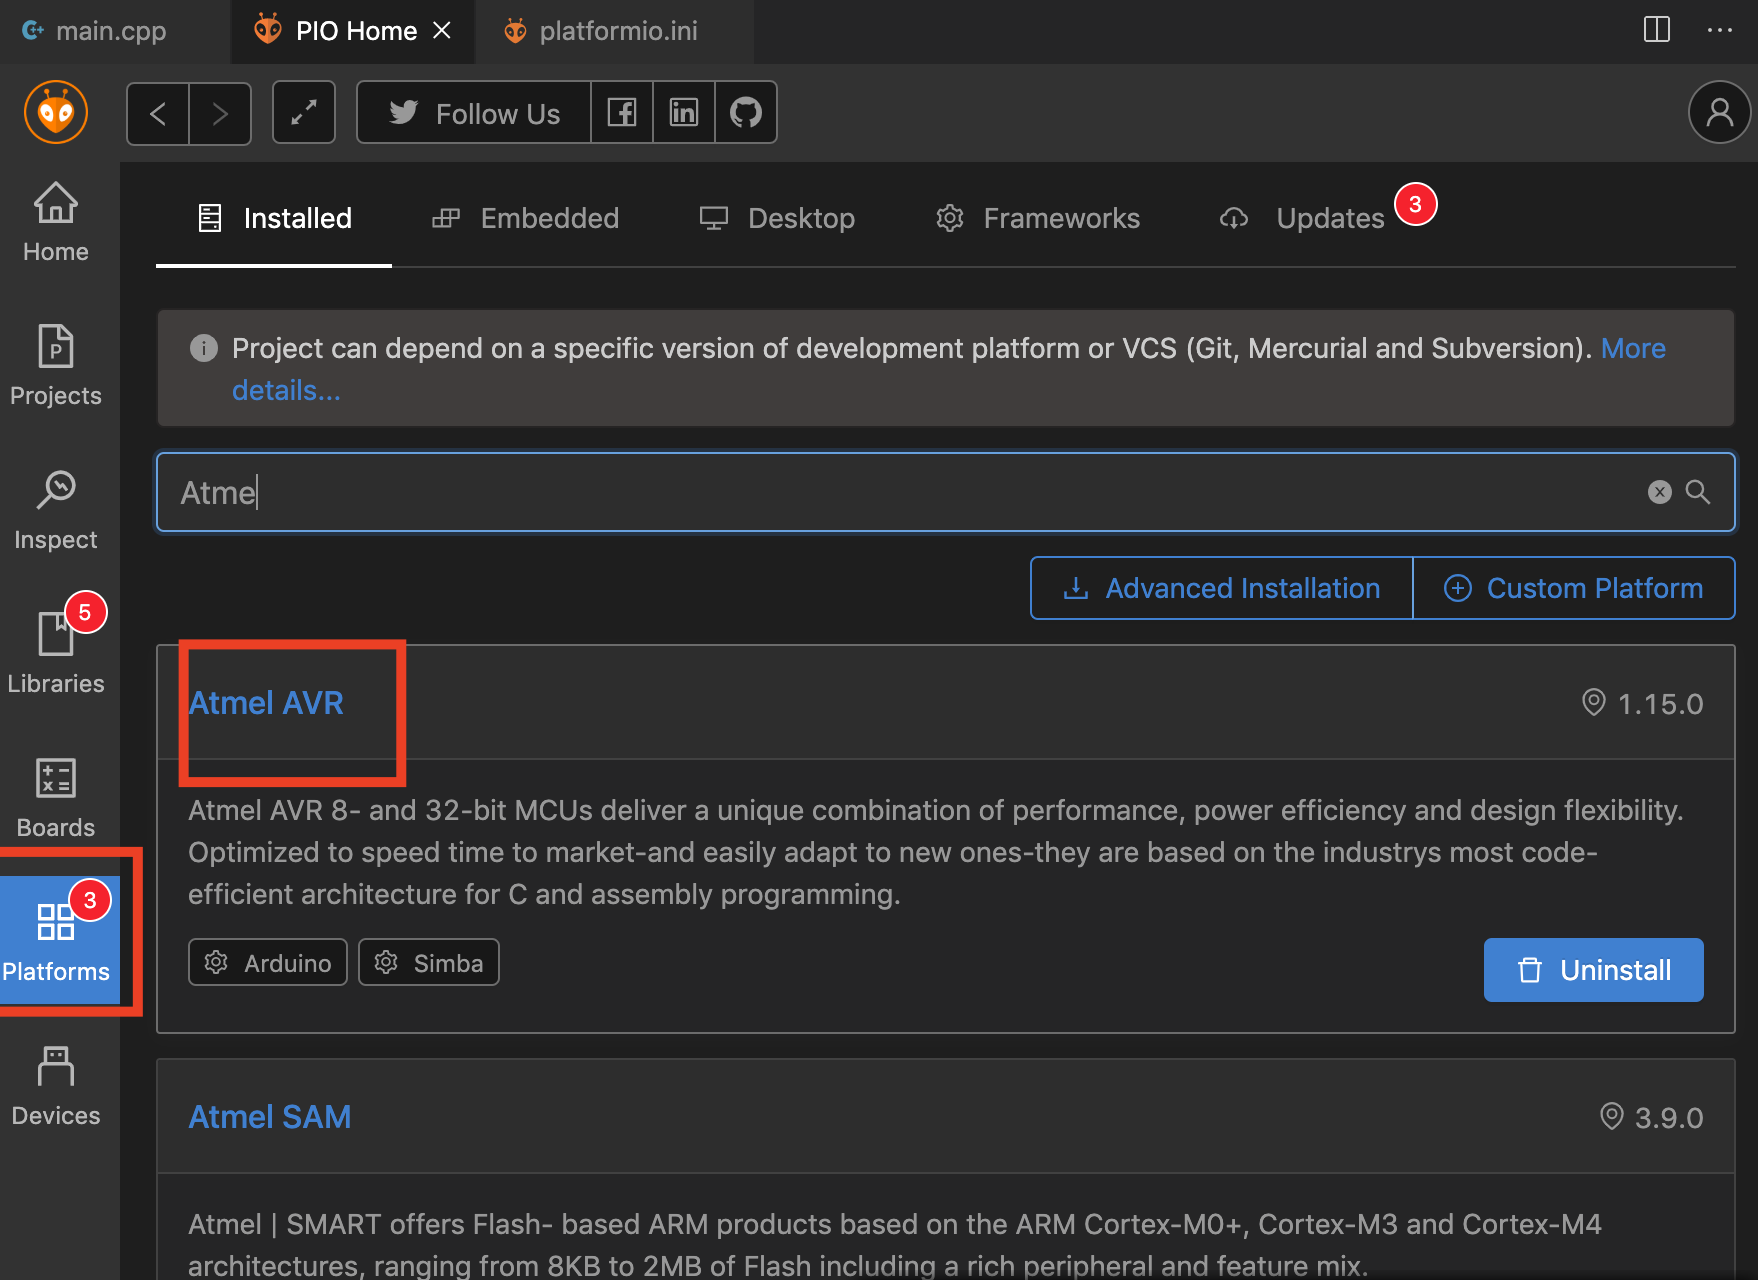
Next, we need to install the Atmel AVR Platform. With Platform.io installed, the Platform.io PIO home should automatically be launched. When it does click on the Platforms button and enter Atmel AVR into the search bar. This should bring out a list of installed/available platforms. Click the install button to install the platform. If you have used an Arduino board with the platform.io IDE before there is a good chance the Atmel AVR platform will already be installed. If this is the case, just update if necessary and move to the next step.
The Atmel AVR platform contains a number of MCU/board definitions from which you select when launching a new project. These board types along with the framework provide all the configurations that are used to compile and upload code to your microcontroller.
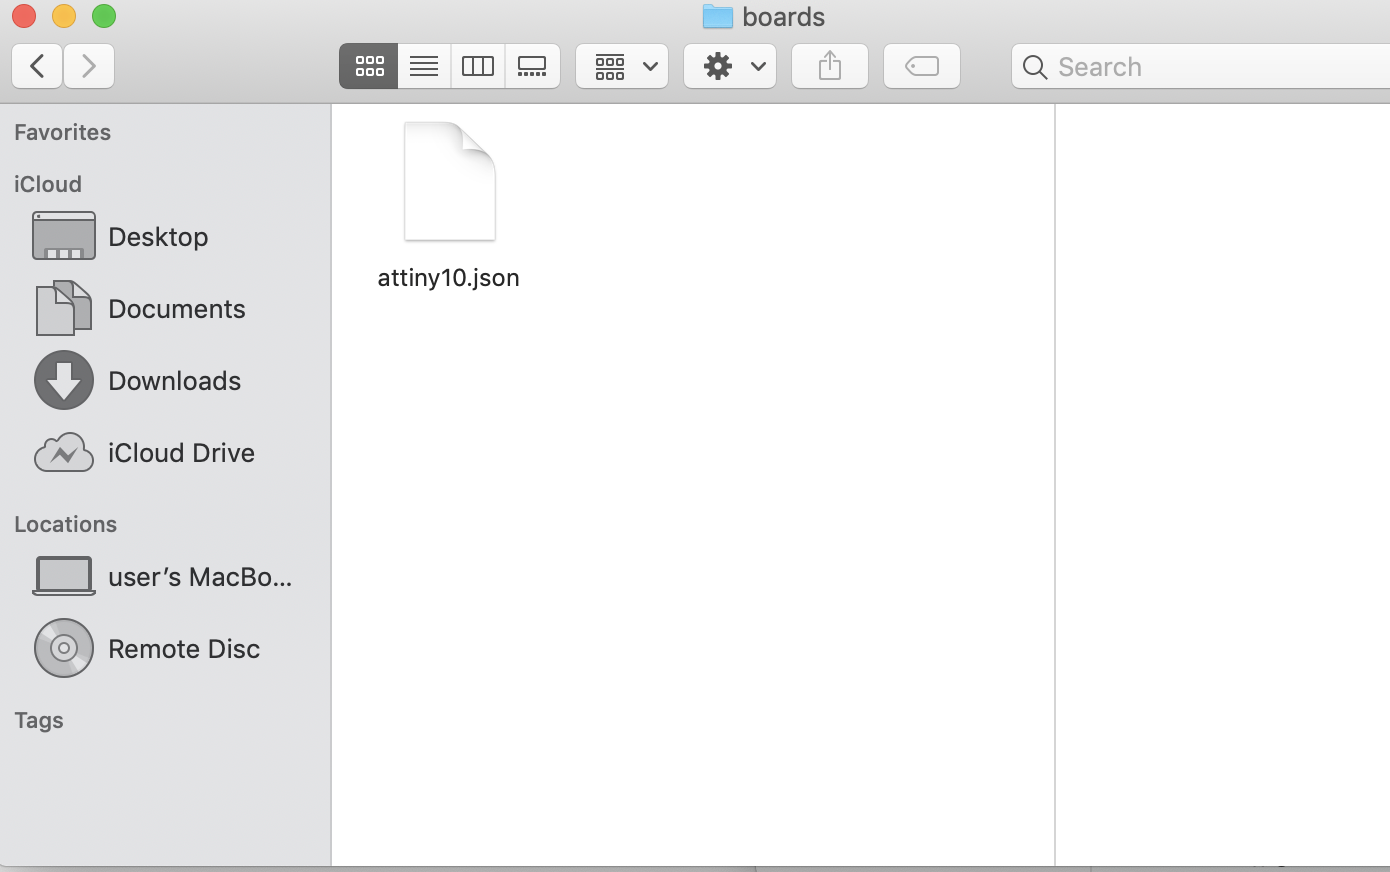
By default, the ATtiny10 board type is not listed among the board types so we need to create a custom board type for it. We do this by going to the Platform.io folder and creating a new folder named “boards” within it. In the new folder, create a JSON file named attiny10.json and copy the lines below, into the file.
{
  "build": {
    "f_cpu": "1000000L",
    "mcu": "attiny10"
  },
  "name": "ATtiny10",
  "upload": {
    "maximum_ram_size": 32,
    "maximum_size": 1024,
    "protocol": "usbasp"
  },
  "url": "http://www.atmel.com/devices/ATTINY10.aspx",
  "vendor": "Atmel"
}
You can create the file using Xcode or any editor you are familiar with. Just make sure the extension is ‘.json”. Not sure about the directory for windows users but for macOS users, the platform.io folder should be in the directory “/Users/[your username]/.platformio“. The folder is naturally hidden so you will need to press “Command+Shift+.” to show all hidden folders.
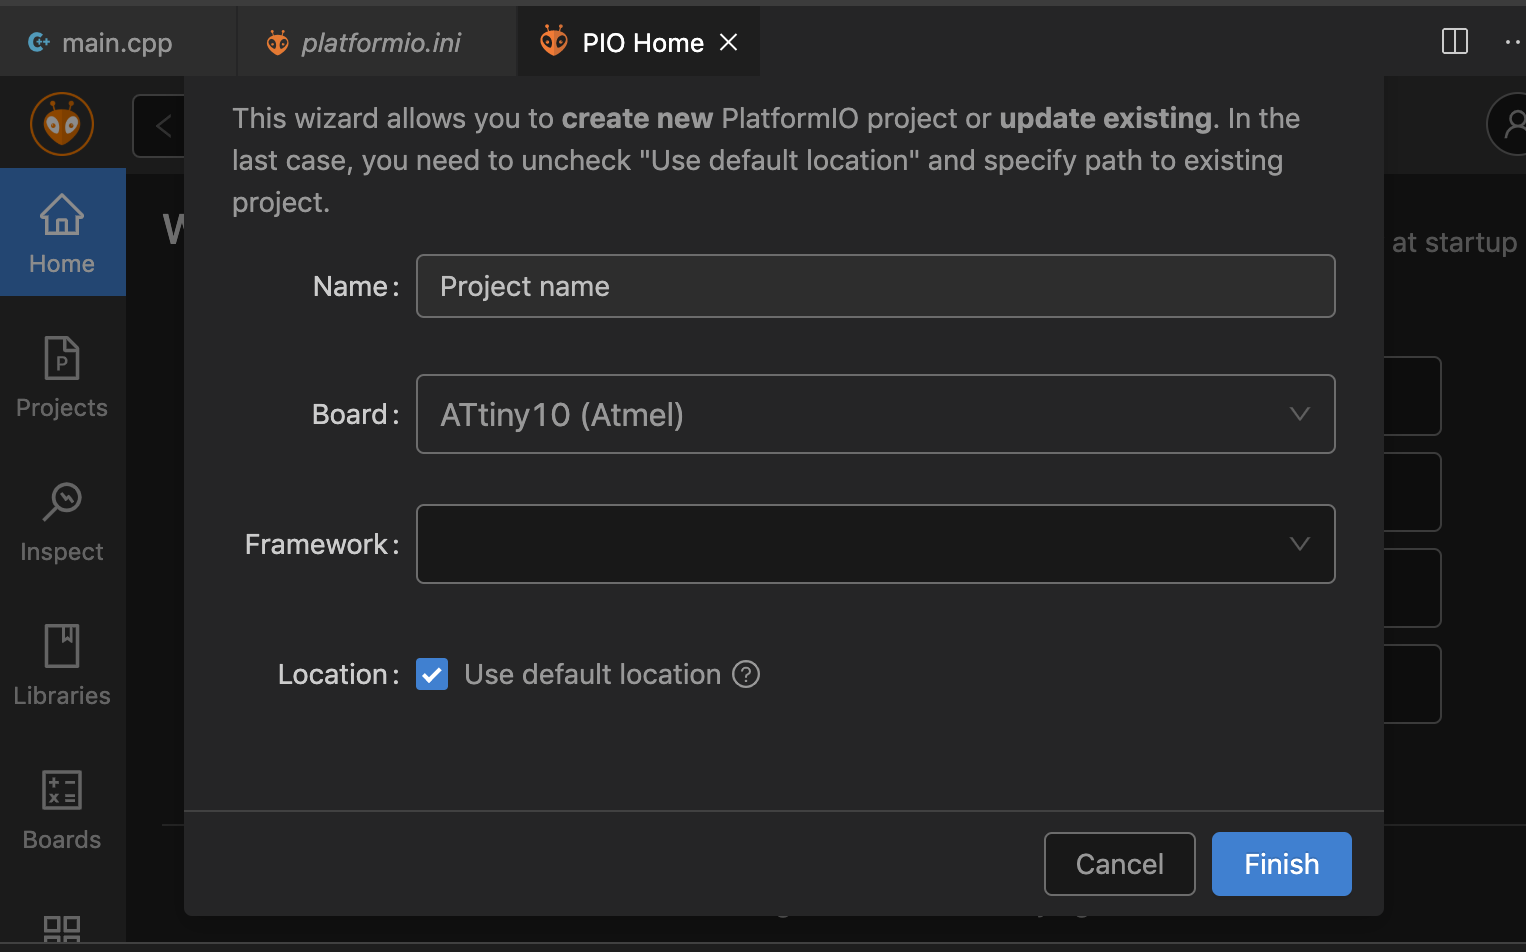
With this done, relaunch the IDE, click on the PIO home button and click on the new project option button. You should now see the Attiny10 board among the board options.
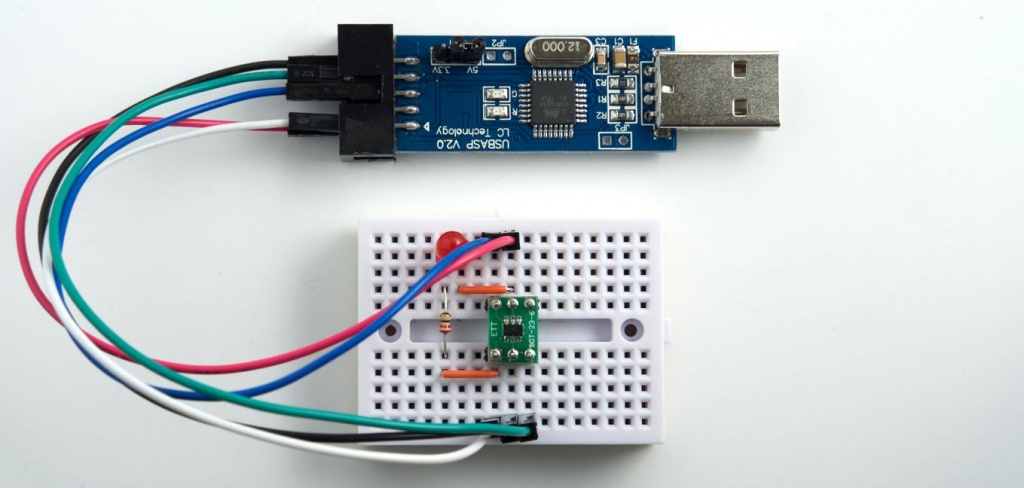
Schematics
As mentioned during the introduction, for demonstration, we will implement the blink example using an LED connected to pin PB0 of the Attiny10. Connect the LED as shown in the image below;
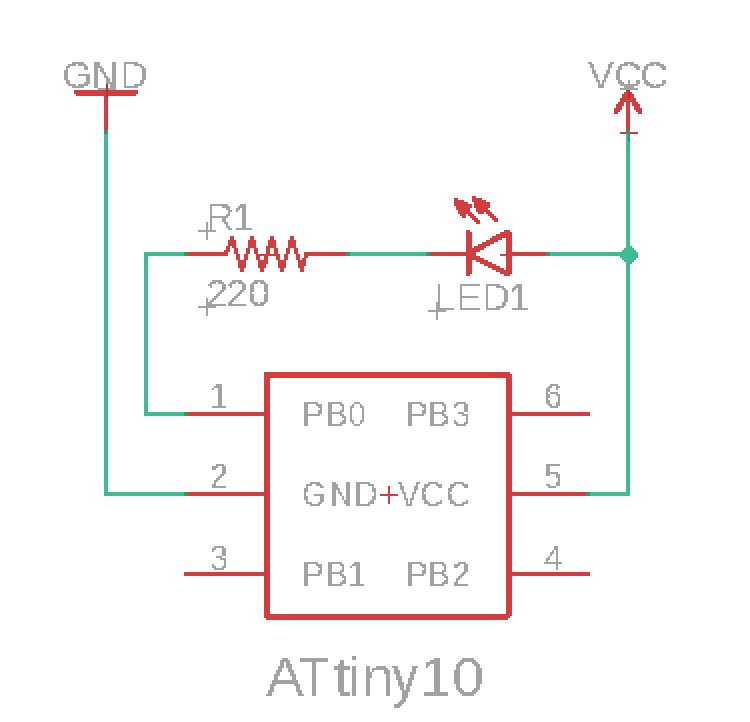
I believe the connection is quite straightforward and easy to understand, but feel free to hit me up via the comment section if you need any clarifications.
Code
With the components connected, the next step is to write the code. As mentioned earlier the goal of the project is basically to implement the blink example to turn on/off the LED at intervals, as a result of this, the code is short and straight forward.
Navigate to the src. folder on the left pane of the VScode interface, the Platform.io file explorer panel, and select main.cpp file. If the file was not created automatically, right-click on src, select “new file” and name the file main.cpp. This should open an empty code (tab) where you are expected to enter your code. Enter the code below into the pane and save it.
#include <avr/io.h>

int main () {
  DDRB = 1;                    // PB0 as an output
  TCCR0A = 1<<COM0A0;          // Toggle OC0A
  TCCR0B = 1<<WGM02 | 3<<CS00; // CTC mode and set prescaler to 64
  OCR0A = 3905;                // Frequency 2Hz
  while (1);
}
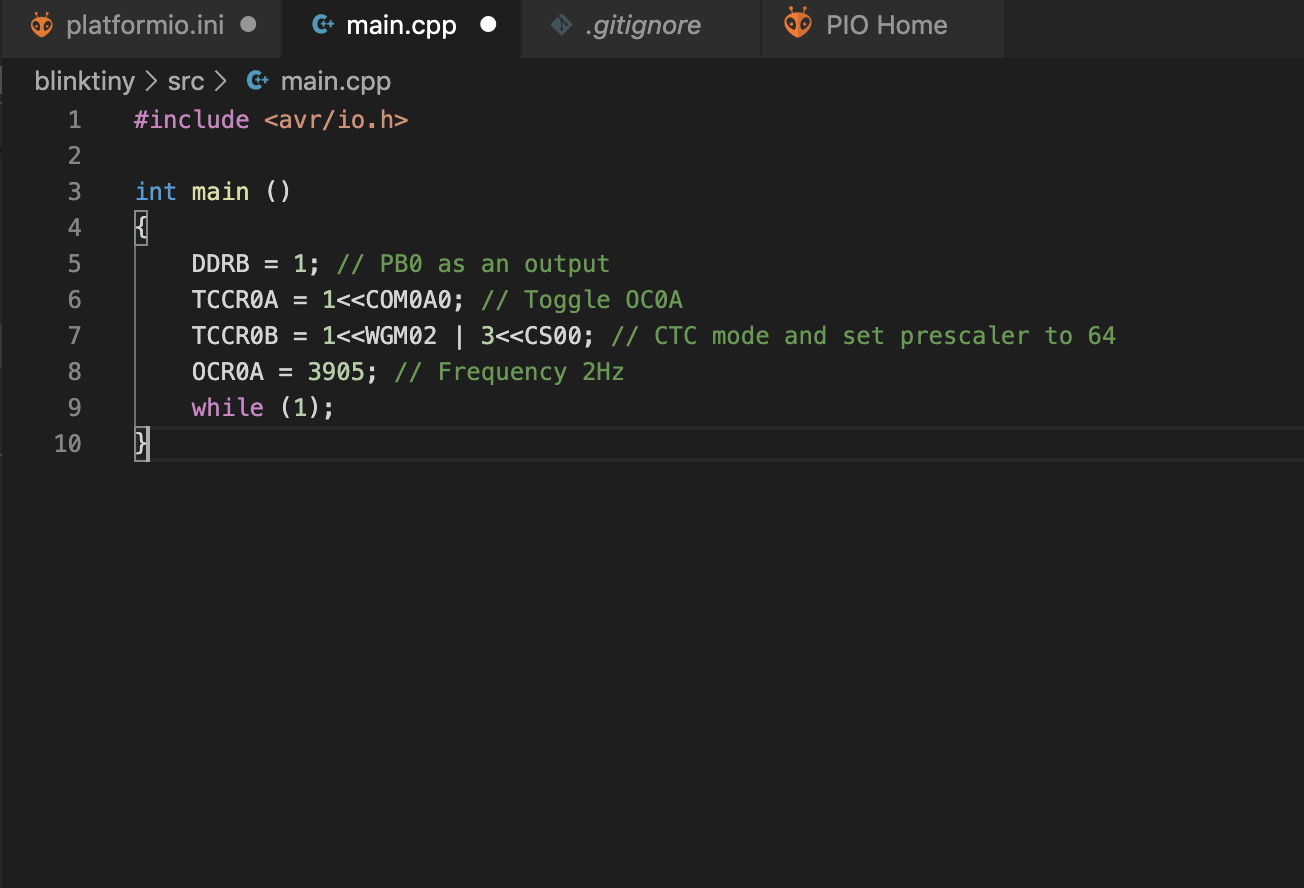
The code is quite straight forward. It starts by including the avr/io library which helps with pin definitions, then follows with the main function. The main function starts with the declaration of pin PB0 to which the led is connected as output in an operation similar to the Arduino pinMode function.
#include <avr/io.h>

int main ()
{
  DDRB = 1;   //
Next, the pin is toggled using its PWM properties, the Prescaler is set to 64, and the frequency is set as 2Hz.
TCCR0A = 1<<COM0A0; // Toggle OC0A
TCCR0B = 1<<WGM02 | 3<<CS00; // CTC mode and set prescaler to 64
OCR0A = 3905; // Frequency 2Hz
The while(1) command is then called to keep it running.
while (1);

}
Uploading the Code
With the code written, we have just one final step, which is flashing it on the Attiny10. There are two parts to do this, one is connecting a programmer to the ATtiny10 and the other involves fine-tuning configurations of Platform.io.
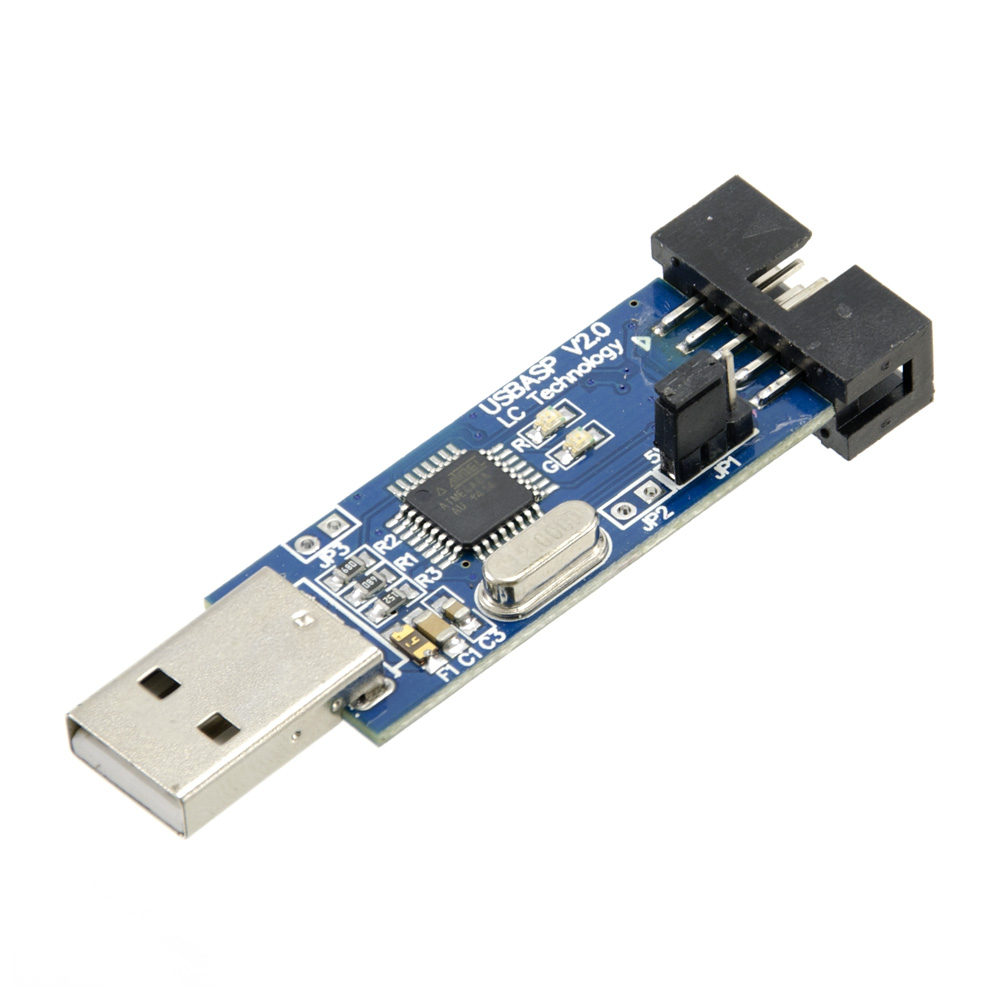
For the first part, while there are different types of programmers that can be used, for today’s project, we will use the fairly popular and cheap USBASP programmer which can be purchased from online electronics component stores like Aliexpress or Ebay. From my experience and that of others, most of these programmers don’t usually support the TPI protocol which is needed to program the ATtiny10, as such there is always a need to run a firmware update on the programmer.
To make it easy for the community and serve as a timeless reference resource, we covered how to update the firmware on the USBASP programmer a while back. So if this is the first time you will be using that particular programmer, check out the tutorial.
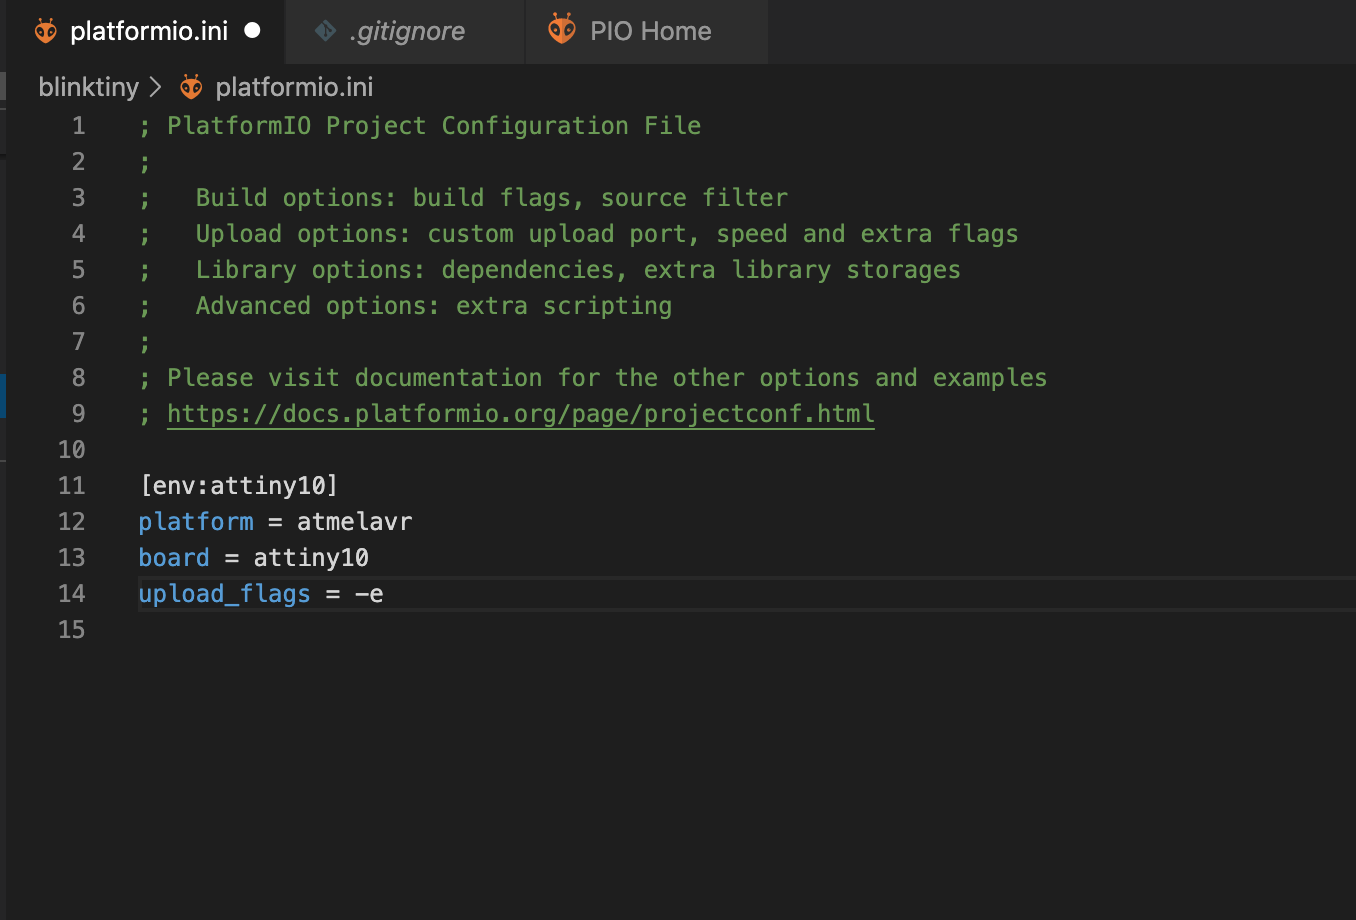
For the second part, Platform.io has different ways to flash a target device with firmware but for the sake of this tutorial, we will use the Upload button. By default, when the upload button is used, Platform.io will run the Upload task without erasing the memory. This leads to errors as the avrdude tries to verify that the code has been uploaded correctly as some part of the old program will still be in the memory. One of the good things about platform.io is the control it gives you over so many things from library version specifications to compilation configs via the platformio.ini file. To solve this problem with the upload button, add the last line in the code below to the platformio.ini file under the ATtiny10 environment.
[env:attiny10]
platform = atmelavr
board = attiny5
upload_flags = -e   ;This is the line to be added
The platformio.ini file should now look like the image below.
With this done and the USBASP connected to the microcontroller, you can go ahead and hit the upload button.
You should see the led begin to blink.
That’s it!
I Agree that this process is not very friendly to folks who are only familiar with Arduino C and not the raw C/C++ style of programming. For the ease which comes with it, I recommend the Arduino IDE route.
Feel free to reach out to me via the comments section if you have any difficulty with replicating this.
If it’s not compiling, add the following to the platformio.ini:
platform_packages = toolchain-atmelavr@~1.50400.0