USBASP Firmware update guide
The USBASP programmer is an important tool/accessory for embedded systems engineers/ firmware developers. It is a USB ICSP (In-Circuit Serial Programmer) that allows developers to easily upload firmware/bootloaders on AVR microcontrollers.
The USBASP programmer is an important tool/accessory for embedded systems engineers/ firmware developers. It is a USB ICSP (In-Circuit Serial Programmer) that allows developers to easily upload firmware/bootloaders on AVR microcontrollers. Unlike what you find to serial programmers like the USB-TTL converters, it does not use a dedicated chip as it runs on an atmega88 (or atmega8), and uses a firmware-only USB driver with no special USB controller required.
While this firmware-only USB driver approach increases its compatibility, it also introduces a major challenge to the programmer as it requires regular updates for compatibility with advancements in how microcontrollers are programmed. One such advancement is the Tiny Programming Interface (TPI) that allows external programmers to access the nonvolatile memory (NVM) of certain low-end Atmel microcontrollers like the ATtiny series.
While features like TPI has been around for a while, using a USBASP programmer is still a problem as both old and new USBASP devices require a firmware update before they can be used. To help users who need this feature, today’s tutorial will spotlight the process involved in updating the firmware on your USBASP programmer to the latest version.
Required Components
The following components are required to perform the firmware update:
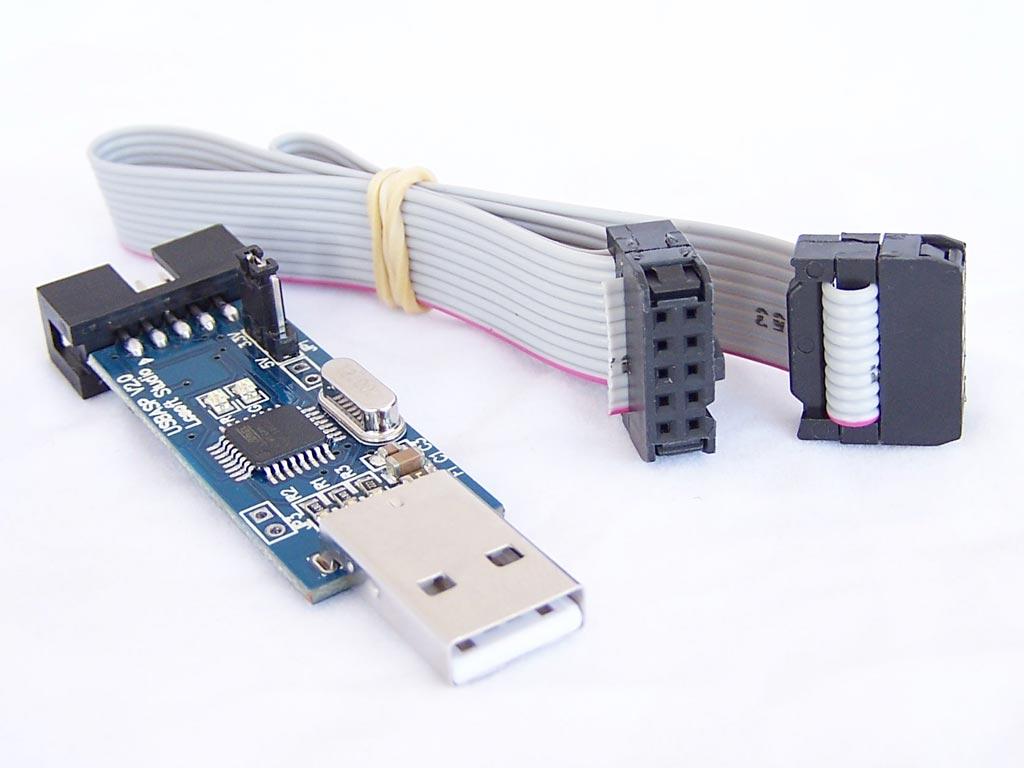
- The USBASP Programmer
- An Arduino Uno (a nano should equally work)
- Jumper wires
- Breadboard
USBASP programmers, irrespective of brand, typically have the same configuration, so this tutorial should work, irrespective of the type or brand that you have.
Prepare the Arduino Uno
Uploading firmware to the USBASP requires a programmer. For today’s tutorial, we will use an Arduino Uno as that programmer. To make the Arduino a programmer, we need to upload a sketch, available among the examples on the Arduino IDE, to the Arduino board. Follow the steps below to do this:
- Go to File > Examples > ArduinoISP
- Connect an Arduino board to your PC
- Select the port and board type and Click on Upload
With this done, the Arduino board is now ready to serve as a programmer.
Schematics
Next, we need to connect the USBASP to the Arduino Board. Using jumper wires and the breadboard (if necessary) connect the Arduino board and the USBASP device as shown in the image below:
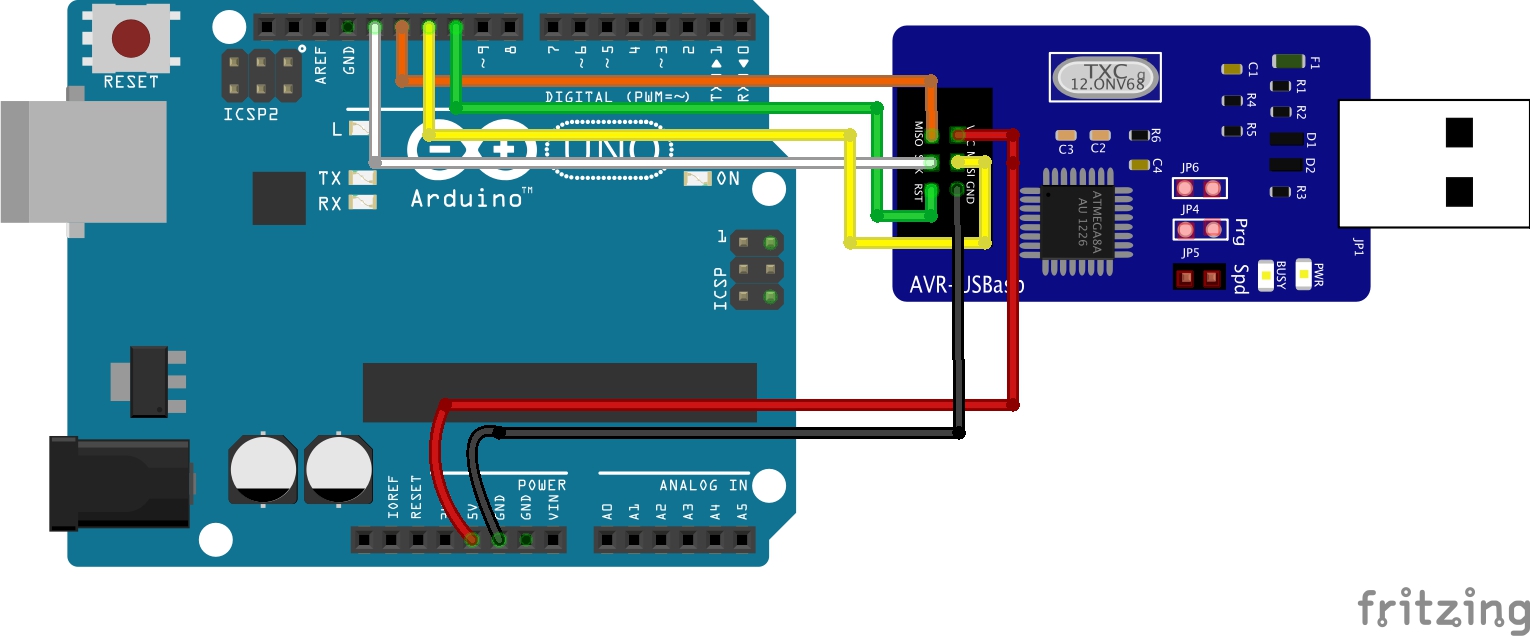
Since the fritzing model is not an exact replica of the popular USBASP types, a pin map showing how the Arduino is connected to the USBASP is provided below to make the connection easier to follow:
Arduino – USBASP
5v - VCC
GND - GND
D13 - SCK
D12 - MISO
D11 - MOSI
D10 - RESET
Go over the connections once again to ensure it’s properly done. If you have doubts about identifying the pins on your USBASP, you can run a google search for the pin-out of that particular board and use it as a guide for the connection.
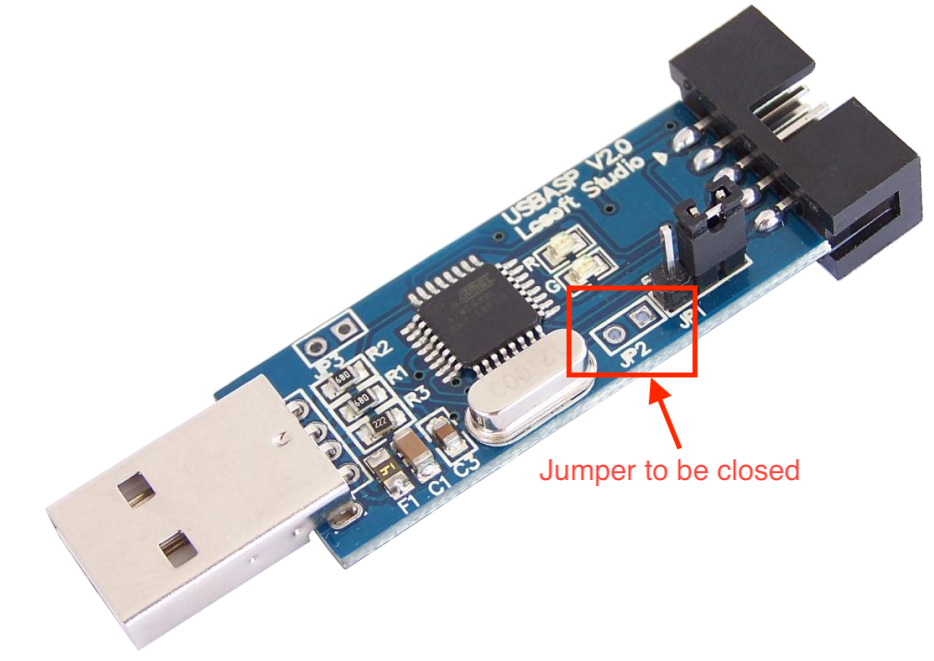
With the boards connected, one more thing we need to do is to close the Jumper JP2 (highlighted below) on the USBASP board. Without doing this, we will not be able to upload firmware to the device. Close the jumper by bridging it with solder led or jumper wires.
With this done we are now ready to upload the firmware.
Uploading the Firmware
We start by downloading the firmware. A repository containing the latest version of the firmware is maintained on Thomas Fischl’s website. As at the time of this writing, the latest version which thankfully has TPI support was released in May 2011. Download that.
A key ingredient of the firmware upgrade process is the AVRDUDE. If you are familiar with the Arduino IDE, you would definitely have seen a reference to it in the verbose during code upload. The AVRDUDE is an utility to download, upload, and manipulate the ROM and EEPROM contents of AVR microcontrollers using the in-system programming technique (ISP). The easiest way to get the AVRDUDE is by fetching its executable located within your Arduino folder -> “ARDUINO FOLDER”/Java/hardware/tools/avr/bin/ or you can downloading it.
Once you have it, the next step is to find it’s configuration file; avrdude.conf file, which (if you follow the Arduino IDE route) would be at the directory -> “ARDUINO FOLDER”/Java/hardware/tools/avr/etc/
Put these two files (the AVRdude executable and configuration file) inside a folder along with the .hex file of the USBasp firmware we just downloaded. This helps shorten the length of the final command. With these done, connect the Arduino with the USBasp programmer attached to it, to your computer, and note down the port that was assigned to the Arduino by your computer.
Finally, open a terminal window, navigate inside the folder we created earlier, and run the command below:
./avrdude -C ./avrdude.conf -p m8 -c avrisp -P /dev/cu.usbmodem14101 -b 19200 -U flash:w:usbasp.atmega8.2011-05-28.hex:i
Ensure you enter the right port after the option -P. If this succeeds without any error message, then your USBASP now has the latest firmware, and it’s ready for some action.
That’s it for this tutorial!
Do feel free to reach out to me via the comment section if you have any challenges with getting this to work.
References:
- USBASP firmware update
- Thomas Fischl website
- TPI Notes from Atmel
- Avrdude user manual
it throws this error
avrdude.exe: stk500_recv(): programmer is not responding
avrdude.exe: stk500_getsync() attempt 1 of 10: not in sync: resp=0x03
i edited ./avrdude -C ./avrdude.conf -p m8 -c avrisp -P /dev/cu.usbmodem14101 -b 19200 -U flash:w:usbasp.atmega8.2011-05-28.hex:i to >E:AVRDUDE\avrdude.exe -C E:\AVRDUDE\avrdude.conf -p m8 -c avrisp -P COM5 -U flash:w:usbasp.atmega8.2011-05-28.hex:i. did i do something wrong?
Same problem here
Used this:
avrdude -C ./avrdude.conf -p m8 -c avrisp -P COM3 -b 19200 -U flash:w:usbasp.atmega8.2011-05-28.hex:i
Any help?
The Arduino UNO is to be flashed with ArduinoISP for it to function as the ISP programmer
Use the Arduino IDE to check for the correct USB port
.\avrdude.exe -C .\avrdude.conf -p m8 -c avrisp -P COM7 -b 19200 -U flash:w:usbasp.atmega8.2011-05-28.hex:i
I bought a USBASP from China (with ATMega8A) and it never worked. When I plugged it into the USB port, Windows didn’t recognize it (Unknown USB device – Device Descriptor Request Failed). I figured his firmware wasn’t recorded so I tried the procedure described on this page. The procedure ended successfully but the operating system was still unable to recognize the device. Finally I found out why: The fuse bits were wrong. When I ran the command below to update the fuse bits, Windows 10 recognized my USB device.
Great . can you upload hex files to other microcontrollers using this USBASP now ? did to test it ?
Surely. I posted after verifying that it is working perfectly. I updated the firmware as well.
Thanks for the feedback, could you report any issue that occurred during the process and how you solved it?
I used a Arduino as ISP to update the USBASP-clone fuses exactly as described in the main article for the firmware update. After that, you don´t need the Arduino as ISP anymore because the windows recognize the USBasp as a usb device. The USBasp is not a Serial USB, I mean, the Windows will not create a COM port for it.
I also remember having to edit the “.\\hardware\\arduino\\avr\\programmers.txt” file from the Arduino IDE to add the following lines:
Now, in the Arduino IDE, you will see a new programmer option: “USBasp Clone”. You need to use this option to use the USBasp from China to upload your projects to other Arduino.
If you prefer use the avrdude tool directly, you need use “-c usbasp-clone” as programmer option. You can verify if “usbasp-clone” exists in ‘avrdude.conf’ file.
On the ArduinoISP sketch, uncomment following line to use the old Uno style wiring:
#define USE_OLD_STYLE_WIRING
With AVRDUDE 7.1 on windows 10:
Firstly in order to backup my USBASP V2.0 firmware (COM4 to adapt for you):
avrdude.exe -C .\avrdude.conf -p m8 -c avrisp -P COM4 -b 19200 -U flash:r:”saveUSBASP.raw”:i -v
To upgrade:
avrdude.exe -C .\avrdude.conf -p m8 -c avrisp -P COM4 -b 19200 -U flash:w:usbasp.atmega8.2011-05-28.hex:i
For me, not needed to change fuse or reinstall driver (libusbK with Zadig).
Right now, I can use directly USBASP in Arduino IDE to burn a bootloader.
———
NOT TESTED: To restore the previous backup (with arduinoISP):
avrdude.exe -C .\avrdude.conf -p m8 -c avrisp -P COM4 -b 19200 -U flash:w:”saveUSBASP.raw”:i -v
i had to replace the atmega8 chip in my usbasp due to damage.
later i am not able to load firmware into it. Any possible support !!
thanks and regards
Hi,
I made the USBasp firmware to be WCID compliant https://github.com/dioannidis/usbasp . This means that USBasp doesn’t need driver on Windows any more. No more Zadig, signed libusb etc. It uses the native Windows winusb driver.
Also UART HID implementation is added for debugging purposes. USBasp will appear as a composite device with a WINUSB interface and a HID interface.
regards,
Copy arduino folder contents from
C:\Users\USER NAME\AppData\Local\Arduino15\packages\arduino\tools\avrdude\6.3.0-arduino17\bin
to a folder where hex file of firmware is placed
then run below command from terminal of windows
.\avrdude -C ./avrdude.conf -p m8 -c avrisp -P COM3 -b 19200 -U flash:w:usbasp.atmega8.2011-05-28.hex:i