Raspberry Pi 4 – A Look Under the Hood and How to Make most of it
The Raspberry Pi 4 was announced a while back and it surpassed the expectations of many, with many new features from its dual-core, Cortex-A-72 processor at 1.5GHz to the modern communication ports among several other upgrades. We published an announcement about it a few weeks ago but on this article we will take it a little bit further.
The Raspberry Pi 4 was announced a while back and it surpassed the expectations of many, with many new features from its dual-core, Cortex-A-72 processor at 1.5GHz to the modern communication ports among several other upgrades. We published an announcement about it a few weeks ago but on this article we will take it a little bit further.
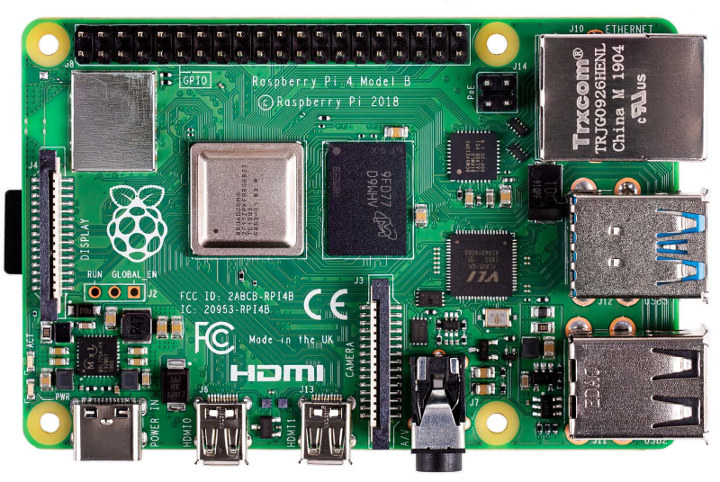
With features as impressive as those possessed by the Raspberry Pi 4, I couldn’t bear to not take a look at the components under it, everything powering up the Raspberry Pi 4 and the source of its new features. For today’s article, we will examine the capacities of the new Raspberry Pi 4 and the components/design consideration, making it all happen.
Raspberry Pi 4 Features
Before we start looking at the components that make up the Raspberry Pi 4, it is probably important to go over some of the features and specs.
Some of the new features include;
- SoC – Broadcom BCM2711 quad-core Cortex-A72 (ARMv8) @ 1.5GHz with VideoCore VI GPU supporting OpenGL ES 3.0 graphics
- System Memory – 1GB, 2GB or 4GB LPDDR4
- Storage – MicroSD card slot
- Video Output & Display I/F
- 2x micro HDMI ports up to 4Kp60 (Currently 1080p60 max. in dual-display configuration, although 2x 4Kp30 is being worked on)
- 3.5mm AV port with composite video (and stereo audio)
- 2-lane MIPI DSI display port
- Video
- Decode – H.265 up to 4Kp60, H.264 up to 1080p60
- Encode – H.264 up to 1080p30
- Camera – 2-lane MIPI CSI camera port
- Audio – Stereo audio via AV port, digital audio via HDMI ports
- Connectivity
- True Gigabit Ethernet (RJ45)
- Dual-band (2.4 GHz/5.0 GHz) 802.11b/g/n/ac WiFi 5
- Bluetooth 5.0 BLE
- USB – 2x USB 3.0 ports, 2x USB 2.0 ports.
- Expansion – Standard 40-pin GPIO header fully backward-compatible with previous Raspberry Pi boards
- Power Supply
- 5V DC via USB-C connector (minimum 3A )
- 5V DC via GPIO header (minimum 3A )
- Power over Ethernet (PoE) via optional PoE HAT
- Dimensions – 85 x 56 mm (same as other model B boards)
- Temperature Range – 0 – 50°C
Components Behind the Features
The awesome features written above are a product of several top-notch design considerations and powerful electronic components. We will take a look at some of these electronics components one after the other.
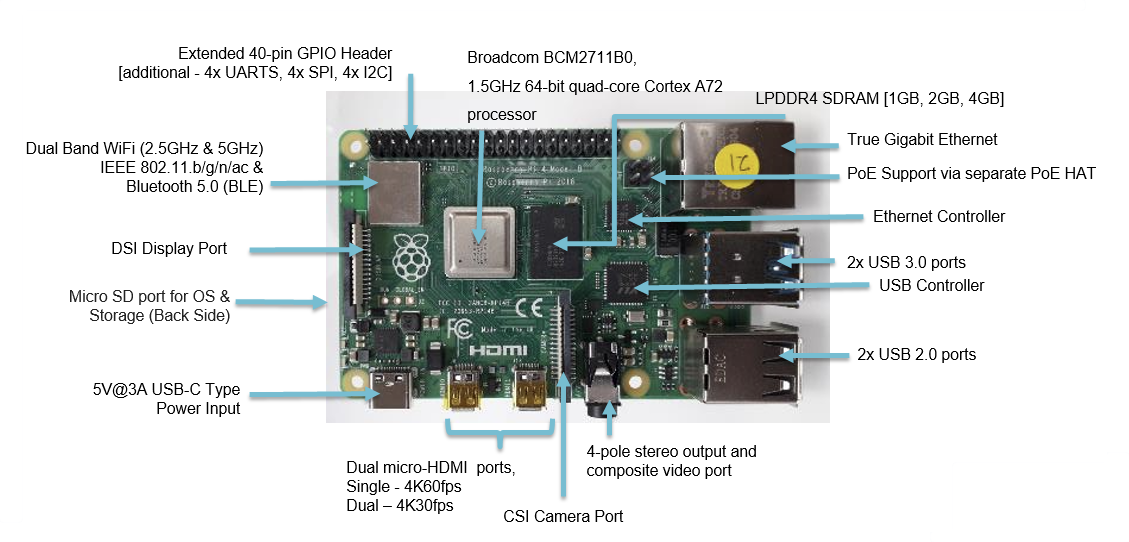
1. The SOC (BCM2711)
At the heart of the Raspberry pi, 4 is the Broadcom BCM2711 SOC which is responsible for a good number of the new features on the raspberry pi 4.
The architecture of the BCM2711 is considering an upgrade to the SoCs used n earlier Pi models. It continues the quad-core CPU design of the BCM2837BO (used in the raspberry pi 3 B+) but is based on the high-performing, 64-bit, and Armv8-A architecture based ARM Cortex-A72 processor which was released in 2015 as a successor of the Cortex-A57, which was used in the BCM2837BO.
The design of the Cortex-A72 and its availability as a SIP Cores Licensee makes it suitable for integration with other SIP cores like GPUs and display controllers among others which no doubt aided the implementation of all the other features of the Raspberry pi.
The BCM28711 also features a PCIe link that connects the USB 2 and USB 3 ports, ability to access more memory than previous Pis and separate ethernet controller all leading to a greatly improved GPU feature set with much faster input/output.
Some of the features brought about by the use of this SoC includes;
- 2x micro HDMI ports up to 4Kp60 (Currently 1080p60 max. in dual-display configuration, although 2x 4Kp30 is being worked on)
- 3.5mm AV port with composite video (and stereo audio)
- 2-lane MIPI DSI display port
- Video Decoding – H.265 up to 4Kp60, H.264 up to 1080p60
- Video Encoding – H.264 up to 1080p30
The BCM2711 chip continues to use the heat spreading technology started with the BCM2837B0, which provides better thermal management but the speed and performance of the chip means it still generates considerably more heat than the BCM2837BO, as such a heat sink will definitely be needed for processing-intensive operations.
2. LPDDR4 RAM
One of the cool thing about the Raspberry pi 4 is the RAM, with 1GB, 2GB and 4GB variety giving different categories of users an adequate cost vs required processing power solution. The Raspberry pi 3 implemented the LPDDR2 but things were kicked off double time in the raspberry pi 4 with the LPDDR4 RAM.
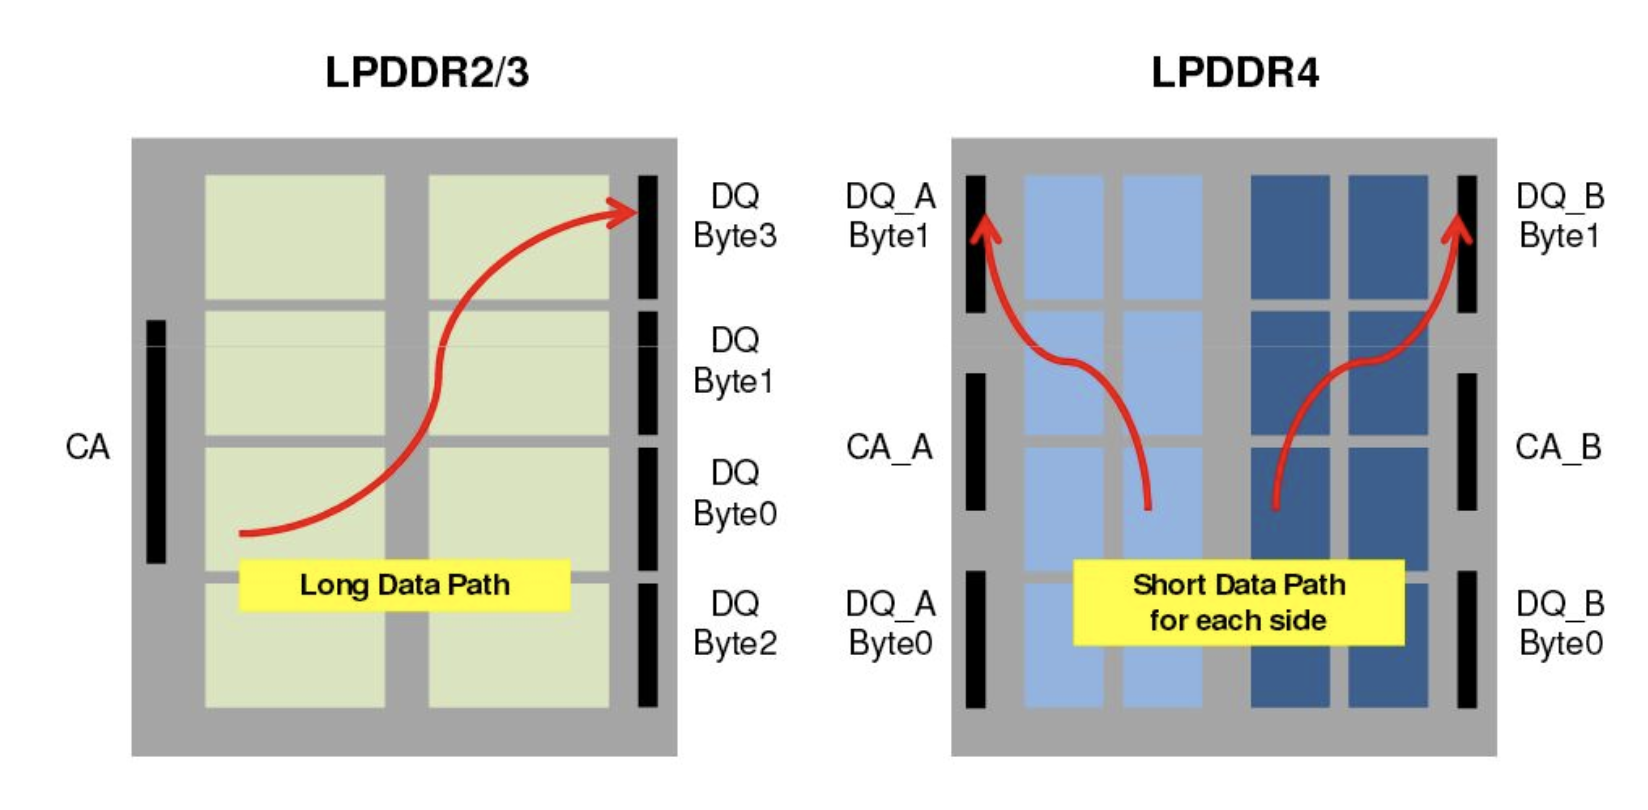
LPDDR stands for Low Power Double Data Rate Random Access Memory which is essentially a low power equivalent of the DDR4 memory which has been in use in most recent High-end computers. It possesses faster memory speed and is low power. Unlike with the DDR4, the LPDDR RAMs come with smaller bit bus which helps it maintain power efficiency even at superb memory speed. Compared with the 10GB/s single-channel die bandwidth of the LPDDR2, the LPDDR4 was redesigned as a 2-channel die, bringing 16 bits and a bandwidth of 17GB/s to each of the channels as such, both channels can be arranged in a dual configuration that pushes the bandwidth to an even greater number.
All of this is what the LPDDR4 brings aboard the Raspberry pi 4. It provides the Pi with an immense processing power for use in computationally intensive operations like Computer Vision which is gradually becoming one of the most popular applications of the raspberry pi.
3. MxL7704
According to Ben Upton, the Raspberry pi 4 was designed to meet the desire of users based on the feedback received. With all the effort made towards improving power management through the pi, one can safely assume that quite a number of that feedback was about power management on the Pi.
The Raspberry pi 4 makes use of the highly integrated MxL7704 power management IC. The MxL7704 comes with an on-board 100mA LDO which provides clean 1.5V to 3.6V power for analog sub-systems, four synchronous step-down buck regulators that provide system, memory, I/O and core power from 1.5A to 4A, an integrated 8-bit ADC with 2 external inputs, and utilizes a conditional sequencing state machine, which according to MaxLinear is “flexible enough to meet the requirements of virtually any processor”. It provides all the key power rails required by the raspberry including the low noise voltage required by the audio circuity of the Pi.

The MxL7704 boast a robust I2C interface through which it receives commands from the Pi’s onboard SoC, for dynamic voltage scaling, PGOOD Routing, sequencing control, and status monitoring, enabling the Pi to save power by dynamically reducing the power to the SoC when the system is in an idle state and push maximum power to it when running at full speed.
4. BCM54213PE
The Raspberry pi 3 B+ was the first attempt to bring Gigabit ethernet to the raspberry pi, but because the USB connection was to the same physical layer as the Ethernet, the maximum speed attainable on the Pi 3 B+ was about 300 Mbps max. To ensure this feature is implemented in its true form, the shared USB + Ethernet bandwidth was severed on the raspberry pi 4 and a “true” Gigabit Ethernet port with a separate Gigabit Ethernet transceiver (BCM54213PE) was implemented.
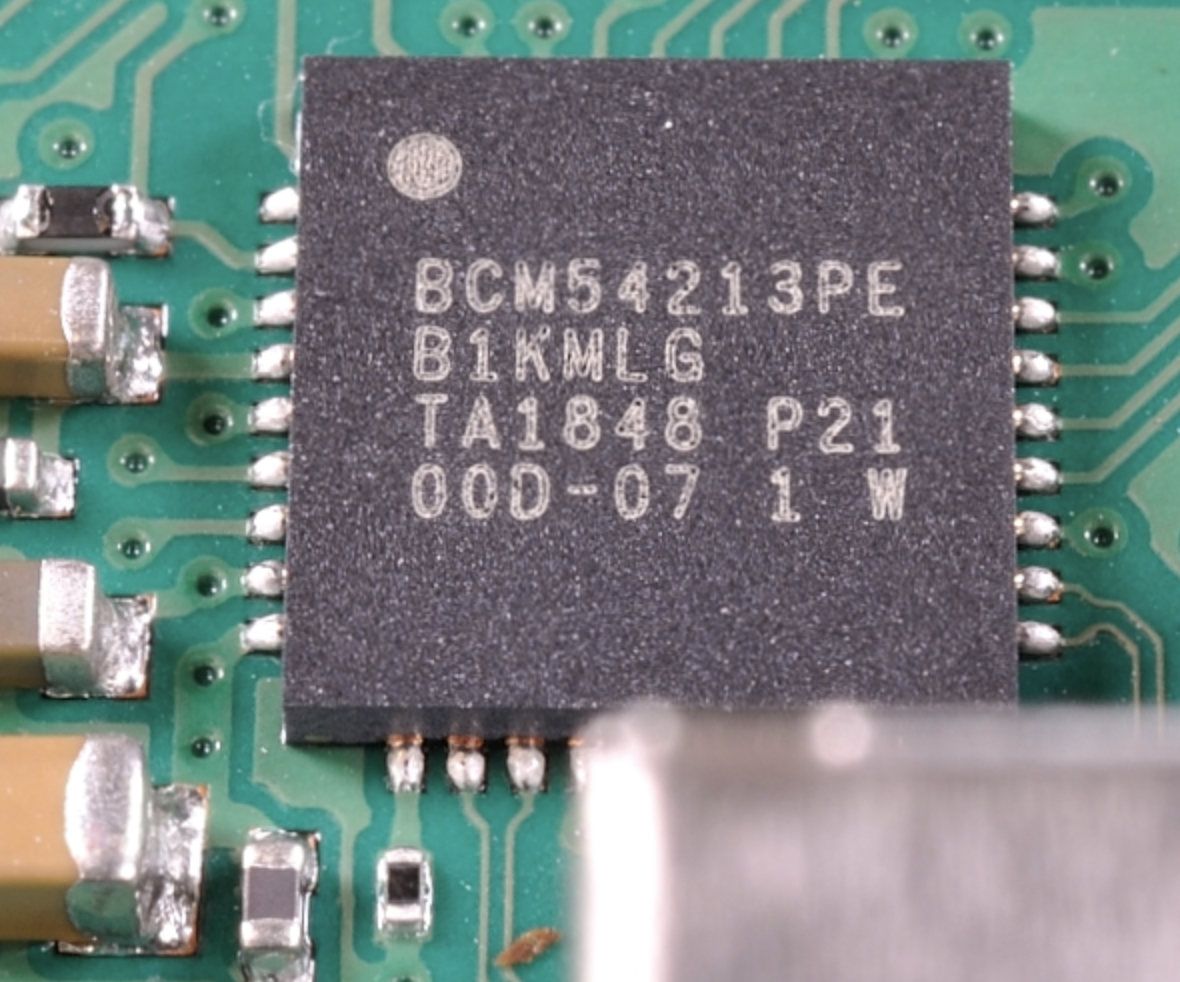
According to the datasheet, the BCM54213PE is a triple-speed 1000BASE-T/100BASE-TX/10BASE-T Gigabit Ethernet (GbE) transceiver integrated into a single monolithic CMOS chip. it performs all physical-layer functions for 1000BASE-T, 100BASE-TX, and 10BASE-T Ethernet on standard category 5 UTP cable. It is highly integrated and combines digital adaptive equalizers, ADCs, phase-locked loops, line drivers, encoders, decoders, echo cancellers, crosstalk cancellers, and all required support circuitry on the single chip.
The BCM54213PE is fully compliant with RGMII and is signed for reliable operation over worst-case cat 5 cable. It is also capable of negotiating with its link partner to determine the highest possible operating speed, thus allowing the network to which it is connected to dictate the speed of data transfer in the sense that, it can revert to slower speeds if the network to which it is connected is not fast enough.
The full implementation of the Gigabit Ethernet makes the Pi 4 ideal for projects that implements it as a media server, router or that relies one way or the other on good Ethernet bandwidth.
5. VL805
Indicating future transition of all USB ports to USB3.0, the Pi 4 implements 2 x USB 3.0 ports along with 2 x USB 2.0 port which is being controlled by the VL805 chip.
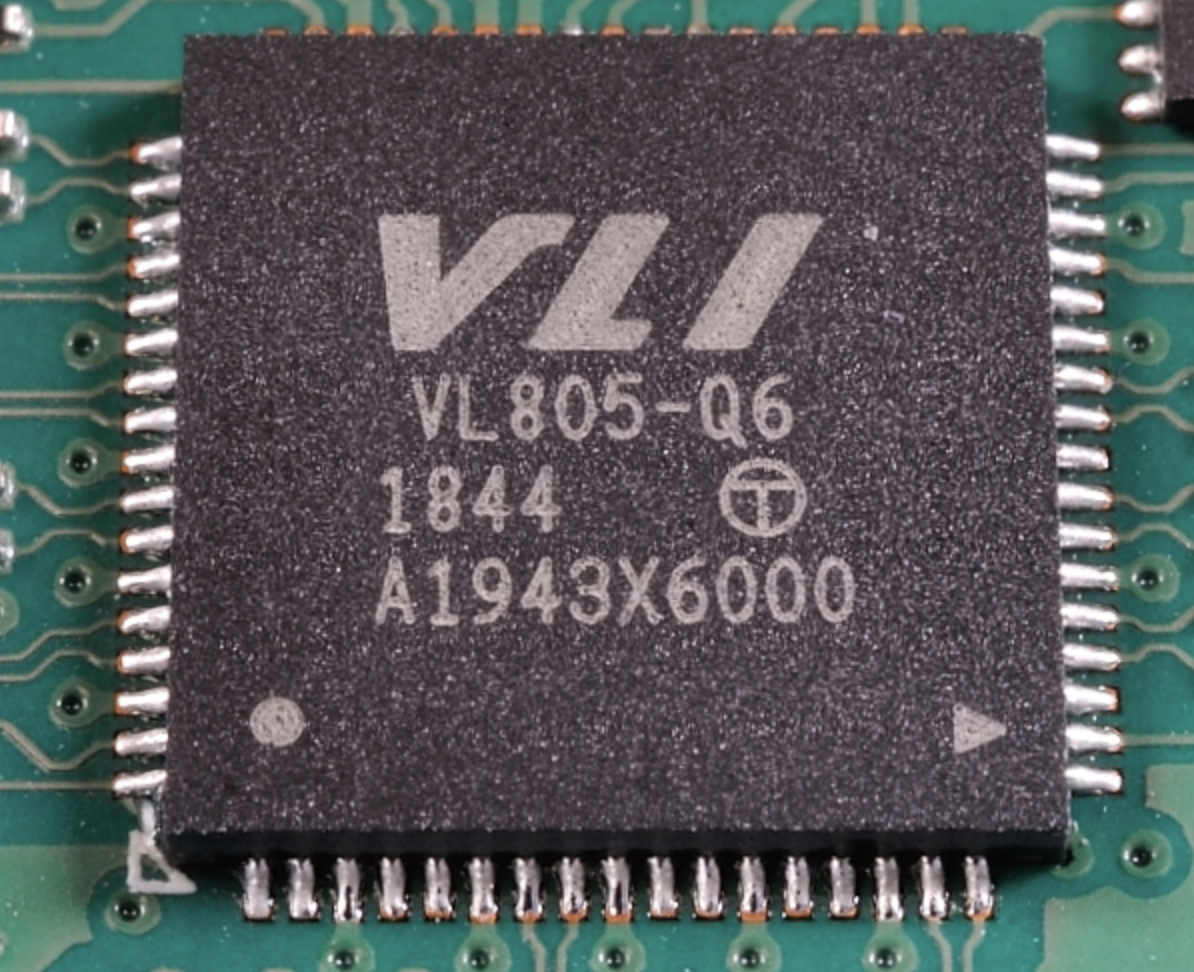
According to VIA Labs, VL805 is a USB 3.0 Host controller, which enables a PCI Express equipped platform to interface with USB Super-Speed (5 Gbps), High-Speed (480 Mbps), Full-Speed (12 Mbps), and Low-Speed (1.5 Mbps) devices. The root hub consists of four downstream facing ports enabling the simultaneous operation of multiple peripheral devices. Based on this, the raspberry pi team could migrate all of the USB ports to USB3.0 in the next version without changing the USB controller.
Asides the USB ports, the Pi 4 is powered over a USB-C connection that is capable of delivering up to 3A to Pi thereby solving most of the power issues that the models have been plagued with over the years.
Several elements exist under the hood including the jump to Bluetooth 5.0 and the reduction in BOM due to the use of the PIMC, but we will leave that for another day as I personally believe they are not so critical to performance.
Making the Most of the Raspberry Pi 4
Immediately after the release of the Raspberry Pi 4, dozens of open-source hardware manufacturers began the release several kits, accessories and add-ons to help users of the raspberry pi fully capitalize on its new features.
This section will look at a few add-ons and accessories for the raspberry pi that are worth investing in.
1. Heat Sinks
From the Pi4 benchmark and general usage so far, one of the key things you will need to put the Pi 4 to any meaningful use is a heat sink, due to the amount of heat the new processor generates. While the processor has the ability to self throttle when the temperature gets to a particular level, this still affects the overall experience and reduces the amount of work to which you can put the Pi to. There quite a number of an amazing heat sinks and cooling technologies available to the Pi 4 but one of my favorites so far still remains the ICE Tower CPU Cooling Fan sold by Seeed Studio. If you put the Pi through heavy-duty work, this will be worth your while. Other cheaper type of heat sink/cooling system worth looking at includes the dual cooling fan and this copper heat sink kit.

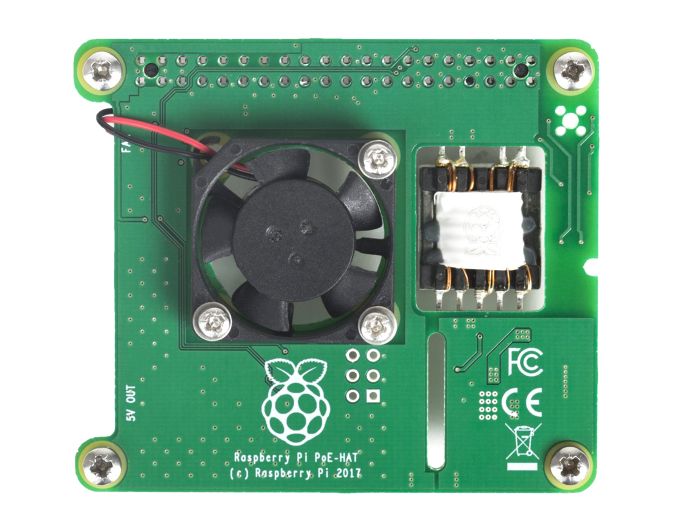
2. Power Over Ethernet(POE) Hat
Power Over Ethernet(POE) was introduced on the Pi 3 B+ and this feature was retained for the Raspberry pi 4. The feature allows you power the raspberry pi via an Ethernet cable connected to a networking device which is capable of sourcing power to the Pi. However, the feature can only be accessed via a “special hat (/shield like we say for Arduino)” known as the POE Hat. If you at any time want to take advantage of the connection via an Ethernet cable to reduce the number of cables connected to the Pi, then you should totally consider the POE Hat.
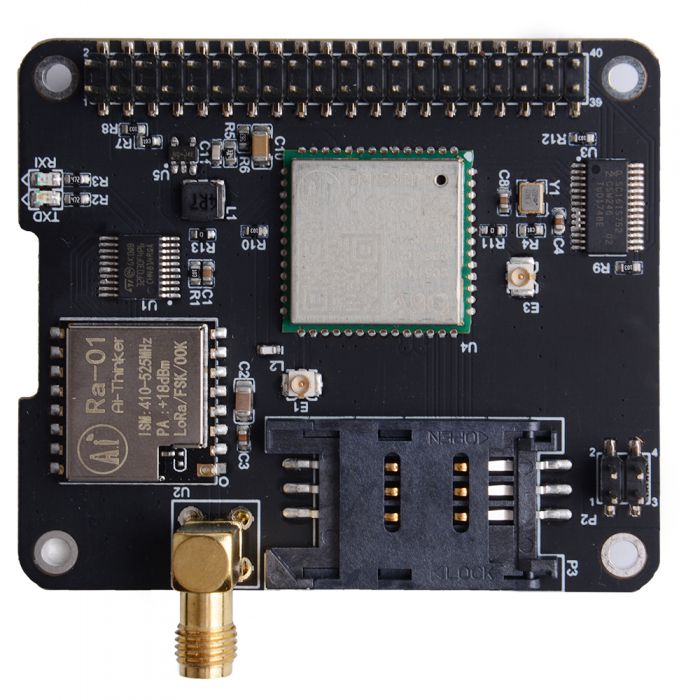
3. Docker Pi IoT Node
Looking to build some IoT Solution with the Raspberry pi 4? then the Docker Pi IoT node will certainly come in handy. The Docker pi IoT node brings GPS/BDS, GSM and LoRa Communication ability to your Raspberry pi. It comes as a Hat and directly plugs into the pi, making use of only the I2C pins as the communication between it and Pi takes place over I2C. It allows the Pi sends and receive data over LoRa, make calls, send texts, etc over GSM and get real-time location and related NMEA data via GPS.
4. Raspberry Pi Keyboard and Mouse
One of the key points that were mentioned during the release of the raspberry pi 4 is the fact that it’s capable of comfortably replacing your desktop computer. If this represents your plans for the raspberry pi then you will definitely need a keyboard and mouse for the setup, and there is none better than the official raspberry pi keyboard and mouse.

5. Raspberry Pi Enclosures
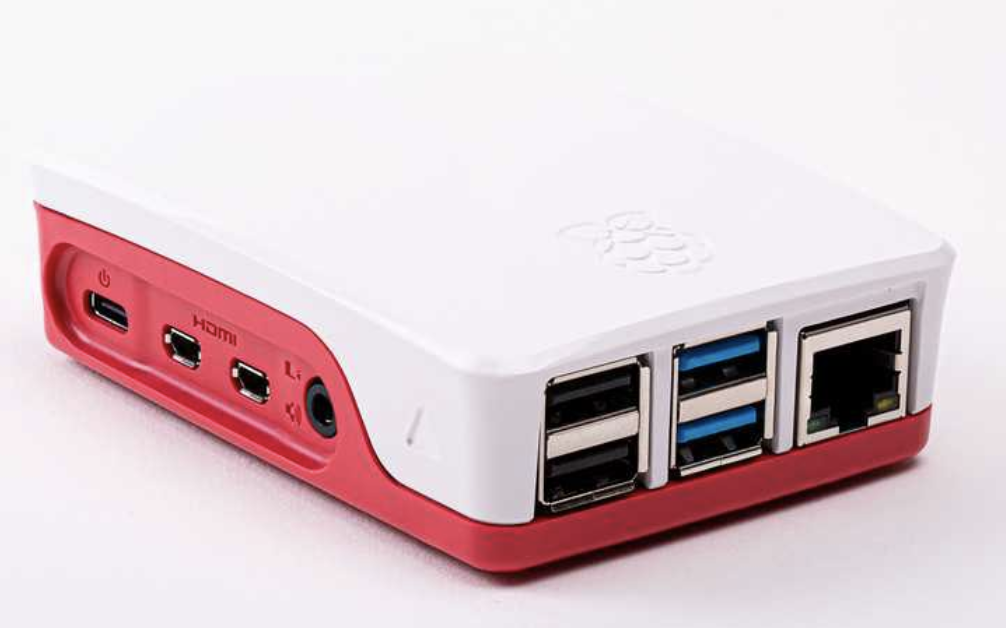
The Raspberry pi 4 has a slightly different form factor compared to the other raspberry Pis, from the 2 mini HDMI ports to the change in position of the Ethernet port, the Raspberry pi 4 will not fit into enclosures for other versions of the Pis. To ensure owners of the raspberry pi 4 have access to protective enclosures, the raspberry pi foundation released the official Raspberry pi 4 enclosure same day as the device. It will provide all the coverings you need to ensure the pi stays dust-free.
So, the list can still go on, but for readability, we will stop here. However, I will look into creating another article focused on sharing some of the coolest raspberry pi add-ons out there.
For those who may still look to get your hands on the Raspberry pi, it is currently available in quite a lot of stores online with many stores like Seeed Studio adding different perks, discounts, and add-ons when you buy from them.
That’s it for this article, thanks for reading. Feel free to reach me via the comment section with any questions you might have as regards it.