Circuit Board Design for Beginners
By: Alex Danovich,President San Francisco Circuits We live in an exciting time where we see a resurgence in electronics as a hobby. Mass production has wiped out a generation or two of kids learning to build radios from scratch with their mom or dad.
By: Alex Danovich,President San Francisco Circuits
We live in an exciting time where we see a resurgence in electronics as a hobby. Mass production has wiped out a generation or two of kids learning to build radios from scratch with their mom or dad. In the good old days, not sure when, you had companies like Heathkit walk you through building a full size color TV at home, for example. “Yes, I made that!” you’d proudly exclaim to yourself after hours of work.
What’s causing this hobbyist resurgence?
- Television shows such as How it’s Made, Mythbusters and other programming on TLC.
- Websites such as instructables.com, hackaday.com, and specialized hobbyist blogs.
- Interest in RC cars, robotics, gaming, computers etc.
- Advent of Arduino boards, modules and free software.
- Open source software/hardware.
- The whole maker movement in general.
So what does this have to do with making circuit boards?
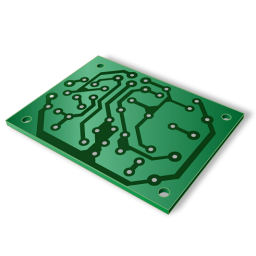
Well, it’s now easy and fairly cheap to make a nice circuit board for your project without a lot of fuss. So you want to get the kids away from the TV and build a fun, blinking LED project for your kids? Gone are the days of tedious hand wiring, empty coffee cups, smoking components and unprintable words; they’re now replaced with easy online applications.
In times past, I would sketch out a circuit on a raw copper board using a Sharpie pen. Then I dipped it in a bath of some nice toxic Ferric Chloride from Radio Shack and waited and waited. After a long while, you removed the board and then hand drilled the work of art. To prevent corrosion, you rubbed some silver powder on it. Finally, stuff the board and there it is. Your mom (or wife) is now furious over the stains, mess and the stink you just created. But there it is. You let out a great sigh of personal satisfaction.
Fast forward to post-dinosaur times.
The Steps to Glory
- There are several good choices for a free schematic and circuit board design program. I prefer Eagle. Lots of hobbyists and pros use it so there are lots of free designs and tutorials available. The free version is somewhat limited but very useful for smaller work. What’s nice is that if you like this as a hobby, you can progress to the “pro” version.
- Next you will have to find a “board house” to make the boards. The author of this article is a good place to start for a free quote – San Francisco Circuits. SFCircuits is a full service PCB fabrication and PCB assembly provider from hobbyist to military grade work with some helpful tutorials in the PCB School section. Who knows – you just might go from blinking LED project one day to a nice ICBM with them. Impress the neighbors?
- Once you have a board on its way, consider it time for buying PCB assembly parts from Digikey or Mouser. They are great distributors and cater to hobbyists with smaller quantities with good pricing. It’s so much better than Radio Shack which carries less and less useful components lately. However, you must be careful buying integrated circuits, resistors, capacitors, etc. online as they come in a dizzying array of sizes.
Design Considerations
- Sketch out on paper what your PCB will look like. Do you need holes for mounting? Do you have a box in mind? You can get a nice plastic case with battery compartments from Pactec. Did you leave room for connectors to stick out? Make sure you leave clearance for taller components. Part of the trick is to visualize all the pieces and how they fit. Make sure you have clearance for your soldering iron as well.
- It’s best to do a single-sided circuit board. You have connection traces between the components on the top side only. A double-sided board can get complicated for first timers. For sensitive analog and high speed digital circuits, consider adding a ground place area on the backside.
- Once your layout is done, a critical step is to verify every trace. Adding jumper wires later is not fun. The traditional method is to print the schematic and start in one corner with your favorite highlighter color. Verify every line. A very important thing to remember is that some schematic packages hide the chips’ power lines for clarity. So you may have chips with no power.
An alternate method is to create a “netlist.” This is a point to point list of every connection (more highlighter). A really smart thing is to allow the layout software (if it supports it) to do an automated netlist check. It will give you a list of all the errors, a much faster solution. I like to do some of the manual method as a sanity check to make sure all is well. There is a lot to think about. Some places sell scrap boards to check your soldering skills or to make art out of other folks’ mistakes. Do your best to avoid it.
So cross your fingers, say your prayers and away you go.
Now aren’t hose blinking LEDs pretty cool?
“Yes, I made that”.
This article was written as a guest post by San Francisco Circuits, a PCB solutions provider located in Northern California.


