Arduino Real Time Clock with Temperature Monitor
Hi guys, in one of our previous tutorials, we built a real-time clock with temperature monitor using the DS3231 and the 16x2 LCD display shield. Today, we will build an upgrade to that project by replacing the 16x2 LCD display with an ST7735 based 1.8" colored TFT display.
Hi guys, in one of our previous tutorials, we built a real-time clock with temperature monitor using the DS3231 and the 16×2 LCD display shield. Today, we will build an upgrade to that project by replacing the 16×2 LCD display with an ST7735 based 1.8″ colored TFT display.
Apart from changing the display, we will also upgrade the features of the project by displaying the highest and lowest temperature that has been measured over time. This feature could be useful in scenarios where there is a need to measure the maximum and minimum temperature experienced in a place over a particular time range.
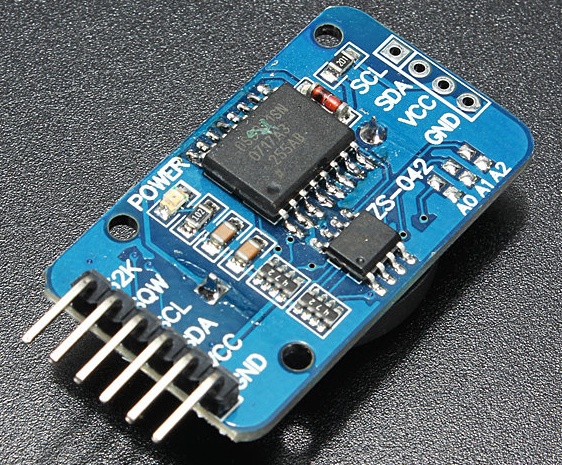
This tutorial is based on the ability and features of the DS3231 RTC module. The DS3231 is a low power RTC chip, it has the ability to keep time with incredible accuracy such that even after power has been disconnected from your project, it can still run for years on a connected coin cell battery. Asides from its ability to accurately keep time, this module also comes with an accurate temperature sensor which will be used to obtain temperature readings during this tutorial.
The main upgrade to the previous tutorial mentioned above is the use of the 1.8″ colored TFT display and details about the features and use of this display have been covered in a recent tutorial here.
Required Component
The following components are required to build this project;
As usual, the exact components used for this tutorial can be bought through the link attached to each of them.
Schematics
We will replace the 16×2 LCD display in the schematics from the previous tutorial with the 1.8″colored TFT display. Connect the components as shown in the schematics below.
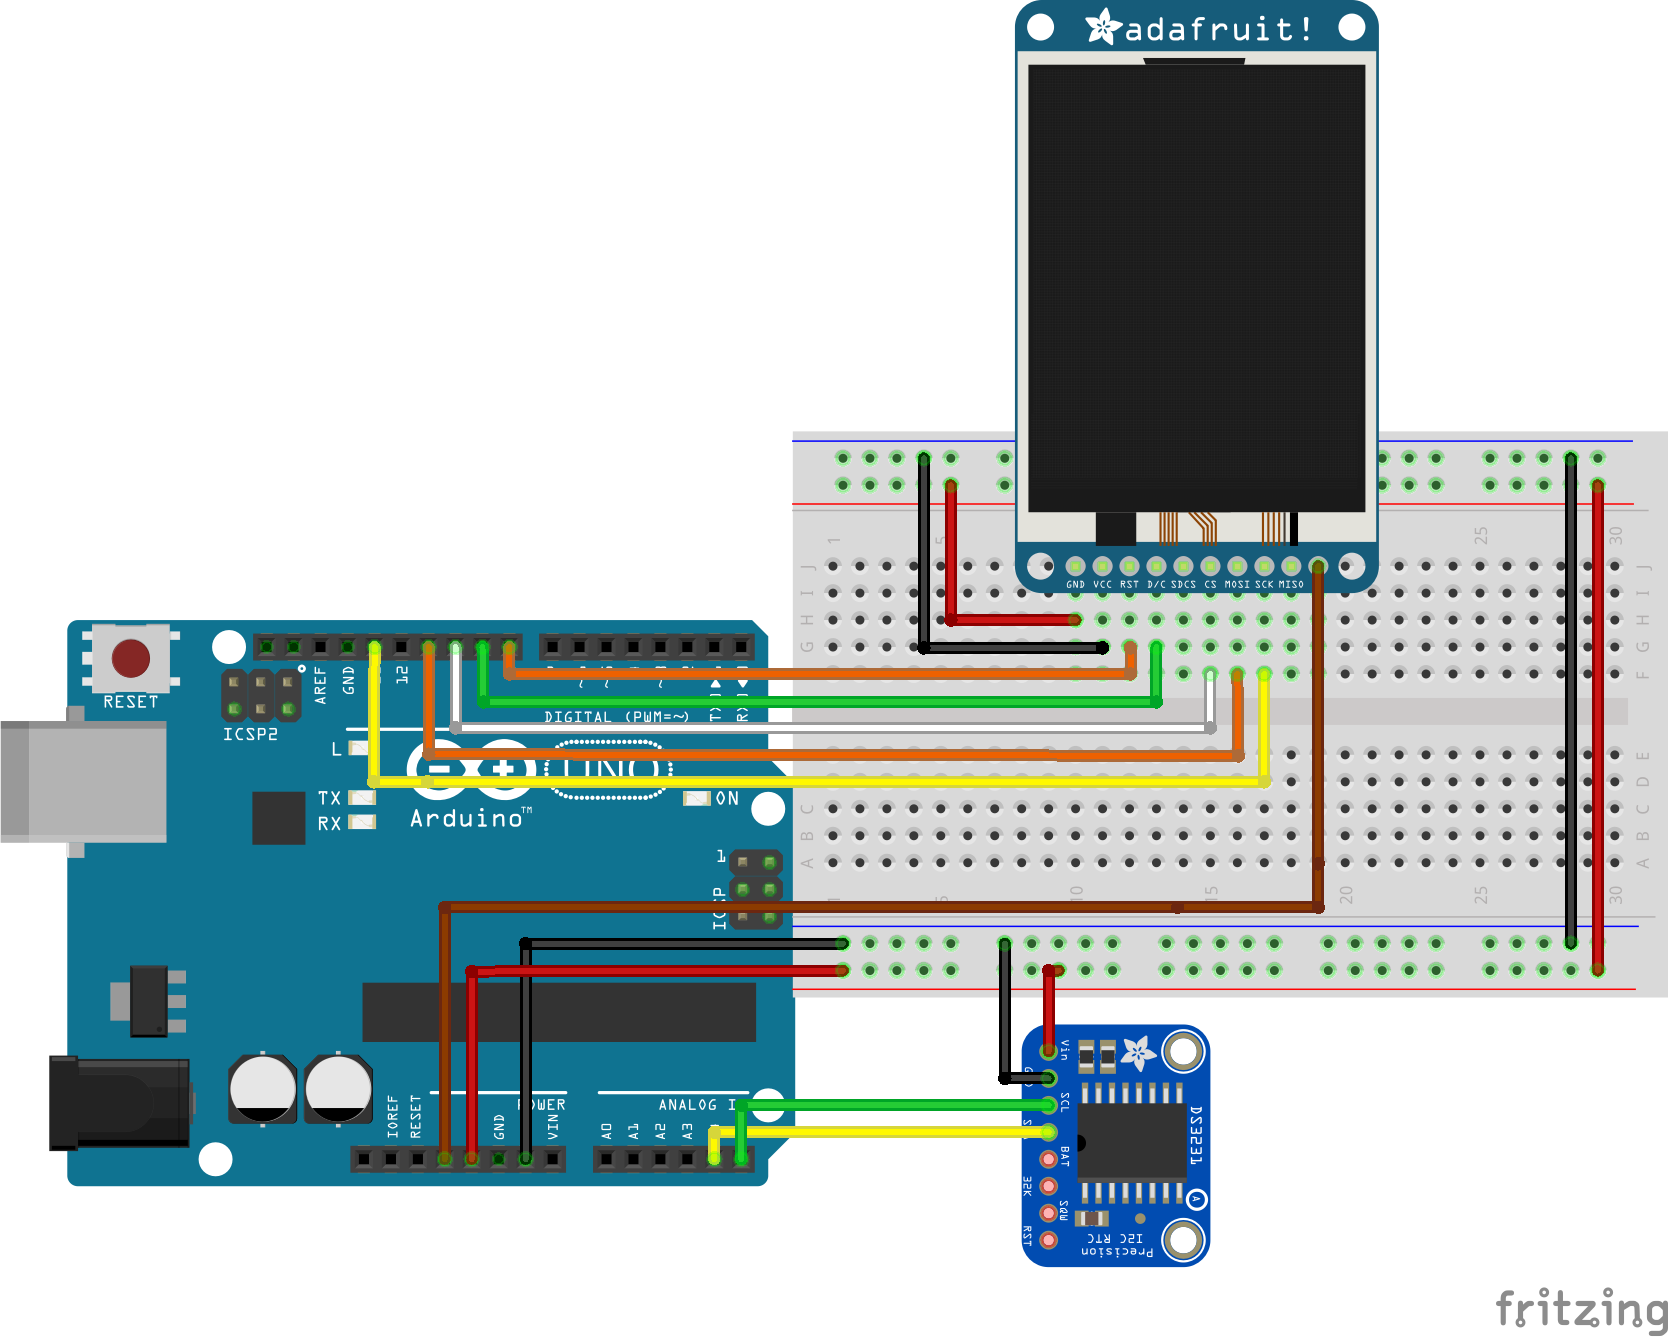
For clarity, the pin connection between the components is described below.
ST7735 – Arduino
LED - 3.3V
SCK - D13
SDA - D11
DC - D9
CS - D10
Reset - D8
GND - GND
VCC - 5V
DS3231 – Arduino
VCC - 5V
GND - GND
SDA - A4
SCL - A5
Go over the connections once more to ensure everything is as it should be.
Code
The code for this project is fairly simple, we will use two main libraries; the Sodaq library which can be downloaded from this link and is used to communicate with the DS3231 and the ST7735 Arduino library to communicate with the ST7735 TFT Display.
The first thing we do in the code is to include the libraries that will be needed for this project. In addition to the two libraries mentioned above, we will add the Adafruit GFX library, the SPI library, and the wire.h library.
   /////////////////////////////////////////////////////////////////
   //         Arduino Real Time Clock fahrenheit         v1.02    //
  //       Get the latest version of the code here:              //
 //       http://educ8s.tv/arduino-real-time-clock/             //
/////////////////////////////////////////////////////////////////


#include <Adafruit_ST7735.h>
#include <Adafruit_GFX.h>
#include <Wire.h>
#include "Sodaq_DS3231.h"
#include <SPI.h>
Next, we declare the pins of the Arduino to which the TFT display is connected and create an object of the TFT class with the declared pins.
#define TFT_CS     10
#define TFT_RST    8
#define TFT_DC     9
Adafruit_ST7735 tft = Adafruit_ST7735(TFT_CS,  TFT_DC, TFT_RST);
Next, we declare and initialize some of the variables used to store different information and data throughout the program.
float maxTemperature=0;
float minTemperature=200;
char charMinTemperature[10];
char charMaxTemperature[10];
char timeChar[100];
char dateChar[50];
char temperatureChar[10];
uint32_t old_ts;

float temperature = 0;
float previousTemperature = 0;

String dateString;
int minuteNow=0;
int minutePrevious=0;
With that done, we move to the setup function which we start by initializing, the TFT display, serial communication and instructing the RTC module to start communication.
void setup ()
{
    tft.initR(INITR_BLACKTAB);
    tft.fillScreen(ST7735_BLACK);
    Serial.begin(57600);
    Wire.begin();
    rtc.begin();
Next, we create placeholders for the temperature, its max, and min value on the display.
printText("TEMPERATURE", ST7735_GREEN,30,65,1);  // Temperature Static Text
printText("MAX", ST7735_RED,18,130,1);
printText("MIN", ST7735_BLUE,95,130,1);
We also include the setRTCTime() function which will be used to set the time on the RTC before it is used. After setting the time, this part of the code should be commented out and the code re-uploaded to the Arduino board.
//setRTCTime();
Next, is the void loop() function. The void loop function handles the sensing of temperature, extraction of time information from the DS3231 and the display of information on the TFT display. Since the changes of the environment temperature are slow, we will only update the temperature when there is a difference between the last temperature displayed on the screen and current temperature. This is done to counter a major downside of the 1.8″ TFT display, which is the slow speed with which the screen is updated when new information is sent to it.
The slow speed leads to the occurrence of a visible flicker on the TFT display and makes things a little bit messy. To solve this problem, we will be leveraging on the fact that we can update a section of the TFT display, without updating the whole display. This means a faster update time as less information will be passed up to the screen reducing the processing time and eliminating the resulting flicker.
void loop () -
{
  rtc.convertTemperature();
  float temperature = Celcius2Fahrenheit(rtc.getTemperature());
  DateTime now = rtc.now(); //get the current date-time
  uint32_t ts = now.getEpoch();

    if (old_ts == 0 || old_ts != ts) {
    old_ts = ts;

  minuteNow = now.minute();
  if(minuteNow!=minutePrevious)
  {
    dateString = getDayOfWeek(now.dayOfWeek())+", ";
    dateString = dateString+String(now.date())+"/"+String(now.month());
    dateString= dateString+"/"+ String(now.year());
    minutePrevious = minuteNow;
    String hours = String(now.hour());
    if(now.minute()<10)
    {
      hours = hours+":0"+String(now.minute());
    }else
    {
      hours = hours+":"+String(now.minute());
    }

    hours.toCharArray(timeChar,100);
    tft.fillRect(10,0,160,65,ST7735_BLACK);
    printText(timeChar, ST7735_WHITE,20,25,3);
    dateString.toCharArray(dateChar,50);
    printText(dateChar, ST7735_GREEN,8,5,1);
  }

  if(temperature != previousTemperature)
  {
    previousTemperature = temperature;
    String temperatureString = String(temperature,0);
    temperatureString.toCharArray(temperatureChar,10);
    tft.fillRect(10,80,128,30,ST7735_BLACK);
    printText(temperatureChar, ST7735_WHITE,35,80,3);
    printText("o", ST7735_WHITE,85,75,2);
    printText("F", ST7735_WHITE,100,80,3);

    if(temperature>maxTemperature)
    {
      maxTemperature = temperature;
      dtostrf(maxTemperature,3, 0, charMaxTemperature);
      tft.fillRect(3,142,33,20,ST7735_BLACK);
      printText(charMaxTemperature, ST7735_WHITE,10,145,1);
      printText("o", ST7735_WHITE,35,140,1);
      printText("F", ST7735_WHITE,41,145,1);
    }
    if(temperature<minTemperature)
    {
      minTemperature = temperature;
      dtostrf(minTemperature,4, 0, charMinTemperature);
      tft.fillRect(75,140,36,18,ST7735_BLACK);
      printText(charMinTemperature, ST7735_WHITE,80,145,1);
      printText("o", ST7735_WHITE,112,140,1);
      printText("F", ST7735_WHITE,118,145,1);
    }
  }
}
    delay(1000);
}
The complete code for this project is given below and can be downloaded from the downloads section.
  /////////////////////////////////////////////////////////////////
   //         Arduino Real Time Clock fahrenheit         v1.02    //
  //       Get the latest version of the code here:              //
 //       http://educ8s.tv/arduino-real-time-clock/             //
/////////////////////////////////////////////////////////////////


#include <Adafruit_ST7735.h>
#include <Adafruit_GFX.h>
#include <Wire.h>
#include "Sodaq_DS3231.h"
#include <SPI.h>

#define TFT_CS     10
#define TFT_RST    8
#define TFT_DC     9
Adafruit_ST7735 tft = Adafruit_ST7735(TFT_CS,  TFT_DC, TFT_RST);

// Option 2: use any pins but a little slower!
#define TFT_SCLK 13
#define TFT_MOSI 11

float maxTemperature=0;
float minTemperature=200;
char charMinTemperature[10];
char charMaxTemperature[10];
char timeChar[100];
char dateChar[50];
char temperatureChar[10];
uint32_t old_ts;

float temperature = 0;
float previousTemperature = 0;

String dateString;
int minuteNow=0;
int minutePrevious=0;

void setup ()
{
    tft.initR(INITR_BLACKTAB);
    tft.fillScreen(ST7735_BLACK);
    Serial.begin(57600);
    Wire.begin();
    rtc.begin();
    printText("TEMPERATURE", ST7735_GREEN,30,65,1);  // Temperature Static Text
    printText("MAX", ST7735_RED,18,130,1);
    printText("MIN", ST7735_BLUE,95,130,1);
    //setRTCTime();
}

//uint32_t old_ts;

void loop ()
{
  rtc.convertTemperature();
  float temperature = Celcius2Fahrenheit(rtc.getTemperature());
  DateTime now = rtc.now(); //get the current date-time
  uint32_t ts = now.getEpoch();

    if (old_ts == 0 || old_ts != ts) {
    old_ts = ts;

  minuteNow = now.minute();
  if(minuteNow!=minutePrevious)
  {
    dateString = getDayOfWeek(now.dayOfWeek())+", ";
    dateString = dateString+String(now.date())+"/"+String(now.month());
    dateString= dateString+"/"+ String(now.year());
    minutePrevious = minuteNow;
    String hours = String(now.hour());
    if(now.minute()<10)
    {
      hours = hours+":0"+String(now.minute());
    }else
    {
      hours = hours+":"+String(now.minute());
    }

    hours.toCharArray(timeChar,100);
    tft.fillRect(10,0,160,65,ST7735_BLACK);
    printText(timeChar, ST7735_WHITE,20,25,3);
    dateString.toCharArray(dateChar,50);
    printText(dateChar, ST7735_GREEN,8,5,1);
  }

  if(temperature != previousTemperature)
  {
    previousTemperature = temperature;
    String temperatureString = String(temperature,0);
    temperatureString.toCharArray(temperatureChar,10);
    tft.fillRect(10,80,128,30,ST7735_BLACK);
    printText(temperatureChar, ST7735_WHITE,35,80,3);
    printText("o", ST7735_WHITE,85,75,2);
    printText("F", ST7735_WHITE,100,80,3);

    if(temperature>maxTemperature)
    {
      maxTemperature = temperature;
      dtostrf(maxTemperature,3, 0, charMaxTemperature);
      tft.fillRect(3,142,33,20,ST7735_BLACK);
      printText(charMaxTemperature, ST7735_WHITE,10,145,1);
      printText("o", ST7735_WHITE,35,140,1);
      printText("F", ST7735_WHITE,41,145,1);
    }
    if(temperature<minTemperature)
    {
      minTemperature = temperature;
      dtostrf(minTemperature,4, 0, charMinTemperature);
      tft.fillRect(75,140,36,18,ST7735_BLACK);
      printText(charMinTemperature, ST7735_WHITE,80,145,1);
      printText("o", ST7735_WHITE,112,140,1);
      printText("F", ST7735_WHITE,118,145,1);
    }
  }
}
    delay(1000);
}

void setRTCTime()
{
  DateTime dt(2016, 5, 4, 7, 38, 30, 3); //Year, Month, Day, Hour, Minutes, Seconds, Day of the Week
  rtc.setDateTime(dt); //Adjust date-time as defined 'dt' above
}

void printText(char *text, uint16_t color, int x, int y,int textSize)
{
  tft.setCursor(x, y);
  tft.setTextColor(color);
  tft.setTextSize(textSize);
  tft.setTextWrap(true);
  tft.print(text);
}

String getDayOfWeek(int i)
{
  switch(i)
  {
    case 1: return "Monday";break;
    case 2: return "Tuesday";break;
    case 3: return "Wednesday";break;
    case 4: return "Thursday";break;
    case 5: return "Friday";break;
    case 6: return "Saturday";break;
    case 7: return "Sunday";break;
    default: return "Monday";break;
  }
}

float Celcius2Fahrenheit(float celsius)
{
  return 1.8 * celsius + 32;
}
Demo
Install all the libraries, open an instance of the Arduino IDE and upload the code to the Arduino board, you should see the TFT display light up with the temperature, time and date information on display as shown in the image below.
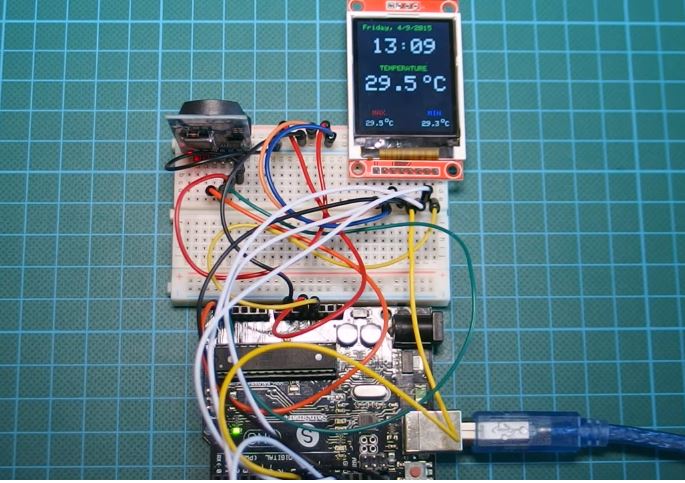
Works? Yea!
That’s it for this tutorial guys. While this might look like an ordinary temperature and clock project, it could be the launch pad for something as cool as a thermostat to control the temperature in your home or smart farm and any other cool stuff you can think of. Feel free to share and ask any question via the comment section.
Till next time!
You can watch the video of this tutorial on youtube here.
Can we use 1.3 colour TFT instead of 1.8 colour TFT