

Using the BLE functionality of the ESP32
- Emmanuel Odunlade
- https://twitter.com/emmaodunlade
- emmaodunlade@gmail.com
- 45.238 Views
- moderate
- Tested
- 0 Likes

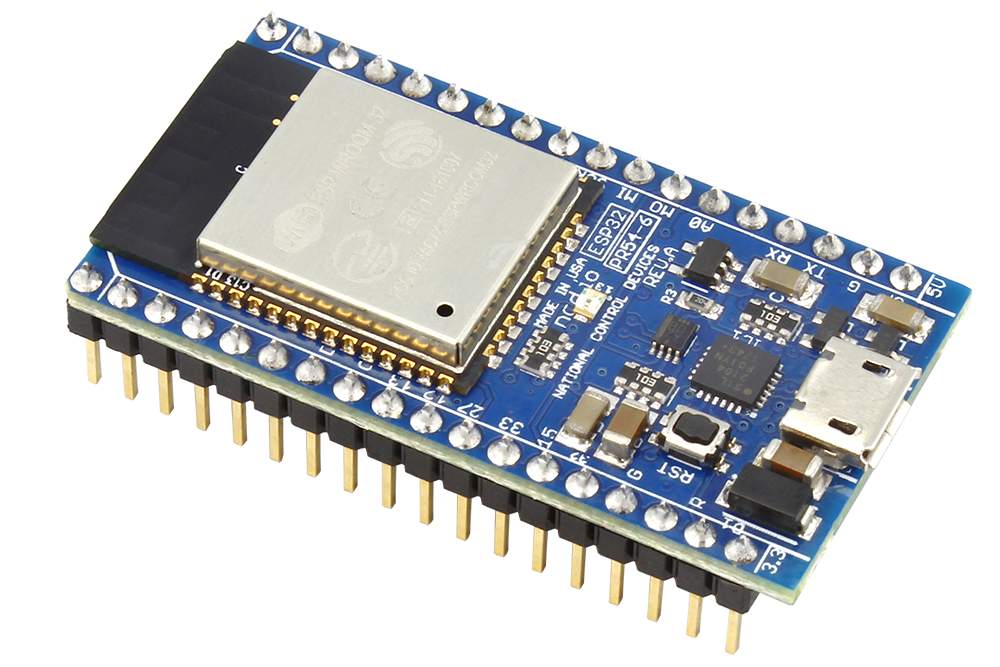
One of the most beautiful features which the ESP32 has over the ESP-12e is the fact that, asides the WiFi, it has two other communication modules onboard. The ESP32 comes with an onboard Classic Bluetooth and Bluetooth Low Energy modules. For today’s tutorial, we will explore how the Bluetooth Low Energy Module onboard the ESP-32 can be used in projects.
Introduction to Bluetooth Low Energy – BLE
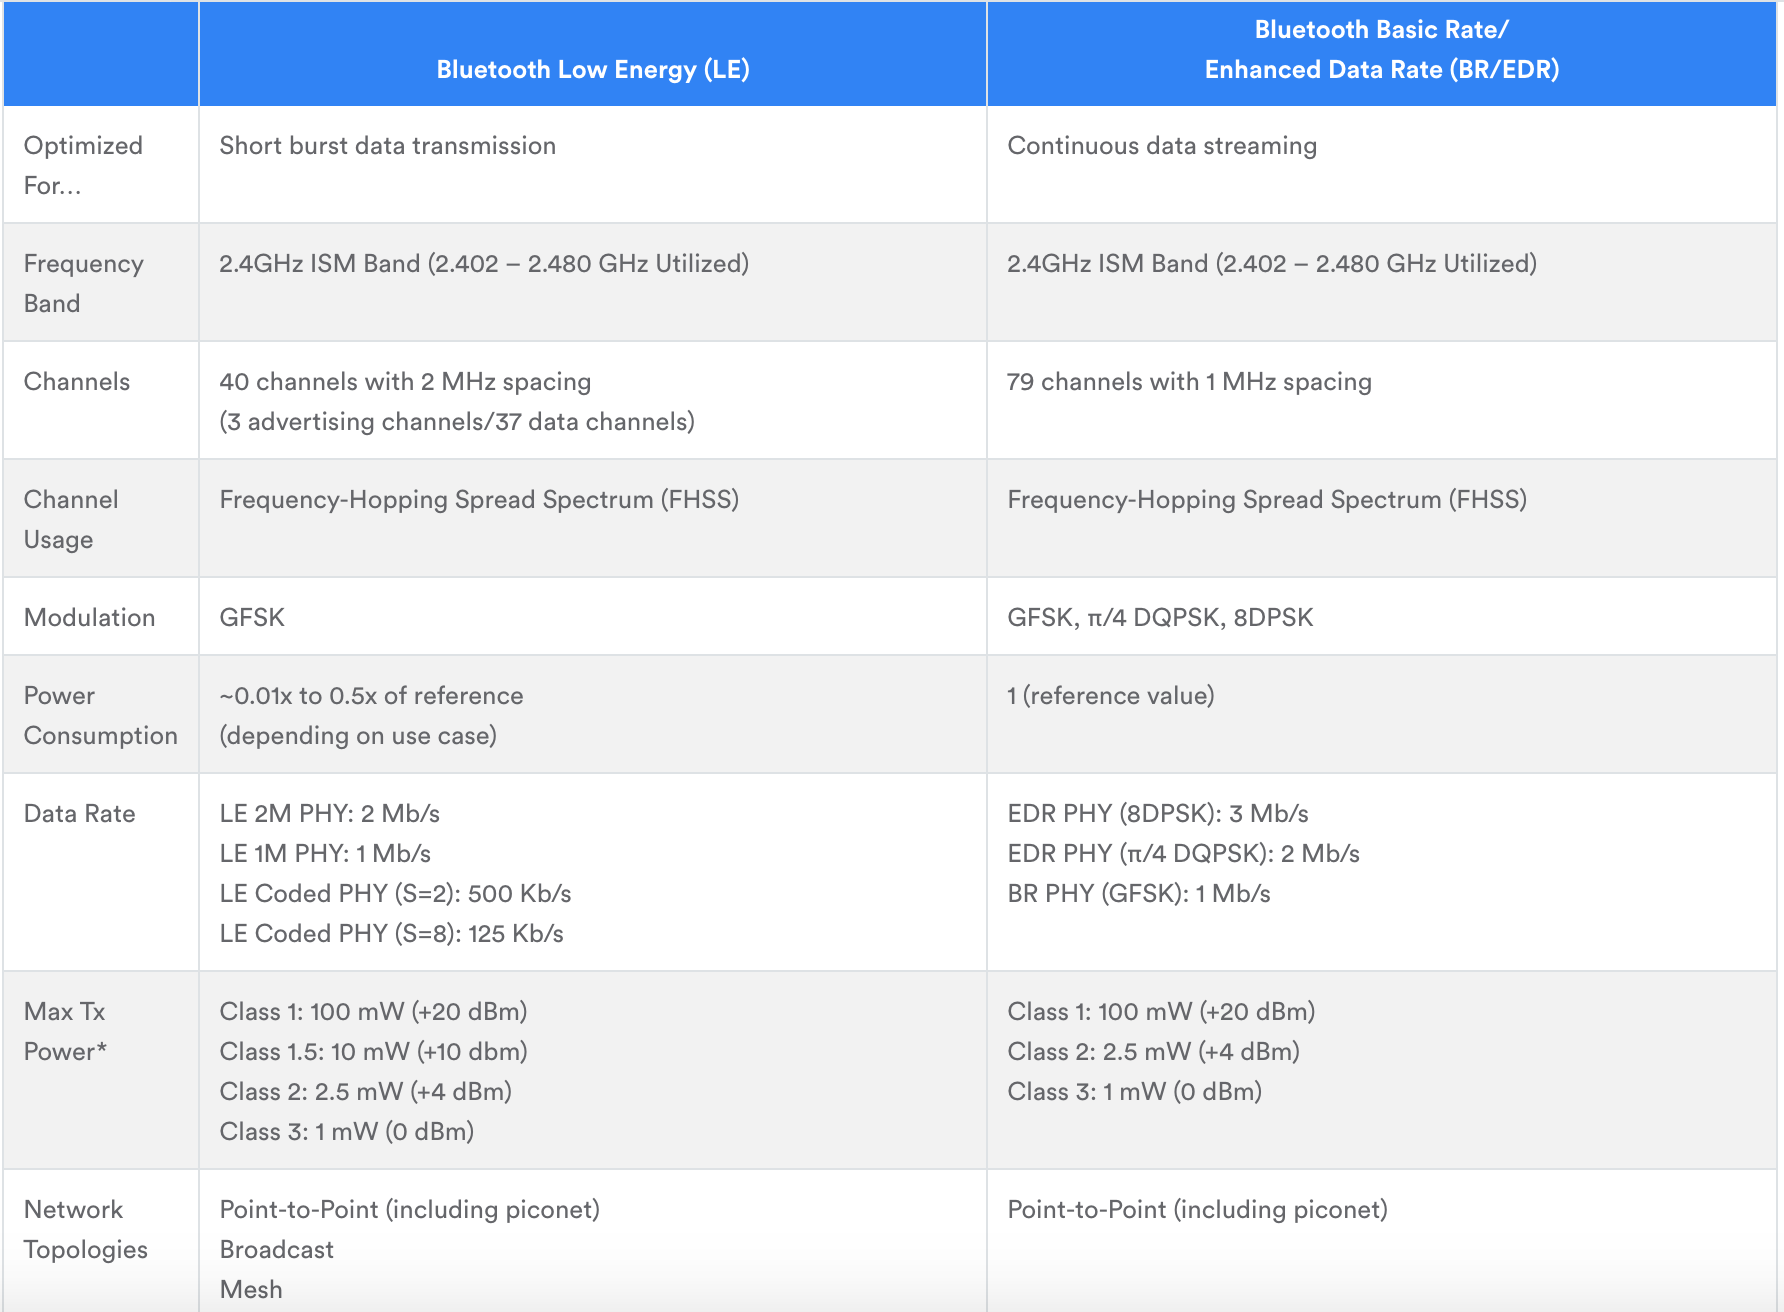
The Bluetooth protocol can be divided into two types; Classic Bluetooth, and the newer Bluetooth Low Energy protocol which is also referred to as Bluetooth 4.0. These two protocols operate within the 2.4ghz ISM band but they both have different data rate, different power consumption rate, and are optimized for different kind of applications. The Bluetooth Low Energy (BLE) was created to overcome the setbacks of classic Bluetooth which makes it a little bit unfit for use in IoT and battery powered smart devices which only need to send short burst of data at specific intervals. The BLE was designed to consume only a fraction of the power which classic Bluetooth devices consume when transmitting data and stay in sleep mode when not transmitting data unlike the Classic Bluetooth’s continuous data streaming. This makes BLE devices more power efficient and suitable for IoT products and other battery-powered smart devices which are usually desired to last for as long as possible on a single battery charge.
A detailed comparison between the two Bluetooth types is shown in the Image below.
One of the downsides of the operation dynamics of BLE devices is the Complexity or Robustness (depending on how you look at it) of the messaging system. In classic Bluetooth, the serial port protocol (SPP) is usually used to send data between the devices as the communication occurs without much overhead, but for BLE, data during communication is organized using a profile referred to as GATT (Generic Attributes).
There are essentially two protocols that are important in communication between two BLE devices; GAP and GATT. Understanding how these two work is extremely important to programming devices to communicate via the BLE protocol.
GAP Protocol
GAP is an acronym for the Generic Access Profile, and it controls connections and advertising (Making a device visible and open for connection) in Bluetooth. It defines the roles which devices play in communication and also determines how the advertising (or scanning, depending on device role) payload is broadcasted.
There are essentially two roles which BLE devices can play based on GAP; Central Device and Peripheral Device. These two devices are the BLE’s representation for the more popular words; “Client” and “Server” respectively. The peripheral devices are usually small battery powered devices who broadcast the advertising data, waiting for a connection from a central device ready to receive the data payload. In IoT based solutions, the peripheral devices are usually sensors, etc., while the Central devices are usually gateway, smartphones, etc. Prior to connection, the Generic Access profile will keep broadcasting the advertising payload until there is a matching scanning response. Once a connection between a peripheral and a central device is established, the advertising process will stop and you will typically no longer be able to send advertising packets out anymore, at this point, GATT services and characteristics kick in to facilitate communication in both directions.
GATT Protocol
GATT is an acronym for the Generic Attribute Profile, and it defines how two Bluetooth Low Energy devices, transfer data back and forth between each other, using concepts called Services and Characteristics. It makes use of a generic data protocol called the Attribute Protocol (ATT), to store Services, Characteristics, and related data in a simple lookup table using 16-bit IDs for each entry in the table. The GATT hierarchical data structure comprises of three main elements; Profiles, Services, and Characteristics.
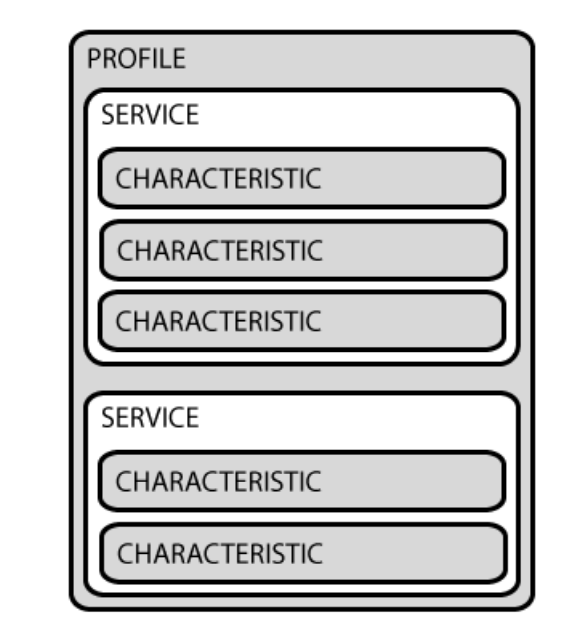
A Profile is a pre-defined collection of Services that has been compiled by either the Bluetooth SIG or by the peripheral designers. For example, in a heart rate monitor, a Heart Rate Profile could include the Heart Rate Service, the Battery Life Service, and the Device Information Service. A list of officially adopted GATT is available here.
Services are used to group data into logic entities and contain specific chunks of data called characteristics. A service can have one or more characteristics, and each service distinguishes itself from other services by means of a unique numeric ID called a UUID, which can be either 16-bit (for officially adopted BLE Services) or 128-bit (for custom services). A full list of officially adopted BLE services can be seen on the Services page of the Bluetooth Developer Portal. To better understand how services work, Consider the Heart Rate Example again, it could contain up to 3 characteristics which in the officially adopted service, for instance, includes; Heart Rate Measurement, Body Sensor Location, and Heart Rate Control Point. Thus a service essentially to group related data.
Characteristics represent the lowest level concept in GATT structure. It encapsulates a single data point and just like services, it distinguished from other characteristics using a Unique numeric ID; the UUID. Characteristics are the major containers that carry data between two devices.
With these said, today’s tutorial will show how to set up the ESP32 as a Client (Central Device) and as Server (peripheral device). For proper demonstration, we will use two ESP32 boards. One of the boards will be programmed to act as the server, with characteristics to send random data, while the other ESP32 board will be programmed to act as a BLE scanner to find the server.
Required Components
- DOIT ESP32 DevKit (2 nos)
- Power Bank/ Battery
As mentioned in the introduction, we only need the ESP32 Module as it already has all that is needed for the project on board. The power bank helps to easily power the Devkit in standalone mode. You can easily modify this tutorial by adding sensors to send live data to the central device.
We will use just the ESP32 boards so with no schematics, we go straight to the project’s code.
Code
Since we will not connect any components, let’s jump straight to the code. As mentioned in the introduction, we will setup the ESP32 as a client and as a server. This means we need two different sketches and we will go over them one after the other.
It is important to note that the code for this project will be written using the Arduino IDE and it will be impossible to upload the code if your IDE does not have the ESP 32 Arduino board package installed. This setup, downloading and installing the ESP32 board files for Arduino was covered in our Introduction to ESP32 tutorial. Ensure you check it out.
Once you have the board files installed, it will automatically load several ESP 32 libraries to the Arduino IDE. Both sketches for today’s tutorial will be heavily dependent on one of those libraries; the ESP32 BLE Arduino Library. The library comprises of functions and declarations that make sending data through a complex protocol (at least more complex when compared with serial) like the BLE easy.
BLE Server Sketch
I will do a brief explanation of both sketches starting with the BLE Server. The algorithm for the BLE server follows the explanation during the introduction above. We start by creating a BLE Service, after which we create BLE Characteristics under that service and a BLE descriptor under the characteristics. We then Start the service and start advertising so the device is visible to Scanning BLE devices.
We start the sketch by importing libraries within the BLE Arduino library that are required for the code.
#include <BLEDevice.h>
#include <BLEUtils.h>
#include <BLEServer.h>
Next, we provide the unique UUIDs for the Service and the Characteristics. These UUIDs can be generated using websites like UUID Generator
#define SERVICE_UUID        "4fafc201-1fb5-459e-8fcc-c5c9c331914b"
#define CHARACTERISTIC_UUID "beb5483e-36e1-4688-b7f5-ea07361b26a8"
Next, We write the void setup() function. We start by initializing serial communication to be used for debugging purposes, after which we create an object of the BLEDevice class and set the object as a server.
void setup() {
Serial.begin(115200);
Serial.println("Starting BLE work!");

BLEDevice::init("Long name works now");
BLEServer *pServer = BLEDevice::createServer();
Next, we create a service for the server and a characteristic for the service, specifying the UUID in both cases. The characteristic properties (which in this case are READ and WRITE) were also specified.
BLEService *pService = pServer->createService(SERVICE_UUID);
  BLECharacteristic *pCharacteristic = pService->createCharacteristic(
                                         CHARACTERISTIC_UUID,
                                         BLECharacteristic::PROPERTY_READ |
                                         BLECharacteristic::PROPERTY_WRITE
                                       );
Next, we set a value for the characteristics. As mentioned earlier, we will use a random value for this tutorial but this could be a sensor value, or any other information you wish to send to the client.
pCharacteristic->setValue("Hello World says Neil");
Finally, we start the service, setup parameters for advertising and start sending out advertising payload.
pService->start();
// BLEAdvertising *pAdvertising = pServer->getAdvertising();  // this still is working for backward compatibility
BLEAdvertising *pAdvertising = BLEDevice::getAdvertising();
pAdvertising->addServiceUUID(SERVICE_UUID);
pAdvertising->setScanResponse(true);
pAdvertising->setMinPreferred(0x06);  // functions that help with iPhone connections issue
pAdvertising->setMinPreferred(0x12);
BLEDevice::startAdvertising();
For this demo, we will leave the loop section empty but you can choose to perform further tasks within it. You can go through all the examples under the BLE Arduino library to better understand.
void loop() {
  // put your main code here, to run repeatedly:

}
The complete code for the server is available below and it is also attached under the download section at the end of the tutorial.
/*
    Based on Neil Kolban example for IDF: https://github.com/nkolban/esp32-snippets/blob/master/cpp_utils/tests/BLE%20Tests/SampleServer.cpp
    Ported to Arduino ESP32 by Evandro Copercini
*/

#include <BLEDevice.h>
#include <BLEUtils.h>
#include <BLEServer.h>

// See the following for generating UUIDs:
// https://www.uuidgenerator.net/

#define SERVICE_UUID        "4fafc201-1fb5-459e-8fcc-c5c9c331914b"
#define CHARACTERISTIC_UUID "beb5483e-36e1-4688-b7f5-ea07361b26a8"

void setup() {
  Serial.begin(115200);
  Serial.println("Starting BLE work!");

  BLEDevice::init("Long name works now");
  BLEServer *pServer = BLEDevice::createServer();
  BLEService *pService = pServer->createService(SERVICE_UUID);
  BLECharacteristic *pCharacteristic = pService->createCharacteristic(
                                         CHARACTERISTIC_UUID,
                                         BLECharacteristic::PROPERTY_READ |
                                         BLECharacteristic::PROPERTY_WRITE
                                       );

  pCharacteristic->setValue("Hello World says Neil");
  pService->start();
  // BLEAdvertising *pAdvertising = pServer->getAdvertising();  // this still is working for backward compatibility
  BLEAdvertising *pAdvertising = BLEDevice::getAdvertising();
  pAdvertising->addServiceUUID(SERVICE_UUID);
  pAdvertising->setScanResponse(true);
  pAdvertising->setMinPreferred(0x06);  // functions that help with iPhone connections issue
  pAdvertising->setMinPreferred(0x12);
  BLEDevice::startAdvertising();
  Serial.println("Characteristic defined! Now you can read it in your phone!");
}

void loop() {
  // put your main code here, to run repeatedly:
  delay(2000);
}
BLE Scanner Sketch
The scanner sketch like the server sketch is available as an example in the ESP 32 BLE Arduino Library.
As usual, we start the sketch by including the required libraries.
#include <BLEDevice.h>
#include <BLEUtils.h>
#include <BLEScan.h>
#include <BLEAdvertisedDevice.h>
Next, we indicate the interval between scan payload broadcasting and create an object of the BLEscan class.
int scanTime = 5; //In seconds
BLEScan* pBLEScan;
Next, we write the void setup() function. We start by initializing the serial monitor after which we initialize the BLE which automatically activates the BLE module on the ESP32. The argument is set as blank since we don’t really require a name for the device.
void setup() {
  Serial.begin(115200);
  Serial.println("Scanning...");

  BLEDevice::init("");
To round up the setup() function, we call the scan function, setting all the parameters required for the scan.
pBLEScan = BLEDevice::getScan(); //create new scan
  pBLEScan->setAdvertisedDeviceCallbacks(new MyAdvertisedDeviceCallbacks());
  pBLEScan->setActiveScan(true); //active scan uses more power, but get results faster
  pBLEScan->setInterval(100);
  pBLEScan->setWindow(99);  // less or equal setInterval value
}
Next, we write the void loop() function. The algorithm behind the void loop() function is used to simply check if any device has been found and print those devices alongside their number. The results are cleared and the loop starts all over again.
void loop() {
  // put your main code here, to run repeatedly:
  BLEScanResults foundDevices = pBLEScan->start(scanTime, false);
  Serial.print("Devices found: ");
  Serial.println(foundDevices.getCount());
  Serial.println("Scan done!");
  pBLEScan->clearResults();   // delete results fromBLEScan buffer to release memory
  delay(2000);
}
The complete code for the scanner is available below and also attached in the zip file under the download section.
/*
   Based on Neil Kolban example for IDF: https://github.com/nkolban/esp32-snippets/blob/master/cpp_utils/tests/BLE%20Tests/SampleScan.cpp
   Ported to Arduino ESP32 by Evandro Copercini
*/

#include <BLEDevice.h>
#include <BLEUtils.h>
#include <BLEScan.h>
#include <BLEAdvertisedDevice.h>

int scanTime = 5; //In seconds
BLEScan* pBLEScan;

class MyAdvertisedDeviceCallbacks: public BLEAdvertisedDeviceCallbacks {
    void onResult(BLEAdvertisedDevice advertisedDevice) {
      Serial.printf("Advertised Device: %s \n", advertisedDevice.toString().c_str());
    }
};

void setup() {
  Serial.begin(115200);
  Serial.println("Scanning...");

  BLEDevice::init("");
  pBLEScan = BLEDevice::getScan(); //create new scan
  pBLEScan->setAdvertisedDeviceCallbacks(new MyAdvertisedDeviceCallbacks());
  pBLEScan->setActiveScan(true); //active scan uses more power, but get results faster
  pBLEScan->setInterval(100);
  pBLEScan->setWindow(99);  // less or equal setInterval value
}

void loop() {
  // put your main code here, to run repeatedly:
  BLEScanResults foundDevices = pBLEScan->start(scanTime, false);
  Serial.print("Devices found: ");
  Serial.println(foundDevices.getCount());
  Serial.println("Scan done!");
  pBLEScan->clearResults();   // delete results fromBLEScan buffer to release memory
  delay(2000);
}
Demo
Copy the code and paste in the Arduino IDE (or launch the code from the example file), then one after the other upload the server sketch to the board designated as the server and the scanner code to the board designated as the scanner. For this demonstration to work, both boards need to be “ON” as the client will not be able to see the server if its “OFF”, so you can either leave the two of them connected to your PC or connect the Server to a power bank or any other power source. With that sorted, launch the serial monitor, ensuring it is set to the serial port to which the client is connected. After a few seconds, you should see the number of Bluetooth devices found and the name(s) displayed on the serial monitor.
That’s it for today’s tutorial. You can immediately expand the project by hooking up a sensor the BLE server and running the BLE Client example on the other ESP32 board or better still use a mobile app that supports BLE devices to interact with the server. BLE is currently one of the most widely used communication methods for smart devices and I hope this tutorial has given you information required to use it for your own project.
As usual, do feel free to reach out to me via the comment section with questions or general comments about the tutorial.
Till Next time!


Hi,
How do I connect the server with the scanner and how do I transmit my sensor values?
Take 2 esp32 board and then download server program to one esp and scan program to another esp using arduino ide(downold ble library).then switch on both and open serial monitor sure that u opened scan device usb port then u will find the server device(esp32) in serial monitor and data value:hello world say neil (what u written ),
u can connect u r mobile using nrfscan app so its act as client
Dear friends, congratulations for the tutorial.
I am trying to send information from a temperature sensor using BLE to an iPhone, but it just can’t work! I find the ESp32 using the app BLE Terminal, but nothing comes out on the screen. I tried connecting on Windows 10, it finds the ESP32, normally pair, but when I activate the Serial Port (goes to COM5) and try to open the Monitor Serial in Arduino IDE, it says that the port is busy and nothing shows up. I already tried many tutorials, sent more than 20 messages, but nobody even answers.
Thank you for ANY help!
#include //Inclusão de biblioteca para o sensor de temperatura.
#include
#include
#include
#define DHTPIN 14 // Definido o pino 14 para a recepção do sinal do sensor de temperatura.
#define DHTTYPE DHT22 //Define o modelo do sensor de temperatura (DHT22 / AM2302).
#define SERVICE_UUID “5ec92a5f-905a-4e87-a74d-a61954f7b906”
#define CHARACTERISTIC_UUID “e76771a5-d239-44c9-a627-d9cc313c52f9”
DHT dht(DHTPIN, DHTTYPE); //Informa os parâmetros para a função.
void setup(){
Serial.begin(115200); // inicializa a transmissão de dados via porta Serial (USB ou Bluetooth).
Serial.println(“Starting BLE work!”);
BLEDevice::init(“Medidor UV”);
BLEServer *pServer = BLEDevice::createServer();
delay(2000);
BLEService *pService = pServer->createService(SERVICE_UUID);
BLECharacteristic *pCharacteristic = pService->createCharacteristic(
CHARACTERISTIC_UUID,
BLECharacteristic::PROPERTY_READ |
BLECharacteristic::PROPERTY_WRITE
);
pCharacteristic->setValue(“Pra que esse campo?”);
pService->start();
// BLEAdvertising *pAdvertising = pServer->getAdvertising(); // this still is working for backward compatibility
BLEAdvertising *pAdvertising = BLEDevice::getAdvertising();
pAdvertising->addServiceUUID(SERVICE_UUID);
pAdvertising->setScanResponse(true);
pAdvertising->setMinPreferred(0x06); // functions that help with iPhone connections issue
pAdvertising->setMinPreferred(0x12);
BLEDevice::startAdvertising();
dht.begin(); // Inicializa a função do sensor de temperatura.
}
void loop(){
//ACIONAMENTO DO RELÉ DO COOLER POR TEMPERATURA INTERNA ALTA
if (dht.readTemperature() > 45){digitalWrite (35, LOW);} // Se a temperatura passar de 45 graus, liga o cooler desligando o pino 35.
if (dht.readTemperature() < 40){digitalWrite (35, HIGH);} // Se a temperatura diminuir abaixo de 41 graus, desliga o cooler ligando o pino 35.
//INFORMAÇÃO GERAL
Serial.print("Temperatura = ");
Serial.print(dht.readTemperature()); // Imprime a temperatura interna do equipamento.
Serial.println("C");
Serial.print("Umidade Relativa = ");
Serial.print(dht.readHumidity()); // Imprime a umidade relativa interna do equipamento.
Serial.println("%");
Serial.println("");
need server and client in same device is it possible help me out
Is it possible to change the default UUID’s to my own generated UUID’s? It appears that any modifications made to the UUID’s in the sketch are ignored and remain with the defaults. Is it possible that once an ESP32 is programmed it cant be changed? I can change the name of the server and I can change the characteristic value, but UUID’s can NOT be changed. Thanks, Ray