Samba : Set Up Your Raspberry Pi As A Local Network File Server
Samba is the Linux implementation of the SMB/CIFS file sharing standard used by Windows PCs and Apple computers and widely supported by media streamers, gaming consoles, and mobile apps. In this tutorial, you will learn how to use a Raspberry Pi as a file server where you can save backups and share files with all the other computers on your network using Samba.

Samba is the Linux implementation of the SMB/CIFS file sharing standard used by Windows PCs and Apple computers and widely supported by media streamers, gaming consoles, and mobile apps. In this tutorial, you will learn how to use a Raspberry Pi as a file server where you can save backups and share files with all the other computers on your network using Samba.
You need the following things for this tutorial:
- A keyboard (Wired or wireless)
- A mouse (Wired or wireless)
- Raspberry Pi (Model 3B is recommended)
- A 32GB (or smaller) micro SD card
- Internet connection (Only to download Samba)
The SD card must have a reasonable amount of free storage space without requiring any extra steps to make it accessible. However, if you want extra storage, simply mount a large USB drive and create a Samba entry for it. If you want to keep your Samba file server compact and portable, install Raspbian on a 128Gb or 256GB SD card. Before purchasing, check online whether the SD card is fully compatible with Raspberry Pi or not.
Install Samba
Samba is available in Raspbian’s standard software repositories. Update your repository index, make sure that the operating system is fully updated, and install Samba using apt-get. Open a Terminal and type:
sudo apt-get update
sudo apt-get upgrade
sudo apt-get install samba samba-common-bin
The download and installation process will start and it will take a while depending on your internet speed.
Create A Shared Directory
Now you need to create a shared directory that will be accessible by other PCs/mobiles connected to the same network. You can put it anywhere, but in this tutorial, it will be at the top level of the root file system of the Pi’s microSD card. Type the following command:
sudo mkdir -m 1777 /share
To help prevent the directory from being unintentionally deleted, the above command sets the sticky bit (1) and gives everyone read/write/execute (777) permissions on the shared directory.
Configure Samba
In this step, edit the smb.conf file to configure Samba to share the selected directory and allow users to perform various actions like read, write etc. Open the smb.conf file using the following command:
sudo leafpad /etc/samba/smb.conf
You need to add the following entry:
[share]
Comment = Pi shared folder
Path = /share
Browseable = yes
Writeable = Yes
only guest = no
create mask = 0777
directory mask = 0777
Public = yes
Guest ok = yes
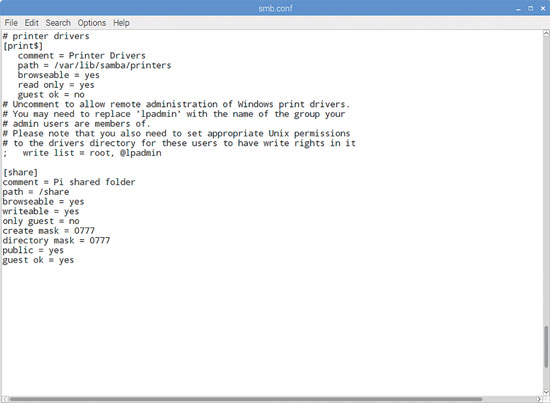
As per the above configuration, anyone can read, write, and execute files in the shared directory, either by logging in as a Samba user or as a guest. Just omit the guest ok = yes line if you don’t want to allow guests. To share a larger external hard disk, simply create a smb.conf entry for the path you want to share across the network (here the external hard disk).
Create A User & Start Samba
Everything is configured and now it’s time to create a user. To set up a password for the user, enter the following command:
sudo smbpasswd -a pi
Then set a password as prompted. It’s recommended that the password should be different from your Pi’s login password. Finally, restart the Samba and set it to start automatically when the Raspberry Pi starts up. Enter the following command:
sudo /etc/init.d/samba restart
Once you’ve made sure that you can locate your shared folder on the network, you can safely disconnect the mouse, monitor, and keyboard from your Pi and just leave it running as a headless file server.


