Stefan Wagner’s NeoController Tests and Controls NeoPixel LED Strips
When you buy any small development board, one of the first things you try is interfacing the programmable NeoPixels. One such example we saw was in the case of Raspberry Pi Pico, which interfaced the NeoPixels using the programmable IOs.
![]()
When you buy any small development board, one of the first things you try is interfacing the programmable NeoPixels. One such example we saw was in the case of Raspberry Pi Pico, which interfaced the NeoPixels using the programmable IOs. If you have been following the maker community, you might have heard about Stefan Wagner and his exciting projects. Lately, he [Stefan Wagner] has designed a tester built on the ATTINY 13 microcontroller for 800kHz NeoPixel strips.
With the small form factor of 21.6mm x 11.4mm you can easily solder the PCB to the NeoPixel LED strip without any problem. However, while designing the tester, he realized the amount of capabilities ATTINY 13 microcontroller could showcase. With this thought, he went ahead and added an IR receiver to the PCB that can control some of the parameters using the IR control remote.
![]()
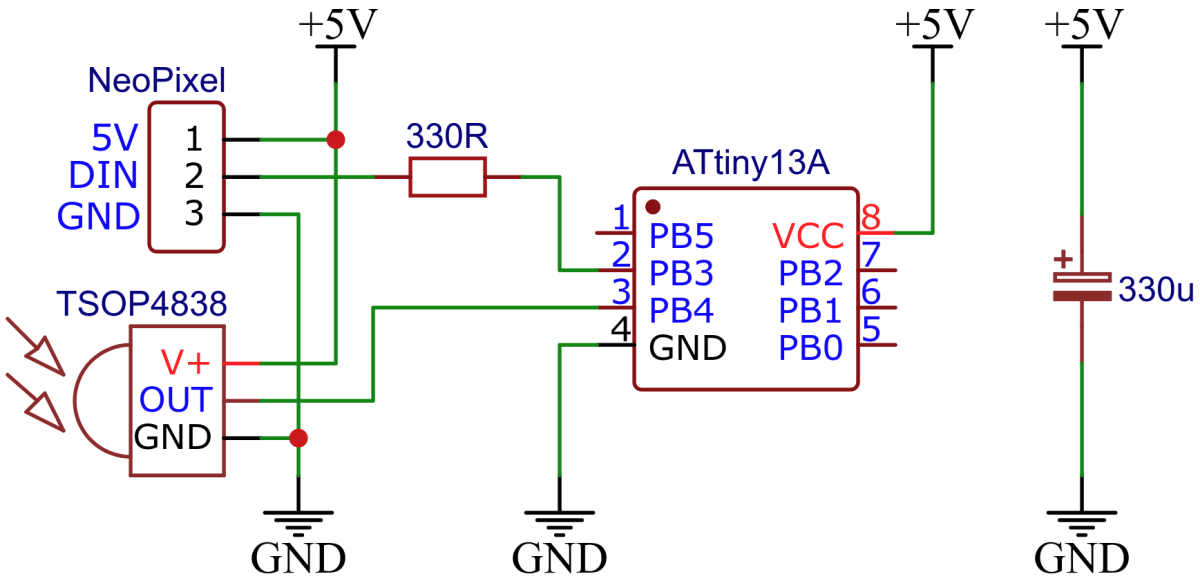
Regarding the hardware circuitry for the tester, it looks very straightforward as shown in the figure below. The microcontroller chip is directly connected to the output of the IR receiver (TSOP4838) and connected to the NeoPixel through a resistor of 330 ohms.
“The control of NeoPixels with 8-bit microcontrollers is usually done with software bit-banging. However, this is particularly difficult at low clock rates due to the relatively high data rate of the protocol and the strict timing requirements,” Stefan explains.
Moreover, after the project, he noticed that the timings mentioned in the datasheet were nowhere close to the actual implementation. He [Stefan Wagner] has provided the timing rules that should work with all 800kHz addressable LEDs in the project’s GitHub repository.
In the end, Stefan notes that more than one-third of the flash memory is available for makers to explore more capabilities of the ATTINY 13 microcontroller for controlling NeoPixels. The IR implementation including decoding and error detection only takes 228 bytes of flash memory. Note that you can also use other 38kHz IR receivers other than TSOP4838.
If you plan to work on this project, you need to program the microcontroller before soldering as there is no ICSP header provided onboard. The designer has given a detailed guide on how to program it using Arduino IDE as well as using the precompiled hex file. Operating instructions are also available in the GitHub repo.


