Build Your Own I2C Sensor
Since Raspberry Pi doesn’t have a built-in ADC (Analog to Digital converter) to read the voltage off from most of sensors, the best solution is to add I2C ADC chips and modules to your project. Paweł Spychalski faced this problem while building his own weather station that is based on Raspberry Pi.
Since Raspberry Pi doesn’t have a built-in ADC (Analog to Digital converter) to read the voltage off from most of sensors, the best solution is to add I2C ADC chips and modules to your project.
Paweł Spychalski faced this problem while building his own weather station that is based on Raspberry Pi. It collects various data and displays them on dedicated web page and Android app. Every few months he tries to add a new sensor to it. Last time it was a daylight sensor. He added this sensor to his system by using ATtiny85 and it was connected via I2C bus.
ATtiny85 is a member of Atmel tinyAVR series which has 8-bit core and fewer features, fewer I/O pins, and less memory than other AVR series.
The Inter-integrated Circuit (I2C) Protocol is a protocol intended to allow multiple “slave” digital integrated circuits (“chips”) to communicate with one or more “master” chips. Like the Serial Peripheral Interface (SPI), it is only intended for short distance communications within a single device. Like Asynchronous Serial Interfaces (such as RS-232 or UARTs), it only requires two signal wires to exchange information.
I2C uses only two bidirectional open-drain lines, Serial Data Line (SDA) and Serial Clock Line (SCL), pulled up with resistors. Typical voltages used are +5 V or +3.3 V although systems with other voltages are permitted.
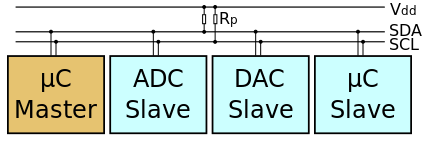
Most of developers use I2C to connect to sensors with the help of the Arduino “Wire” library or “i2c-tools” on the Pi, but it is rare to see someone that is actually building the I2C slave device. Paweł’s project uses TinyWireS library, a slave-mode SPI and I2C library for AVR ATtiny Arduino projects.
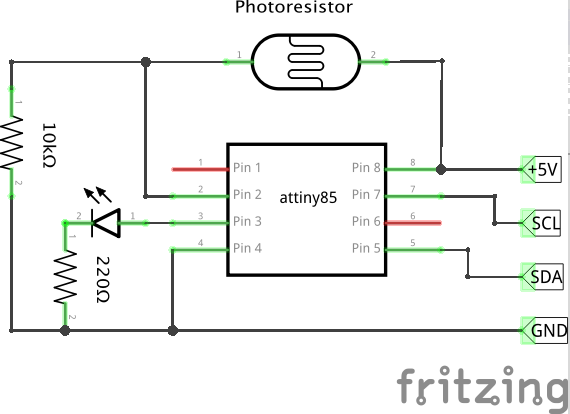
This diagram shows how to build analog to digital converter using ATtiny85 and connect it to any device (Raspberry Pi, Arduino) using I2C bus. Here photoresistor has been used, but any analog meter will be fine: temperature, potentiometer, moisture…
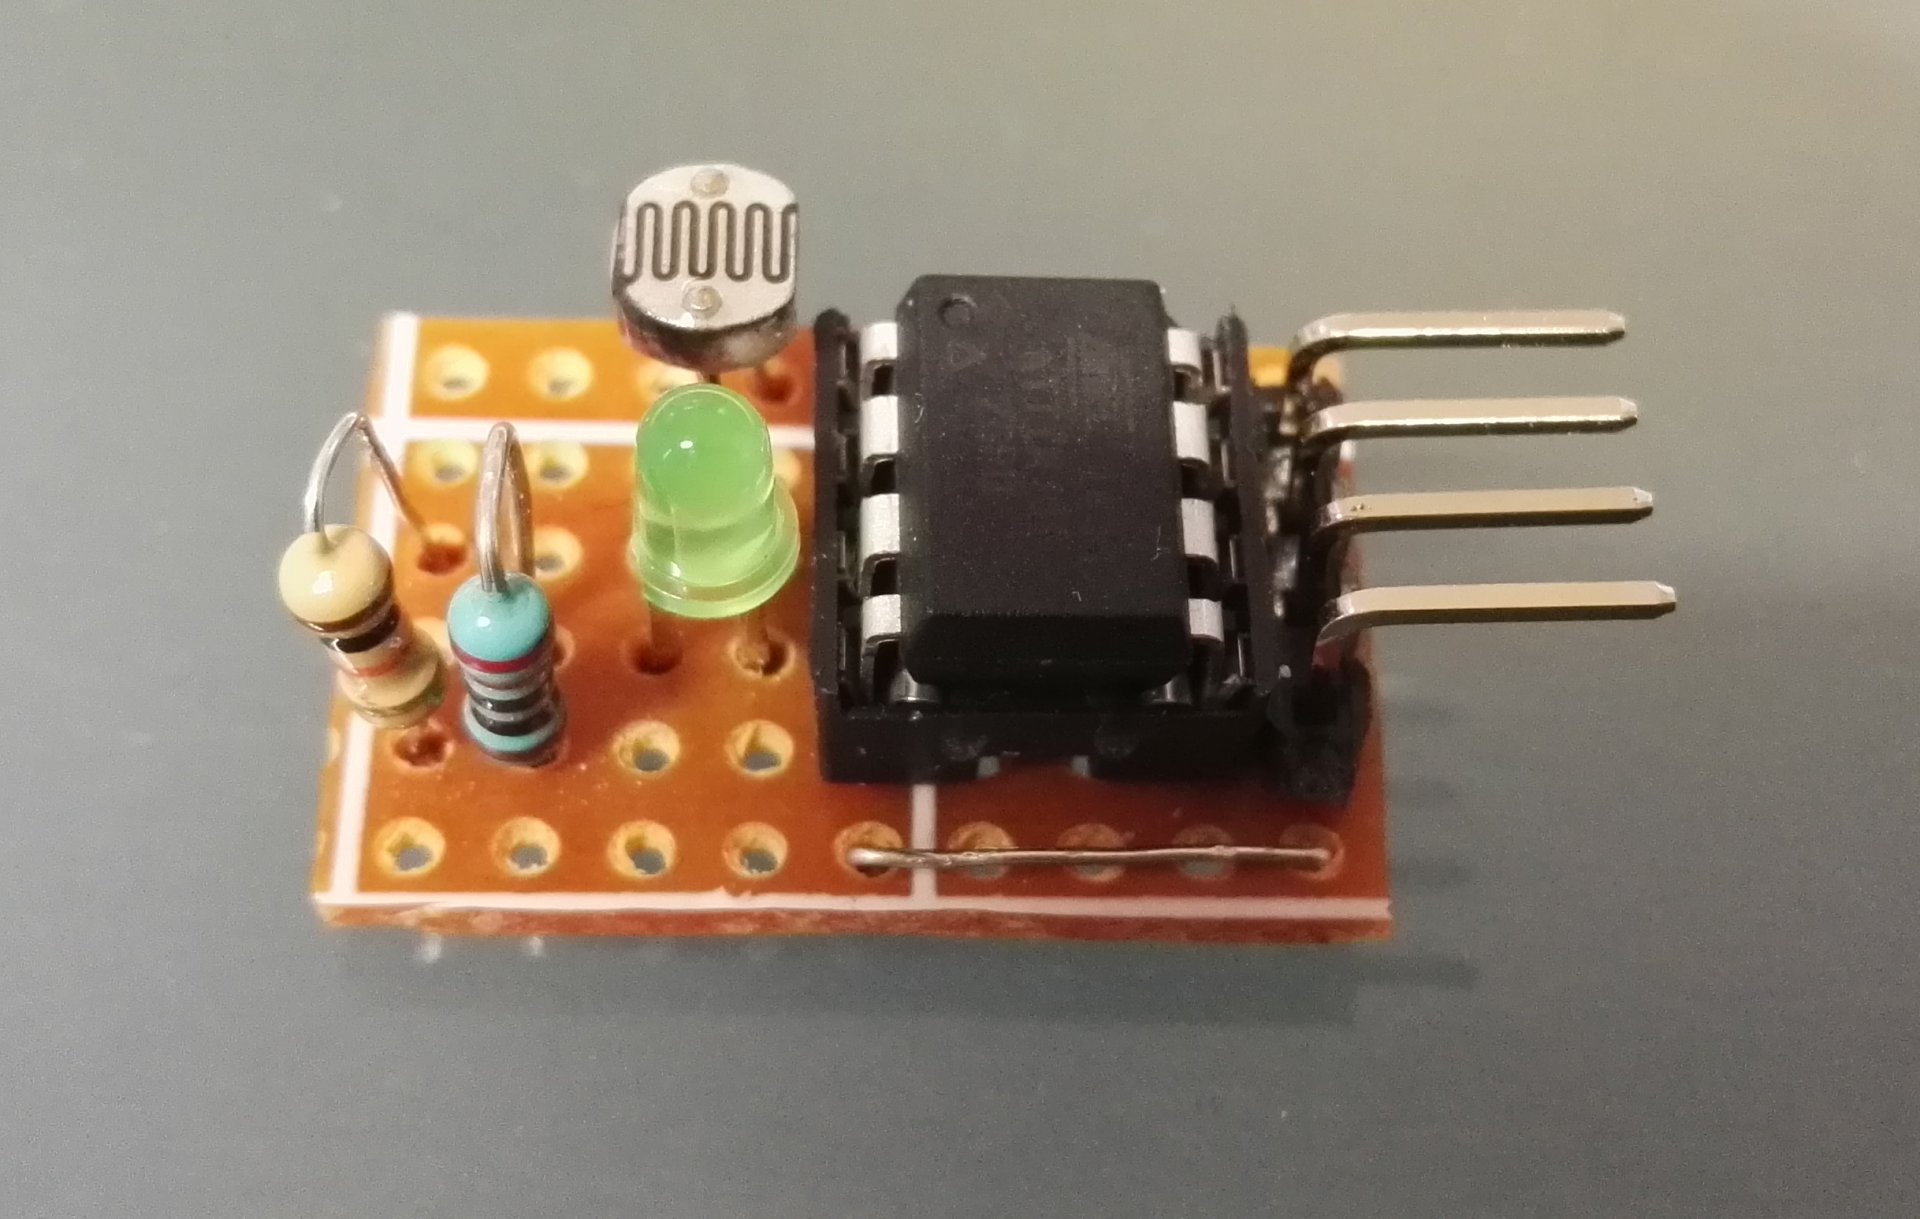
ATtiny85 directly connected to Raspberry Pi via I2C, photoresistor with 10kOhm pull down connected to ATtiny85 and signal LED.
For reading data you can use this code. ATtiny sends current measurement as two 8 bit value. First older bits, then younger 8 bits.
Wire.requestFrom(0x13, 2);    // request 2 bytes from slave device #0x13

int i =0;
unsigned int readout = 0;

while (Wire.available()) { // slave may send less than requested
 byte c = Wire.read(); // receive a byte as character

 if (i == 0) {
  readout = c;
 } else {
  readout = readout << 8;
  readout = readout + c;
 }

 i++;
}

Serial.print(readout);
To do this project you need to use Arduino IDE 1.6.6., TinyWireS library,ATtiny45/85 board, plus an 1MHz internal oscillator.
Watchdog timer interrupts ATtiny every few minutes, measures voltage, filters it and stores in memory. Every time read operation is requested, last filtered ADC value (10 bits as 2 bytes). I2C support is provided by TinyWireS library that configures ATtiny USI (Universal Serial Interface) as I2C slave.
/**
* This function is executed when there is a request to read sensor
* To get data, 2 reads of 8 bits are required
* First requests send 8 older bits of 16bit unsigned int
* Second request send 8 lower bytes
* Measurement is executed when request for first batch of data is requested
*/
void requestEvent() {
 TinyWireS.send(i2c_regs[reg_position]);

 reg_position++;
 if (reg_position >= reg_size) {
  reg_position = 0;
 }
}

/*
* Setup I2C
*/
TinyWireS.begin(I2C_SLAVE_ADDRESS);
TinyWireS.onRequest(requestEvent); //Set I2C read event handler

This cool weather station and its need of daylight sensor is only an example. The amazing thing is that you can now build new I2C sensors and introduce new modules to your projects easily following Paweł’s steps.
For more details about this project you can check Github and the weather station website.


Hello, i used your code but i have an error.
WDTCR |= (1<<WDCE) | (1<<WDE);
^~~~~
WDTCSR
exit status 1
‘WDTCR’ was not declared in this scope
Could you help me pls?
how to configure that between ATtiny85 slave (sensor) and ATtiny85 as master