DIY: Build a controller with a knob that can easily change the volume of any app on your PC
Ruben Henares has designed a Maxmix controller with a stylist knob that could save us the stress of having to always go through the menus and on-screen sliders to change the volume of individual apps on our PCs. The knob on the controller takes an input from the encoder/button to display the desired app where volume is to be adjusted.
Ruben Henares has designed a Maxmix controller with a stylist knob that could save us the stress of having to always go through the menus and on-screen sliders to change the volume of individual apps on our PCs.
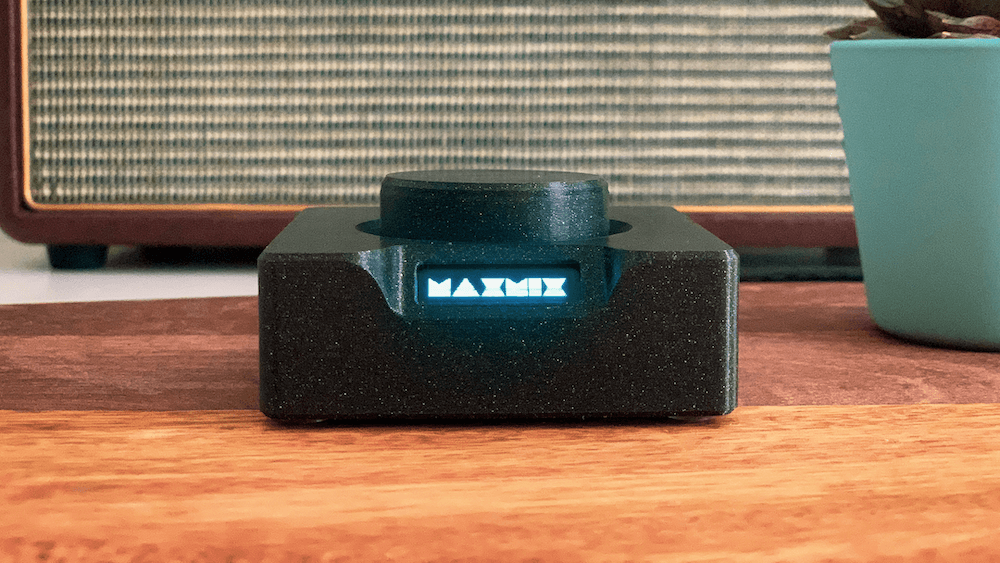
The knob on the controller takes an input from the encoder/button to display the desired app where volume is to be adjusted. All we need to do is to just turn the knob to select the particular app, push down and rotate to turn the volume up or down. To switch to another program, press the knob down and repeat the same process, simple!
Speaking about the ease of replicating the project, Reuben said:
“It uses a combination of 3D printed parts and off-the-shelf electronics components, and all parts can be easily found and ordered online!. The total cost of the parts is ~$25.00 USD including 3D printing and shipping and it takes around 25 minutes to build”.
The overall build is such a great design with an OLED screen located by the side of the controller where the current app status is shown and an optional LED ring responsible for giving some extra lightning effects to the controller. Henares recommends that a community printing service can be used if a 3D printer is not readily available since the enclosure for the controller is made from 3D printed parts.
A list of the components used for the project include:
- An Arduino Nano 328P CH340
- One power bus and one rotary encoder
- A 128 x 32 I2C OLED display
- M2 5mm screws (6x) and 10mm countersink screws (4x)
- An optional 8-bit WS2812 5050 LED ring, and
- 11 pieces of 10cm female to female jumper wires.
For software installation, you will need a computer running Windows 10, an available USB 2.0 or any greater port, alongside the MaxMix device.
The controller is open source and all the materials required to build your own version of the device; including guidelines for wiring and assembling of the build, instructions on installations as well as links to where one can easily buy the parts can be found on his website.


