A LEGO-Compatible Digital Weather Billboard
Internet of LEGO “IoL” is an interactive LEGO city built and designed by Cory Guynn, a cloud computing and IoT enthusiast. This project combines computer and electronics engineering with our favorite childhood toy, LEGO!
Internet of LEGO “IoL” is an interactive LEGO city built and designed by Cory Guynn, a cloud computing and IoT enthusiast. This project combines computer and electronics engineering with our favorite childhood toy, LEGO!
Through the IoL blog, Cory shares a collection of circuit projects, coding examples, and tutorials which use Arduino, Raspberry Pi, NodeJS, Node-RED, and LEGO.

A recently added project is a digital billboard that broadcasts the weather information from IoL local weather station. It uses a Raspberry Pi running Node-RED to collect weather data from the local station and display it on an OLED screen powered by an ESP8266.
The hardware materials needed for this project:
- Raspberry Pi
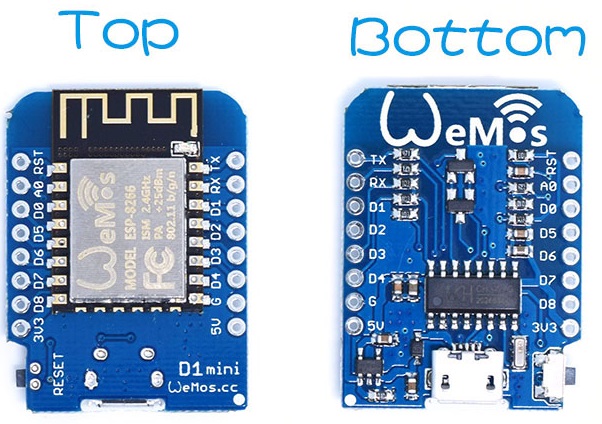
- WeMos D1 mini
- OLED 128×64 I2C screen
- 2x LEDs
- 2x 220 ohm resistors
- Breadboard and wires
- LEGO bricks!
And the required software:
WeMos D1 mini is a cheap mini wifi board based on ESP8266 and compatible with Arduino and NodeMCU. It has 11 digital I/O pins that support PWM, I2C, and interrupts, and has only one analog input with a microUSB connector. The WeMos D1 is available for only $4 and is supported by many shields.
The 128X64 OLED is about 1.3″ display, it is very readable due to its high contrast. This display is made of 128×64 individual white OLED pixels, each one is turned on or off by the controller chip. No backlight is required because the display makes its own light, which reduces the power required to run the OLED.
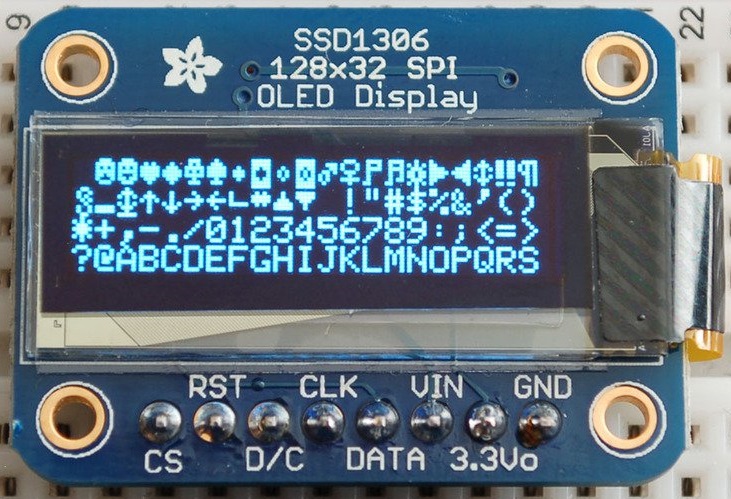
OLED’s driver chip, SSD1306 can communicate in two ways: I2C or SPI. The OLED itself require a 3.3V power supply and 3.3V logic levels for communication.
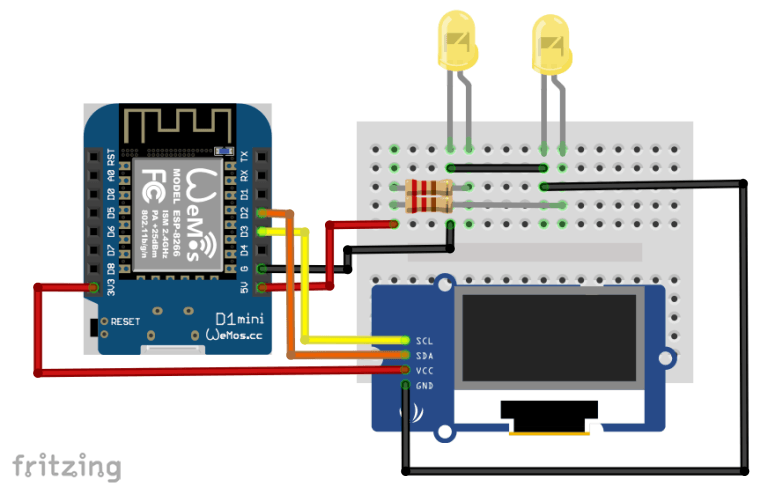
The display uses I2C connection at this project, so you will need to solder the two jumpers (SJ1/2) on the back of the OLED, then use the ‘Data’ pin as ‘I2C SDA’ pin and ‘CLK’ pin as ‘I2C SCL’. The WeMos D1, OLED, LEDs, and resistors are connected as shown in the figure.
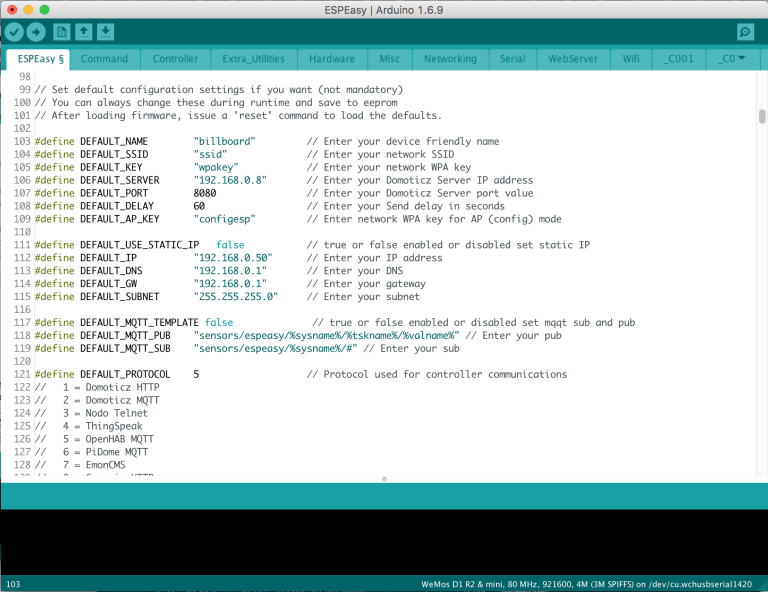
To simplify configuring WeMos D1, a special firmware called “ESPEasy” has been used. It is a free and open-source web configurable software framework for IoT, which allows the device to be configured using the web browser instead of writing codes.
ESPEasy can be uploaded to the WeMos D1 using the Arduino IDE by installing the ESP8266 board support from Boards Manager, and then uploading the ESPEasy firmware as described in this tutorial.
MQTT is a lightweight machine-to-machine publish/subscription messaging protocol. It works like Twitter where each device will subscribe and/or publish to a topic, much like a #hashtag, and the payload will then contain the data being transmitted.
Mosquitto is a free open source broker that works perfectly on a Raspberry Pi. It is a MQTT server manages the MQTT message flow, and connects with all devices.
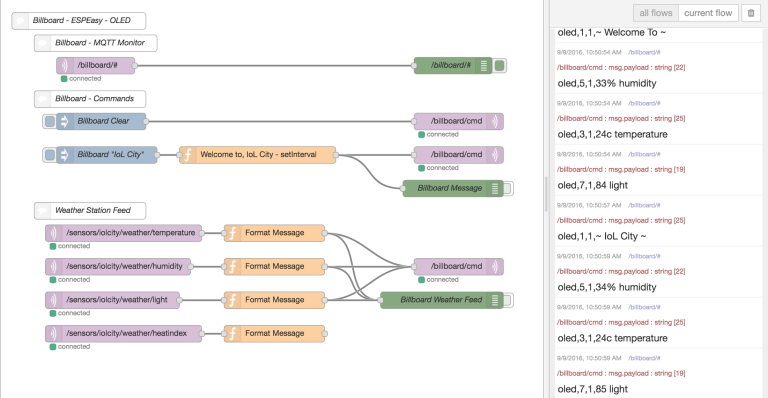
The last step is configuring the Raspberry Pi on the weather station for sending the information to the billboard. An easy way for that is using Node-Red, a visual tool for wiring together hardware devices, APIs and online services for IoT applications.
Node-Red is pre-installed on the Raspbian Jessie image. Run the software and download this flow. It will accept an MQTT message on the topic “/sensors/iolcity/weather/#” and transmit it to the WeMos on the topic “/billboard/cmd”. Function nodes will format the message using JavaScript.
You can use it with your own weather station or any other sources of data, just change the MQTT input nodes to match your topics. To build a weather station check this IoL project and this ChipKIT-based station. Alternatively, you could get weather data using the Weather Underground service with the Node-RED node.
Further information and detailed description are available at the original project page.


