Programming TPI AVRs using USBASP Programmer
AVR microcontrollers are RISC architecture-based microcontroller series that have on-chip flash memory for data storage. The popularity of ARM microcontrollers can be seen by the range of applications it has.
AVR microcontrollers are RISC architecture-based microcontroller series that have on-chip flash memory for data storage. The popularity of ARM microcontrollers can be seen by the range of applications it has. They are used in home automation, touch screen, automobiles, medical devices, and defense. They are also quite popular among hobbyists and makers. Most AVR microcontrollers use the In-System Programming (ISP) feature. ISP is a feature of microcontrollers that allows uploading of a program while the chip is on the system. This aids the end-users as they can program the hardware device according to their needs. Three pins are dedicated for the programming which are Serial Clock (SCK), Master-In-Slave-Out (MISO), and Master-Out-Slave-In (MOSI). All types of memory on the micro-controller can be accessed using the SCK, MISO, and MOSI pins while holding the RESET pin LOW.
USBASP is an open-source ISP (In-System Programming) programmer for AVR devices. If someone wants to develop programs that use the UART of Atmega32, you need to upload code using ISP. USBASP can be used for programming other AVR micro-controllers also. It can be used for burning the boot loader. The LED on the board indicates power. It goes off while uploading code, giving an additional indication. Newer AVRs use much faster programming techniques like TPI and UPDI. But someone may want to flash newer TPI-based AVR microcontrollers with an old USBASP board. Kevin Cuzner documented how to program TPI-only AVR microcontrollers using a USBASP device.
TPI Programming: A summary
Before going into the steps involved in the programming process, let’s first get an overview of TPI programming. The Tiny Programming Interface (TPI) is the only programming interface available in some newer AVR microcontrollers. TPI interface method consists of two layers Physical layer and the Access layer. The physical layer consists of two operations: transmit and receive. The TPI Access layer controls the mode of operation. TPI interface method needs only 3 pins for usage which are Reset, TPIDATA, and TPICLK. TPIDATA is a bidirectional data line unlike in the SPI method, where 2 data lines are used for transmission and reception of data.
Steps to program TPI based AVR MCUs using USBASP programmer
Kevin listed the following steps that are involved in programming TPI-only AVR MCUs using USBASP:
- Buy another USBASP programmer as one of them will be the programmer and another one would be the target that is going to become TPI capable.
- Download the latest firmware from Thomas Fischl’s website: https://www.fischl.de/usbasp/
- Switch the programming jumper on the target by shorting the appropriate header (sometimes labeled JP1, sometimes labeled JP2). It’s a two-pin jumper and is NOT the target voltage jumper, nor the “slow clock” jumper.
- Connect the programmer USB to the PC. Don’t connect the target to the PC.
- Connect the two USBASPs using the 10-pin ISP ribbon cable.
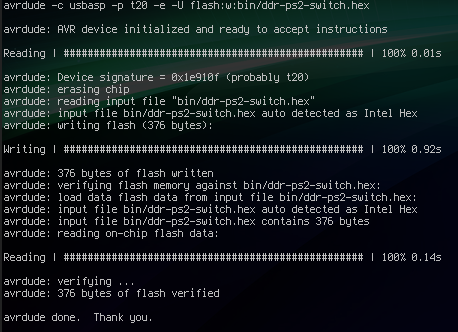
- Use avrdude to program the downloaded firmware (be sure to choose the correct hex file for the ATmega used on the target programmer).
For interfacing, connect the TPIDATA pin of the TPI header to the MOSI pin of MCU, TPICLK to ISP CLK, and RESET to the corresponding RESET pin. Further, it is necessary to ensure that the AVR is running at 5V.

Complete documentation can be found at http://kevincuzner.com/2020/11/08/avr-tpi-programming-with-usbasp-for-dummies/


